Who doesn’t like to surround themselves with beautiful things that please the eye, create mood and comfort? If there is a woman in the house (and more than one!), the warehouse is actively replenished with cute trinkets, for children and adults, for which you need to look for a secluded place.
With a little patience and imagination, you can make an exclusive box yourself. And even if it differs from those donated from the store, nevertheless, it will compete with them, because in handmade work there is a piece of your soul and the embodiment of individuality.
Boxes of shoes, glasses and teapots are stuffed throughout the house. It looks like trash, but it’s a shame to throw it away. The master class “Do it yourself jewelry box from a box” will tell you how to turn old boxes into fashionable boxes.
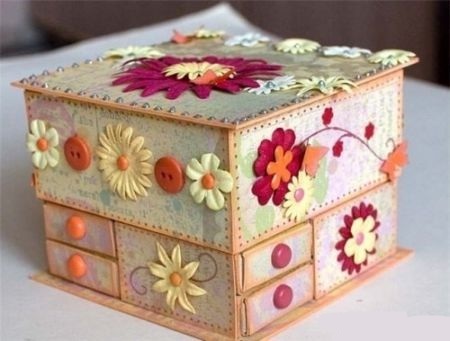
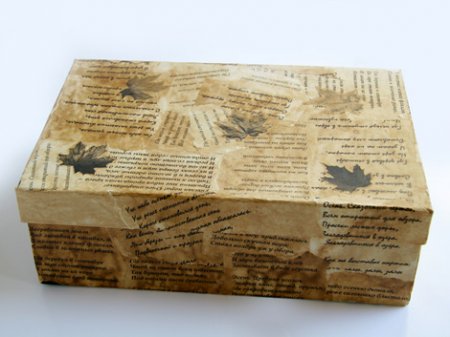
Our version of the box has different levels of complexity. The easiest way is to take a small shoe box, cover it according to the given scheme with a material dear to your heart (even beautiful wallpaper) and leave it at that. If the box is white (you can paint it) or without a pattern, you can paste it with pictures cut out from magazines (it’s good if the scissors are curly, or you can carefully tear off the picture) and put commemorative tickets, booklets and everything that is dear to your heart after a vacation or some event. This box is perfect for handicrafts or a first aid kit. You can make inserts from another box to make it easier to find the little things you need, and jewelry is better preserved in such pockets. Well, if inspiration also gives you options for decorating the box, feel free to bring them to life. We offer a DIY jewelry box master class with shoe box decoration.
Jewelry box out of the box
Tools and materials

Step-by-step instruction
Preparing the basis

First we trim the inside

Jewelry Mounts
You can stop at this stage of the DIY jewelry box master class and store all the treasures there together. For those who love the German order, we will make fastenings. We glue sponges into one tray, from which we first carefully remove the hard base. Apply glue to the bottom of the tray and glue the sponges. You can’t press down too hard - a sponge soaked in glue becomes hard, looks unsightly and sticks worse.
In the second tray we glue an “accordion” for decorations, for which we cut out a rectangle from cardboard, cover it with fabric and secure the partitions. Since the junction of the accordion with the liner is small, it is better to secure it with superglue so that it sticks immediately. Hold the edge until completely dry. You can make partitions over the entire area, or you can leave some free. During the drying process, the grooves can be shaped into a cylinder for convenient storage of rings. 
On the lid of the box you can make holders for hairpins and bobby pins from braid. We measure out two strips of braid of the same length, slightly longer than the length of the box. We make slits along the edges of the lid and insert the braid there. We stretch the ends to the top of the lid and fix them with glue.
The same braid can be attached to the folding side of the box. It is convenient to work with a stapler here.
The most crucial moment is covering the top of the box

Box of postcards
 This master class on making boxes from postcards with your own hands is probably familiar to everyone “who cares…” - who among the Soviet girls did not sew original boxes from postcards for all sorts of little things? Now postcards have replaced virtual messages, so if you cannot find material for work from old postcards, you can select suitable pictures on the Internet, print them and stick them on cardboard. You can also buy modern postcards. You can make such a box together with your children - it’s accessible and interesting.
Tools and materials
- old postcards of a suitable theme;
- needle with a large eye;
- embroidery threads.
Step-by-step instruction

Another original version of the box with your own hands, a master class in the video “Box from a book.”
Every woman has many little things that need a special storage system. These are various decorations, accessories for creativity or handicrafts and many other items. A DIY cardboard box can be an excellent option for storing all the little things you need. Creating a suitable drawer is easy. The main thing is to use your imagination and give it a unique and original look.
A simple box. Preparatory stage
This option is easy to create. The box is a cardboard box. Its capacity and functionality depend on your needs. To make the task easier, it is recommended to use blanks. In this case, it is much easier and simpler to make cardboard boxes with your own hands.
The diagrams must be transferred to paper. Before calculating the dimensions, think about what purposes your box will be used for. If jewelry will be stored in it, then you should not make it bulky. But if the box is intended for needlework, the dimensions of the box should be much larger.
Manufacturing technique
So, let's look at how to make a box with your own hands from cardboard:
- Prepare thick cardboard.
- Using the diagram, mark the contours of the box on it.
- Cut out the resulting blank.
- Fold the fold lines. Carefully glue the places where the box is connected. If you take thick cardboard, it is difficult to work with. But it is precisely this that allows you to create a durable structure. Such a box will be an excellent place to store various things. You can use superglue or PVA. But a more reliable option is tape.
- The resulting box needs a beautiful case. To do this, use wrapping paper. This is a thin material that perfectly decorates the surface of cardboard. Old wallpaper is a good option.
- When gluing the box, be sure to leave allowances for the hem. Wrap them up and glue them to the inside of the box.
- Choose wrapping paper that suits your style for interior decor. Cover the bottom of the box with this material immediately. Then - the inner side parts.
- Now all that's left to do is come up with the decoration. For decoration you can use any ornaments, flowers, beads, beads. It all depends on your imagination.

Round box
Sometimes it seems that making a box of this shape is difficult. Totally wrong! It is quite easy to make a round box from cardboard with your own hands. You will see this for yourself.
Round box manufacturing technology:
- Mark a circle on thick cardboard. This will be the base of the box.
- Draw a long rectangle. This is the side of the box. Its width is the height of the future box. And the length should correspond to the circumference plus 2-3 cm per connection.
- To assemble such parts together you will need allowances. They can be left on the base of the box. So, as shown in the figure or on a rectangular blank.
- Having carefully calculated the dimensions, cut out the blanks.
- Connect them with glue or tape.
- Make the lid for the box using the same technology. But remember that the base circle should be a little larger. After all, the lid should be easy to put on the box. And its height is less.
- So, you made an excellent cardboard box with your own hands. All that remains is to decorate it. When thinking about an interesting decoration, do not forget about an important point. All hems must be carefully disguised. Therefore, it is recommended to decorate both the external and internal sides.

Scotch tape box
This is a simple but original solution. How to make a jewelry box with your own hands from cardboard and a reel (from tape)?
Let's look at it in detail.
- Trace the bobbin on thick cardboard in an outer circle. You will need two such blanks. One will become the base, and the other will become the lid.
- Connect the bottom to the bobbin. You can use tape for this. Or leave a hem allowance at the base in advance.
- To make the lid, use the technology described in the previous example. Remember that it should be slightly larger than the base.
- You have created a wonderful box with your own hands from cardboard with a lid. Now it's up to your imagination. The original decor will make it a real work of art.
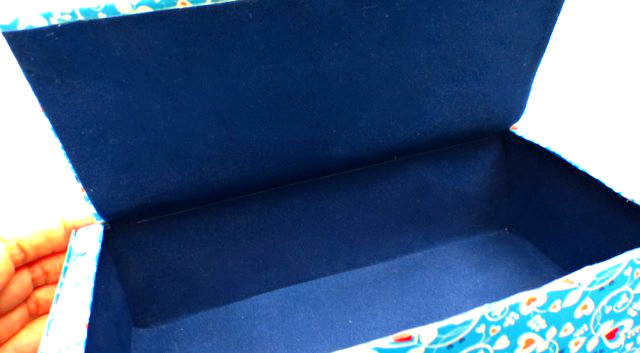
Soft box
Having considered simple options, let's try to diversify the technology a little. For example, if you want to create boxes with your own hands from cardboard and fabric, then you can use the following method. This box will be a great place to store important things. In addition, it is an excellent decorative element.

Let's look at how to make such a box with your own hands from cardboard. The master class will greatly help with this:
- You will need a round box. You can use a ready-made blank (for example, left over from a hat) or make it yourself.
- Apply a thin layer of glue to the outer side surface.
- Glue thin foam rubber to it.
- Choose a nice fabric. Measure a rectangular cut on it. Its width should be equal to twice the height of the box plus 10-15 cm for free folding. The length corresponds to the circumference with the addition of seam allowance. Wrap your box in this fabric.
- Cut a cardboard circle that will easily fit inside the box. Cover it with foam rubber and fabric. It is better to choose a lighter fabric for the bottom.
- If desired, you can decorate such a box in any way. Use ribbons, beads, buboes, beads.
Heart box
This box itself looks quite original. In addition, this box is easy to make with your own hands from cardboard.

The master class allows you to understand the progress of the work:
- Cut out two hearts from construction paper.
- Prepare two rectangles. Decorate one side with “teeth”.
- Glue a rectangle around the perimeter of the heart. Combine the prepared “cloves” with the base. It is best to use Moment glue. This will provide the necessary strength.
- Repeat the procedure for the other rectangle. In this case, be sure to take into account the allowance required to connect both side parts.
- Glue the second heart blank at the bottom. The decor imitating lace looks original.
- Create the lid for your box in the same way.
- Cut out pictures of bears or illustrations in a romantic style will add sophistication and originality. Complete the decor with beads, flowers, butterflies.

Box made of threads
This is another amazing technique that you can use to make a box. Let's look at how to make a box with your own hands from cardboard and thread.
Progress:
- You can choose any shape for the base. It can be a circle, rectangle or heart. Cut out two blanks from thick cardboard.
- One of them, which will become the bottom of the box, needs to be decorated. You can choose any solution for this. As a last resort, cover it with colored paper.
- In this base, mark holes around the perimeter with a needle. The distance between the “holes” is 1 cm. Try not to leave much space from the edge. Screw toothpicks into the marked holes. Each of them must be glued.
- Now you can take up the threads. Place the first row between toothpicks. Pass the thread as follows: in front of the stick, then behind it. The next row is placed in a checkerboard pattern.
- Braid to the middle. Now place a bead on each toothpick. Continue weaving with threads.
- Having finished the box, you need to secure the structure. To do this, put and glue beads onto each toothpick.
- The upper and lower parts of the box can be decorated with an original chain or ribbon.

Now you know how to create a beautiful cardboard box with your own hands.
Conclusion
If you are inspired to create such a masterpiece, then many of the recommendations given in the article will be useful to you. Such a detail will become an amazing decoration of your home and a source of your pride. In addition, a beautiful cardboard box, created with your own hands, can be an excellent gift. After all, every woman needs such things.
Where do you store your jewelry? How familiar it is - jewelry folded into one vase, at best, sorted by type in different containers. And, of course, at the most necessary moment, either the second earring cannot be found, or the ring, ideally suited to this particular dress, does not want to fall into the good hands of its owner. A special jewelry box will help you put your small jewelry, rings and earrings in order. And today’s master class will tell you how to make it with your own hands.
To create a jewelry box with your own hands you will need:
cardboard – thickness from 2 mm;
PVA glue;
glue gun;
padding polyester;
pencil;
wooden handle for furniture;
fabric in two colors.

How to make a jewelry box: master class
In the master class, cardboard is used, which served as partitions in a box of glasses. It is quite dense, so it can be used to make jewelry boxes.
Using scissors, we cut out the blanks of the sizes we need.

We begin to assemble the base of the box. Hot-melt adhesive must be applied to the very edge of the cardboard and quickly position the side wall perpendicular to the bottom. First we glue the walls with a size of 8.5x8.5 cm opposite each other, and then the rest. All walls should be the same height.

On the outside, it is advisable to cover the joints with masking tape. This way the walls will hold better.

Cut the fabric to a size of 28x28 cm and place it face down on the table. Using a brush, apply a thin layer of PVA glue to the lower part of the base and glue this part to the fabric, placing it exactly in the center. The fabric surface must be smoothed so that there are no bubbles.

Trim off excess fabric at the corners. These will be squares measuring 9x9 cm. We make cuts on four sides from the cut corner to the corner of the box. This will leave allowances that will need to be glued to the walls of the box.

We glue the allowances only on two opposite sides, applying glue to the fabric with a brush.

We glue the remaining two sides together with the allowances to the walls of the box, smoothing the surface. We also glue the fabric inside, repeating the shape of the box.


Glue the sides with taped seam allowances in the same way.

Making a lid for a jewelry box. We still have two cardboard blanks for the outer and inner parts of the lid. Glue them onto the fabric, leaving allowances. We cut off the corners, as in the photo below, leaving allowances of a few millimeters. We seal all sides of both parts.

Attach the handle to the lid. Place the pen on the table and place the top of the lid on it, face down. Make sure the handle is centered. From above we drive nails into the handle through the cardboard.


We glue the bottom of the lid with hot glue, making equal indentations on all sides.

The final touch remains - padding pads. We cut out four pieces of padding polyester measuring 8x5 cm. We twist each of the bottoms into a cylinder; We glue or hem the tip so that the cylinder does not unravel.

We cut out 4 pieces of fabric of a different color from the main decor of the box with dimensions of 10x6 cm. At the edges we bend the fabric 1 cm inward and we get blanks with dimensions of 8x6 cm. To the other edge we glue a roll of padding polyester with hot glue, wrap it and seal it at the end. We glue the pads to the bottom of the box.


Making a jewelry box with your own hands is simple and fun! This is a good gift for both yourself and a friend!


Antonina Mazur specifically for the site
A box is a very useful thing, because you can store all kinds of household items in it: jewelry, threads, needles, buttons, keys, business cards, etc. Probably, every home has such a product. A beautifully designed stylish box can also successfully highlight the style of a room, living room or bedroom and become an integral part of the interior.
A personally decorated box will be a wonderful gift for a friend, colleague or relatives for a birthday or wedding, and the decorating process itself can later turn into an exciting hobby.
It is also worth noting that such a hobby perfectly develops imagination, memory and has a positive effect on the nervous system. If you have an old wooden box at home that has long lost its former appeal, do not rush to throw it in the trash, because even a person who has never decorated before can stylishly decorate the thing with their own hands.
Preparation
Before you start decorating a wooden box, you need to prepare it for this. So, if there are remnants of paint, varnish, glue or paints on the outside walls, clean them so that the surface of the material is as even and smooth as possible. If the surface is not too smooth, it can be sanded.
After this, the outer surface should be degreased so that the applied new material remains firmly in place. This can be done by wiping the chest with a napkin soaked in alcohol or vodka. After this, let the product dry for 10-12 hours or dry it with a hairdryer.
Decoration

There are a huge number of options for decorating boxes. We offer for your consideration the most popular and interesting of them, and you can supplement and modify them, guided by your own imagination.
Painting with acrylic paints
Of course, you are unlikely to be able to create a brilliant masterpiece with your own hands on the first try, since this type of art requires dexterity and certain skills.
But if you try, the result will certainly impress not only you, but also your loved ones.
We will need:
- acrylic paints for decoration;
- primer for acrylic paints;
- thin pattern brush, flat synthetic brush;
- pencil, eraser, palette;
- masking tape.
First you need to prepare a sketch. The simpler the drawing, the easier it will be for you to apply paint. You can come up with something yourself, or you can look for interesting drawings on the Internet or books.
First, we sketch a sketch on a sheet of paper, focusing on the dimensions of the box. For ease of use, repeating elements can be cut out of hard paper and subsequently applied to the walls and lid of the product.

We carefully treat the leveled surface with primer for acrylic paints and let it dry thoroughly. After this, we proceed directly to painting. First, we cover the surface of the box with the base, dry it, and only then apply a drawing to it using templates. Now, very carefully, using special thin brushes, paint the picture.
If you suddenly make a mistake during your work (and this happens even to professionals), don’t be upset.
Acrylic paints have a covering effect, so you can apply a new layer of the desired paint over the blot without any damage to the pattern.
Advice. If you doubt your abilities, before applying the pattern to the box, practice on another surface - for example, on a piece of paper.
The finished painted box needs to be dried thoroughly. If you are impressed with the result and you want to make the decor durable, you can coat it with furniture varnish.
Kanzashi
Kanzashi (or kanzashi) is the Japanese art of hair decoration. It is based on the ability to fold flower petals from ribbons and pieces of fabric and glue them to the base. Today, the kanzashi technique is used all over the world to decorate interior elements, decorative pillows, curtains, women's handbags, and jewelry boxes.
Ribbons can be used to decorate not only a wooden box, but also a box made of any other material - plastic, glass, clay, etc. Boxes decorated with kanzashi look very rich, impressive and elegant.
We will need:

- ribbons or strips of fabric;
- scissors;
- chalk or pencil for marking;
- PVA glue or “Moment”;
- threads, needles;
- decorations (beads, rhinestones, beautiful buttons, beads, etc.).
First of all, you should cover the box - the very basis of the craft - with fabric or ribbons. To do this, generously lubricate the workpiece with glue and glue the fabric.
While the base dries, we begin preparing the decoration. From ribbons and pieces of fabric you can make not only flowers, but petals, miniature fruits, etc. You can decorate them in any way you like, using beads, buttons or rhinestones. Larger ribbon crafts should be glued to the lid, and smaller ones - to the sides of the box.
It is worth noting that it is best to decorate the box with ribbons made of expensive fabrics - satin, velvet, silk, as these materials look the most elegant and rich. But you shouldn’t buy cuttings specifically for these purposes - you can use scraps left over after sewing clothes, curtains or curtains.
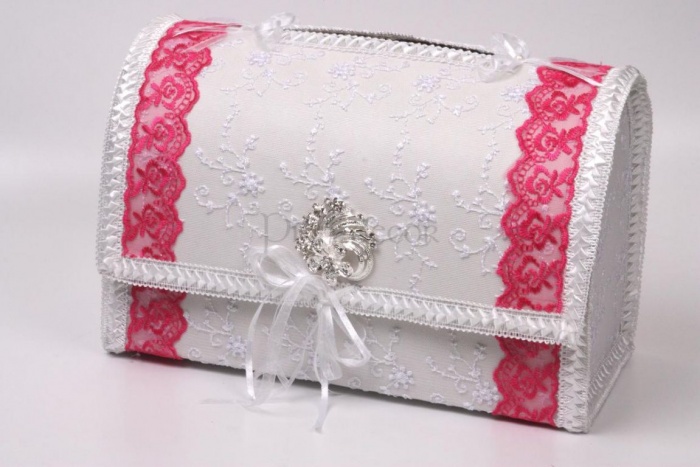
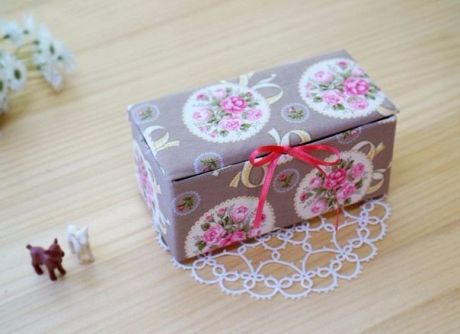
If you want to decorate a wedding box (for money or rings), you can use the following idea. Cover the body with white or ivory satin, and decorate the lid with pink lilies or roses and white or light green ribbons.
Marine theme
Surely, while relaxing on the sea coast, you have repeatedly met merchants offering various souvenirs made from natural materials. Among such crafts, as a rule, there are always beautiful boxes decorated with shells.
Few of us thought that such a present could be easily made on our own, without shelling out fabulous money to southern craftsmen.
We will need:

- different size shells;
- glue "Moment";
- 2 brushes;
- wood varnish.
You can decorate not only a wooden box, but also a cardboard box or chest with seashells. First, sort the shells and carefully think through the decor idea. When planning it, be sure to leave some shells of a certain size and color in reserve, since they can be damaged during work.
Content
The options that we have prepared for you are suitable for decorating a gift for any holiday and for any occasion, and for storing jewelry, cards, and various small items. Stock up on good thick cardboard, sharp scissors, glue and colorful paper.
Options for making boxes
From a candy box
As usual, let's start with the simplest and most affordable option for creating a cardboard box with your own hands, using a ready-made candy box. What you will need additionally:
- PVA glue;
- scissors;
- decorative (gift) paper;
- white acrylic paint.
First, you need to remove the foam insert with the candy slots from the box. Now the box needs to be covered with gift paper and the inside painted with white paint. Instead of paint, you can use white cardboard to decorate the inside of the lid. If you want, you can return the plastic cells to make it convenient to store rings, earrings and chains separately.
From ordinary matchboxes
This is also one of the interesting and affordable options for making a cardboard box with your own hands. The main material will be cardboard matchboxes glued together. What you will need:
- thick cardboard for the base;
- matchboxes - 8-10 pieces;
- PVA glue;
- paper for registration;
- beads, felt, rhinestones, seed beads and other decor.
First, you need to cut out a square from thick and strong cardboard to which you will attach the parts of the future decorative chest of drawers. Connect matchboxes in pairs and glue them to the base. Now you can start decorating. You need to cover the “drawers” of the chest of drawers with paper and attach your decor to them.
Use buttons or large beads to make convenient handles for drawers.

Corrugated cardboard
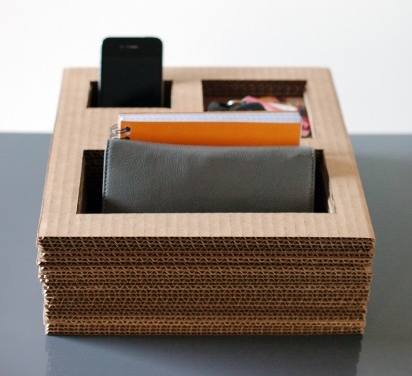
This is a do-it-yourself chest box made of cardboard, which does not have a lid and which can serve as an organizer on the desktop. What do you need:
- several sheets of thick corrugated cardboard or regular thick cardboard;
- stationery knife;
- PVA glue;
- Ruler and pencil;
- pattern.
First you need to make a drawing of a cardboard box with your own hands or use ours:
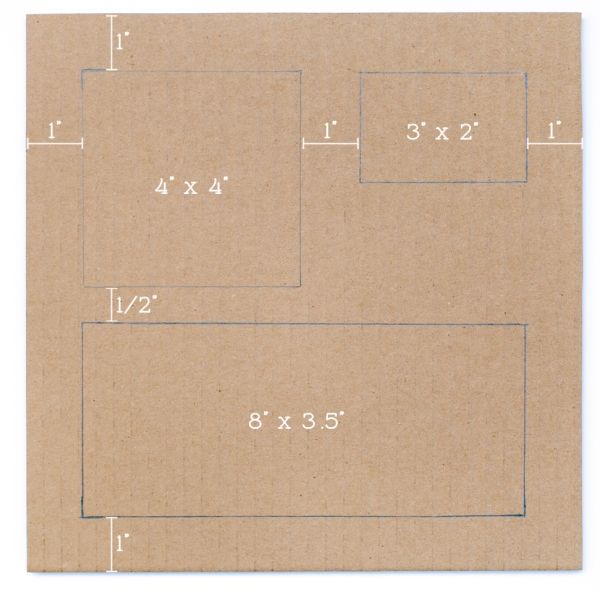
Now, using a sharp utility knife, you need to cut out the holes for the future organizer. You need to prepare 20 such templates. But! Make five layers with only the large hole, another five with all three holes, and 10 patterns with only two holes. You will also need 5 sheets without holes.
Now you need to glue the parts together: first, connect the solid parts, then glue the parts with a large hole, then glue the parts with two holes and the rest of the parts on top. You need to put something heavy on the organizer and leave it overnight. Now you can put a stylish and environmentally friendly box on the table and store your phone, notepads, notes and other necessary things in it.
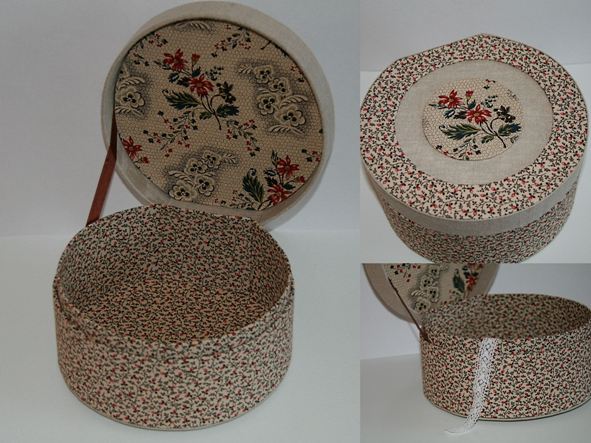
Round
This is a DIY version of a box made of cardboard and fabric. You will also need the following materials and tools:
- padding polyester;
- cardboard;
- dense material with any pattern;
- PVA glue;
- sharp scissors;
- paper tape;
- binders;
- a simple pencil;
- ruler.
First you need to cut out a circle of the diameter you want the chest to be. Now you need to cut out a long rectangle for the side. The width will depend on how tall you see the future product. Now connect these two parts using masking tape.
Now you need to cover the blank with the selected fabric, and also cut out the bottom of the box from the fabric. Use binders to secure the material and allow it to stick well. Using the principle of preparing a box, make a lid, glue padding polyester on top so that it is soft and also decorate the lid with fabric. You can use additional decor to decorate the sides and lid.
You can decorate the box not only with fabric, but also with thick gift paper, and also use a heart shape. We offer several interesting options that are suitable for decorating a gift, for example, a watch or jewelry, as well as for storing sewing supplies or jewelry.
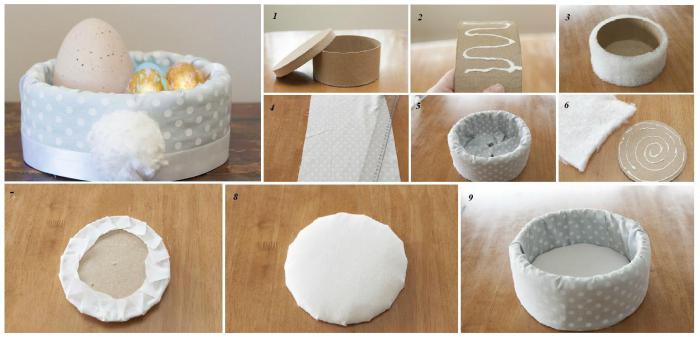
In such a soft box it is convenient to store jewelry made of precious metals or use it as an egg stand for Easter.

It is not necessary to additionally decorate a cardboard box with paper or fabric; you can use corrugated cardboard and leave it in its original form or paint it in any color.

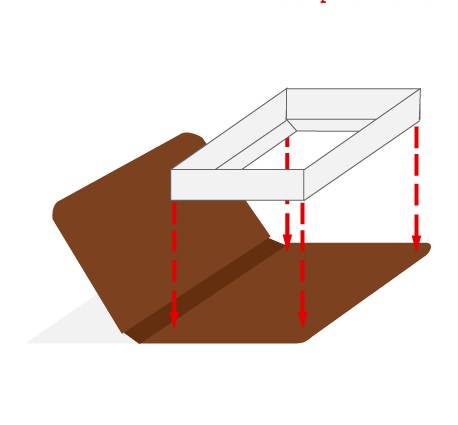
In the form of a chest
This chest will be useful for playing pirates, for collecting money at a wedding, or for storing any things. If you use a ready-made pattern, which we will post below, then choose thinner cardboard that bends easily. If you assemble the chest lid in parts, then thick cardboard will do.

Decorate cardboard boxes with your own hands using fabric, paints and satin ribbons.

Made from cardboard with several compartments
You need to stock up on the following materials:
- thick cardboard (an electronics box will do);
- sharp tailor's scissors;
- PVA glue;
- scotch;
- large buttons;
- decor (paper, lace, napkins for decoupage technique, paints, rhinestones).
First, make a drawing of the future box on prepared cardboard.

Now you need to carefully cut out the pattern and prepare other parts.

Assemble all the design parts using tape. It will provide the structure with strength and stability.

When the structure is ready, then you can start decorating. Use any suitable material for this: fabric, paper, lace, satin ribbons. Use large buttons as handles.

Box-book
An interesting gift option or option for secret storage of jewelry or money.
What you will need for the craft:
- thick binding (take an old or unnecessary book that you don’t mind using for crafts. Although, of course, book lovers can argue with this);
- scissors;
- pencil;
- ruler;
- corrugated cardboard;
- thin cloth or gauze;
- for decorating the top: vinyl wallpaper or thick fabric, or gift paper and other materials.
First you need to separate the binding of the book. Next, you need to construct a future book-safe box from corrugated cardboard.
Carefully connect the parts and use gauze to seal the walls. Next, all that remains is to decorate the top of the future book, using any material that is at hand.
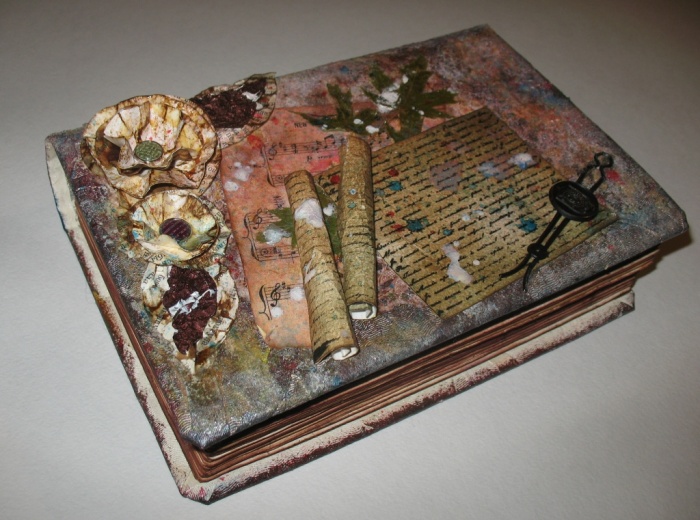
This is an option for designing a box in the form of a book, although the execution technique shown in the photo is somewhat different. Here a real book is used and its glued sheets with a cut-out hole serve as a container for storing objects.
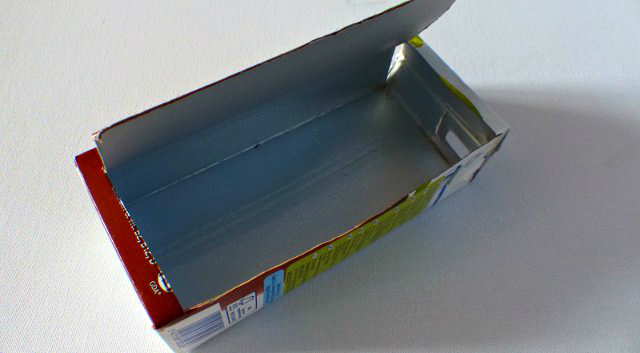
From a milk or juice box
A fairly simple option to implement, but it turns out very cute and beautiful. At first glance, it is even difficult to understand that the chest is made from an ordinary Tetra Pak box. What you will need:
- empty and clean box of any shape;
- masking tape;
- printed paper or wrapping paper, you can even use wallpaper;
- stationery knife;
- ruler;
- pencil;
- glue;
- all kinds of decor;
- satin ribbon.
To begin with, on the wide side of the box you need to use a pencil and a ruler to outline the future door and carefully cut it out using a knife.
Now you need to cover all sides of the box with tape (you can use masking tape), as shown in the photo:

Next, you can start decorating the box. Use pre-made materials and glue to complete the look. You can also attach a lock or a satin ribbon to your box, tying it in a bow.

To make the inside of the box look like a real box, you need to cover it with velvet, felt or any suitable soft material.
We invite you to look at a few more photos of do-it-yourself cardboard boxes:
When decorating, you can use various interesting techniques, for example, decoupage, craquelure, quilling and others.

An ordinary shoe box makes an excellent jewelry box with compartments for storing jewelry. Thick cardboard is quite easy and convenient to work with, it is durable, amenable to glue and goes well with various decors.
We suggest using one of the mentioned techniques to design a cardboard box with your own hands. A master class is traditionally at the end of each of our articles:
Post Views: 37


