Often, when people hear the word “heating,” they think of heavy, rough, cast iron batteries, which were present in everyone's home during the Union era. The radiators took a long time to warm up, did not retain heat in the apartment, and performed their function somehow. Nowadays everything is different - there is an opportunity to choose among worthy alternatives. The most advanced of them is the “warm floor” system. Therefore, we learn how to install heating pipes in a floor screed.
However, these systems are quite expensive, limited in their applications, or require significant skill. The resulting result is a non-stretchable screed that does not crack violently and does not reach the ends of the slab. To others important advantage This system is able to apply screed just 8mm above the panel spacers. Controlled screed cutting makes it unnecessary to make "control cuts", preventing joints from being brought back onto the surface with unethical cuts of tiles that do not match the joints.
Warmth starts from the feet
System operation
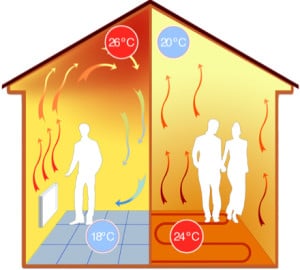
Why is laying heating pipes in the floor screed a wise decision? Isn't it easier to change batteries? Of course it’s easier, but easier doesn’t mean better. The laws of physics cannot be canceled. The operating principles of heating networks are radically different. Conventional radiators generate heat, which rushes along the walls to the ceiling, warming it first. Then the air returns down, but in a cooled state. Thus, the ceiling is warm, but people are cold. The convection principle is not the best.
Thanks to the reduced mass of the screed and due to the placement of the heating tubes close to the floor surface, the system responds extremely quickly to temperature changes and is therefore characterized by low thermal inertia. The system has been tested for many years in many applications and is currently being finalized with new solutions especially suitable for renovation or renovation of existing buildings.
If you are interested in installing yourself, you can skip over the theoretical part and discard it. So we decided for both of us, due to the failure of one system - it still remains a functioning second system. In addition, radiators can provide a rapid increase in room temperature in cases where the floor has been unplugged for a long time and cooled. For example, if you turn off circuits before going on vacation. We also use radiators to dry gloves and clothes in winter when children come in wet from outside.
But heating pipes in a screed work differently. The heat first warms the legs, and then, cooling, rises. The inhabitants of the house do not freeze, and with this heat distribution mechanism they feel better.

Before installation, weigh the pros and cons
Methods for placing heating loops
Most often you may encounter electric or water underfloor heating. There are other exotic options, perhaps hot air. But in this article we will rely on this warmth.
Method of heating heating elements
Heated floors. Sex distribution underfloor heating. The document briefly describes the most commonly used floor screeds, associated standards and test procedures to verify critical parameters. It also provides examples of failures, their causes, and repair options.Advantages and disadvantages of technology
Before installation polypropylene pipes screed, familiarize yourself with the pros and cons of this heating technique, because you need to be sure that you are investing resources wisely.
So, the advantages of “warm floor”:
- duration of operation (from 50 years);
- uniform heating;
- efficiency (maintenance of such heating is cheaper than the classic version);
- lack of moisture;
- ease of care;
- space saving;
- safety (children will not be injured or burned from batteries);
- maintaining normal air humidity;
- lack of environment for the appearance of bacteria;
- aesthetics.
It is designed for making custom building materials and can therefore be used to understand how to understand the material marking code for screeds or what properties or classes of properties may be prescribed. He is widely involved in conformity assessment, which is important in particular for manufacturers of screed materials. The standard does not specify requirements for its own design.
An example of shadow material designation. It contains only definitions, always in Czech, English, German and French. The requirements for the actual construction, that is, the layers of screeds built into the floor, are, for example, new ones that are covered by another post. It lists the requirements for the most commonly used cementitious screeds currently in use and for calcium sulphates.
Differences in heat movement between classic version and "warm floor" system
There are few disadvantages, but you should know them:
- reducing the height of the room;
- difficulty of carrying out repair work(searching for pipes in a screed is a difficult task);
- impossibility of installation in specific places, for example, on flights of stairs.
This is important to know! If there are no restrictions on mansions, then before changing the heating system in a multi-story building, make sure that the central system can withstand such a hydraulic load.
The traditional material is cement screed. Compared to anhydrite cast screeds, its strength is moisture resistance, frost resistance and relatively low material cost. On the other hand, the disadvantage is the need for maintenance, the need to reduce narrowing joints and the greater ease of installation.
The second most commonly used material today is anhydrite and other calcium sulfate based materials. These ties require shorter and less intensive treatment. Their further advantage is their virtually negligible shrinkage, allowing large areas to be created without tapering joints and a relatively low workload. With careful design there is usually no need to level the surface with a trowel.
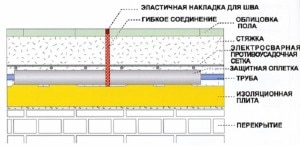
Installation diagram of the "warm floor" system
System installation
Work always begins with a plan, purchasing materials, and finding tools. Warm floors are no exception.
Wisdom of pipe selection
Which pipes are the most reliable for heating installations? You are free to choose copper, but it is very expensive. It is better to focus on polymer products consisting of polyethylene and polybutylene. This “duet” is resistant to pressure - both external and internal: it does not cause any trouble if everything is installed correctly. Polypropylene pipes must function in a floor screed, since their only drawback is low hardness. Composite structures made from metal-plastic are no less good.
Their main advantage, in my opinion, is the ability to speed up construction when the maturation of the screed is a matter of cooling them. In exceptional cases this can also occur with magnesium screeds or synthetic resins. For completeness, it should be noted that the so-called pre-assembled layer, consisting of interconnected plates, can successfully perform the function of a screed. However, this is not relevant to this article.
The mesh connected to the substrate is not a self-supporting structure and copies all the deformations of its substrate. As a rule, splashes laid in a much smaller thickness can also be included in this category. These screeds are very complex in design, especially to achieve the necessary adhesion to the substrate and protection against moisture loss. At the same time, cracks and other defects in the substrate are projected.
As for the installation of metal elements, in this case the risk will be unjustified. Water from the mains is sometimes replete with “chemicals”, and the material may not withstand such aggressive influence - as a result, rust will appear, and then leak. Hard water also has a detrimental effect on metal. Therefore, polymer pipes are a wise solution, and at an affordable price.
The layer is separated from the substrate by a separating layer. A separator separated from the substrate by a release layer is particularly useful where cohesion with the substrate cannot be ensured or where we want to eliminate cracks from the substrate in the screed. This screed is supported vertically in the vertical direction and can be deformed horizontally regardless of the substrate.
Floating screed is the most common type in residential and civil buildings, due to the need to isolate spaces on different floors from the transmission of impact noise. This screed acts completely independently on the floor, both horizontally and vertically. Its load-bearing capacity depends not only on the thickness and mechanical properties screed, but also from the compressibility of sound or thermal insulation under the screed.
Video tutorial on choosing elements for a network
Preparing the premises
The network installation is carried out after the connection points for other communications have been installed, as well as after the installation of windows and doors. The room should be cleared of furniture, the old heating network should be dismantled or left if you want double heating of the room.
Allowable surface unevenness is up to 1 cm. If they are larger, the base will have to be leveled.
For floating screeds, the decisive parameter characterizing the mechanical properties is the tensile strength after bending. They are then broken in a testing press and the compressive strength can be determined in fractions. With this method we directly determine the parameter that is usually prescribed for the screed, and at the same time the test result is determined by the partition in the middle of the thickness and at the bottom edge of the screed layer, where defects are often hidden. On the other hand, sampling is relatively difficult and leads to damage to the screed.
Task No. 1 – level the floor surface
The rooms located above the cold zone (basement) need to be separated with insulating panels - so that you warm the house, not the cellar.
The final stage of preparation is cleaning. An industrial vacuum cleaner will cope with this task perfectly. All that remains is to ask your family not to interfere and proceed with the installation.
An alternative method used is to determine the tensile strength surface layers. In this test, a scratch is glued onto the surface of the test layer and torn using a special tool. This is a strong tensile strength, the size of which depends mainly on the surface properties of the screed layer. To test your screed, place a test target on a highly polished surface. According to many years of experience, concrete has a tensile strength of approximately half its tensile strength after bending.
Intermediate stage of work
Installation of the structure
Work begins on the installation of heated floors with thermal insulation. You already understand that the hot air should be at the top, not at the bottom. To insulate the network, you can use materials in the form of sheets or rolls. The main thing is to make sure that there are no gaps between the joints of the heat insulator; if you see gaps, cover them special tape. Polystyrene or basalt fiber coated with reflective foil is ideal for this task.
Requirements for elements of a “warm floor” system
The test can also be used to control the surface before surface treatment if the surface allows sufficient fixation of subsequent layers. The test target should then be glued directly onto the test surface. For thicker floor screeds you can also use general methods tests to evaluate the compressive strength of concrete. Pressure testing on cored wells or non-destructive methods such as Schmidt hardness tester or Mashek fang.
The assessment of the mechanical properties of the screed should always be supplemented by visual inspection of the surface and edges and the use of several probes to control the thickness of the layer. In practice, the moisture content of the screed is always checked before laying subsequent layers. This method is based directly on determining the moisture content of the material, which is the ratio of the moisture content contained in the material and the dried material. With more high temperatures they release a significant amount of so-called chemically bound moisture.
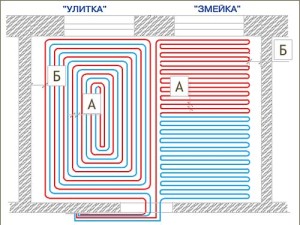
How to lay pipes? Uniform heating is important, so use elements such as a snake or a spiral.
The main thing when laying the network is to adhere to the same step between zigzags or turns. Step size matters too. For rooms up to 20 m², a distance of 20 cm is sufficient. If you are installing a network in large rooms, it is recommended to install several spirals/snakes.
In this method, a calcium carbide capsule is destroyed in a sealed container containing a sample of the material being tested. Its reaction with water produces acetylene, the pressure of which is measured in the test vessel. This method provides relatively accurate results and its big advantage over the gravimetric method is its speed.
In addition to these two methods, we can use methods based on the measurement of electrical quantities. These methods were mainly developed mainly for measuring the moisture content of wood. Layers of surface flatness are important for the laying of subsequent layers. Surface flatness is measured geodetically and is important to ensure that the floor surface is connected to adjacent elements such as door thresholds, floors in adjacent rooms, etc. on the other hand, local flatness is important for the floor layer for smooth operation on the floor.
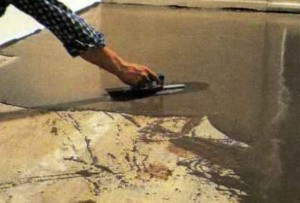
Laying is done wet or dry. If you choose the first - the more common one, at which heat transfer is maximum, then you will have to install reinforcing mesh. You are free to purchase a factory kit or build a reinforcement structure on our own. The size of the cells depends on the pitch, but the side of the cell should not exceed the pitch distance. The fittings are fixed using clips, but if special heat insulators with bosses are used, then fastenings will not be needed.
Features of installing a “warm floor” in a concrete screed
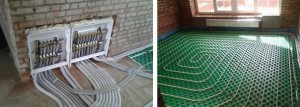
It is measured with a two-meter board and a sliding scale. Since floor screeds are generally not underlays, their requirements should be based on the requirements of the subsequent layers on the underlay. Floor screed in a family home. The floor structure on the first floor is formed from the bottom surface concrete base, waterproofing, polystyrene insulation panels called. Technology under the floor heating layer and cement screed. The technological layer consists of cement screed about 20 mm thick, into which the plastic floor pipes are guided.
A reinforcing mesh is also installed on top of the pipe network as a safety net so that the elements do not deform under the weight of the screed. Next, the mesh is filled with a solution (gypsum, cement or other building mixture). The thickness of the screed varies between 3-7 cm.
This is important to know! Before pouring the screed, check the pipeline for leaks.
The floor tiles are expected to be ceramic floor tiles. On the floor plan side, part of the future kitchen and part of the future living room, the cement screed was removed before a local investigation was carried out and the so-called technological underfloor heating layer was discovered. After the disturbed area, it was discovered that the cement screed was made with a thickness of 20 to 50 mm. The reason for the different thickness of the screed is, apparently, the unevenness of the surface of the technological layer. Cracks were found in the remaining cement screed.
Upon closer examination of the surfaces of the floor slabs where the expansion joints were located, on one side of which the cement screed had been removed, it was discovered that the layer of cement screed deeper below the surface was very fragmented. A large subsurface gap was also found on the left sample of the drained screed. The condition of the cement screed may be marked as unsatisfactory to ensure long term floor construction services.
They also practice the dry method of “masking” the network.
How to hide pipes in a dry screed? Use chipboards. The technology differs only in that instead of a solution, they install chipboard sheets. The technique is simple; you don’t have to wait for the screed to dry. However, dry installation cannot be called popular, since it has a disadvantage - the voids slow down the heat transfer of the network.
The shape of the structure is at your discretion
Using pipes in a floor screed for heating is not a luxury at all, right?!
Video: how to hide a heating pipe in a screed
This article will be useful to those who are planning to buy new apartment and faced a new heating trend. Very often, new buildings begin to move away from traditional risers supplying coolant ( hot water) to the batteries, and use a gasket plastic pipes right on the floor. This decision frightens many people, since it is not known how durable and practical it is. After all, there is no direct access to the pipes; check their condition and notice the leak in time. An article about the advantages and disadvantages of such a solution.
I’ll start right away with the fact that abandoning risers and routing pipes to radiators along the floor is absolutely justified and has whole line benefits. There is no need to be afraid of such heating systems. Firstly, this solution allows you to install a heat meter for heating and pay for heating not according to the standard, but according to actual consumption. For example, when the apartment gets hot or when you go somewhere for a couple of weeks, you can turn off the heating and not pay for it. For example, I have had months in the winter when the heating bill for January or December included a hundred rubles. With a conventional heating system using risers, it is technically impossible to install a heat meter. The fact is that in the case of floor distribution, there is only one central riser, which is located in the entrance, and from it the heating radiates throughout the apartments. That is, heating is apartment-by-apartment. A heat meter is installed at the outlet from the riser. In the case when each battery has its own riser, it is impossible to install a heat meter, since there are several risers in the apartment and, more importantly, the coolant flows from floor to floor, which makes it impossible to calculate the amount of coolant spent on heating specific apartment. This leads to another significant advantage of installing heating pipes in the floor - if necessary, you or your neighbors above (below) can turn off the heating of only your apartment in the event of an accident or repair without harming others. While in the standard version you will have to block the entire riser from the first to the last floor. Moreover, in order to shut off the riser, you will have to notify the management company (housing office), while with apartment heating there is no need for this - just go to staircase your floor and turn off the tap.
Another significant advantage of the system is its maintainability. The service life of heat-resistant plastic pipes is twice as long as that of conventional standard pipes in risers. If a pipe needs to be replaced, the floors will not have to be opened. It is precisely this moment that scares many people away. The stereotype works: if a pipe is in the floor, it means that sooner or later the floor will have to be broken in order to replace the damaged section of the pipe. Not at all. All pipes passing through the floor are laid in special corrugation(SNiP requirement), thanks to which the replacement of a damaged pipe occurs without opening the floor.
Another advantage of such a heating system is the fact that the pipes running in the floor heat the floor. In addition to hot radiators, we get heated floors. Warming up is especially noticeable if the quality flooring was used floor tiles(for example, in the kitchen). The heating of the floor, of course, is uneven - only where the pipes pass. But you won’t have to pay extra for these “warm floors”.
Well, the last, probably the most obvious, advantage is that there are no risers in the apartment that need to be hidden or put up with the fact that they will spoil appearance rooms. Indeed, in the case of floor distribution of pipes supplying and discharging coolant, we only have in the room the radiator itself, the pipes from which go to the floor.
The only disadvantage of the system is the possibility of its damage during some repair work. It is necessary to drill the floor quite carefully. Of course, when installing flooring, be it laminate, tiles or carpet, this is not required. But there is work related to the installation of sliding wardrobes, installation of door thresholds, when the need nevertheless arises to drill the floor. But, firstly, the pipes lie at a certain depth (at least 4-5 cm), and secondly, in management company You can ask for a diagram of the pipes in the floor so that you know where exactly these pipes go (such diagrams should be there). And thirdly, in the worst case scenario, if you do damage the pipe, it can be replaced without opening the floor.
Also, many are afraid that a pipe laid under the floor may spontaneously leak. This is practically impossible, since before pouring the floor, water is supplied to the pipes under a pressure of 12 atmospheres (working pressure during heating season does not exceed 6 atmospheres). And only after checking the pipes for leaks, workers begin pouring the floor. Another thing is how well the organization followed the work technology. In any case, the organization that carried out the work is responsible and will carry out repairs, if anything, at its own expense.
In my opinion, the advantages of floor apartment system heating still significantly outweighs the only negative, which I described just above. But the final choice is yours. I hope you found the article useful. When copying an article or parts thereof, a link to the source and author is required.