Known for a series of articles. And just recently Lyokha defended his dissertation (March 21, 2014) in the specialty 09/05/03 - “Electrical complexes and systems” and is slowly returning to creativity.
Congratulations to Alexey and look forward to new articles!
Manufacturing printed circuit boards in amateur conditions - not such a simple matter if you pursue the goal not only of the quality of the tracing, but also the beauty of the design as a whole.
Repeatedly on the Internet and among friends and acquaintances, I have seen printed circuit boards that do not inspire confidence in the device simply because of its appearance.

Rice. 1
The beauty of a board consists of several components, and one of the main ones, in my opinion, is smooth edges and a strict rectangular shape (boards of more complex shapes are rather a special case).
The easiest way to cut PCB at home is with metal scissors, but there is a problem - under the pressure of the blades, the material deforms and delaminates. This is especially true for modern Chinese-made PCB, with which Lately I had to deal with most often. The degree of deformation depends on general case on the skill of the master, the shape and size of the scissor blades, the presence of play between them, as well as their sharpening.
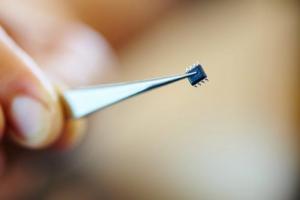
Another, also quite well-known, but more complex cutting method is the combination of “a cutter made from a fragment of a hacksaw + a metal ruler” (Fig. 1). There is no longer any deformation here, but it is noticeably more difficult to cut straightly - not only do you need to control the pressure on the cutter, you also need to hold the ruler so that it does not move away, and it is better throughout the entire cutting, and not just at the beginning.
Having struggled with holding a ruler and not wanting to cut with scissors, I made a simple device (Fig. 2) that allows me to cut PCB with a cutter made from a hacksaw blade without fear for the quality and with almost no effort - a bed for cutting PCB.

Rice. 2. Bed for cutting textolite (general view).
The base of the frame can be a piece of plywood or chipboard, 15-20 mm thick. Using two bolts firmly glued into the base on epoxy resin(Fig. 3), a corner is pulled to the bed, while the outer edge of the corner is aligned with a ruler using a file and emery cloth.

Rice. 3.
The bolts, nuts and washers chosen are stainless, although ordinary ones will suffice if you are not cutting them on an industrial scale. The marked workpiece is placed under the corner and aligned along the edge, taking into account the thickness of the cutter (~1 mm) inside or outside. To prevent the PCB from slipping, a piece of PVC electrical tape is glued to the pressing edge of the corner (Fig. 4).

Rice. 4.
Having tightened the nuts, all we have to do is carefully run the cutter along the edge of the corner approximately 7-10 times (for standard thickness 1.5 mm) until the part to be cut can be broken off (Fig. 5).

Rice. 5.
In this case, our only task is to control the pressure on the cutter. It should be the same throughout and not too large.
Having cut out several boards on this “structure” different sizes, I can say one thing - a very convenient thing to use! I recommend everyone to get one.
The only drawback is that it cannot automatically control the pressure on the cutter.
While I was writing the article, the idea arose to take the guides from an A4 printer and make a cutting block with a spring-loaded cutter, but I think that’s enough for now. Learning to press the cutter is not that difficult, the main thing is that the workpiece is securely fastened!
For this, I want to say thank you to everyone for your attention and sincerely wish you good luck in your work!
Hi all. Due to working issues, fiberglass laminate of a certain size was required. But it didn’t work out to buy right away. In one place they sell but do not cut, in another place they cut but do not sell. Fiberglass is sold by weight. And mostly the sheets are not small. In one store I found a sheet 1m by 0.95m, a bit of a strange size;)
I couldn’t find fiberglass cutting in Moscow, I found several places where they cut from 15-100 km from MSC. And cutting the road) 3500 per meter. Therefore, we decided to cut it with our own hands, on our own)
Cutting fiberglass laminate is similar to cutting plexiglass
Since I was cutting it alone, I decided to secure it first.

For insurance, I put hardboard under the fiberglass, in case I get carried away)

To make the cut perfectly straight, I glued an iron ruler to the cutting line with double-sided tape and molar tape (temporarily).


The cutting knife was used the same as for cutting plexiglass. Just because it is fiberglass, it had to be sharpened twice (during cutting).


To speed up the process fiberglass cutting, between cutting the knife “passed” several times with a hacksaw for metal. She, too, quickly became dull and clogged. It also heats up very quickly.
Miniature a circular saw for cutting PCB it is very convenient and useful thing when making printed circuit boards at home. Cutting metal with scissors can be not very convenient, especially when the size of the workpiece is much larger than the length of the cutting blade of the scissors. At the beginning of cutting everything goes fine, but then the PCB begins to bend or take the shape of a spiral, the foil can peel off, in general this method creates unnecessary hassle. You can, of course, cut with a cutter made from a hacksaw blade, but this method can be used when you need to cut 1-2 workpieces, and if there are a lot of them, then this process is very long and tedious. Therefore, in this article I suggest everyone who wants to make it themselves small at home table machine for cutting PCB, which will greatly facilitate the production of printed circuit boards.
Assembly miniature I started making circular saws from scrap materials, whatever I found in the pantry at home. Of course, cutting discs will have to be purchased at the market or in a store.
Cutting disc and machine parts

On the tool market, where they sell drills, grinders, and rotary hammers, I found a disk slotting cutter with an outer diameter of 40 mm and a thickness of 0.25 mm, Type I, Z = 100, internal diameter 10 mm. It is advisable to supply a cutter with an outer diameter of 50 mm, but unfortunately the sellers did not have one.
It is advisable to make the base to which the disk cutting cutter will be attached on a lathe, but this is in case someone has such an opportunity. Due to the absence of a turner I know, I invented everything myself. It is this device that will hold the cutter that I made from a video head from a broken video player.
The operating principle is as follows: remove the head from the body and disassemble it.


You need to knock out the shaft from one half of the device, remove all excess from the other half, as shown in the photo. The shaft from such a video head has a diameter of 6 mm. Next, the problem arose with finding a pulley for this shaft. The solution was found in this way - I found a suitable size bolt made of brass, drilled a hole with a diameter of 6 mm in the center. Then clamped this bolt into the drill chuck and using various files and sandpaper I made a pulley for the shaft and electric motor.


For fastening disk cutter you can use parts from a ceramic variable resistor. The bushing from the potentiometer has an M10 thread, and its internal diameter is 6 mm, this is what was required! Next, I pressed it onto the shaft and soldered it to a blank made of bronze, which is located on the video head.


About the electric motor
Initially, all adjustments were made to the DPR-42-N1-03 motor, shown in the photo.

But this motor turned out to be rather weak in power, so I had to change it to a more powerful one, which could easily drill a metal plate with a 4 mm drill at 30 V. The motor is powerful, but its shaft diameter is 4 mm.


The pulley installed on the engine has an outer diameter of 6 mm and is made from a 10 mm brass bolt by hand. The driven pulley is also brass with a diameter of 9 mm, it was removed from an old tape recorder and its internal hole was drilled to 4 mm.
Passing straps can be cut from a bicycle inner tube

The body of the circular saw is made of 3 mm fiberglass covered with foil on both sides.

Due to textolite covered with foil, it became possible to assemble the body by soldering without the use of various angles and bolts with nuts for connection. For anyone who starts assembling such a machine, the body dimensions may differ from mine, as well as the material for manufacturing, here it’s just who has enough imagination and ingenuity .