You can create a beautiful and cozy interior in your home with the help of handmade crafts. Making such original things is not so difficult - you don’t need professional skills for this. The things we make with our own hands are unique, they give the interior of the home individuality and add variety to the environment.
Handmade crafts exude the special warmth of a home. Thanks to unusual creative gizmos, you will have the opportunity to change the interior at will or in accordance with the seasons (for example, create New Year's decor). DIY home decor is varied and purposeful. Homemade beautiful things and useful crafts for the home can be used as original furnishings, decorative elements, or as devices intended for storing various household items.
In order to make things with your own hands, you don’t have to buy expensive materials; you can also use improvised means.
Creating unusual decor is possible without large material costs. Most of you have various unnecessary little things in your house, for example, fabrics, colorful paper, buttons - all this can be used as material for crafts.
There is similar “junk” in almost every house, if you dismantle the pantry or rummage around in the attic, you will find something. Natural materials, glue and threads are also useful for making beautiful new items and homemade little things. But handmade decor ideas at home are also needed - of course.
Many people believe that only people with experience can make crafts and create presentable interior items on their own - this is a misconception. Show your imagination, combine different textured materials, don’t be afraid to experiment, and you will create not only beautiful, but also original home decor.

Even if you have to tinker with the first thing, each subsequent decorative craft will come out better and better, and you will spend less time.
DIY craft ideas for the home
So, what can you do yourself for your home? Let's look at a few ideas for inspiration. Among the proposed options, you will definitely find something interesting for yourself and try to make the thing you like with your own hands.
Housekeeper
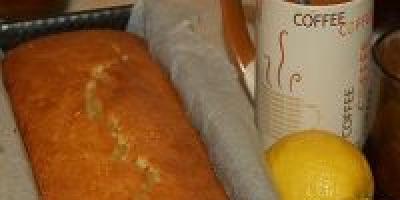
One of the useful things for the home that also serves a decorative function, which you can make with your own hands, is a key holder.

The peculiarity of this key holder is that its design imitates brickwork. The basis for the key holder is thick cardboard (you can use part of a box). You will also need thick toilet paper or thick napkins. Dense material is needed so that it does not spread when lubricated with glue. Stock up on acrylic paints, varnish and glue (ordinary PVA will do).
Make the back wall of the key holder from rectangular cardboard or a sheet of plywood. Hooks will be attached to the base. Cut out small rectangular bricks from cardboard, the size should be the same, and glue them to the base, leaving a small distance between the parts. Not the entire surface of the cardboard is covered with bricks.
In the central part you need to stick a sign decorated with an inscription, and in the upper part you need to place a beautiful picture.
After this, coat the bricks well with glue, and put a napkin (previously crumpled) on top and a little more glue for impregnation. Using a stick, press tissue paper or paper into the gaps between the miniature bricks to create corners. Give the craft time to dry.

Paint the dry panel with paint (to imitate natural brick, you need to choose a red-brown shade). Use bronze paint to paint the seams.
After the paint has dried, paint the bricks with the same tone using a dry brush (dip the brush into bronze-colored paint, then wipe it on paper until it is almost dry, and only then brush the brickwork).
On a note! When painting bricks, you need to move the brush without changing direction.
To give the key holder a smooth finish, coat it with a clear matte varnish.
The work is completed by attaching the loops, after which it can be hung on the wall or given as a gift to someone. The photo below shows the finished key holder:

Jewelry hanger
All representatives of the fair sex love jewelry; Almost every woman has jewelry that needs to be stored somewhere. An original storage for jewelry will be a hanger made like a painting.
In order to make a hanger for storing jewelry, you will need:
- baguette frame;
- plywood;
- stain (paint can be used as a replacement);
- hooks and drawer handles;
- nails;
- screwdriver and drills;
- cutting tool.
Cut the plywood according to the dimensions of the frame and coat it with stain, then dry it and apply it to the frame. Mark the places where the hooks will be attached and screw them. All that remains is to hang the decorations on the hanger.
Now you have a place to store women's treasures - jewelry.

Plastic canvas box for storing small items
A simple but presentable box designed for storing various small items can be made from plastic canvas.
Canvas is a material for embroidery. You will need a canvas made of plastic; you can buy it in stores that sell everything for needlework.
On a note! Plastic canvas is usually made in the form of sheets, A4 size. The perforations in the plastic canvas differ in size. Canvases are produced with different numbers of perforations; the more there are, the smaller they are.
In addition to the canvas, you need to stock up on the following materials:
- dense threads;
- large needle;
- fabric or beads;
- scissors.
Embroidery on plastic canvas is almost no different from regular embroidery. Embroidery techniques can be different, the most popular are cross stitch and satin stitch.
The plastic canvas is flexible, but at the same time it is very durable.
Decide what the dimensions of your box will be. Divide the material into parts intended for the sides and the bottom. There should be five parts in total. Make elements for the lid. Make a workpiece whose size is 0.5 cm larger in width and length from the bottom. The sides of the lid should be slightly narrower. You will need five more parts. Then sew the parts with thick threads (you can use braid and even ribbons).

You can embroider any pattern on the blanks. Drape the parts that are not embroidered with fabric or embroider with beads.
Having completed all 10 blanks, begin assembly. The first step is to sew the side parts to the bottom. Then sew all the side elements of the box from the outside and trim the top around the edges. The last step is to assemble the cover in the same way.
We assemble the lid of the box in the same way.
A beautiful box made of plastic canvas is ready.
Woven rugs using tapestry technique
One of the options to add coziness to the interior is tapestry rugs. To weave such things, you do not need special tools. A rug using the tapestry technique can be made from scrap materials: thick threads that are used for knitting (they can be replaced with ropes made from old clothes) and cords.
A tapestry is a lint-free carpet made by hand. The base of tapestry rugs is decorated with ornaments created by interweaving threads. We will create a plot composition in the form of a circle with drawn lines; a thread will run along them, serving as the basis.
All work is done using weft threads. The complex name hides ordinary ropes and braid, from which weaving and decorative patterns are created.
- choose a strong thread to create the base;
- pulling the weft thread should be done by hand;
- To make the tapestry more dense, you can press the threads to the center, for this you use a simple fork.

Stage one. We draw out cardboard measuring 500 x 500 mm. We stitch the cardboard with the thread chosen for the base. To do this, cut the markings drawn on the cardboard and thread a rope through the lines so that it runs through the central part.
Stage two. Let's start weaving the tapestry. You need to carefully fix the starting thread. Weaving using the tapestry technique involves pulling the underlying cord by alternating one thread at the top and the second at the bottom.
Stage three. After weaving the last turn of the thread around the cardboard circle, you need to turn the resulting rug over to the reverse side and cut off the base cords. When pruning, leave about 5cm at the ends. Pull the ends of the laces out of the notches made on the cardboard (there is no need to remove the picture while pulling it out) and tie them into pairs. Attach pompoms to the resulting knots.
Complete the composition by sewing a thick rope from the wrong side in a circle - this will hide the knots and ends of the threads.
Advice. By using different textures and shades of threads, you can make different rugs and then combine them into one. You will get a large rug that can be hung on the wall or laid on the floor.
A tapestry rug placed on the floor will make it warmer and also looks beautiful. Weaving a tapestry rug with your own hands is not difficult: try it and see for yourself.
Ribbon curtain
You can make an unusual curtain from ribbons. Tape curtains are suitable for both windows and doors. Making curtains from ribbons will take a little time; you don’t even need a sewing machine. A fluttering ribbon curtain repels insects well; Previously, such curtains were made from newspapers cut into strips.
To make a curtain from ribbons, you need the following materials:
- ribbons or fabric strips (with edges that do not fray);
- cornice;
- clips or buttons.
The ribbons need to be thrown over the cornice and secured with clamps. Large beads can be strung onto fabric strips for decoration.
The ribbon curtain performs not only a practical, but also a decorative function. The advantage of curtains made from ribbons is their lightness. This is an excellent option for a summer house; a ribbon curtain can also be hung in an apartment.

Flower pots made from paper bags
Many people have paper bags at home; instead of throwing them away, make them into flower pots.
Materials for making flower pots:
- paper bags;
- wooden skewer;
- scissors;
- rope;
- glue;
- plastic container.
Take paper bags and mark them: eight strips measuring 70x300 mm, then cut the paper along the dotted lines.
Place a wooden skewer in the corner of one of the strips and wrap the paper base around it diagonally. You must make a paper tube from each strip. Tape the corners of the paper tubes to prevent them from unraveling. The easiest way to do this is with a glue gun.

Take a plastic container, apply glue to it and wrap it with paper (from the same bags) so that the plastic is not visible. Glue paper tubes to the bottom of the container. Cut paper strips measuring 70x450 mm (you will need large bags) and make tubes.
Wrap the tubes so that they are pressed tightly against the walls of the container. Attach a long tube of paper with glue to the bottom of the container and wrap it around it, you need to braid the main tubes. Wrap all the main tubes, and then change the direction of weaving to braid the missing tubes - this way you need to wrap the entire container.

Make two holes in the sides of the pot (top).
Stretch a string through the holes made; tie a knot at each end of the twine to secure it well. Another woven tube will help hide the ends of the twine. Wrap the tubes protruding above the pot inside the container and secure with glue.
The unusual flower pot is ready.

Handmade items for the home can be used as decorative elements in your home or given to friends.
Most things made by hand are not only beautiful and original, but also useful and necessary in the household. Feel free to start working on homemade things and decorate your home with them.
Video For five more ideas for handmade crafts with your own hands to decorate the interior of rooms, see the video below:
When going through the little things that have accumulated at home, you often wonder: what can you do with your own hands at home with all this so that the products are of high quality, beautiful and functional?
I speak from personal experience: sometimes all that separates us from great homemade products is our own insecurities and lack of self-confidence.
On the Internet you can find many master classes on making things from a variety of available materials: plastic dishes, purchased blanks, pallets, old tires, etc.
But you must admit: rarely does anyone actually have old Kamaz tires lying around at home, from which you can make a pouf, and there will be difficulties with pallets if you don’t have your own cafe or store.
We propose to take a different route and solve two problems in one fell swoop: do without expensive purchases and concentrate on eco-handmade products made from natural materials that can be easily found at home.

Cards, decorations and crafts
The simplest of those things that you can do with your own hands at home are small products made from paper, fabric and simple designer decorative details.
Creating these little things is good because it develops fine motor skills and stimulates the unbridled creativity of kids.
But it cannot be said that the activity is purely childish: many adults, fascinated by handmade, make amazing things from simple materials and even sell them on the Internet.
Postcards
Let's start with the simplest. Colorful homemade cards, with some effort, are not inferior in beauty and quality to purchased ones.
Advice: if you were suddenly invited to a party, and you think what you can do with your own hands at home and present to the birthday person, start with a postcard. It's simple - even a novice handmaker can handle it, and the memory and pleasant emotions from such a gift will remain for a long time.
There are many options for postcards: simple (flat), opening, with three-dimensional figures inside; made of paper or fabric; decorated with applications, drawings, inscriptions, etc.
 The simplest and at the same time original gift can be a postcard made with your own hands.
 As for materials, you can find everything you need to create cards at home.
The required minimum is a pencil, pen, scissors, PVA glue and, of course, paper (preferably thicker - whatman paper or thin cardboard).
Here's what else you can use to create postcards:
- Colored paper. These don’t have to be new sheets - scraps left over from a child’s crafts will also work.
- Foil for chocolate and candies.
- Unnecessary parts from old jewelry: cabochons, rhinestones, etc.
- Fabric scraps. Almost any will do, but it is best to take samples without fluffy lint.
- Threads.
- Colored pencils, pens, markers. To design inscriptions, you can take black or colored liners - they practically do not smudge and draw with clear lines of a given thickness.
- Watercolor paints. If you have school-age children, then you can find a simple set of watercolors at home - they are quite enough for crafting postcards.
 To prepare a souvenir, leftover bright fabric, beads, and ribbons will be useful.
 In addition, you may need a utility knife and superglue (“Moment”, “Second”).
The list of materials can be continued for a very long time, because literally anything can be used to create postcards.
At one time, I got myself a special box in which I put any little things that seemed suitable to me - even if I didn’t have specific ideas for using them at that time.
Experience has shown that in the end absolutely everything is used.
 The main thing is to have patience, free time and the desire to please your loved one
 Tip: to make your cards look stylish and harmonious, remember the most popular formats for their production: rectangle 105x148 mm (A6 format), elongated rectangle 98x210 mm, squares 140x140 and 120x120 mm.
Let's look at how to make a regular A6 postcard with your own hands.
- The first step is to prepare the base. Let's take the option that you definitely have at home: a regular A4 sheet. Fold it in half along the wide side, making sure that the edges meet very precisely. Glue the sheet so that the halves fit tightly together. Let it dry, then fold it again on the wide side. The base for the postcard is ready.
- Now come up with a design. Consider the available materials, think about which ones you want to use, which ones are best combined with each other. You can draw a sketch on a separate piece of paper. Visualize in your head the card you want to make as much as possible - and, having selected the necessary materials, get to work.
- Process decorative elements. If you decide to place a shaped paper or fabric applique on the card, cut out the required shape in advance. Prepare everything that you will attach to the front of the card: colored paper, bows, rhinestones, fabric, etc.
- If you don't want to leave the background of the card white, you'll need to color it now. Take watercolor paints or markers and apply a light coat of a suitable color. You can give the paper an antique effect by painting it with tea or coffee. And if you throw a few grains of salt on wet watercolor, you will get beautiful snowflake patterns. Remember to let the paper dry after painting.
- Decorate the front side of the product with the prepared decor.
- Sign the card on the spread, accompanying it with a beautiful poem or just a short congratulatory phrase.
 The original homemade postcard is ready!
 Don't limit yourself to experiments and flights of fancy.
Try different styles and materials, paper formats and options. Look for your own signature style and, most importantly, don’t give up trying if the first results don’t suit your taste.
As in any business, everything depends not only on talent, but also on perseverance and practice.
Decorations
Among the things you can do with your own hands at home, jewelry is one of the most popular options.
You can wear them yourself or give them to someone, or you can sell them, receiving not only pleasure from your own, but also material rewards.
 Kids just love these unique popsicle stick bracelets!
 The simplest option that you can involve small children in making is bracelets made from ordinary wooden ice cream sticks.
It’s worth honestly noting: these bracelets, both in size and style, are primarily for children.
Little needlewomen and craftsmen are happy to participate in the creative transformation of familiar objects into bright jewelry - especially if you then decorate the bracelet the way he likes.
These bracelets are very easy to make. You will need:
- Popsicle sticks (one per bracelet)
- Glasses of suitable diameter
First, place all the sticks in one container and fill it with water so that it completely covers our workpieces.
Since they are wooden and float easily, cover the container with a lid or something else.
After a while, check the sticks. Once well soaked, they will begin to bend without breaking.
Then they need to be placed in a glass, bent inside or outside close to the walls.
I prefer to wrap the sticks around the glass, pressing them on top with strong rubber bands: this way the finished product will more accurately take the desired shape.
Leave the workpieces to dry in a warm, dry room.
After complete drying, the bases will remain curved, and you can begin decorating the product.
A wooden bracelet for a girl can be decorated with rhinestones, turning it into an accessory for a real princess, and a bracelet for a boy can be decorated with the emblem of his favorite superhero.
 Another useful cuteness is a jewelry stand
 Tip: to glue decorative elements to wood, it is better to use superglue, and after painting it is worth varnishing the product.
Bracelets are rich soil for creativity. It’s easy to imagine what you can do with your own hands at home, having fishing line and beads on hand.
But I suggest paying attention to more non-standard products - woven Shambhala bracelets, which are great for both adults and children over 12 years old.
This product, made independently, is both a talisman and a stylish accessory, combining patterned weaving with beads.
 Popular Shambhala bracelets can be easily made with your own hands
 To weave Shambhala you will need:
- An odd number of beads made of wood or natural stone.
- Two smaller beads - for the clasp.
- The base cord is of such thickness that the selected beads can be freely strung on it. Take the length of the base cord based on the circumference of your wrist plus ten centimeters on each side for the fasteners.
- The main weaving cord is three to four times longer than the warp (for the first tests it is better to take a longer one). Thicker threads are good for braiding.
- One lace about forty centimeters long for making a fastener.
Shambhala bracelets are convenient to weave from waxed threads, but you don’t have to run to the store for them. Experiment!
I wove one of my coolest bracelets from regular twine and a strong “iris” thread at the base.
Tip: to make Shambhala smooth and smooth, secure the weaving. To do this, you can use a tight paper clip and a tablet (or book cover).
Let's start weaving. About ten centimeters from the end of the base cord, tie a knot from the braiding thread so that it divides the thread into two tails of equal length.
Now you need to knit knots from these tails around the base cord, alternately threading one thread under it and the other above it.
Having made the desired number of knots, string the first bead onto the base and continue the braid immediately after it.
Alternate beads with weaving knots, using spaces to suit your taste); at the end, do not forget to knit the same number of simple weaving knots as at the beginning. Finish it off with a knot.
 Making designer jewelry may well become an additional source of income for you
 If you used natural thread, apply a drop of PVA glue to the final knot, let it dry, then trim off the excess cord.
If the thread was synthetic, carefully trim the ends and burn the tails with a lighter or match - naturally, being careful.
Let's move on to the lock. Take the tails remaining on both sides of the bracelet, put them together and tie them with several braided knots using a third cord.
Fasten the lock in the same way as you fastened the bracelet. Place small beads on the remaining tails of the base cord and tie knots at the ends.
Now your own beautiful Shambhala bracelet is ready.
Congratulations! This is an exciting activity, so don’t be surprised if after a while you give these amulets to everyone you know and wonder what to do with the new items.
Sell - let others appreciate your talent!
Crafts
What can you do with your own hands at home for children under 10 years old? Of course, toys are a win-win option.
Usually, sewing dolls requires a lot of additional materials, such as special fillers, and sewing skills above the basic level.
But there is also an option that the children themselves can handle (and will be happy to help you with): motanka dolls.
 Get your child interested in making a cute motanka doll
 To make them, you will need assorted pieces of fabric - any pieces of old unnecessary clothing will do.
For the base, the body of the doll, it is better to choose something light: an old white sheet or thin burlap, but for clothes you can take any colors to your taste.
You will also need regular sewing threads, optional ribbons and other little things for decoration.
The doll is made like this:
- Roll one piece of fabric into a voluminous rectangle or cube. This is the base of the motanka head.
- Place a square piece of light fabric on it, gather it on one side and wrap it with sewing thread. There is no need to make knots: a large number of threads will fix themselves and will not unwind.
- Take another square piece of light-colored fabric. The length from corner to corner is the arm span of our doll, so choose accordingly. Roll this piece into a roll and wrap the “wrists” with sewing thread.
- Tape the “sausage” of hands to the body of the doll under the head. It is best to do this by winding the threads crosswise.
- Select several different colored pieces of fabric for your doll's clothing. Make a skirt, preferably from two or more layers of fabric: it looks very cool. Secure the skirt with thread, twine or ribbon.
- Another piece of fabric will be used to make a scarf. Fold the cut into a triangle and tie it on the doll's head.
Traditionally, motanka dolls are made without faces - these are impersonal amulets.
I know that some people are scared by faceless dolls, so if you don't put any additional meaning into it, you can easily embroider or draw a face on the fabric, giving your doll some personality.
 Such a doll will simultaneously become your personal amulet.
 Today you have learned how to create a variety of beautiful and useful things, and I am sure that you will be able to expand your handcrafting arsenal of skills further.
For inspiration, I suggest watching this video on what you can do with your own hands at home:
Pleasant little things made with your own hands most often become the main factors in creating home comfort. Many of them are not difficult to make - all you need is sleight of hand, a little imagination and creative inspiration.
The interesting things collected in our photo selection not only please the eye, but also make life even more enjoyable. Let’s quickly start reviewing exciting DIY things.
Rug of stones
Let your interior be one step closer to nature. This cute DIY rug made from large pebbles will make a bright, natural decor - a great alternative to the traditional rug at the entrance.
Mug with gold accent
Have you been dreaming of transforming your favorite mug? Stop putting off your plans for later. Buy a special aerosol with golden paint and start creating as soon as possible. There can be many design options - be creative or follow the original example in the photo.
Lampshade made of lace
You are unlikely to find the likeness of this lace lampshade in any store, because such a masterpiece is the result of manual creativity and craftsmanship. The essence of the work is shown in the photo.
Paper cut: evening city on a shelf
It’s not at all difficult to create real magic in your home. This spectacular fairytale castle lantern is cut out of paper. Even your child can do this technique.
For the craft, prepare the following materials:
- thick paper;
- scissors, pencil, ruler, eraser, breadboard knife, glue stick;
- New Year's garland (preferably battery-powered).
- a shelf for a picture (necessarily with a side that will hold the picture).
We bend the edge of the layout to install it on the shelf. We lay a garland along the bottom and light the lights. The fairytale castle with lighting is ready!
Kitchen organizer
Kitchen devices made with love by you look much more interesting than their store-bought counterparts. With them, the environment around is filled with a special warm atmosphere and comfort. Even such a simple cutlery organizer made from tin cans will add some personality and charm to the interior.
Cardboard frame for mirror
Get creative with your vanity design. Instead of a boring classic mirror, you can hang something more original above it, for example, a mirror with an openwork cardboard frame. Believe me, such a DIY masterpiece looks much more refined than its store-bought counterpart.
City story from cable
Add a touch of unpredictability to your interior. A long black cable lying chaotically near a white wall can turn into an original minimalist urban plot against its background.
Vintage photo frame
An antique frame from a stray picture and simple wooden clothespins are a great material for creating a unique vintage-style photo frame with a creative approach to design.
Charging point in box
If you are one of those who have accumulated a lot of chargers, we have for you the perfect solution for an aesthetic and at the same time functional box for storing them. Not only does it visually brighten up the room and keep all your devices organized, but it also charges them on the spot!
Book with kisses
A creative surprise for a loved one - a mini-book with kisses. As you flip through the pages, there are more and more hearts.
An accessory for toast lovers
You can make this cute toast yourself. A nice gift for the occasion.
Shoes with cats
Add a little more color to your daily routine. Old ballet shoes can be transformed in an original way by decorating the socks with charming cat faces.
And you will need very little: plain ballet shoes, a brush, black and white paint, a white marker, masking tape. Further everything follows the instructions in the photo.
A soulful winter accessory
Homemade decorative skates will once again remind you of a winter fairy tale and relaxing at the skating rink.
If you want to make the same ones, then prepare large pins, felt, cardboard, wool threads for laces, hot glue, a marker and a tapestry needle.
A little humor on a rainy day
Comic covers on rubber galoshes will certainly not allow you to feel sad in rainy, cloudy weather.
Adorable prickly hedgehog
A sewn hedgehog made from yarn can also have needles, but not your own, but sewing needles.
Funny abstractions
Feel like an abstract artist by building bright smiley faces from different miniature figures.
Cute kittens made of cardboard for storing threads
Handmade stamp collection
Children's bunny bag
Why buy accessories for your child if you can make them yourself. A bag for a girl with a bunny face looks very original.
Ice cream garland
Create a summer mood by tying a garland of the most popular delicacy at this time - an ice cream cone.
Notebook in homemade leather binding
Stylish hanger
Loops made of leather ribbons nailed to the wall - an extraordinary minimalist hanger or shelf for books, magazines and other small items.
Magic vase
You can create a magical atmosphere in your home with the help of simple, beautiful things, such as this vase.
Rhinestone bracelet
Decorative letters for the refrigerator or children's chalkboard
Learning alphabet letters are a great idea for home decor. All you need is a little gold paint.
Convenient headphone clip
Spectacular shimmer
Candles with golden and silver shimmer will add a little palatial feel to the interior. This beauty can be made at home using old candles and aluminum tape.
Donut Bracelet
Young Homer Simpson fans will love this adorable donut bracelet. All you need here is bright nail polish and a plastic children's bracelet, then all you have to do is get creative with the glaze.
Not boring clothes
A simple hat will significantly transform your everyday style. It is enough to sew a few bright flowers along its edge.
T-shirt with scoop neck
Watercolor sweatshirt
Beach pareo dress
Headband
Braided scarf
A simple white T-shirt will become more stylish if you sew on it a neat pocket with an interesting print.
More ideas for DIY crafts are presented in the following selection of photographs.
As you can see, in order to please yourself and your loved ones, you don’t need to spend a lot of effort and money. Your desire, creativity and inspiration can work wonders. And the result of work done with your own hands cannot be compared with purchased accessories and other store-bought items.
Do you like to do handicrafts? Tell us about your favorite creative masterpieces.
Few people experience sincere pleasure from hired labor - for an individual entrepreneur, a company or a government agency. A person who has decided to quit a job that has become unbearable or is looking for additional sources of income naturally develops an interest in, since with the development of global communications there are more and more of them every day. A new business will inevitably require cash injections and (at least at first) hard work, but its payback, work schedule, and even the list of clients will depend solely on the will of the businessman.
Making something with your own hands is not so easy: it requires not only a commercial spirit, but also a certain diligence, and sometimes real talent. The main thing for a newly minted businessman is to decide on the field of activity; then you can think about ways to sell souvenirs or crafts. Listed below are 25 varieties of products that are not particularly difficult to manufacture and are excellent for sale.
What can you make with your own hands to sell?
Practice shows that anything can be sold as a souvenir - from home-made winter preparations to home-made items of clothing, dishes or furniture. The main thing is not the essence of the craft, but the craftsman’s ability to present the product: come up with original packaging, describe its practical advantages, if any, and at least for the time of sale, make the actual uselessness as less noticeable to the buyer as possible.
A souvenir is always a gift that you can give to yourself, family, friends or colleagues. In part, this simplifies the task of an entrepreneur: it is difficult to find another equally simple way to sell something unnecessary, and even with a significant markup. In part (taking into account the difficult economic situation in the country) it complicates it: unlike the idea of offering things necessary for everyday life, the successful sale of souvenirs, even those made by yourself, is not guaranteed - demand can weaken or stop altogether at any moment.
Advice: A good idea for a novice entrepreneur would be a preliminary one, according to which he will be able to take further steps and set new goals. It is unlikely that it will be possible to attract investors or receive money from large creditors, as when opening a business, but a clear plan for the development of the project will appear, which is no less important.
When making souvenirs at home with your own hands, it is not necessary to follow established stereotypes, being guided exclusively or, on the contrary, focusing on the target audience consisting of men. The master can, at his discretion, choose any niche and act within its framework - or develop, adding new crafts to the previous assortment. Selling homemade trinkets will eventually become his main activity - and if not, you can always switch to something else, more familiar or interesting.
Making souvenirs with your own hands, be it knitting or making boxes, has its pros and cons. The most important of the first is the ability to independently plan the entire work cycle (from schedule to communication with customers); the most depressing of the latter is the difficulty for a beginner who is not yet accustomed to relying entirely on himself. Otherwise, the advantages and disadvantages for each type of product vary significantly; You can find them below in the descriptions of the most popular souvenirs.
Jam
An ordinary jar of jam can be a souvenir made with your own hands at home: as long as it is tasty and the container is beautifully packaged. However, if a novice businessman does not have the opportunity or desire to provide high-quality packaging, jam can also be sold in ordinary glass jars - preferably shaped ones (you can order them from a supplier or purchase a batch in a store) and not of too large a volume. A souvenir is, as already mentioned, a gift, not food, and no one in their right mind would take home a two- or three-liter jar of jam, even the most delicious one.
But the need to bottle products into small jars is associated with additional costs, and therefore an increase in the cost of finished products: the cost of glass exceeds the cost of jam, unless it is made from expensive raw materials or using unique technologies that require sophisticated equipment. In practice, there is no need for such delights: an entrepreneur can make jam from what grows on the site or is available in the nearest store; The main thing is to present the souvenir beautifully, and there will certainly be buyers.
Advice: As a marketing solution, it can be proposed to stick original labels on jars of jam with the symbols and name of the city, the signature of the manufacturer, and also package them in accordance with ideas about “folk traditions” - for example, in birch bark boxes.
It is impossible to sell “souvenir” jam: it all depends on the cost of the raw materials and jars used, the cost of electricity and water, as well as the actual labor costs of the businessman.
from 10 thousand rubles.
Herbal teas
Themes of healthy eating, as well as following “folk traditions”, have recently enjoyed constant popularity. In this regard, it is quite logical to sell herbal teas made from chamomile, fireweed, sea buckthorn leaves and more complex herbal infusions as a homemade souvenir. As in the previous case, the main thing in such a business is not the taste component, but the beautiful packaging: it is far from a fact that the buyer will use herbal tea for its intended purpose. Most likely, he will simply put the souvenir on a shelf or give it to friends.
Important: Despite the minimal likelihood of consumption, an entrepreneur making crafts at home should be as conscientious as possible about the quality of raw materials. A seemingly small mistake can undermine the buyer’s health, not only jeopardizing the businessman’s reputation, but also exposing him to the need to answer for negligence in the courtroom.
As practice shows, it is best to pack herbal teas in canvas bags with appropriate inscriptions or symbols of the city; The same packaging is perfect for selling fragrant compounds needed to refresh and ennoble indoor air.
Start-up investments in business - from 5 thousand rubles; profitability depends on the cost of the raw materials and packaging used, as well as the labor intensity of the process.
Honey
Another constantly in demand product, which, like jam, is recommended to be sold in small glass jars, miniature wooden tubs or tueskas - it all depends on the desire and imagination of the entrepreneur who has decided to start making and selling this type of hand-made souvenirs.
Advice: as in the two cases listed earlier, the object of art that gives the souvenir great value is the beautiful and original packaging, which (at least in part) must be made with your own hands. On the label you can place an image or symbols of the locality where honey is sold or produced, and wooden surfaces can be decorated with stylized local patterns.
An excellent solution would be to sell “souvenir” honey complete with a wooden spoon - you can also make it yourself, or at least, armed with a burning device, decorate the object with simple painting.
Start-up investments in business - from 7 thousand rubles; For better product promotion, it is recommended to order several reviews in popular public pages on social networks.
Souvenirs made of polymer clay
An entrepreneur who is familiar with modeling techniques, and even better, has an artistic education, can make good money selling products made from artificial or natural clay. The advantages of the first are greater plasticity and uniformity and no need for firing; the second is the strength, environmental friendliness and unique texture of the finished products.
The additional materials needed to decorate the figurines are beads, large and small beads, glass items, chains, sparkles and, of course, paints. The more effort an entrepreneur puts into the final product, the better demand he will receive: unique clay souvenirs will always be in great demand both among tourists and the local population.
Start-up investments in business - from 7–8 thousand rubles.
Handmade boxes
A box is not only an excellent souvenir, but also a useful household item, used for storing jewelry, memorable items, and even kitchen utensils. The larger and more spacious the box, the more expensive it will cost and the more effort it will take to finish it, and vice versa. When pricing, it is also important to take into account the cost of raw materials and the time required to produce one unit.
Boxes can be made from any suitable materials: wood, plastic, pressed paper and even metal. In the latter case, instead of third-party decorative elements, it is more logical to use embossing or engraving, so as not to overload the artistic structure.
Advice: You should approach the interior decoration of the box with special care - a craftsman working at home can use velvet, natural fabrics and other decorative materials. If the souvenir you made with your own hands is intended to store jewelry or cosmetics, it would be logical to equip the lid with a small mirror from the inside, as well as an external or built-in lock.
Start-up investments in business - from 15 thousand rubles.
Containers made of wood or birch bark
Like boxes, such souvenirs are suitable for storing anything - from jewelry (although in this case it will be more difficult to organize their storage) to various small items that should always be at hand, or even food. To give a barrel or barrel originality and increase its value when selling, the craftsman needs to decorate it on the outside with colorful paintings (his own painting or imitating local ones), and line the inside with soft material, as durable and airtight as possible.
If the souvenir is intended for storing fragrant herbs or products that require an influx of fresh air, it is necessary, on the contrary, to provide ventilation slots in its design and provide the craft with a removable lid. It is not recommended to use aggressive substances when processing wooden containers: they can not only affect the safety of the items inside, but also give the product a permanent unpleasant odor.
Start-up investments in business - from 10 thousand rubles.
Stained glass windows
Due to their special fragility, such souvenirs are best sold in special packaging or at least wrapped in several layers of soft material. In this case, external beauty can be neglected: the main artistic value is the stained glass window itself, and not the wrapper.
The advantages of making crafts with your own hands are relatively little competition and, by default, the high cost of finished products; The disadvantages are technological complexity, the high cost of the materials used and the fragility of the finished product: often an entrepreneur has to write off as a minus several souvenirs broken during transportation, thus losing money.
Since the process of selecting glass based on transparency and shades is quite labor-intensive in itself, and not everyone likes ready-made color solutions, it is more logical to make such stained glass windows on an individual order; the cost of the work, of course, increases. Start-up investments in business - from 25 thousand rubles.
Stained glass windows
Making such a souvenir is easier for two reasons: the master can use ordinary transparent glass as a starting material, and poorly chosen or applied paint can always be washed off and the work improved. The cost of the product is lower than when using colored glass; however, the same applies to the artistic merits of the craft: opaque or translucent glass, shaded with paint, does not look as attractive as colored glass.
In most cases, such stained glass windows are used as wall paintings or decorations installed on obviously opaque surfaces; Therefore, an entrepreneur working from home can immediately frame the souvenir - this will also increase the durability of the product.
Start-up investments in business - from 15 thousand rubles.
Author's soap
To produce souvenir soap, you need to purchase high-quality, expensive materials, including fragrances, aromatic oils or liquids, base, dyes and even artificial decorations. As a result, an entrepreneur working from home can make a real work of art with his own hands, and over time, develop his own unique style, which will significantly increase not only the popularity, but also the selling price of the product.
In addition, handmade soap can be cast in special molds suitable for gifts for the New Year, March 8, February 23, professional, family or personal holidays. And, of course, the more beautiful the souvenir is designed, the more income the businessman will ultimately be able to receive.
The advantages of creating designer soap are the relative simplicity of operations and the wide demand for products: unlike other souvenirs, soap is usually used for its intended purpose, if not immediately, then after some time. Disadvantages are the high cost of the initial components and the risk of injury: in the process it is easy to get a thermal or chemical burn, as well as more serious damage.
Start-up investments in business - from 12 thousand rubles.
Candles
Casting decorative candles with your own hands is no more difficult than making soap: a novice entrepreneur will need to acquire raw materials (wax or stearin, dyes, fragrances, wicks and decorations that do not interfere with natural combustion) and molds for making souvenirs. Candles can be made either “flat”, suitable for installation on any surface (they are usually mounted in sockets made of aluminum or other non-flammable material), or the more usual tall ones - candlesticks are required for their use.
Advice: in order not to complicate the buyer’s life, it is strongly recommended to adjust the diameter of designer candles to standard ones; They are easy to get acquainted with by visiting any hardware store or focusing on “holiday” consumer products.
Candles can be decorated with sparkles or other non-flammable items, artistic carvings (for example, the name of the customer or the person for whom the gift is intended), gilding or a layer of silver paint. And having mastered the process a little, a businessman should try pouring shaped candles - in the shape of any objects, animals or architectural monuments. The demand for them is guaranteed to be higher than for ordinary, even beautifully decorated souvenirs; the price will be higher.
Start-up investments in business - from 8 thousand rubles.
Candlesticks and candelabra
These souvenirs can be sold together with designer candles or separately from them, that is, as independent interior items. The main requirement for crafts is fire safety: they must be made of metal, ceramics or other non-flammable materials available to the entrepreneur. It goes without saying that wood or paper cannot be used in production, even if they do not directly touch the combustion zone.
Taking into account the specifics of the material, candlesticks and candelabra can be decorated with embossing, engraving, gilding or overlay elements that are not exposed to open fire. It is highly desirable to ensure that the product is easy to clean from wax or stearin stains: the design should be collapsible or not too complicated, allowing you to get rid of dirt without wasting time and nerves.
Advice: It is best to make candlesticks and candelabra miniature - the buyer is unlikely to enjoy moving around the city with a huge heavy object, especially if it is to be transported to another city. A good idea is to organize the production of personalized crafts, providing ready-made souvenirs with a congratulatory inscription addressed to the recipient of the gift.
Start-up investments in business - from 45 thousand rubles.
Bookends
These thoroughly forgotten items, even not used for their intended purpose, can become a magnificent interior decoration. Book stands can be made from any materials that can support a large volume weighing 4–5 kilograms: wood (then the products should be decorated with artistic carvings, original or imitating folk, through or “blind”), metal (recommended finishing methods are traditional embossing, engraving , gilding and inlay), natural (not the best option due to gravity) or artificial stone or plastic.
As in all other cases, it would be a good idea to offer the buyer “personalized” engraving or burning on a souvenir stand: on its lower edge or on the central holder, you can either simply write the name of the gift recipient, or make a small congratulatory or dedicatory inscription.
Since the book stand is a fairly massive item, it should be sold in attractive, durable packaging, equipped with handles for carrying. At the request and skill of an entrepreneur engaged in making crafts with his own hands, this packaging can turn into a case that forms one whole with the stand.
Start-up investments in business - from 10 thousand rubles.
Educational toys for hands
Such souvenirs, consisting of a durable, abrasion- and tear-resistant shell and soft filler, not only have a positive effect on the fine motor skills of adults and children, but also have a calming effect. The main condition for the success of a businessman who decides to make “crumpled” toys with his own hands is the correct selection of materials: the buyer will be extremely upset if the souvenir he just purchased breaks or loses its shape.
To give them individuality, hand toys should be painted in the author’s style, using paints that are non-erasable, moisture-resistant (since your palms will sweat) and, of course, non-toxic to humans. To increase the attractiveness of products in the eyes of the buyer, they can be equipped with individual inscriptions or designed in accordance with the client’s wishes.
An entrepreneur who is not yet sufficiently familiar with the technology of making educational toys for hands can choose a standard round shape that fits comfortably in the palm of the hand and ensures the greatest strength of the product. In the future, as the level of skill increases, a businessman can move on to experiments with form, producing figurines in the form of animals, buildings or various objects.
Start-up investments in business - from 5 thousand rubles.
Soft stuffed toys
An entrepreneur who sews toys at home with his own hands can show all his imagination. It is not limited by the shapes, materials used, or colors; Moreover, a designer toy is a work of art, and the more unique it is, the better. Having become sufficiently familiar with production, the master can move on to creating soft toys to order: according to the wishes or the customer’s own sketches, repeating famous city landmarks, animal shapes, human outlines and various objects.
The outside of such toys can be decorated with all available materials: beads, beads, ribbons, gold or silver threads, and so on - the main thing is that they are safe for humans and firmly attached to the surface. The main requirements for the filler are environmental friendliness, hypoallergenicity (due to the inevitable accumulation of dust in the toy, special care should be taken) and the ability to keep its shape, returning to its original state after being crushed. Impregnation of material with antibacterial compounds is a controversial issue: there will be no harm from it, but the benefits of its use have not been proven. You can make a stuffed toy unique by embroidering on it, at the buyer’s request, the name of the person to whom the gift is intended, or a corresponding inscription.
Start-up investments in business - from 15 thousand rubles.
Toys made of wood or stone
The advantage of such products over clay ones is their increased strength: even if the souvenir falls or hits a foreign object, it is highly likely not to break. The special properties of the materials used are also associated with the difficulties that arise when creating crafts: the entrepreneur will have to master, depending on preferences, the techniques of wood or stone carving, burning, engraving, painting, and ideally, inlay. All substances used in the work, including paints, must be safe for human health, not erased over time, waterproof and, if possible, non-flammable.
The latter applies to a greater extent to wooden toys: the craftsman is strongly recommended not only to treat the wooden base from splinters and irregularities, but also to impregnate it with antibacterial and fire-resistant mixtures. Such a precaution will not increase the cost of the finished product too much, but will significantly extend the production time, which, in the absence of proper organization of the process, will have a bad effect on productivity. The conclusion is simple: a businessman who wants to add a special treatment to the advantages of the toys he offers needs to establish a continuous process of preparing the basics - perhaps by involving an assistant in the process.
Start-up investments in business - from 3 thousand rubles.
Dolls
The oldest items of children's games have long outgrown their original purpose: now they are used as decorative elements, as collectibles, and even as improvised means - for example, holders of umbrellas or hats. They can be made from any materials depending on the purpose and wishes of the customer; the main thing is not to forget that the souvenir should not be too bulky or heavy, so as not to cause unnecessary problems with transportation to the buyer.
When painting wooden, plastic or porcelain dolls, you should use paints that are resistant to abrasion, moisture and heat - most likely, they will be held in the palms of your hands from time to time. Straw dolls can be decorated with colored ribbons, beads, gold and silver threads and fabric dyed using authentic methods. To personalize the souvenir, at the customer’s request, you can write on it the name of the person for whom the doll is intended, or provide it with a postcard with a congratulatory inscription.
Start-up investments in business - from 2 thousand rubles.
Keychains
These items are not only pleasing to the eye, but also useful: the keychain helps you avoid losing your keys and, depending on the built-in functions, helps you illuminate your way, sound an alarm, or carry digital data with you. Depending on preferences, a businessman who makes souvenirs at home with his own hands can make a keychain himself from start to finish (then it will be more like a work of art) or use a ready-made base (flashlight, sound device, etc.), embedding it into a decorative shell .
Keyrings can be made from any durable materials: wood, metal, stone, plastic and even pressed paper. The surface of the product should be covered with varnish, paint, inlay, engraving or embossing. As in other cases, it doesn’t hurt to invite the client to put a name on the keychain - his or the person for whom the craft is being purchased.
Start-up investments in business - from 3 thousand rubles.
Keys
Decorative keys, decorated with an inscription appropriate for the occasion, are an original idea for a gift. Souvenirs can be made from any materials that are not too heavy and fragile: for example, a metal gift key should not be too large, while a glass or crystal one will be extremely difficult to store and transport; It is logical to produce such products only on an individual order, not forgetting about prepayment.
On standard souvenir keys you can depict the coat of arms and the name of the city in which the sale is planned, and other decorative elements. The very shape of the product implies a through carving, so a beginner who is not familiar with all the intricacies of production is recommended to start with more pliable materials (wood or pressed paper), painting or decorating them using substances that are resistant and safe for human health.
The key bit pattern should not replicate real elements: the only requirement for it is aesthetics and attractiveness for the buyer; the same applies to the head - since the product is not intended for regular use, it can be of absolutely any shape, even if it is not very comfortable.
Start-up investments in business - from 5 thousand rubles.
Key holders
These souvenirs, intended for storing keys (real, not decorative ones), can be either wall-mounted, table-mounted, or even floor-mounted: it all depends on the imagination of the entrepreneur and the availability of the equipment necessary for the work. The larger the key holder, the lighter the material should be used for its manufacture and the more difficult it will be for the master to come up with a truly original pattern for decorating it.
You can create a unique effect using any surface treatment technique: from polishing and pasting with colored paper to engraving and inlay. It is quite logical that the more expensive the method used by a businessman who decides to make souvenirs with his own hands, the more the cost of the craft will increase - it is necessary to monitor this indicator so as not to make the purchase “unaffordable” for interested people.
Start-up investments in business - from 7 thousand rubles.
Magnets
Making magnets, which are especially eagerly purchased by tourists and casual visitors to the city, as well as residents planning to give gifts to out-of-town friends, cannot be called a difficult task. To make these trinkets you will need a magnetic base, glue, decorative elements, varnish and paints.
As the first option, it makes more sense to use commercially available plates: they can easily come off a metal surface, for example during cleaning, and at the same time are able to withstand significant loads - up to 200–300 grams. A blank is applied to the plate, the main requirement for which is as small a mass as possible and an original shape. Next are finishing materials, from coffee beans to shells and acorns, fixed to the surface with glue. The finished structure can be painted or varnished to protect it from water splashes and cracking.
To achieve greater demand for his crafts, an entrepreneur can offer customers to place names or small congratulatory inscriptions on magnets, as well as artistic images or photographs of the person for whom the gift is being made.
Start-up investments in business - from 2 thousand rubles.
Brooms
Decorative brooms, made from straw or artificial material, can be decorated with additional images or inscriptions placed on individual strips. To ensure the safety of the souvenir, it must be additionally treated with antibacterial and anti-mold compounds, and the top coated with varnish.
Often gift brooms are accompanied by other artistic elements, from a towel to a poker; The design style of a souvenir depends only on the imagination of a businessman who makes handicrafts for sale, and the wishes of clients.
Start-up investments in business - from 1 thousand rubles.
Decorative felt boots
Such souvenir shoes can be made in both full and reduced sizes; in both cases, the manufacturer is recommended to pay special attention to the treatment of the external and internal surfaces of the products - the more elegant and unusual the gift felt boots are, the greater the demand a businessman can count on.
Both traditional felt and more modern synthetic materials can be used as the main material; When producing at home, the latter option is preferable due to its simplicity and absence of unpleasant odors.
Start-up investments in business - from 10 thousand rubles.
Knitted products
Hats, scarves, mittens and mittens - any items made by hand from natural wool, painted in different colors or decorated with metal threads or ribbons can be sold as souvenirs.
Start-up investments in business - from 2 thousand rubles.
Embroidery
Decorative embroidery is an excellent gift for any significant event. It can depict any attractive landscape, a congratulatory inscription or even a portrait of the person for whom the souvenir is being prepared; The more complex and unusual the order, the greater the reward the entrepreneur can expect.
Start-up investments in business - from 5 thousand rubles.
Leather products
Beautifully crafted wallets, purses, belts or gloves are not only good gifts, but also practical items that, if properly cared for, will serve the buyer for many years. The main thing for a businessman is not to skimp on materials and use only substances that are safe for human health and high-quality decorations.
Start-up investments in business - from 30 thousand rubles
Where can you sell your crafts?
Producing souvenir goods with your own hands is not enough for success; a novice entrepreneur needs to plan the implementation process in advance. Crafts can be sold in retail outlets, through online stores or handmade stores.
A store
To sell products in retail outlets, you must either rent space yourself or negotiate with the owner of an existing outlet. Otherwise, no difficulties are foreseen: the entrepreneur needs to deliver souvenir goods on time, take into account the wishes of clients and take his share of the income, not forgetting to pay taxes.
Online store
Trade in unique gift products is one of the best. In this case, a businessman should take care of creating and promoting a website, as well as connecting several payment options - using bank cards, electronic wallets and maybe even cryptocurrency.
Handmade goods store
Opening your own handmade goods store is not a bad idea, but only if the aspiring entrepreneur has enough money or the ability to attract investors and creditors. In other cases, it is more logical to initially be content with the first two options, gradually developing the concept of your own retail outlet and saving money to launch it.
How much can you earn from making your own products?
The earnings of a person who makes souvenirs with his own hands directly depends on his diligence, talents and start-up capital: the more he is willing to invest in the business, the easier and faster he can achieve success. It is impossible to name the average level of income: it fluctuates in different situations from 2-3 thousand rubles per month to several tens of thousands.
Let's sum it up
Making souvenirs at home with your own hands is a labor-intensive process that requires a significant investment of time, talent and at least a small start-up capital from the performer. It is recommended for a novice entrepreneur to draw up a business plan: it will help not get confused when taking the first steps in a new direction. The ideal option would be to attract private investors or lenders, but in home production conditions this is practically unrealistic.
You can make anything for sale with your own hands - from sweets and herbal teas to leather wallets and decorative keys. The main thing is not to forget about the quality of the product and its safety for humans. You can sell goods in retail outlets or an online store, and in the future - in your own handmade store.