If you decide to have laying hens, take care of where you place them. A good and practical poultry house should be warm, bright, easy to clean and equipped for chickens. First you need to decide what type of bird houses you need, then choose a chicken coop of a suitable size, develop drawings, look at step-by-step construction instructions with photos, and also figure out how you will finish the building outside and inside so that it does not spoil the appearance of the site .
All existing types of chicken coop
A barn for chickens can be summer, that is, seasonal, and winter, in which they can spend time all year round. At a dacha, it doesn’t always make sense to build a permanent building. To understand which type of shed is right for you, you need to know the features of both types, their advantages and disadvantages.
Chicken barn with run
Winter chicken coop
In summer, chickens can spend most of their time outside, but in winter they generally have nothing to do there. Some people force their pets into an unsuitable barn or other outbuildings. Poultry requires full care, and only a specially equipped room can provide comfort. Therefore, it is extremely important to take care of arranging a warm chicken coop before the onset of cold weather.
It should be warm and dry inside
Since the outside temperature is low in winter, you need to make sure that the chickens do not freeze. The optimal temperature at which they feel good and lay eggs regularly is 15-25 degrees. Chicken coops for winter should be designed in such a way that they can maintain this temperature throughout the day.
To keep the temperature at the same level and not drop, they build an insulated chicken coop. Insulating materials are used to insulate the walls and roof, seal the slightest cracks and eliminate cold bridges - this way there will be no drafts in the barn and the necessary microclimate will be created.
Wall insulation is mandatory
Since chickens will spend almost all their time in the winter barn, and the days are short in winter, you need to take care of the lighting. In addition to the mandatory presence of a window for access to natural sunlight, you will also need a light bulb under the ceiling. But you don’t need to leave it on around the clock; in everything you need to strive for natural conditions. At night the lights are turned off.
A chandelier is too much, but you need a light bulb
You can’t do without walking at all either. Keeping a bird in confinement for several months is harmful and will immediately affect its health and performance. Winter walking should be covered, protected on all sides from the wind. You can let them go outside even at sub-zero temperatures, the main thing is that there is no gusty cold wind.
Summer chicken coop
A summer barn for chickens is not such a major structure. The purpose of the building is to provide the bird with a roof over its head from spring to autumn. It is often practiced to buy young chickens in the spring, they produce eggs all summer, and in the fall they go into soup. If you do not plan to keep poultry in the winter and breed it, a simple summer chicken coop is what you need.
The chicken housing includes:
- barn;
- fenced area for walking;
- feeder and drinker;
- nests;
- perch.
Summer pen for three chickens
The configuration can be very diverse. The simplest chicken coop for the summer can be made in a few hours from boards and mesh. The house can be low and compact, or it can be raised, and the space underneath can be used for walking. The paddock should be located so that it is not in deep shade or dampness. It is ideal to place it in partial shade, under trees or under a special canopy.
For large chicken breeders, they offer prefabricated chicken coops made of sandwich panels. Modular structures come in all shapes and sizes, so you can easily choose the appropriate option. They are lightweight, easy to assemble, and, if necessary, enlarged and extended. Such a shed is easy to care for, since such materials do not corrode or rot.
Chicken coop project
For households, they sell prefabricated chicken coops made of wood of any model. It’s very convenient, just choose the house you like from the catalog. The shed is sold unassembled. All fasteners are included for assembly; you will have to take care of the tool yourself. The price of such structures is quite high, but the speed of installation and the aesthetic side of the issue are a significant advantage.
If you have a small flock, you can use a portable chicken coop. This design is made of lightweight materials and has wheels for movement. To prevent chickens from marking time in one place, they can be moved from time to time. Often only the walk is made portable, and the bird goes to a permanent house to spend the night.
Mobile poultry house on wheels
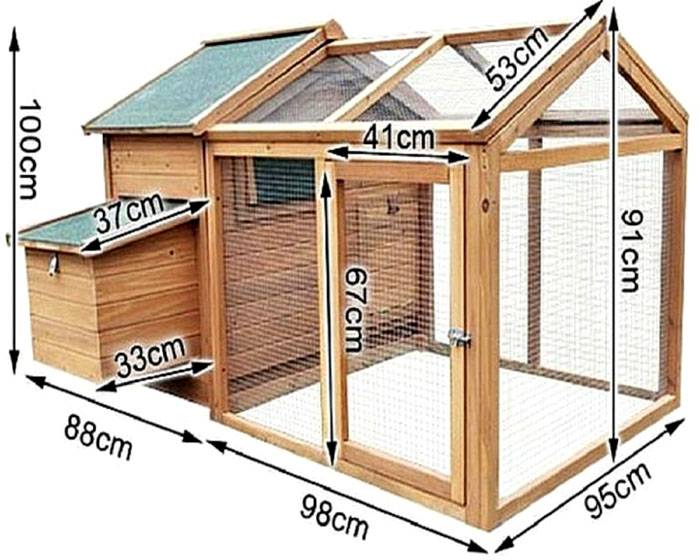
Chicken coop dimensions
Of course, the size of a chicken shed is subjective. But there are certain standards regulating the area of the poultry house depending on the number of chickens living in it. Laying hens spend a lot of time in nests, and they are not as large as broilers. Therefore, the standards for the housing density of these types of chickens are different.
House for 5-10 birds
Mini chicken coop for 5-10 chickens
A small chicken coop that is too densely populated will be difficult to clean, the chickens will be crowded, they will start to get sick and their productivity will decrease. The normal “population” density for laying breeds is 4 individuals per square meter of building. If you are a chicken raiser and have young chicks, make sure you have a free square meter for every 14 chicks.
But, in addition to the internal space of the barn, the area allocated for walking is also taken into account. A 3x3m chicken coop can accommodate 5-10 chickens. Such a compact barn can provide eggs for a family of 4 people throughout the year. There is enough space for a brood of new chicks, but then you need to be even more careful when designing heating and lighting.
Shed for 20-30 chickens
A small chicken coop for laying hens for 20 heads should be more spacious. In addition to the same norm - 3-4 laying hens per 1 square meter, it is necessary to provide each hen with a place to roost.
Housing plan for 20 heads
All birds have a natural desire to climb onto a tree branch to protect themselves. Ideally, the length of the perch will correspond to the following proportion: 1 m for each chicken. To place 20-30 meters of perch in a 6x3 chicken coop, it is installed in several rows on the same level. Normal height is about 120 cm.
The height of the room should be about 1.8-2 m. This is due to the fact that the bird needs to be cleaned regularly, and with a low ceiling it is inconvenient for a person to do this. The layout of a chicken coop for 20 chickens assumes the presence of a spacious insulated barn and a fenced paddock of approximately the same area.
Drawing with dimensions
Barn for 50-100 chickens
50-100 chickens is already a fairly large population. The area of the chicken coop for such a farm should be 15-25 square meters. m. In winter, much less space is needed, since the birds stay together, huddle and warm themselves. In summer, when it's hot, you will need more space.
The design of a chicken coop for 50 chickens with free range has approximately the following proportions:
- barn length – 4 m;
- width – 2.5 m;
- height – 2 m;
- walking area – 50 m2 (4x12.5).
Dimensions of a house for 50 chickens
A detailed plan of a chicken coop for 100 chickens will help you correctly calculate the materials needed for construction, as well as rationally position the shed in the yard. For 100 chickens, the poultry house should be about 20 square meters with a decent run so that the birds have room.
Large chicken coop for 200-500 birds
Large chicken coops for 200-500 chickens are built for rearing on an industrial scale. Such buildings are never made in one section. Experienced farmers must divide their livestock into at least 2 groups.
In a large group, infectious diseases spread easily, which can cause the death of all birds. Dividing pets into several parts will allow you to keep healthy chickens by limiting contact with sick ones.
A chicken coop drawing usually shows several rectangular sections. All the doors of the barn face one side, making it easier to control and care for the birds. Walking can be shared or separate.
For mass breeding
We build a chicken coop with our own hands
Building a chicken coop correctly with your own hands is not so easy. There are too many nuances to consider. Below are detailed instructions on each of the construction processes: construction of the foundation, walls, roof, floor and paddock.
Chicken barn foundation
Building a chicken shed should start with the foundation. Depending on the design of the poultry house, the foundation can be:
- tape;
- columnar;
- pile
Drawing of a small poultry house
A strip foundation is suitable for a barn with brick walls, when the entire load is evenly distributed along the perimeter of the building. In accordance with the location of the load-bearing walls, they dig a trench about 50 cm deep. The bottom is leveled, compacted, and sprinkled with sand.
Then permanent or collapsible formwork is constructed. A reinforcement frame is installed, the longitudinal and transverse reinforcement are connected with knitting wire or by welding. Pour the concrete mixture. When the concrete gains sufficient strength, the foundation for the chicken coop is waterproofed with several layers of roofing material and bitumen coating.
A columnar foundation for a chicken coop is suitable for a frame-type barn. At the points where, according to the design, load-bearing columns are located (they can be wooden, brick, etc.), you need to dig holes measuring 50x50 cm and about 30 cm deep.
The supports are made from large concrete foundation blocks or bricks. The size of such a block is usually 40x20x20 cm. At least two rows of two blocks are laid. You will get a kind of square pedestal, slightly rising above the ground. The blocks then need to be waterproofed where they come into contact with the ground.
Columnar foundation
The most labor-intensive type of foundation is the foundation for a chicken coop on stilts. This method is used when the bearing capacity of the soil is insufficient or the groundwater is shallow. Driving piles requires special equipment, which is usually rented. Concrete piles are placed strictly vertically, to avoid eccentric compression, and driven along the entire length of the pile without preliminary excavation.
For a pile foundation, you need a grillage - a strapping to distribute the load using concrete monolithic beams. The grillage can be made from a wooden beam if the size of the chicken shed is not very large.
How to make wooden walls
There are a lot of options for what to make the walls of a chicken coop out of. The easiest material to install yourself is wood. Wood is inexpensive, does not require expensive equipment and tools for processing, and is a natural, breathable material.
Wooden chicken coops are good for everyone, their only drawback is the fragility of the material if not properly cared for. If the walls of the poultry house are treated promptly and efficiently with substances that prevent rot and mold, as well as protected from moisture, the wooden building will last for several decades.
Frame for a wooden poultry house
The most affordable method is a chicken coop made of timber. Powerful and reliable walls are made from rectangular timber from coniferous trees. The main problem when building such a shed is choosing the right material. Insufficiently dry timber will begin to deform and dry out after some time, which will certainly lead to the formation of cracks and even skewing of the poultry house.
A simpler option is a panel chicken coop. Here they also use wooden beams, but only for the frame. Enclosing elements - walls - are made of other materials: OSB sheets or plank boards. This technology is characterized by speed of installation and reliability of the design.
Capital building made of wood
Making a beautiful chicken coop from logs is not so easy. Log buildings are built using special technology. Since the logs are very heavy, the walls have a decent weight of their own, not to mention the weight of the higher elements: rafters, coverings.
You won’t be able to make a chicken coop from a log house in a month with your own hands. After installing the walls, you need to let the building stand for several months. This way the soil will settle sufficiently under the weight, the logs will dry out a little and take their final position.
The log house looks solid
Instead of timber or logs, railway sleepers are often used in the country. They are large, quickly installed, and treated with impregnation, which prevents the wood from deteriorating. A chicken coop made from sleepers is very strong, reliable and durable.
Capital walls made of blocks
Another option is a block chicken coop. The following block materials are used:
- bricks;
- cinder block;
- foam and aerated concrete;
- shell rock
Brick wall in a bird house
Building a chicken coop out of brick will take a little longer than building a wooden model, since the masonry is carried out piece by piece, and it is not allowed to lay out the entire height of the wall in one day. Brick is a very heat-intensive material. Even with minimal wall insulation, the poultry house remains warm in winter, and in summer it will not be so hot.
A popular analogue of brick is cinder block. A cinder block chicken coop is quicker to build due to the larger size of each element. If desired, cinder blocks can be made right in the yard if you have the form. Then construction will also be economical.
Light, warm and affordable - a chicken coop made of shell rock. If you have a lot of this stone in your area, you can use it to build a chicken shed. Shell rock is a natural material. Work with it in the same way as with a cinder block. Shell rock is highly valued in construction for its low thermal conductivity.
Aerated concrete blocks are a popular building material. In terms of its thermal conductivity and hygroscopicity parameters, aerated concrete is close to wood. It is better to secure a chicken coop made of aerated concrete with reinforcement. A groove is cut in the blocks along the entire perimeter of the poultry house and steel reinforcement is placed there for strength.
Big barn of their block
A chicken coop made of foam block is a great alternative. The material is non-toxic, which is important for keeping poultry. The D400 brand is suitable for walls. The size of one element is usually 200x300x600 mm, the weight of a 400 grade block is 15.6 kg.
The thickness of the walls for the chicken coop may vary. If you live in a temperate climate, walls of one foam block will be enough. If your winters are very cold, it is better to play it safe and do the masonry in two blocks.
Other wall materials
In the construction of a barn for chickens in the country, materials other than wood or blocks are often used. For example, an old, time-tested method is a clay chicken coop. Our ancestors used this material, the technology has survived to this day and is often used by lovers of everything natural and environmentally friendly.
The wall is reinforced with a mesh so that it does not collapse
For the chicken coop, a wooden frame is built from clay, which will take on the entire load. Then they begin to gradually lay the walls. A mixture of wet clay, straw and binding material (people often used cow dung) is used to make a kind of bricks, dry them in the sun and lay them out in offset rows. Then the walls are covered with the same composition to seal the cracks and level the surface.
Drawing of a bird's house made of panels
In contrast to ancient great-grandmother technologies, modern methods are used, for example, a chicken coop made of sandwich panels. Such panels can be different, but they have the same principle: between two layers of finishing material there is a layer of insulation. This wall is thin, but surprisingly warm.
A frame chicken coop made of sandwich panels is calculated individually in each specific case. The number of layers, material and thickness of the insulation varies depending on the climate zone.
The area under the house is free for walking
How to make a floor in a poultry house
When the question arises, what is the best material to make the floors of a chicken coop from, the builder has several options:
- wood;
- concrete;
- clay.
The warmest and most comfortable is a wooden floor in a chicken coop. As a rule, it is raised several cm above the ground so that the resulting air gap serves as additional thermal insulation. The plank floor is easy to clean. For construction, a wooden frame is made - logs, on which polished boards are laid. Connect everything with nails. Try to avoid creating cracks in the floor.
Concrete cools quickly and does not retain heat well. If you decide to make a concrete floor, you must lay wooden flooring on top or sprinkle the floor with straw. Step-by-step instructions on how to properly fill the floor in a chicken coop:
- Clean and level the surface.
- Add a layer of crushed stone or gravel.
- Prepare a cement screed (proportion of sand and cement 3:1).
- The mixture should be quite liquid so that it can easily penetrate into the spaces between the stones.
- Fill the floor, level the screed using a rule or a long lath.
- After the first layer has set, prepare another portion of screed of less thickness.
- Distribute the mixture on the floor, level with the rule.
- Wet the floor regularly with water until the concrete gains strength - about 7 days.
- Decide what to put on the floor of the coop.
Hay for warmth on the floor
To keep the chickens in the barn cool on the concrete floor, it is often covered with a warmer material. This type of bulk floor in a chicken coop is made from hay, straw, sawdust, and shavings. Chickens like to rake grass and dig, such a floor will be comfortable and warm for them. The main thing is to change the material in time, because there is no other way to clean the poultry house.
If you want to make a clay floor in your coop, tightly compacted loam or clay will do. The disadvantage of the material is that rodents and small predators can easily overcome it. Choose an earthen or clay floor only when using a strip foundation, then no rat will dig under.
What kind of roof to make in a poultry barn
Before you make a roof in the chicken coop, you should decide on the scheme. The roof can be pitched or gable; flat roofs are almost never used, since in this case the outflow of rainwater is difficult.
If your chicken barn is small, a pitched roof will do. The tilt angle should be up to 30 degrees. The main advantages of a single-pitch design:
- ease of construction (do-it-yourself without special skills);
- the roof is light;
- Fewer building materials are used – savings;
- sediment removal is carried out in full;
- ease of installation of the ebb.
Gable roof scheme
The slope is best done backwards - in the opposite direction from the facade and front door. This way you won’t be faced with constant puddles in front of the entrance and an endless stream of water when it rains. And the snow that will slide off the roof will not block the door.
If you want to use the space under the roof for an attic, a gable scheme is more suitable. To do this, the angle between the slopes must be at least 40 degrees. The gable roof for the chicken coop rests on the Mauerlat from below, and on the purlin from above. The rafters cut into the supporting elements. They are supported from below by a rafter leg, each board fits tightly into the corresponding groove.
Start of roof construction
Then a sheathing is made from transverse boards. A vapor barrier material is attached to it to prevent condensation and moisturize the insulation from the inside. Then insulation is laid, usually mineral wool. It is covered with waterproofing to protect it from moisture from the outside. Then they begin laying the roofing material.
Wooden frame with rafters
The roof of the chicken coop can be made of slate, corrugated sheets, metal tiles or soft tiles, roofing felt.
Corrugated roofing
Doors to the poultry house
An important detail is the door to the chicken coop. It should be the same as the door to any other outbuilding, that is, match your height. Most often, a wooden door is made from boards, but any option will do.
The door in the chicken coop should open inward, this makes it easier to control the bird so that it does not run outside when you enter. A lock or deadbolt is a must. This way no stranger will get into the barn.
How to make a door frame with your own hands from boards in a chicken coop:
- Take a board that is equal in width to or slightly larger than the thickness of the wall, the thickness of the board is about 50 mm.
- Cut one board equal to the width of the opening - it will be at the top of the box.
- The length of the vertical elements is 50 mm less than the length of the opening.
- The lower part is the threshold, 100 mm less than the opening width.
- Connect the elements using furniture dowels.
- Secure the fastening with wood glue.
- Keep an eye on the level. The entire structure must be strictly in one plane.
Door height depends on height
To keep the cold out when opening the entrance door to the chicken coop, you can provide a vestibule. A small room literally 1 square meter in size. m is a kind of transition zone where the temperature is maintained.
The question of whether a chicken coop needs a window arises only for those who raise poultry exclusively in the summer. Then the chickens spend all their time outside and do not suffer from a lack of sunlight. In winter, the presence of a window in the barn is mandatory.
The size of the windows in the chicken coop depends on the height of the room. The larger the area and height of the poultry house, the larger the window that needs to be provided. To prevent blowing from them, make several layers of glazing, seal the cracks or install ready-made double-glazed windows.
Comfortable perches
Arranging a bird's home
Once the outside of the house is ready, all that remains is to make it habitable. First you need to make a hole for the chickens in the chicken coop. This is a hole in the wall through which the chickens go outside and come back.
The entrance for chickens in a chicken coop raised above the ground should be accompanied by a special ladder or ladder along which the birds climb up. The same ladder should be placed inside the barn for the passage of chickens to roost.
For large flocks, you need an automatic door in the chicken coop. Such a door can open and close on a timer. The chickens will go out for a walk at the allotted time without your participation. You can also make the feeder automatic.
Box nests
The feeder can be simply indoors or retractable. This scheme allows you to pour feed without going inside the poultry house. This is very convenient, especially for those farmers who have a large number of livestock and poultry on their farm; it saves a lot of time.
Nests must be provided for laying hens. In individual houses, the chicken will rest and hatch eggs. It is convenient to bring a tray to each nest, along which the egg will roll down. From here the owner can regularly collect new eggs without disturbing the birds.
Interior arrangement option
Walking poultry
The exit for chickens from the chicken coop leads to a specially fenced paddock. It is calculated according to the standards, depending on the number of pets. The walk can be open or under a canopy.
A chicken coop with a run completely solves the problem of a damaged lawn or trampled flower bed. This solution is optimal for both chickens and their breeders. The walk should be bright, spacious and safe, grass grows in it and the birds have free access to it.
The question immediately arises: how to fence the chicken coop. There are several options:
- Rabitz;
- fence.
Multi-storey project with walking area
The mesh for the chicken coop is selected depending on the size of the holes. To prevent rats or other pests from getting into the poultry house, and to prevent chickens and chickens from escaping, the mesh cells should not be larger than 1.5 cm.
The fence for the chicken coop is made only along the perimeter of the run or fenced off from above as well - to protect against birds of prey, if such are found in your area. The walk should also have a door for the owner so that he can clean the area or pour water for the birds.
Choose a thick wire mesh
How to fence a chicken coop using mesh:
- Identical rectangular sections are knocked together from the timber.
- Stretch the mesh over the beam.
- Vertical support posts made of the same timber or metal profile are installed in the ground.
- Sections of the fence are attached to the posts.
- One of the sections is hung on hinges and serves as a door.
In summer there is no need for a large shelter
Exterior decoration of the chicken coop
A beautiful chicken coop can be a decoration for yours. You can make a poultry house of an unusual shape or simply approach the exterior or interior decoration with taste. The simplest option is original painting.
How to paint the outside of a chicken coop - wood paint. Choose one that is labeled “for outdoor use.” It does not fade and is not washed off by rain. Therefore, you will have to repaint less frequently.
Option for chickens
Painting the chicken coop should be done in the warm season; the boards should be cleaned of old paint or varnish, degreased and well primed with a special compound. The choice of paint color depends entirely on your preferences.
If you are deciding how to paint the inside walls of the chicken coop, then the issue of beauty is not so pressing. It is better to opt for practicality. Diluted lime, if used to paint walls, will become both a fungicide and antibacterial protection.
Non-standard approach
The construction of a permanent barn for keeping chickens is not too different from the construction of other similar outbuildings, but there are some nuances that cannot be ignored. If everything is done correctly, it will be a wonderful home for poultry. It will be good for laying hens, which will immediately affect their productivity.
We will send the material to you by e-mail
Many village residents, as well as farmers, breed poultry for eggs and meat. Chickens are not demanding creatures, however, keeping the birds warm will help increase the productivity of laying in cold weather and increase the number of birds. Anyone who knows how to use construction tools can build a winter chicken coop for 20 chickens with their own hands. This design has its own characteristics, providing household utensils with comfortable conditions even in severe frosts.
Warmth and comfort for feathered nurses
DIY winter chicken coop for 20 chickens: necessary conditions for keeping birds
Unprofessional poultry farmers, who only need 10 to 20 chickens to constantly produce domestic eggs, often violate the necessary conditions for keeping birds in cold weather. As a result, egg production drops, and the laying hens themselves begin to get sick. Therefore, it is important to build a winter chicken coop for 20 chickens with your own hands on time, observing the requirements for ventilation and the level of heat inside.
In addition to warmth, there are several other features of keeping chickens in winter that are worth considering when choosing a drawing for construction.
Optimal conditions for laying hens in winter
All conditions for keeping poultry in winter come down to several points:
- balanced diet;
- maintaining the temperature above 10 ⁰С;
- artificial increase in daylight hours;
- maximum insulation of nests;
- density of chickens is no more than 1 pc. per 1 m².

To prevent the productivity of chickens from falling, they should be provided with proper nutrition. In winter, the birds' diet includes four feedings per day. In this case, mash is given in the mornings and afternoons, grain - in the evening, and it must be crushed. Whole grains can be given at night, as digestion of the high-calorie product will provide internal warmth to the chickens.

Note! In winter, laying hens need to make up for the lack of fresh grass by adding zucchini pulp, chopped carrots or frozen potatoes to their diet.
The temperature in the room where birds are kept should not fall below 7-10 ⁰C. If you have not yet finished building a winter chicken coop for 20 chickens with your own hands, you can use heat guns, electric heaters, potbelly stoves and other means of increasing the temperature.

It is important to provide adequate lighting to the birds. In winter, the length of daylight hours is significantly reduced, which reduces the level of masonry. Professional poultry farmers recommend turning on lamps from 6 to 9 am and pm, but not making the day too long, as laying hens need rest. If all conditions are met, the chickens will continue to actively lay eggs even in severe frosts.
We choose drawings for a warm chicken coop for 20 chickens with our own hands
When choosing among designs for a chicken coop for 20 chickens, you should take into account the number of chickens and the required area. The absence of dampness and drafts is mandatory. The lighting requirement is uniformity with good wiring.
Required dimensions of a chicken coop for 20 chickens and installation location
If you are wondering how to build a chicken coop correctly with your own hands and without extra costs, then when drawing a drawing, take into account the dimensions, which will help you calculate the amount of building material for the work.

Before making calculations, answer a few questions:
- why do you need to raise chickens;
- how many laying hens do you want to get;
- what size house do you want?
Helpful information! 10 chickens provide eggs for a family of 3 people.
The optimal size of a chicken coop is considered to be 2 by 5 m with a height of 1.9 m for 20 chickens, since such a room even retains a small amount of space for increasing the number of birds. In this case, the paddock should be 2 m wide and at least 7 m long.

Given these features, it is important to decide on the location of the house. Choose a site with a slight slope, dry and on a hill. The walk should remain on the south side.

Having selected a site, think about the foundation. A ribbon version is suitable, but a columnar one can also be used. All this is taken into account in a properly prepared project. Here are a few secrets for building and preparing the project in the video:
How to make a do-it-yourself chicken coop for 20 chickens with photo examples
To get a really good and warm chicken coop, purchase building materials and equipment for the job. Some people equip ready-made rooms for birds, for example, they supply greenhouses or barns with heaters. Really comfortable conditions that ensure high productivity in laying hens will be in a real house with a place for walking.

Prepare the required amount of bricks, boards, metal rods, sand and sawdust, glass and mesh, cement mixture for the foundation and mineral wool for insulation. And also don’t forget about the tools:
- concrete mixer (if available) or container for mixing the solution;
- hammer and nails;
- door hinges and locks;
- other tools for installing ventilation and lighting systems.

At hand should be a cable for wiring, a socket with a light bulb and a drawing of the entire structure. Only after this can you start working.
Here is an example of interesting chicken houses made by your own chickens:


If you do not know how to build and work with tools yourself, turn to the experts for help.
The cost of a finished warm chicken coop
If you decide to buy a winter chicken coop, the cost of construction will depend on the area, selected materials and additional components. Prices may vary in different regions. Here is an example of several options:
| Title and image | Technical data | price, rub. | |
|---|---|---|---|
 Thomas | Number of chickens | 15-20 | 125000 |
| Dimensions (H*W*D) | 250*150*250 cm | ||
| Pipe with a cross section of 80*80*3 mm | 7000 | ||
| Heater installation | Infrared | 3500 | |
 Chernushka | Number of chickens | 15-20 | 140000 |
| Dimensions (H*W*D) | 250*150*320+180 cm | ||
| Additionally, pile foundation | Pile | 7000 | |
| Heater installation | Infrared | 3500 | |
 Dodonova double | Number of chickens | 20 | 225000 with assembly |
| Dimensions (H*W*D) | 235*380*375 cm | ||
| Heater installation | 2 IR included | ||
Mikhail, St. Petersburg:“My father lives in a private house in the region and raises chickens. So far there are only 10 laying hens, but he plans to expand, so he bought “Thomas” “for growth.” I ordered the whole kit with assembly and foundation, I’m happy with the work.”
Maria, Bryansk:“I bought the Chernushka model for 15 laying hens for my mother. It’s been there for 2 winters already, and it’s really warm and cozy.”
Pavel, Moscow:“In the region, my mother raises poultry, I don’t have time for construction, I ordered a Dodonova double.” They made it quickly, it’s warm and has good walking.”
Dodonov double winter chicken coop
You can choose other options with or without insulation, for a flock of 5 chickens and above. When choosing a suitable chicken coop, consider the location on the site and the desired area for walking.
Description: how to build a warm chicken coop for 20 chickens
To build a chicken coop for laying hens with your own hands, you need to complete the preparatory stage in advance with the collection of building materials, and also thoroughly think through the drawing. The work itself will be carried out in several stages:

- Pouring the foundation with all preparatory work
- Construction of the frame
- Insulation of buildings
- Ventilation system installation
- Interior arrangement with feeders, nests and lighting
- Preparing for a walk.
Each point has its own nuances that must be taken into account to make the bird house truly warm, light and spacious.
Working with the foundation
The foundation is the basis of any building. It must be durable and not shrink. You can choose a strip or column base for a winter chicken coop. The second option is less expensive, but the first is more reliable, so let’s consider it.
| Work stage | Photo example |
|---|---|
| After choosing a location, you need to clear the area of grass and bushes and mark the perimeter using pegs and rope. Then, you should mark the inside of the base, stepping back from the first 40 cm and pulling the ropes. According to the markings, dig a trench 30-40 cm deep. |  |
| Sand (100 mm) is poured into the bottom and compacted. The evenness of the bottom should be checked with a water level. Then, build a formwork from boards, which will be 30 cm above the ground surface. Make a frame from reinforcement, tying it with wire. And mark the level of the concrete mixture with a rope. |  |
| Fill everything with the prepared concrete mixture, which is diluted from cement, sand and water. It is advisable to use a concrete mixer. Leave everything to dry for 4 days. |  |
| Two layers of roofing material are spread onto the finished base, which serves as thermal insulation and protects the wood from rotting. To complete the base, create a frame from timber, connected by sawing out the halves at the corners so that they fit under each other. |  |
If you decide to choose the first option and make the foundation columnar, then after marking you should do several steps:
- Dig holes up to half a meter deep under the pillars located at a distance of 1 m from each other. In this case, the supports themselves should rise above the ground by 20 - 30 cm.
- Pour sand into the prepared holes, as in the first option, then make a frame and pour the mixture.

The difference in the two methods is only in the area of the foundation. If you are planning to build on loose soil, which is often washed away by water, then it is better to choose a strip option, which provides greater stability to the chicken coop. If weather conditions do not affect the selected area, you can save money and make a columnar version of the base.
The timber frame is made the same way in all cases. And do not forget to lay roofing felt to protect against freezing and destruction of the base.
Assembly of the structure
The next stage is no less important than the first. Construction of the frame. The work must be carried out slowly, avoiding drafts due to cracks. To create a reliable chicken coop for 20 chickens, do the following:
There are quite a few design options, the simplest option is presented above, which all that remains is to insulate, install light and arrange feeders with nests.
Video: how to build a comfortable chicken coop with your own hands
How to insulate a chicken coop for the winter with your own hands
In addition to laying insulation during the construction of the chicken coop, there are additional measures to maintain a comfortable temperature for the chickens: installing heaters and additional bedding.
If you have a chicken coop that was not intended to be used in winter, it should be insulated. To do this, use felt, sawdust or straw; a good option is polystyrene foam.

To insulate the floor, it is enough to lay a dense layer of straw or sawdust. If you built the chicken coop correctly, then there will be no large gaps and such natural heating will be sufficient.
The inside of the roof can be sealed with felt, and the walls can be additionally sealed with polystyrene foam. If there are very severe frosts in winter, consider small heaters that should be placed in places inaccessible to birds. IR ceiling models are preferred.

Such insulation for the winter will be enough to maintain the productivity of chickens. The hens will feel comfortable, and with additional lighting, egg production will remain at the same level.
Ventilation in the chicken coop in winter
How to make ventilation in a chicken coop with your own hands so that the bird is comfortable in winter and summer? Quite simple if you follow all the recommendations. There are two types of room ventilation:
- natural;
- supply and exhaust.
The first is obtained automatically by arranging windows and an exit for chickens during the construction process. Moreover, it is better to place window openings opposite each other, ensuring maximum ventilation.

Helpful information! Mount a hole under the ceiling with the diameter of the pipe, which will provide air flow without drafts.
You can create artificial ventilation of the room, which will take a little more time, but in winter the heat will be better retained. To do this, you can make two pipes or install a fan in the wall.

If you choose the option with pipes, then place one pipe vertically, with the edge above the floor (no more than 25-30 cm) and in an arc leading out onto the street just above the roof. The second pipe is at the other end of the chicken coop and its upper part is high above the building itself.

Any of the chosen methods will provide sufficient fresh air to the birds, which is necessary for the health of the laying hens.
Arranging a chicken coop inside with your own hands: photos of interesting and correct options
How to arrange a chicken coop inside for laying hens so that the chickens are comfortable? You should follow the rules for the location of the poles, the height and width of the nests, and also create a sufficient amount of artificial lighting.
The hen spends a lot of time on a perch, on the floor or in the nest. Perches are poles made of 5 by 6 cm beams. This is a necessary condition for the chickens’ paws so that they do not get injured.

They must be mounted at a distance of 40-50 cm from the floor, and between them a length of 35 cm must be maintained. Beams cannot be fastened close to the wall; a distance of 25 cm is required from it.
Note! You should not organize a roost in several levels; in this situation, chickens fight because of the desire to occupy the upper shelves.
The arrangement inside the chicken coop should be comfortable and practical. There are requirements for the total number of poles. Each hen needs 25 cm of free space. For laying, 1 nest is installed for 5-6 chickens, this quantity is enough, since birds do not lay eggs around the clock.

Baskets or wooden boxes are used for the nest. The optimal depth is 40 cm, and the height and width are 30 cm. Be sure to lay sawdust or straw on the bottom to make the chicken comfortable. One or two llamas are sufficient as lighting for a small house. Distribute them at different ends of the chicken coop and do not forget about turning the lights on and off in a timely manner.
Here are some photo examples of interesting and neat interior design of a homemade chicken house:


Heating a chicken coop in winter: how to choose the right heater
With proper construction of a winter chicken coop, you can do without an auxiliary electric heater. This factor is also influenced by the climate zone. If in winter frosts often drop below -30 ⁰С, then the installation of an additional heat source will be required.

The safest and most suitable are infrared electric heaters. Their operating principle is to scatter IR rays, which are similar to solar rays. There are panels on sale that warm up rooms quite well without taking up much space.

Electric heating is safer than gas heating, but due to interruptions in the current supply, frequent outages can occur. But there are no harmful emissions from combustion products and the fire hazard with proper connection is much lower.
Advantages of an infrared lamp for heating a chicken coop
Infrared lamps for a chicken coop are considered the simplest and most convenient heating method. They do not burn the air, maintaining the necessary humidity. At the same time they serve as a source of heat and light, so there is no need to do additional wiring.

IR lamps can be red or transparent. The first option produces more heat, but the second is used as a light source.

According to professional poultry farmers, such equipment has high efficiency, increasing the productivity of laying hens and the growth of young animals. At the same time, the range of lamps on the market is wide, the most popular and trusted manufacturers are the following:
- Philips: high cost, but also reliable;
- Osram: similar to the first option;
- IKZ: more affordable.
Note! One 250 W lamp heats a space of 12 m².

It is enough to use one lamp to heat the chicken coop in winter, which is profitable and effective. The cost varies, for example, the IKZK 220-250 mirror lamp costs only 180 rubles.
DIY heating for a chicken coop in winter without electricity
If the laid layer of thermal insulation for severe frosts is not enough to insulate the finished chicken coop, choose a suitable material for insulation. They can cover walls and ceilings. The process is no different from finishing a regular residential space.

Do not forget about the need to insulate the windows and the entrance for chickens, since cold air will flow through the cracks. For window openings, you can use standard insulation methods using masking tape, and door cracks can be filled with polyurethane foam and the process of insulating the canvas itself can be carried out.

Note! Creating a floor bedding is necessary for a comfortable living environment for laying hens.
For deep bedding, apply a layer of slaked lime to the floor at a rate of 1 kg per 1 m², then you can lay a layer of straw or sawdust with shavings. We can also use natural thermal insulation material: fallen leaves, peat or a mixture of straw and manure.

During use, the litter will be compacted, so it must be turned periodically with the addition of new material. If the chicken coop is located in a mild climate without severe frosts, the listed insulation methods are quite sufficient.

To understand all the nuances of self-insulation, watch the video.
Content:
It is no secret for any farmer that hens are sensitive not only to the food supply, but also to the conditions of detention. With proper care, the farmer will always receive a large amount of egg production and excellent muscle gains. But all this is in the future; first you need to take care of building a dry and comfortable barn for poultry. With such words, exorbitant costs for building materials and a team of specialists immediately appear in your head, but this is completely unnecessary, because everything can be done with your own hands.
How to choose the right place
It is best to stop on any hill available on the site. This will prevent flooding in the spring. In addition, in such a place the snow will melt faster, and this will allow the bird to be released outside for a walk as early as possible (the ground warms up much earlier than in the lowlands).
It is not recommended to set up a chicken coop near a living space, because... Even constantly changing the bedding does not save you from the specific smell. It is best to build a poultry house on the leeward side in direct relation to human habitation.
It is recommended to immediately equip a comfortable barn with a walking enclosure, and place the room from the west side to the east so that the window openings face the south side. This practical approach provides natural light throughout the day. Of course, you will also need additional lamps that will help maintain light in the room with the onset of autumn.
What requirements must the premises meet?
Some breeds of chickens have not lost their ability to fly, and therefore the outdoor enclosure must be fenced with a fence of such a height that the birds cannot overcome it. The better the quality of the fence material, the less likely it is for small predators to get into your pets. It is recommended to choose wood or corrugated board for construction; you can put a small mesh between the stakes.
An additional safety measure to protect laying hens can be a mesh covering the top of the walking space. This measure does not allow wild birds, which are carriers of various diseases, to enter the territory, and at the same time protects chickens, especially young animals, from predators.
If we talk about the size of the chicken coop, then they must correspond to the breed characteristics of the bird and the total number of livestock.
Before starting construction, the size of the room must be calculated. According to sanitary standards, up to 4 chickens can be located per square meter. If we talk about meat breeding, then the figure presented above should be increased.
During construction, it is not necessary to purchase new building materials; you can take a board that has already been used.
There is only one requirement for wood: it must not be rotten, and the metal parts must not have rust or holes.
Microclimate requirements
The concept of microclimate includes several concepts that together form an indoor environment suitable for birds to live in.
Temperature
To make the barn warm, the walls are erected with solid ones, taking into account the fact that their thickness should not be less than 15 cm.
Insulating materials are used both for external structures and for indoor floors and roofs. There should be no holes, cracks or openings through which small rodents can get to the birds. If possible, the premises are made as airtight as possible. At the last stage, heating devices are installed.

Insulating a shed for the winter
If you plan to keep chickens all year round, then you need to think about how to make the room warm before the coming cold weather. If you adhere to the following recommendations, then no problems should arise with converting a summer barn in winter:
- Not only external walls are insulated, but also internal ones. It is best to use glass wool for this purpose.
- The insulating material, whatever it may be, must be protected from birds by durable sheathing. Otherwise, chickens may begin to peck at the insulation, which will lead to the death of the livestock.
- Additional options include plastic for wall cladding both inside and outside.
- To insulate floors, a thick layer of bedding in the form of wood shavings and straw is used.
How to make a bird barn with your own hands
You can consider the stages of building a barn using the example of a poultry house with a columnar foundation. This design will be stable and will also serve as very good protection for the inhabitants from predatory animals and bad weather conditions.
If we talk about tools, you need to have the following on hand:
- concrete blocks;
- cement mortar;
- bars with boards;
- shovel;
- hammer with nails;
- coal slag;
- roofing materials;
- wooden slats.
Construction of foundation and floor
Any construction begins with these structures. There are several types, and it all depends on what kind of chicken coop the owner wants to see. For permanent buildings, deep foundations are erected, which will have to support both the walls and the roof. If you plan to make a summer version of the barn, then a lightweight design will be sufficient.

The floors must be protected - they are poured with concrete rather than left earthen. A good chicken coop requires a strong floor. Initially, a hole is dug to a depth of 20 cm, the bottom is laid with crushed stone, and then cement filling is used. This option will protect the chickens from rodents and predators that dig holes into defenseless prey.
Walls
Here, as in the version with a foundation, everything depends on the use of the chicken coop. For the summer version, wall materials can be represented by boards with a thickness of up to 30 mm. More durable material is best used to build a barn in which chickens can live year-round.
For winter rooms, insulation is required, which was discussed a little earlier.
When building walls, it is important not to forget about the presence of ventilation grilles; at least two of these are made. The gratings are equipped with latches and are placed at the beginning and end of the barn.
What should the roof be like?
The easiest option is to make the roof pitched. But when choosing a gable option, additional insulation of the entire structure is created.

Interior arrangement
After the construction work on the shed is completed, it's time to think about what should be inside the chicken coop.
First of all, these are perches. Most often they simply make poles, which are located at a height of half a meter from the floor. There should be at least 20 cm of perch surface per bird so that individuals cannot interfere with each other. This figure will need to be increased if it is planned to breed broiler chickens.

Secondly, be sure to install feed containers. These can be either unnecessary bowls or special feeders. The second option is preferable, because it will not be difficult for the chicken to knock over a bowl or basin, but with a container with high sides it is already difficult to do this. In addition, specialized feeders are equipped with protection so that birds cannot climb inside and contaminate the feed with feathers and droppings.
If we talk about drinking bowls, it is best to opt for automatic water supply, which will greatly facilitate caring for your pets. There are a large number of automatic drinkers, and the choice here depends on the needs of the owners.
It is imperative to install nesting houses where the hens will lay their eggs. In the absence of nests, the bird will lay eggs in any place it chooses, and the owner will have to try to find egg products.
Additionally, you should think about installing containers with gravel, feed chalk and shell rock. These useful supplements will help chickens get the right amount of mineral components. The poultry farmer will only have to add all of the above additives in a timely manner.
This zone is optional, but recommended when raising chickens. They create a walking area so that birds can leave the premises during the warm season. Walking is beneficial not only for the health of birds, but also for reducing food costs. While outdoors, the bird will independently eat small insects, plant seeds, etc.
To prevent chickens from causing damage to garden beds, the walking area is surrounded by a mesh fence. A canopy must be installed inside, which will protect the laying hens from bad weather conditions and the scorching sun. You also need to install several nesting houses, perches and containers for food and water.
Some owners specially sow part of the walking space with grass so that the bird can eat the green mass on its own. In this case, the farmer is relieved of the burden of harvesting grass in the summer.
After all, they are a good source of additional income and products.
Chickens, like people, need a good-quality and spacious home where they can sleep peacefully all year round, without fear of wind, rain, or cold. And for this you need a shed that you can easily make with your own hands, without involving builders or purchasing expensive materials. Our article will tell you about simple ways to build a cozy “house” for chickens.
Anyone, even a novice farmer, knows that chickens are very sensitive to the conditions in which they live. And if conditions are not so good, it can seriously affect the health of the birds.
Requirements for the shed
It is recommended to build a barn for laying hens from wood. In order to make it, you will need ordinary wooden boards and beams.The structure of the barn must be solid and ensure complete safety for the birds:
- It should be quite large in size and divided into several zones in order to then place tools, etc. inside it.
- During construction, sanitary standards must be observed.
- If a chicken breeder breeds several types of chickens, depending on their purpose (eggs, meat), then in the future barn each group of birds should be housed separately from each other. There should be enough space in the future house for all the livestock.
- A good-quality barn must be equipped with light, heating, etc. You can learn how to correctly install these elements from our article.
What materials are suitable for building a shed?
For a permanent barn, you will need materials from which it will be possible to build a foundation and build the barn itself. In general, the following materials are suitable for this design: 
- concrete blocks or bricks (for the foundation);
- cement mortar;
- sand;
- OSB boards;
- wooden boards and beams;
- metal constructions;
- sheathing material (lining, plywood, etc.);
- insulation.
In addition, you should stock up on tools: self-tapping screws, nails, metal corners, a screwdriver, a hammer, brushes, a grinding tool, etc.
Thermal insulation of a barn
Maintaining heat in the chicken coop at any time of the year is an important issue when dealing with chicken coops. When building a shed, it is better to immediately ensure that the floor, walls and roof of the future structure are insulated with special materials.
Suitable materials include polystyrene foam, felt, sawdust, and straw. For example, when insulating with polystyrene foam, it should be plastered so that chickens cannot peck at it.
The walls of the barn need to be insulated both from the outside of the structure and inside, between the sheathing material. The roof should be insulated from the inside with felt, and the floor can be covered with a dense layer of sawdust or straw.
How to Make a DIY Chicken Shed: Step-by-Step Guide
First, the master needs to carry out preparatory work. Namely: 
- Decide on where to build the shed. It is not recommended to build the structure in lowlands, because as precipitation falls, the barn will flood. The surface must be level. In addition, it is better to build a house for chickens away from the owner’s, so that the breeder is not bothered by any unpleasant odors.
- Build the foundation. To do this, it is necessary to take measurements of the perimeter of the future shed on the ground and mark the places where the poles will be installed. This can be done using pegs and cord.
- In the areas marked for the foundation, you should dig holes, fill them tightly with sand, and lay the foundation (concrete blocks or bricks) on top of the cement mortar.
- The foundation pillars must be strictly at the same level. Otherwise, the entire structure will be uneven and therefore not very strong. Using a wooden lath, you can check the height of the erected pillars and the evenness of their installation.
- Next, you should begin to construct, directly, the frame, walls and roof of the future barn.
Consider a shed made from OSB sheets. Today this is one of the popular types of structures. First things first.
- Installation of the frame. To do this, take an edged board measuring 5*10 cm or a beam 10*10 cm. They should be laid along the perimeter of the pillars of the erected foundation, and inside the resulting rectangle you need to embed transfers from a beam or board (installing it with an edge) to increase the rigidity of the structure. For future walls of the barn, you also need to build a sheathing along the entire perimeter of the structure, onto which OSB sheets will be attached. For windows and doors, openings in the frame must be immediately marked.
- Roof laying. To do this, take 2 beams and install them in the center of the sheathing on two opposite sides of the barn. Then, using similar methods, 2 beams are attached at equal distances from each other along the entire length of the future barn, using corners. The sheathing is also mounted on top using corners.
- Fastening OSB sheets. The sheets are attached using self-tapping screws to beams or boards around the entire perimeter of the barn, including the roof.
- Covering with wooden boards, which need to be fixed with self-tapping screws.
- It is recommended to lubricate the finished roof with resin and cover it with several sheets of roofing felt. This material will additionally protect the shed from moisture and cold.
- At the end of construction, you need to start insulating the entire shed using the tips described in the previous section of the article.
- Installation of the door, window frames and opening that leads to the street or.
How to avoid mistakes during construction?
In order for the barn to serve the chickens for a long time, the owner must remember several important construction tips. 
- The size of the barn should be calculated based on the rule: 1 square meter for every 4 chickens. It is better to immediately take into account a small reserve for the future offspring of individuals.
- It is better to first fill the floor of the structure with a concrete screed or lay brick, and only then cover it with boards. This will protect the birds from invading predators.
- When planning year-round use, it is better to provide a vestibule in the barn.
- The temperature in the finished shed should not exceed 16 degrees. Otherwise, the chickens will suffer from thirst. At more than 29 degrees in birds, it will be much thinner.
- The cold in the barn should not be allowed either. This causes chickens to get sick and die. It is better to think carefully in advance about how thermal insulation will be carried out and install it during construction, without delaying until the cold weather begins.
Internal equipment of the barn
To begin with, you need to place feeders, drinkers and perches inside the chicken house.
They should be located separately from each other at a considerable distance. Otherwise, the shed will become cluttered and messy.For example, it is better to install perches in the darkest, quietest and warmest part of the barn, where the chickens will rest most comfortably. This also applies to the installation of nests. They can be wooden boxes separated from each other by a thick opaque film.
 As for feeders and drinkers, it is best to place them separately from resting areas, so that it is convenient to clean and change
The main task of a poultry farmer in winter is to create conditions under which his chickens will not lose egg production, will not get sick and can calmly wait until spring. The harsher the climate, the more requirements are placed on the winter keeping of chickens. Normal breeding of birds during this period means the presence of a chicken coop at the dacha, where there is warmth, sufficient light, and adequate nutrition for the inhabitants.
What is the difference between a winter chicken coop and a summer one: which one is better?
In the warm season, an ordinary healthy chicken needs the sun, which provides light and warmth, a sufficient amount of food and a perch to which it climbs as soon as it begins to get dark. Theoretically, all this can be provided under a canopy on the street. The presence of walls in a permanent structure is not necessary.
But with the onset of autumn, when daylight and natural solar heat become scarce, at least two important problems arise:
- How to extend daylight hours?
- How to keep chickens warm?
The main difference between a winter chicken coop and a summer one is the ability to heat the room, protect it from wind and precipitation, as well as the presence of artificial lighting.
Dimensions and layout of the poultry house at the dacha
There are two ways to raise chickens in winter: in cages and on the floor. The following aspects must be observed:
- The chicken coop must be dry. In a humid room there is a risk of losing all the birds due to rapid-onset upper respiratory diseases.
- Natural winter light must penetrate into the room where the chickens are kept. This will help them produce vitamin D.
It is best to build a winter chicken coop where natural light will enter the room as much as possible during the day. When kept on the floor, you need to install perches at least 60 cm high, as chickens love to fly.
For the normal functioning of chickens, it is necessary to keep no more than 4-5 laying hens per square meter.
When to convert to winter
Chickens can withstand up to -10 degrees Celsius; at lower temperatures they can freeze their paws. Therefore, when the thermometer shows -7 or below, it’s time to move the birds to a warm chicken coop.
Construction according to drawings, area and number of birds
Distinctive features of the construction of poultry houses based on the number of birds.
Scheme for an insulated building for 5 birds or a ready-made warm chicken coop
Even for such a small number of laying hens you need a full-fledged house for chickens. 5 chickens will live quite comfortably in a space of 3 m2. So their winter home can be 1.5 meters long and 2 meters wide.
How to properly build a chicken coop is described.
Here it is quite appropriate to place perches on the sides of the chicken coop.
Place cages near the longest wall, and install feeders near the opposite one. It is best to go out into the enclosure here.
For such purposes, a ready-made chicken coop according to Dodonov’s design may be quite suitable, or you can build a simple foam block one.
Layout of a barn for 10 chickens for the winter
It is enough for 10 birds to stay in a room whose width is 1 meter, length 2 and height from 1.5 meters.
The layout can be as follows: install perches on the sides of the chicken coop, and feeders near the longest wall. Residents can enter the chicken coop from the enclosure through a small door above the floor.
It is advisable to place the door on the south side of the building. Next to it you can make an entrance for a person.
Step-by-step instructions for creating a house for a well with your own hands are outlined.
It is no more difficult to properly organize space for a larger number of birds. 
Chicken coop layout for 20 to 50 birds
Two dozen laying hens is quite a large number. Among them there may be birds of different breeds.
In this case, the winter chicken coop could look like this:
- A length of 4 meters or more is divided into sections. If there are three of them, then you can keep 6-7 chickens in each.
- The door from each section will open into a common corridor. Its length is equal to the length of the entire chicken coop. The entrance to a person's chicken coop should be through this corridor.
- In sections on the walls adjacent to the corridor, install cages with nests. This will make it easier to get eggs without going into the section.
- On the opposite wall you can allocate space for ash baths.
- You can feed chickens in cages, but you can also install feeders on the floor.
- The bird's exit into the enclosure can be from the doors located on the smallest wall (its length is sufficiently 1.5-2 meters).
With this layout, the chickens will have the opportunity to walk and rest in separate cages.
The optimal area for comfortably keeping 20 chickens should be from 10 m2. In such a space, the bird is not cramped, and a person will have the opportunity to fully care for it.
It is possible that you may need information about varieties.
How to build the right all-season project with your own hands
When you have decided on the project, it is important to adhere to the established drawings, otherwise the construction plan for the building may be violated, which will subsequently lead to an uncomfortable stay for the birds in the chicken coop. Features that should be considered before starting construction:
- It is best to make it not wide, but long;
- you need enough perches, feeders and drinkers to allow all the birds to eat together;
- the longer the chicken coop, the more ceiling lamps it should have, so choose construction schemes with an elongated building;
- doors should be positioned in such a way as to minimize the entry of cold air when they are opened.

Foundation and floor options
Like any permanent structure, a winter chicken coop needs a foundation. If we are not talking about a poultry farm, then it is quite enough to make a ditch up to half a meter deep. After the concrete solution has hardened here, roofing material needs to be laid on top. Floors can be made in at least two options.
- Lay the underlay, on top of it is a pipe for a water heated floor, and then fill this structure with a 3-centimeter layer of concrete. Such a floor will need to be covered with straw and hay and, if calculated correctly, it will provide warmth throughout the chicken coop.
- On top of the foundation, covered with roofing felt, lay logs around the perimeter of the room . They will need to lay a wooden covering. By itself, such a floor will be warm enough, but, of course, it is incapable of heating the room.
If there is no stove or some other heating source in the winter chicken coop, then there is no point in abandoning the installation of a heated floor. The egg production of chickens depends 40% on how warm it is in the room where they are located. If it is not possible to install water heating, it is quite possible to install an electric heated floor.
If the room temperature drops to +7 °C, then it is already very cold for chickens. This chicken coop needs to be heated. Therefore, in order not to have to worry about heating it every winter, it is better to install a heating system once and be glad that the birds are warm here. 
Winter building walls
Such a room does not need special beauty. Any option for which there is money would be appropriate here. The walls of a winter chicken coop can be made of:
- bricks;
- bentonite, cinder block;
- adobe;
- tree.
Each of these building materials is best insulated from the outside. This, firstly, will save energy costs. Secondly, it will protect the building from cold and wind.
You can also familiarize yourself with the features of the device.
The minimum height of the walls in the chicken coop should be slightly higher than human height, namely 2-2.2 meters. The outside of the building can be clad in any available way. But the inside walls need to be plastered and whitewashed.
How to make a roof
After the walls are erected, before the last row of masonry, you need to lay the logs. Wooden flooring can be laid on top of them. It can also be made of any material containing wood (OSB, chipboard).
It is best to make the roof itself pitched. Firstly, it will be possible to equip an attic here. Secondly, there will not be a lot of snow on such a roof and the chances that it will fail are much less.
If there is an enclosure, the roof must be made so that it at least partially extends above it. The aviary can be equipped near any wall of the chicken coop or even along its entire perimeter. In the chicken coop itself, you need to think about a ventilation and lighting system.
He will tell you how to make a birdhouse with your own hands.
Interior arrangement
The ideal humidity for chickens is just above 40%. This indicator is achieved, among other things, thanks to normal ventilation. At the same time, the flow of fresh air into the chicken coop carries out some other design functions:
- Circulation of fresh air in the room.
- Removing not only ammonia vapor, but also some of the harmful microbes.
- Maintaining the required temperature.
It is possible to organize ventilation in a winter chicken coop only if the temperature outside is not critically low and the chickens can stay in the enclosure.
It is better to immediately install a ventilation system in the chicken coop. It comes in two types:
- natural;
- supply and exhaust.
Natural ventilation
This is the easiest way to ensure constant access to fresh air. It is necessary to position the windows so that when opened they ventilate the room as much as possible.
Or you can make a hole under the ceiling the same size as the pipe. Its end must be raised to the level of the lower part of the roof. Natural air circulation in this case will not create drafts.
Artificial ventilation
This method is more effective, but also complicated.
- You can install a fan in a hole in the wall; it will “displace” air from the chicken coop to the street.
- You can make two pipes.
The end of one of them should be located almost above the floor (no more than 25-30 centimeters). It needs to be taken outside, this end should be slightly above roof level.
But the second pipe needs to be placed at the opposite end of the chicken coop, almost under the ceiling. And the street part of the pipe should be as high as possible. This ventilation method will help to constantly ventilate the chicken coop without energy costs and drafts.
In the finished chicken coop, the birds should not only be warm and well-fed. They still need something to do. Straw and hay are used not only for bedding, but also for the birds to row.
The video shows a do-it-yourself winter chicken coop.
A good winter chicken coop is like a home for a person. If desired, it can be done for minimal funds, but at the same time achieve comfortable maintenance of even a large number of birds, which will calmly survive the winter, providing its owner with the same number of eggs as in the summer.