Which mixer do you prefer, double-valve or single-lever? Take the latter, because this is what experienced plumbers install in their homes.
- Firstly, a “one-armed” mixer produces a stream of the desired temperature much faster;
- Secondly, it is very easy to use. With a slight movement of your hand you can regulate both the temperature and pressure of the water supply. At the same time, one hand remains free, which is very useful during cooking;
- Thirdly, it is economical - in the sense of maintainability. This is all thanks to the presence of a cartridge inside the mixer, which is very easy to change if necessary. Installing a new unit does not require any special skills and can be done with your own hands.
Advice! And a little more about saving. Don't skimp on an accessory like an aerator. It saturates the water with air bubbles, the stream becomes softer and the amount of splashes decreases, but this is one plus of the nozzle.
Passing through the aerator, the stream becomes visually thicker. Psychologically, this will force you to reduce the water supply. Neither less nor more, but according to experts, water consumption is reduced on average by 30 - 50%.
Learning to become a plumber
Nothing in this world lasts forever and sooner or later the equipment still fails. As for single-lever faucets, their design is so simple that for repairs you do not need the help of plumbers, whose call can take days, and in some cases, weeks.
Let's look at the design together and try to repair a single-lever kitchen faucet ourselves.
Similarities and differences in the design of the mixer
The general layout or design of a single-lever kitchen faucet is, in principle, the same for similar models (see also the article on). It is shown in the photo below.
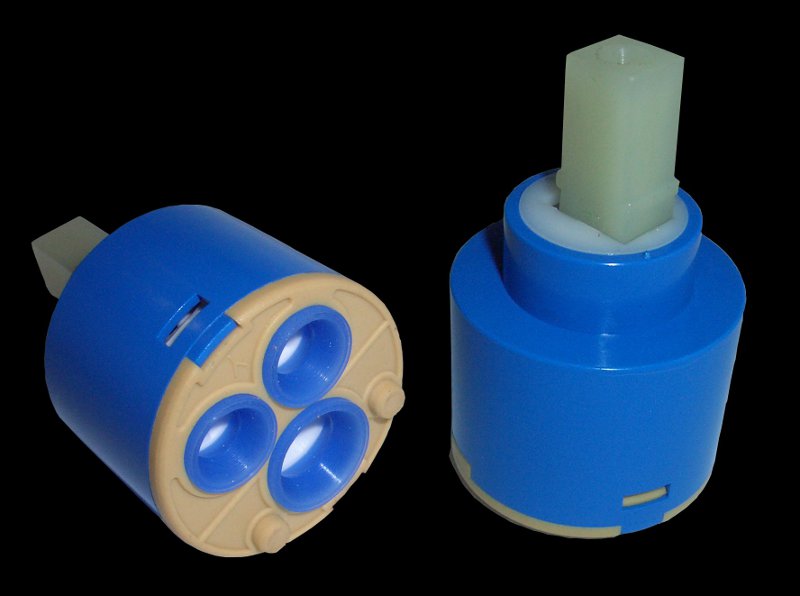
- We unscrew the decorative nut (case cover) by hand. And using an adjustable wrench, unscrew the nut that secures the cartridge in the mixer body;
- We take out the replacement block, replace it with a working one and reassemble the mixer in the reverse order. The cartridge is inserted into the corresponding grooves and clamped using a fixing nut. Screw on the decorative nut and install the lever in place;
- Major breakdowns
- Tools and materials
- Repair technology
Mixers are used quite often in everyday life. They are classified according to various indicators, for example, by type of installation (shower, bathroom, kitchen). No matter where used this device, its malfunctions are provoked by the same reasons.
The ball mixer has simple design and easy to operate.
Repair of a ball mixer, which is the most commonly used, has its own characteristics. This is explained by the fact that its design is characterized by a special modification. However, repairing a ball mixer is not difficult. The main thing is to follow the rules and consistency.
Major breakdowns
A device such as a ball bathroom faucet may have the following breakdowns:
- liquid flows out of the tap;
- water pressure is weak;
- The water temperature is not set correctly.
The reason why water pressure decreases may be a clogged faucet. To eliminate this problem, install a special filter in front of the mixer. Liquid leaks, as a rule, because the gap in the cartridge between the rotating element and the rubber gaskets is clogged. The tightness of the installation can be compromised even by a small grain of sand.
Repair in this case consists of the bathroom and cleaning the clogged area. Otherwise, the leak will only worsen, since even a small grain of sand will completely ruin the rubber gasket over time. Due to a strong change in water temperature, one of the holes may become clogged with rubber pieces from the gasket or sand particles.
If it is impossible to determine the cause of the breakdown, then repairs are necessary completely for the bathroom.
Some people buy faucets at quite low prices. Such products are made from cheap silumin. It is completely unreliable and can break even with a small mechanical impact. This type of crane cannot be repaired. It is better to purchase a high-quality, inexpensive model once.
Return to contents
Tools and materials
For an effective bathroom, you need to prepare materials such as:
- aerator;
- ceramic head;
- head casing;
- cartridge for single-lever mixer;
- control handle;
- plastic and rubber rings;
- decorative plug.
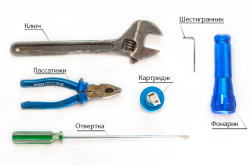
In addition, you will need the following tools:
- adjustable wrench;
- pliers;
- hammer;
- screwdriver;
- hex wrench;
- drill.
Return to contents
Repair technology
The first step is to disassemble the crane. To do this, remove the handle:
- shut-off valves are closed;
- loosen the screw using a hex wrench;
- The handle is removed directly.
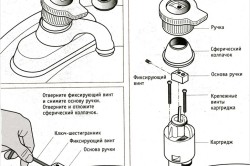
Next, you need to press the screwdriver onto the recess of the threaded ring and carefully turn the ring counterclockwise. It is necessary to ensure that the entire mixer does not turn and the water hoses underneath are not damaged.
Using pliers, the chrome dome is removed so that the 4-tooth ring located under the dome is not damaged. It is usually removed along with the dome itself. Tightening the threads corrects the flow of water, so the position of the wheel can be adjusted down or up. Experts advise unscrewing the plastic ring from the dome to see that the threaded connection rotates well and is not dirty.
Next, take out a plastic part in the form of a shield, which consists of 2 parts, white and black. The black part is the seal. Its conical shape is often broken after long use, or it becomes rusty. This causes leaks to form. Repairing a bathroom faucet usually requires simply removing the dirt. However, if the problem is not with the seal, then you need to disassemble further.
Using an upward movement, the ball is removed from the mixer. It has a limiting hole that determines the rotation of the mechanism. It is necessary to carefully examine the ball stopper for dirt, chips and cleanliness of the coating. If the ball is damaged, it should be replaced.
When installing a new ball, you need to pay attention to ensuring that the cutout that runs along the right side completely fits onto the ledge next to the top of the tap. Then the shield is inserted, placing the plastic fuse in the slot on the side of the faucet.
The springs located under the black seal must be in working order at the time of disassembly. If they do not work, then you need to replace them with new ones. To do this, remove them carefully with a flat screwdriver. Since the new springs are somewhat stronger and longer than the old ones, when installing them it is recommended to use several duckbills, as well as pull the shield down until the springs are clamped. Next, the ring and chrome dome are installed, which are tightened with pliers. The more you tighten the ring, the more difficult it will be to turn on the mixer in the future.
When repairing seals, you should use silicone grease(it extends the service life).
It will not be washed off with water and improves the movement of the rubbing elements of the faucet.
To assemble the mixer, you need to do all the steps described in reverse order. This completes the repair. After repairs, be sure to check the faucet for leaks.
Often the leak starts near the base or top area of the faucet. To correct this problem, you need to lift the spout at the base and pull it up. The ball bathroom faucet has 2 O-ring seals. Usually they are the ones that provoke faucet leakage over time. These rings should be carefully removed using a small flathead screwdriver. After they have been replaced and the valve has not yet been installed, the O-rings should be coated with silicone grease to minimize wear.
When installing and repairing a crane, everything threaded connections should be sealed with a special thread or fluoroplastic tape. It must be remembered that the plumbing market offers a huge variety of ball mixers, so their repair may vary slightly.
The mixer is the most weak link in the plumbing system. This equipment, even the most reliable, someday leaks. So that such a nuisance does not take you by surprise, the article will tell you how to repair a faucet with your own hands.
The task of the mixer is to mix cold water with hot water. There are mainly 2 types. This device can be:
- valve-type, where the temperature and pressure of water are controlled using valves;
- lever, which in turn is divided into single-lever ball and ceramic, where instead of a ball, ceramic plates are placed in the cartridge.
Installation and repair of ball mixers
Many people install a ball mixer. All because he:
- easy to use, because The design consists of one rotary handle. Occupying the upper and lower positions, it regulates the water pressure, and by moving it to the right or left you can change the temperature;
- one of the most reliable.
The algorithm for its operation is as follows:
- by lifting the lever, we make the ball rotate;
- the holes of the ball begin to coincide with the holes of the seats;
- Depending on what part of the area of these parts coincides, the jet is adjusted.
Briefly about the design
![]()
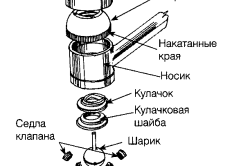
If you look at a cross-section of a single-lever mixer, you will see:
- decorative plug on which there are symbols for cold and hot water;
- screw;
- control rod;
- a hollow ball with two holes where the water actually mixes;
- 2 rubber seats - one for cold water, the other for hot water. A ball is installed in the saddles and pressed against them under the influence of water pressure;
- steam cuff;
- regulating ring;
- steam and adjustment cuff;
- ball sleeve;
- aerator.
Most important details mixer - the ball and seats are part of the cartridge, which is a non-separable unit. Therefore, repairing a ball mixer, if one of them fails, comes down to replacing this module.
Possible causes of the malfunction. Elimination
If your faucet is dripping, then:
- First of all, we conduct a survey of the body. If found mechanical damage in the form of a chip or crack, we can only perform temporary repairs to the mixer tap by sealing the damaged area with sealant;
- Let's check if water is flowing from under the lid at the top. To do this, tighten the nut from below. If this is the reason, then the leak will stop;
- when the body is intact and the nut is well tightened, but water is still dripping, you will have to dismantle the mixer by performing preparatory work. Turn off the water, then drain the remaining water from the mixer itself. Now all that remains is to unscrew the fixing nut and look at the gasket. The reason, most often, lies precisely there. In this case, the repair consists of replacing it;
- in the case when all these manipulations do not help, the cartridge is to blame. Perhaps it is simply clogged or the cause of the malfunction lies elsewhere, but this is no longer so important, because... In any case, only replacing it will help.
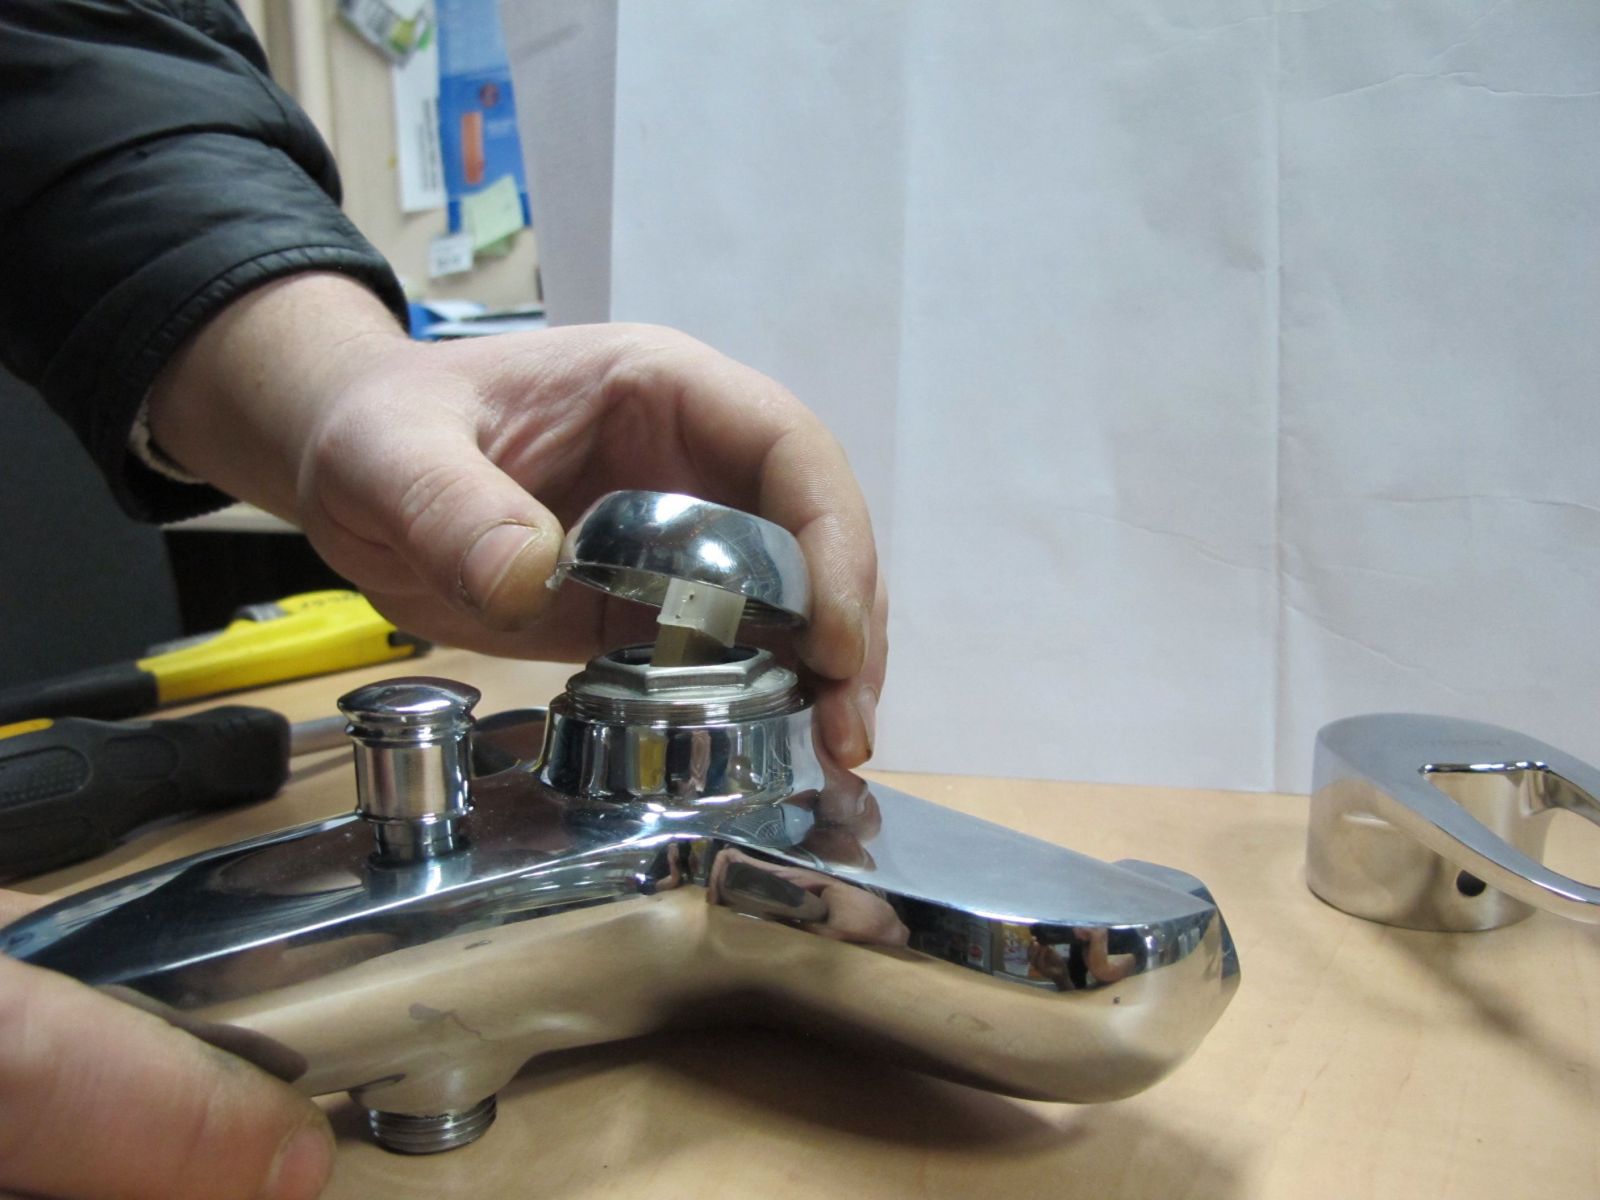
Replacing a cartridge when repairing a single-lever mixer
Repair of a single-lever mixer associated with replacing the cartridge is carried out as follows:
- to avoid flooding, turn off the water valves and drain the water;
- remove the mixer;
- remove the plug indicating hot and cold water;
- unscrew the screw;
- dismantle the lever;
- we gain access to the cartridge and remove it, install a new one instead of the old one;
- we collect everything as it was.
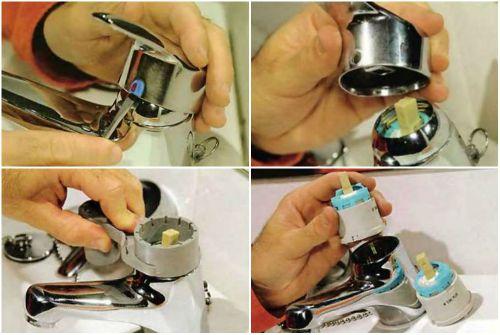
Useful: if this moment If for some reason you cannot purchase a new cartridge, then rinse the old one thoroughly, wrap it with FUM tape in 1 layer and put it in place. This measure is temporary, so try to buy a new one as soon as possible.
When the reason is in the aerator
It also happens: you can’t wash the dishes properly because the water from the tap in the kitchen flows in a weak stream. Before blaming the water utility, check the water pressure in the bathroom. If everything is fine there, then most likely your aerator is simply clogged. Your actions in this case:
- remove the aerator;
- open the water. Is everything okay now? There is no doubt that this detail is definitely the reason;
- rinse the aerator under a strong stream;
- It may turn out that it is rusty, then we buy a new one.
Take note: the same symptoms are observed when pipes or hoses are clogged. Exit 2: either change it or get by with cleaning it.
Features of repairing a ball mixer in the bathroom
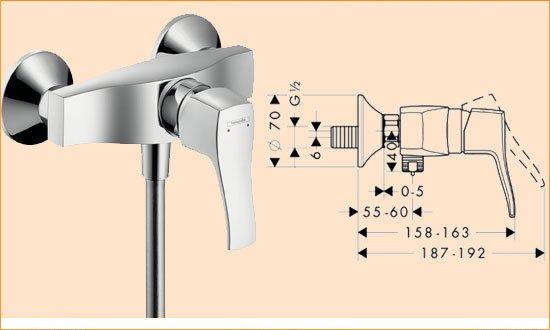
Surely you have encountered such a phenomenon as spontaneous lowering of the switch lever when trying to supply water to the shower. It flows well from under the tap, but not from above. Let's say it is necessary to repair the Damixa Eclipse 47100 mixer, although the probability of its breakdown is low, but still... First, briefly its characteristics:
- it is produced in Denmark. DAMIXA Company;
- intended for bath;
- chrome plated, has a ball regulator and a fixed spout of 15 cm;
- hose outlet 1/2″;
- sockets and 3/4″ eccentric connections included.
We find the reason by trial:
1. Let's try to start repairing the mixer with the simplest thing - replacing the top gasket:
- remove the hose by first unscrewing the union nut;
- prying up the gasket with a thin knitting needle, remove the gasket;
- We install a new one in place of the removed one, not forgetting to moisten it with water before doing this;
- We assemble the mixer.
2. If nothing has changed, the lower gasket may be to blame:
- you will have to turn off the water;
- then remove the flexible hose;
- remove the adapter, spout and switch;
- now it is possible to remove the eccentric;
- access to the spool was opened. We also dismantle it;
- finally a ring. We remove it and replace it with a new one;
- further assembly.
It will be useful: spare gaskets are usually included with the faucet. When you don’t have them for some reason, make them yourself. This is possible if you can find 3-4 mm hard rubber.
This video will help you repair your faucet:
Valve mixer repair
Although ball mixers are considered the most reliable, if you choose a 2-valve mixer from a reliable manufacturer, then it will serve and look just as good. The top popular manufacturers include:
- GROHE (Grohe) from Germany;
- Damixa (Denmark);
- Vidima (Bulgaria).
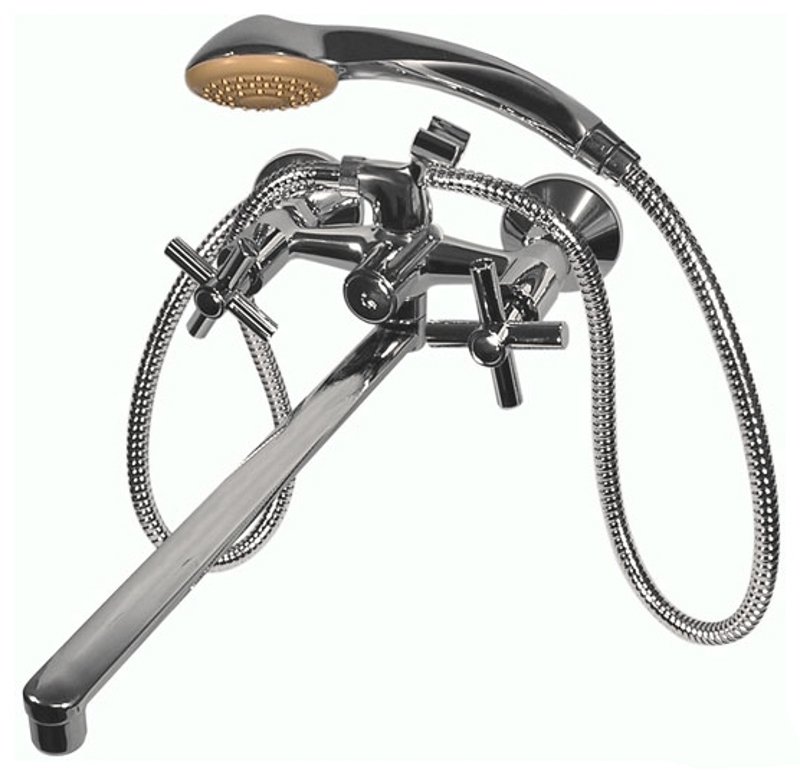
However, either after the warranty period has expired, or due to poor quality water, repairs may be necessary. Let's consider repairing the Grohe Chiara 33988 valve mixer.
What can leak here is the faucet axle box. Its design is simple:
- 2 disks are pressed tightly against each other;
- there are through holes on the disks;
- the tap opens - the holes coincide, in the closed position they are blocked.
If a leak is noticed, then, obviously, the lock nut on the body has become loose:
- take a wrench;
- pull up. As you can see, everything is very simple.
Sometimes nothing helps, then the cartridge has served its purpose and it’s time to change it. The technology is similar to the one we used to replace this unit in the ball cartridge:
- take a screwdriver and unscrew the screw under the plug;
- first loosen it slightly and then remove the lever;
- unscrew the screw holding the handle and remove it completely;
- pull out the cartridge and insert a new one.
By the way: if you have a mixer with a worm gear and it fails, then install a crane axle box in its place. This will increase its reliability.
Everything that is said about the Grohe faucet can also be applied if you need to repair the Vidima faucet, manufactured by the company of the same name from Bulgaria, part of the IDEAL STANDARD INTERNATIONAL corporation. This mixer:
- reliable The warranty is up to 5 years, so before this period you are unlikely to have to perform any manipulations with it;
- Most of them have ceramic cartridges;
- They are made mainly from brass. To obtain a shiny surface, manufacturers use electrochemical galvanization.
Repair of cheap models of 2-valve mixers
Models of two-valve mixers, which use a worm gear instead of a faucet, are cheaper, and their reliability is proportional to the cost. So, the mixer tap needs repair. Let's start with disassembly:
- The valve body must be unscrewed. To do this, we turn it counterclockwise;
- remove the gasket;
- we replace the old seal with a new one, purchased in a store or made independently;
- We wind a layer of FUM tape under the thrust edge;
- Next comes the assembly.
This will help if the problem is in the gasket, but it may also be that the place where the gasket rests, the seat, in other words, is rough, and the seal does not fit well. Then this very roughness must be eliminated:
- take a special cutter;
- install it in the place where the worm gear is located;
- use a drill to turn the cutter until seat will not become smooth;
- change the gasket.
To consolidate the information received, also watch a video about faucet repair:


