In order for the product to be perfect, it is enough to have high-quality stencils for wood carving! In this article you can find out all the information, how to use them and how to find them. Wood carving is an ancient art. The skill passed from generation to generation, gaining momentum and improving with evolution. Now there are enough materials for working with wood and blanks. You just need to have a little patience, a desire to study and the mood!
Selecting a template
First you need to decide on the choice of pattern. A stencil helps to apply symbols or patterns to a surface. They are suitable for decorating external walls and creating a new interior in the house.
Let's look at what stencils are needed for:
1) For carved ornaments;
2) For pilasters;
3) For towels;
4) For brackets, etc.
Examples can be seen below:

Thanks to these templates you can create a three-dimensional ornament. They will help you create a beautiful product. A stencil will completely make the task easier, because you don’t need to invent something new, draw, or spend a lot of time making a template. It’s enough to find a great option on the Internet and that’s it - the masterpiece is ready for execution.
Progress
Before starting work, decide what exactly you will create. Enough ornaments have been created, so it will be easy to find templates.
1) For beginners you can find various sketches, but most masters post schemes for intermediate skill levels on websites. To create such products you need to have experience and skills.
2) If you haven’t found the template you’re interested in, you can draw it yourself. Use thick cardboard. Make a sketch, draw lines. Observe the proportions strictly! To work, use a ruler, compass and tracing paper so that every detail is traced and drawn.
3) When the template is ready, apply it to the workpiece and carefully trace along the contour.

4) There are 2 more convenient methods of work:
- If you transfer geometric shapes, then use the pricking technique. This will make the work easier. It is enough just to fix the sketch on the workpiece, and then use a needle or awl to mark all the necessary points. Connect the marks on the wood with straight lines so that the product has exact proportions.
- Copy paper is ideal for the product. Place it under the sketch and trace the lines in the drawing. Thus, the image is transferred to the workpiece.
We invite you to look at the photo, where there are examples of templates:


Methods and methods
There are several types of wood carvings. It is slotted carving that will always be challenging, but exciting. Traditionally, such carving is also called through or openwork, because it is very reminiscent of lace. The peculiarity of this carving is the removal of the background part of the pattern. It is carried out by sawing through workpieces of small thickness. The slotted thread is suitable for almost different products. The result is an original and aesthetic look that craftsmen love to use. The widespread use of carvings is reflected in decorations, cornices, picture frames, etc.
Stencils for slotted carving are easy to find. How to work with them is indicated above.


Carving tools vary. For slotted carving, different types of chisels, knives and jigsaws are suitable. By the way, craftsmen believe that a jigsaw is a substitute for many electronic machines and knives that are necessary for the product. In their opinion, it performs patterns no worse than more professional tools. With a simple tool, a jigsaw, you can easily surround yourself with beautiful things. There are millions of pattern options. You can do wonders with a jigsaw.
Stencils can be made from any material. Whether it's plywood or paper, reusability is a plus. You just have to number the sheets so as not to lose them! Such templates will often help in creating the interior of a house or room. Wood products have been gaining momentum lately, but isn’t it great to make something with your own hands?
Housing
In ancient Rus', decorating the trim of your house with carvings was a sign of well-being, wealth and well-groomed. Every house looked like a picture. Ornate patterns attract attention and fascinate. But who said that now it is not beautiful or fashionable? Nowadays, old traditions are returning, so information about wood carving for the home is suitable for everyone. What was most often found in houses? Animals, sculptures of people and carved household appliances.


Carvings are chosen for decorating private houses, cottages and gazebos. This type of house carving is suitable for exterior design - trim on doors and windows. Animal images that look ideal in the form of sculptures, paintings, etc. are suitable for homes.
Some drawings for inspiration:


Geometric wood carving consists of different elements that have a geometric shape and is done with one cutter. maybe: lines, squares, triangular and tetrahedral recesses, etc. This technique will even allow you to make carved works of such shapes as leaves, flowers, berries, ears of corn. If you develop the skill, it will turn into the form of contour carving.
Original box made with geometric carvings
You can search the Internet or come up with it yourself. Geometric cutting is quite simple to perform; for this you will need: a cutter, a pair of semicircular chisels. Geometric carving lessons will show how you can play with chiaroscuro and unusual patterns. It is especially beautiful in different triangles, nail-shaped cutting and triangular-notched shape. This cutting allows for polishing and matte finishes.
For triangular notched carving, you only need a jamb knife, it has a beveled blade. In addition, the following tools are needed:
- flat chisel, 2 cm wide;
- semicircular chisel;
- hacksaw;
- files: round, square, semicircular;
- ruler;
- simple pencil;
- compass;
- eraser.
 Elements and patterns for making geometric wood carvings
 The cutting technology is simple, but each component plays its role in the work.
Wood
Wood comes in the following types: hard, very hard and soft. For beginners, it is better to use soft wood, it is easier to work with (linden, pine or aspen).
Linden is more difficult to obtain than other types, as it is often used by professionals. Pine has a disadvantage - it splits when cut.
Aspen is a good option for work. There are many visual photos of what kind of wood it should be, and what the longitudinal fibers look like along which you need to work.
Preparing for work
For the first lesson, you need a board measuring 170 by 110 mm and 2 cm thick. Sketches for this work will be given below. The surface of the board must be sanded with sandpaper. Now, using a ruler and a simple pencil, draw out the entire surface of the tree in 5 cm cells.
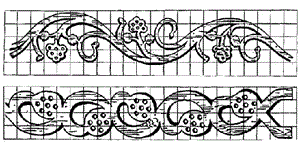
 Wood carving patterns
 Then we draw all the figures, as shown in the figure below. There were 7 figures in total: pegs, diamonds, a twist, a pyramid, stars, squares and a rosette. From these figures you can then create new patterns. A photograph that shows what compositions can be made from just elements, and how the composition looks after processing and painting the wood.
Pegs - the first figure
In triangular-notched carving, the entire process consists of two operations - pricking and trimming. These are simple movements that are easy to do in practice. We take the knife in our hand, the thumb rests on the beveled part of the handle.
Press the cutter vertically to deepen it a few mm, then lower the blade at an angle to intersect the line of the side knife in accordance with the markings. In the same way, a prick is made on the left side of the triangle. 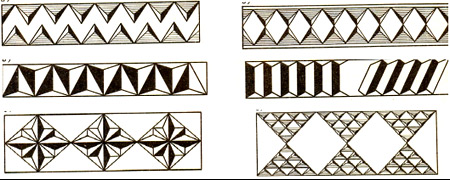
For pruning you need:
- attach the cutting part of the knife to the left side of the triangle, so it connects to the top with its bevel;
- we move the handle of the knife back, maintaining a parallel between the right side of the pattern and the cutting blade (this movement is done with the hand, as if we were pulling a bow);
- press on the knife, returning to the first position of the hand; so the nose of the knife is on the top, and the cutting part is on the right side of the triangle.
Read also
Wood carving elements
The trimmed triangle will eventually break off, hence the name “peg”. This movement is called "shooting". When doing it, try to keep the angle at 45 degrees. The drawing comes out simple with this figure, but this is the basis of geometry.
Security measures
All movements should come from the hand, this simplifies the work and takes the load off the shoulder. 
The working hand (in which the cutter is located) is pressed tightly against the work table to free the movement of the hand. When you hold the workpiece with your free hand, you need to ensure that your fingers are positioned so that they are not on the working part when the cutting process is in progress.
Diamond - second figure
Ornaments for geometric carvings consist of simple details such as pegs and diamonds. A rhombus consists of two triangles connected by their bases.
The technology is the same, only you first need to cut out the top row, and then turn the board and make the bottom one.
Viteika – third figure
It consists of mastering basic carving techniques and basic shapes. Viteyka is the same type of chips. They are simply shifted to the side in relation to each other.
 Shapes for geometric carving
 The result will be a winding path. To do this, you need to cut out and pin the lower triangles, and turn the board - the upper ones. So we will see that there remains a “snake” in the middle.
Pyramid – fourth figure
The first patterns were the simplest. And you can deal with them without difficulty. The following ones will be more difficult to complete, since they consist of several triangles and are located in a certain order in relation to each other.
So the pyramid consists of three triangles, it has in the center the point of contact of all the corners. Therefore, when cutting a given figure, each element, when pricked, comes into contact with the same point several times. The most important thing is that pruning is done in the direction of the wood layer. 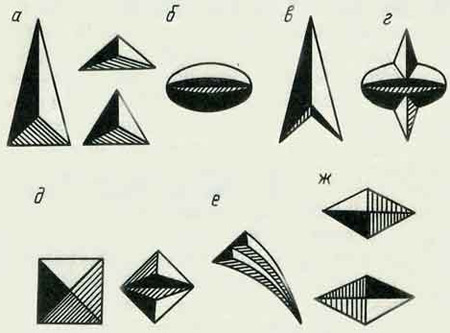
If you cut across, you will get unwanted chips that will ruin the patterns.
Asterisk – fifth figure
Geometric cutting patterns can be varied, but basically consist of the same elements that are arranged together. Same with the star shape. It consists of four pyramids, and this figure will not be difficult to make. You just need to sequentially cut out four pyramids one after another.
There is such a type of thread as through or openwork - it is divided into, in fact, through and overhead, it has two subtypes: slotted thread (through sections are cut with chisels and cutters) and kerf thread (actually the same thing, but such areas are cut out with a saw or jigsaw ). The most productive tool, of course, is the jigsaw. It makes it easy to do slotted carving, which is great for woodworking!
Openwork carving is called openwork, because, as you can see in the photographs, products made using this technique look incredibly light, like the most delicate lace. The essence of slotted carving is to saw through a pattern in a thin piece of wood. This type of carving has gained incredible popularity in the field of design and interior decoration. The most striking examples of carved carvings can be considered house carvings - decorations for frames on windows and doors, carved railings, pediment decorations have been created in Rus' since time immemorial and many of them have survived to this day.
The main difference between slotted threads is that the background of the product is completely removed. But sometimes, for better perception of the pattern, it is nailed or glued to a solid background of a contrasting color. This technique is called overhead threading.
Learning wood carving: where the work begins
Initially, it is necessary to select a wooden blank of suitable size; for this type of carving, coniferous wood (spruce, pine, fir) is usually used.

Then the desired ornament is selected and the workpiece is prepared for transfer. At the same time, you can create a drawing of the future stencil yourself, or choose an existing template from the Internet, where you can find a huge number of both individual pictures and entire albums with images. The photo below shows examples of convenient and simple drawings:

The selected design is first transferred to paper, then the paper is rigidly fixed on a wooden piece. After this, you can either immediately drill holes for the file and begin sawing, or additionally transfer the pattern to the surface of the wood, and then begin carving.
When choosing a sketch, you should remember that small details of the ornament will be invisible against a large background, for example, on the facade of a building. Therefore, you need to select the desired ornament taking into account the proportions of the element to be decorated, be it a house or a picture frame.
We select tools and devices used to create patterns
When performing this type of carving, a variety of cutting tools are used, such as ordinary knives and chisels. But working with such tools is very labor-intensive and tiring. Therefore, drills and saws are more popular for such purposes, and the type of saw can be different - from a jigsaw to a hand saw, depending on the size of the template you created.
Nowadays, craftsmen rarely use manual labor when performing large-scale work. Convenient household power tools are often used, such as an electric drill, a hand router and a jigsaw. Using a jigsaw, work is done quickly, easily and efficiently. But with such work it is impossible to do without a drill used to pre-drill holes for the file. Working with a hand router is not so easy and productive; moreover, it requires preliminary skills in handling this power tool. But the carving is much better quality and there is no need to make preliminary holes in the workpiece.

There are also more original ways to create a slotted pattern on a wooden workpiece. One of these methods is burning. The essence of this method is to literally burn through a pattern on wood with highly heated nichrome wire. The disadvantages include the specific burning smell, the need to cool the working tool, which causes the work to take a little longer, as well as noticeably charred edges of the finished pattern.
A more advanced method of this method can be considered laser cutting, which is distinguished by the high quality and accuracy of the resulting pattern. However, the use of this method is only possible when purchasing very expensive equipment, which is why this type of work is now not very often used in practice.

In conclusion of the article, I would like to show you the amazing work of a very experienced master, who depicts in his works not just abstract drawings, but very accurate and detailed copies of animals.
Video on the topic of the article
One of the most luxurious products, valued for their originality and handicraft, are rightfully considered to be products made in the form of wood carvings. Since ancient times, with the help of this type of art, unsurpassedly decorated towers and huts have been created.
Some of them are currently considered architectural monuments. This art is beginning to revive in the modern world. Wood carving stencils are excellent helpers in this matter.
In contact with
What is a stencil for?
First, let's try to figure out what stencils for woodworking are. These are special ones that are used to apply pattern elements to the surface of wood.
They are much make it easier to repeat identical characters and allow you to speed up your work. For example, the most popular stencils for are samples for platbands.
With their help, quite complex interior and facade design work is performed.
Stencils are divided according to their purpose for creating interior elements:
- ribbon carved ornament;
- carved platbands;
- pilasters;
- towels;
- carved balusters and more.
All varieties are considered professional templates. You can use them create several ornaments for wood carving of a voluminous nature and significantly facilitate the task assigned to the master. There is no need to create them yourself. On the Internet you can find and download the option you like.
Prices for wood carving kits
wood carving kits
How to choose a stencil
Wood carving patterns are so diverse that they can be used by both beginners and advanced professionals. With their help, both simple ornaments and high-level works of art are created.

The main thing is to make the right choice. To do this, you must adhere to certain rules:
- if you started using incisors quite recently, then Don’t choose intricate patterns, since it is quite difficult to work with them, and the workpiece can be damaged;
- for each type of wood carving they choose their own stencil;
- Before starting work, you must apply a stencil design to the workpiece; the lines must be neat and clear.
 Finding stencils today is easy. This can be done using electronic libraries.
Every decorator will appreciate the convenience and wide selection of this source. Here you can choose drawings from a bygone era as well as modern masterpieces.
When making a choice, be sure to compare the dimensions of the workpiece and the image itself.
You also need to choose a sample that will look appropriate on an element of the interior. We pay attention to the nuances:
- for a large product, you do not need to choose a stencil with small elements or openwork patterns;
- for small items, stencils with large designs are inappropriate;
- proportions must always be observed.
All these tips apply to any drawings.
Types of wood carving
Wood carving does not have a narrow direction; on the contrary, it has several varieties:
- slotted;
- flat-relief;
- embossed.
Slotted carving on plywood
 The key to success when performing slotted carving is the correct choice of ornament. Thanks to it, plywood carving sets the overall concept and adds aesthetics to the product.
Drawings and ornaments on floral or animal themes are standard representatives of the classical style and are suitable for any interior design.
Very often used slotted inscriptions. In this case, ready-made stencils are difficult to find, since they are created individually for each case. This is due to the fact that it is necessary to maintain the size, style of the font, and the set of words is always different.
Important! The situation is completely different with patterns of plant, animal and fantasy styles. Many options for this topic can be found on the Internet. Some options are shown in the photo below.
House wood carving
Brownie is the main focus of the design of huts, which is very common in the Nizhny Novgorod region. It is she who can boast of various lace patterns. To perform it yourself, you should select the appropriate sketches.
The main condition for house carving is to avoid small parts. They will get lost on the facade of the house, and will not last long.
Options for house carvings can be selected on websites dedicated to wood carvings. But there are craftsmen who can make a template to order. In this case, you can realize exactly your idea and get an original pattern.
Attention! Patterns for house carvings are applied using tape stencils.
Through wood carving
A distinctive feature of through thread is complete wood removal from the inside of the picture.

Through threads come in different styles:
- simple, in which elements are cut out along the contour of the design;
- openwork, when the pattern is created with a volumetric effect due to multi-level cutting.
Through carvings are used to make frames, various overlays, door panels, and decoration elements.
Through carving in oriental style is done using a jigsaw.
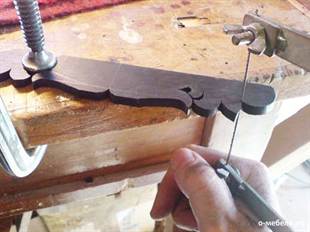
Sawing with a jigsaw
Sawing with a jigsaw is mainly carried out on plywood. To perform quality work you must have at least the slightest experience with the tool. Also an important factor is the presence of an original stencil depicting animals.

Commonly used stencils:
- a pair of swans;
- head of a deer, wolf;
- cockerels on a knitting needle;
- a horse standing on its hind legs;
- butterflies.
It all depends on the style of the interior, which needs to be supplemented with decorative elements. You can easily find examples of templates on the Internet.
 The most suitable material for sawing is birch plywood 3–10 mm thick. In addition, for work you need to prepare:
- copy paper for interleaving the pattern;
- special paper for sanding parts;
- wood glue for joining parts;
- clear varnish to give a decent appearance.
Before starting work, the workpiece is carefully polished with glass paper, only then do they begin to transfer the design.
Floral ornament
Often, floral or foliage patterns are made in the form of stripes or borders consisting of repeating patterns. Can be made in an individual composition that contains an image trees, fruiting plants, various floral elements And so on.

The work is done in various ways:
- display in a naturalistic form;
- simplified plant elements.
Floral patterns for carving wood are in second place in popularity after geometric patterns. Favorite thematic elements at all times are lilies, grape leaves and berries, oak, hops, ivy, etc.
Sketches for patterns
Stencils for wood carving are quite diverse in their subject matter. Some of their variants are used in a narrow direction, and some can be found on any interior elements.

Here are several sketch options that can be used for a specific purpose:
- Wooden patterning is used to decorate the facade of houses. It looks perfect on both doors and walls.
- Art style cutting is used to decorate tableware and furniture.
- Products made using intricate openwork cutting are especially held in high esteem. Most often it is used for household items.
Important! A correctly selected sketch will help you complete wood carving quickly and accurately.
Useful video: templates for wood carving
Each type of cutting has its own processing technology, and detailed elements are maintained. In some cases, several techniques are used simultaneously, which are subsequently transformed into a three-dimensional canvas with the presence of smallest fragments. This characterizes a true master.
Hand-made window trims are a wonderful decoration for the facade of a house (ready-made stencils and templates will be given in the article below). They make the house unlike any other, visually changing its proportions.
Today, with certain skills, you can independently create elegant frames for windows in a wooden building. Moreover, they can be made not only from wood, but also from other materials.
Specifics
 When the owner decides to install platbands, he strives to arrange traditional decor in his possessions.
Platbands have the following advantages:
- Excellent decorative function. This visually enlarges the building.
- Complementing the overall style of the architectural design.
- The space between the window opening and the wall plane is protected from moisture and dust.
- Heat losses and noise levels are reduced.
- The individual features of the house and the style of the chosen era are highlighted.
Platbands also have some disadvantages:
- Wood needs certain treatment to prevent high humidity and deformation.
- Products require regular care and treatment.
- They do not harmonize with metal-plastic windows. In this case, the platbands are made in the same color scheme.
Create your own templates
 Today there are many platbands. Their types are determined by the methods of their installation to the window. According to this criterion, there are two varieties:
- Telescopic. Their specifics: L-like protrusions that coincide with the grooves of the window frame.
- Invoices. Installation takes place on the window frame. Fasteners - construction glue or nails with screws.
For your information: finished samples are created in full size. They are printed in compliance with the required parameters.
An elegant solution is the installation of carved products. It is possible to independently implement such plans only if you have special equipment.
Popular materials

- The most common material for platbands is wood. Products made from it have an elegant and harmonious appearance.
- Plastic versions are also often used. They are characterized by strong resistance to temperature changes and ultraviolet radiation. Plastic options are sold ready-made.
- Another popular material is MDF. It is prepared from wood waste. It is more environmentally friendly than plastic. In addition, products made from it have a look reminiscent of natural wood.
- Polyurethane. Variations from it are highly practical. Facade stucco is often made from this material.
The nuances of choosing the right wood
 As already noted, wood is the most popular material for platbands. And the performance characteristics of wooden platbands depend on the type of wood used.
Here we usually pay attention to such options.
- Hard deciduous. These varieties include oak and beech. They are very durable. But it is quite problematic to create patterns on them.
- Soft deciduous. These are: linden, aspen and alder. They are easier to process. Patterns are even created on their surface by hand. And such surfaces are thoroughly treated with special means.
- Cherry and apple tree. They are optimal for creating small components that can be attached to the base.
- Pine and birch. They are also easy to handle. And they have excellent working qualities.
- Various combinations of wood types. The use of special protective compounds for powerful impregnation here is mandatory.
Using high-quality wood, a beautiful, original design of the window opening is obtained.
The nuances of creating templates on your own
The basis of the work comes down to creating stencils and design.
Printing stencils on your own is something that everyone can do. It is important to achieve a combination of the chosen ornament with the entire style. Mixing geometric and floral patterns is not allowed.

When working on platbands, the following subtleties are taken into account:
- There should be harmony in the color palette of the walls and decorative elements.
- It is imperative that the appropriate parameter is selected correctly. The platbands should not be very wide or small.
- A high-quality version of the coating is selected. Special paints and varnishes are used.
- A template is required for making external carved components.
- The pattern is correctly positioned on the workpiece. The details follow along the wood grain.
When it is possible to achieve a color combination of platbands and the plane of the walls, a complete and harmonious facade is obtained.
Manufacturing stages
Before creating window decor, carved frames are selected from photographs. You need to make a template in advance. It should turn out to be the same for the design work of all openings.

The following methods for creating patterns are usually used:
- Overlay thread. It has separate pattern elements. They are attached to the same base.

Installation of overhead components should be on the base in compliance with the template pattern.
- Slotted thread. Here they make a through ornament. It looks like wood lace.

For all working methods, the presence of stencils is mandatory. This is what they look like:
Advice: For simple patterns it is not necessary to make a large-scale stencil. A piece of notebook paper is enough.
 Also in your work you must have the following tools:
- Jigsaw.
- Hacksaw (oriented for wood).
- Knives and chisels.
- Drill.
- Milling technology
Platbands must be created from prepared materials. The working stages are:
- Meticulous measurements are taken.
- The selected tree must be dry. If it is wet or humid, then it must be brought to dry conditions. The width of the boards is determined by the parameters of the window opening. The thickness of the material reaches at least 3 cm if a slotted thread is made, and at least 1 cm when an overhead thread is made.
 All workpieces are pre-treated with a protective compound. They are cut using templates. And the cutting of ornaments is done using a jigsaw. It is better to use different types of files for this tool.
Working with an electric jigsaw requires certain skills and special care. The created holes must be filled. An excellent tool for this is sandpaper. After powerful grinding, the part is treated with special impregnation.
Next, all prepared parts are installed on the base. Here you need to use glue or special nails. In such work, it is better to avoid using self-tapping screws. They will cause the products to crack.
Installation specifics
 The created platband can be attached to the desired position using the following methods:
- On a dull thorn. Installation of such parts is carried out on the inside. Special holes should be made in the frame for them. Glue is applied to the spike and distributed evenly. The tenon is inserted into the groove. This fastening protects the platbands from dust and moisture.
- Using a through tenon. The joint area here is thoroughly treated with varnish.
These methods are justified when working with a wooden window. To attach to metal-plastic, a special powerful liquid glue is used.
Required care
 The installed platbands require constant attention and care. For processing, special preparations are used - powerful impregnations. They create high-quality protection against:
- wood pests;
- appearance of cracks;
- sudden fire.
Carved versions must be coated with a primer, then varnish or paint. The intensity of such treatments is once every 3-5 years. In this way, the service life of the products will be seriously extended, and at the same time their attractive appearance will be preserved.
When installing plastic or metal products, no special care is required. It is necessary to provide high-quality protection against corrosion for products. Periodic paint updates are also required.
Thus, it is very possible to independently make platbands of extraordinary beauty with elegant patterns. Some carpentry, carpentry and tool handling skills are required. This way you can decorate window openings in a very original way and add an elegant twist to your chosen architectural style.
How carved frames are made using the slotted carving technique, see the following video:


