Old-style drain tanks are simple in design. This makes the system quite reliable, but even the most primitive devices break down periodically.
If primitive people could repair hammers, then the modern Internet user has enough skills and knowledge to repair the old mechanism at home.
Some toilet models use a separate cistern drain that directs water into the sewer line directly rather than running it through the toilet. This ensures that there is enough water in the toilet before the next use.
Problems that you can solve yourself
Pressure Softener: The toilet is flushed with water, which, by means of a pump, compressed air, or other means, is accelerated by a pressure system. Typically, designs toilet paper with reduced pressure are found in water-resistant toilets with low level flushing.
The design of these products is different water and a design designed using the simplest physical laws. The main nodes are: a filling device, consisting of a movable lever, on one side of which a float is placed, and on the other, a valve that shuts off the water, and.
The most "ancient" toilet cisterns of the old sample consist of cast iron bell-cork with soft rubber gasket. When you press the outer lever, the bell rises, the water rushes down through the opened hole.
Q: Uplifting sonic air boosted toilet flush sources
About eleven years ago, we remodeled two of our bathrooms. There was no visible water in the tank, and instead there was a fairly large reservoir of of stainless steel, which appeared to be a pressure reservoir. When the toilet turned red, there was a "noisy" sound, similar to air pressure.
Tank repair with two buttons
It was like the sound of toilets on cruise ships. Richard is similar to a pressurized flush toilet that uses a combination of building water pressure and air charging to flush the toilet using less water than some other systems. Leaching pumps Wastewater combine a tank on the floor to receive waste from the toilets, as well as a sewage pump to lift wastewater to the building's drain line, which is higher than the plumbing serviced by the pump. Jet pumps are often found in basement washrooms in buildings, emerging from the sewer line above basement floor height.
In later designs the bell was replaced by rubber or plastic pears. When the container is released, the float drops and the lever opens the valve through which water begins to flow. As the tank fills, the light part rises until it is in a position where water stops flowing into the device.
Toilet water storage tank - wall-mounted
An toilet water tank or "cistern" is a water tank that is used to flush a toilet. On antique toilets, the cistern was mounted a few feet above the toilet and attached to the wall of the building. Modern flush toilets that use a water tank have a tank bolted to the toilet, or include a tank and bowl in a one-piece toilet design.
A toilet flange made of brass, plastic, or steel flange forms a flat ring around and is usually attached to a waste pipe in the floor or wall. The toilet flange includes holes to allow the flange to be attached to the floor or wall, as well as slots to receive the heads of the toilet bolts that secure the toilet to the flange.
Possible breakdowns and repair methods
In any even the most primitive mechanism, sooner or later they begin to fail. various details. Most breakdowns in old-style drain devices are fairly easy to fix.
Continuous supply of water
First of all, you need to check filling valve is leaking. To do this, remove the cover and lift the float lever. If after that water enters the tank, it means that the valve itself has broken and needs to be replaced.
The toilet flange is shown in our photo on the left and another toilet flange, indicated by the red arrow in this photo. Toilet mount bolts secure the toilet to the toilet flange, and in four-blade toilets, two more bolts can secure the toilet to the floor.
Toilet bolts secure the base of the toilet to the floor or structure. Beware: A poorly stocked toilet not only seeps into the floor, it's dangerous. A disabled person or a person sitting on an unsafe toilet could tip over the unit, resulting in serious injury.
For this turn off the faucet in front of the tank and drain the water. Wrench the part connecting the valve to the water supply is unscrewed, the float lever is removed, the fixing nuts and the valve is pulled out. A new one is installed in its place. The float arm is set to the optimum position after water has filled the body.
Deep toilet dimensions - toilet placement
The deep dimensions of the toilet place the toilet waste pipe and flange assembly in the rough and finished floor housing so that the toilet will be located at a sufficient distance from the wall. Rim Height: The height of the toilet rim above the finished floor. "Standard" toilets are slightly shorter, typically 14 to 16 inches above the floor surface.
Side Handle Flush Wipe: The most common toilet flush control uses a lever mounted on the side of the toilet or in the front near one corner to operate the flush valve. The lever usually raises the hand to open the flush valve.
If the water flow is completely blocked when the lever is raised, The problem can be caused by the following reasons:
- Distortion of the float lever (thrust)- leads to the fact that it begins to cling to the sleeve, the float does not fully pop up and the valve does not close. In this case, the traction is pulled out and straightened.
- In case of violation of the tightness of the float it remains partially or completely submerged in water and does not close the valve. In this case, it is replaced with a new one. If there is no suitable model, the damage can be sealed with heated plastic or sealant, after removing all the liquid from the leaking part, but this is a temporary measure.
Constant outflow of water
If, until it is empty, it means that the tightness of the drain mechanism is broken and water seeps between the body and the bell (pear). There are several reasons for this error:
Tap water shut-off valves or isolation valves
Top flush toilet or top flush toilet: manual control A flush consists of one or more buttons or rods that run across the top of the toilet. Stop valve for water supply: a water valve installed under or next to water-cooled toilets.
Water level in the toilet
The flush toilet is located below the building's sewer line and uses water pressure to move waste vertically to a drain line that is higher than the toilet itself. Wastewater leaching pumps above. Toilet water level: Most toilets have a mark on the inside of the tank indicating the correct fill level in the tank. Adjust your fill valve to fill to fill that level for proper flushing. Too little water can result in wasted water by briefly flushing the toilet.
- Corrosion or contamination of the seat surface lead to the fact that deposits do not allow the drain mechanism to close tightly. In this case, it is cleaned with an emery cloth.
- Gap between body and seat lead to the same problems. In this case, it is necessary to tighten the fixing nuts with a socket wrench.
- Sometimes the guide bushing falls out of the saddle- this leads to a distortion of the constipation when lowering. In this case, the sleeve is inserted into the hole of the arc and wrapped with an elastic band.
- The release lever could also be the culprit., which in the wrong position prevents the pear from completely blocking the saddle. In this case, it is necessary to bend it and lower it below the inlet of the underwater pipe by 2.5 mm.
The second option is check the fastenings of the rocker-retaining plates and tighten loose screws. This is quite difficult as the distance between the wall and the screw heads can be less than 10 cm.
Filling the toilet above the recommended fill line draws water on every flush and risks a "working toilet" if the fill level brings water down the overflow pipe. Water-efficient toilets use a lower total volume of water to flush or clean the toilet, typically from 1 gallon per flush to 6 gallons per flush. Synonyms: low water toilet, low water consumption toilet, low flush toilet, high efficiency toilet.
Water supply or filling valve for toilets
Waterless toilets listed below. Valve ball valve or valve to fill the toilet above.
Early flush toilets: wall-mounted cisterns
Modern toilet designs - photos, examples. A variant of the flush valve toilet is the flush valve toilet, which is used in bathrooms whose toilet was below the outlet of the building's sewer line to a sewer or septic tank.
You can try tightening them with a short tool by inserting it into the slot of the screw. When performing these steps, you must ensure that vertical plate with four corners was in a recess on the body.
Overflow problems
This is a fairly typical failure, which is easy to identify. Water is drawn into the tank and starts to flow out, if you turn off the tap, the flow of water from the device stops, and when you press the overflow socket, the flow stops - the fastening nut is loosened. In some cases, it is enough to turn the overflow several times clockwise and the nut takes its rightful place.
An explosive toilet relies on building water pressure to push waste from the toilet up to a higher sewer line. Since a cleaning toilet that relies on water pressure on a building creates a cross connection, these toilets are not allowed by plumbing in most jurisdictions.
Repair of a tank with a lower water supply
In our photo of the flush toilet, you can see the flush control lever mounted on the wall in the upper right corner. Like modern toilet with the flush valve shown above, the flush flush toilet is also a rear flush or rear flush toilet.
Otherwise, you will have to resort to the following tricks. Need to empty the water tank wait until all surfaces are dry.
If the nut does not unscrew completely, which appears between the overflow socket and the bottom of the tank tightly wrap the gap with sealing material and fill it with silicone glue or paint. Wait until the coating is completely dry.
Basement toilets using a sewage leaching pump
The above flush valve toilet does not form a cross connection, drains into a gravity sewer line, not a raised sewer line, and is permitted by current plumbing codes. Bathroom fixtures, including toilets, located in buildings whose sewer line extends high into the basement wall need a means to raise gray water, as well as black water or wastewater from the toilet, to a height sufficient to drain into the sewer line and exit from the building.
If the nut is completely unscrewed, the overflow is removed, a sealant is wound on its thread so that it fits snugly into the hole in the bottom of the tank.
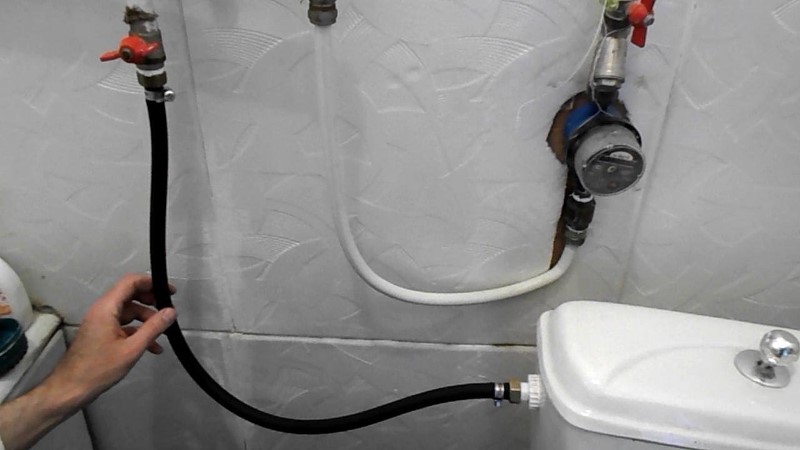
Supply hose replacement
Damage to the supply hose and gaskets at the junction leads to the appearance of water droplets (the problem can be confused with) at the points where it is attached to the body of the drain device. First of all tighten the connecting nut.
The liquid ejector pump for sewage is the most common solution to this problem. The sewage push pump integrates a small storage tank, a sewage treatment pump, and pulverizing piping, and then pumps the sewage and sewage from the lower floor level to a raised sewer line, which then exits the building.
The real owner must know the basic designs of drain tanks
Our photo shows a typical basement sewage jet pump installation. The toilet connected to this pump is not shown, but was placed on the floor nearby. The drain from the basement toilet was run below the floor slab onto the black plastic tank shown in our photo. White valve in the photo center above the top of the tank sewer pump is a non-return valve that prevents sewage from flowing back into the pump from above.
If the leak remains, turn off the water and disconnect the hose. The gasket is changed, the thread is covered with a winding, the hose is reattached to the tank and the nut is tightened.
Loud noise when filling
 Sometimes when filling drain device for an old type tank, it makes a loud noise that can wake up the household. Can replace the part with a special stabilizing device, and thus fix the problem. If the pressure entering the housing is not too strong, the problem can be solved much easier.
In a plumbing system using a wastewater ejector pump, as a rule, all water pipes merge underground building by gravity into the jet pump pump reservoir. When the level of sewage in the ejector pump reservoir reaches a sufficient level, the float turns on the pump, forcing the sewage to pass through check valve up to the construction sewer pipeline.
Depending on the location of building piping, we sometimes find sewage jet pumps that are positioned with the top of the unit slightly above floor level - perhaps reducing the available storage volume between pump cycles.
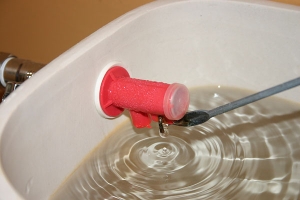
The filling valve mechanism includes a short tube for draining water. She needs vertically install a muffler from a flexible plastic or rubber hose by lowering the lower end into the water at the bottom. This will help to avoid noise from falling water and the sound of a jumping float.
A familiar picture - go to the toilet, and there is water under your feet. And well, if not a few centimeters. Or as an option - to leave the toilet, but the tank does not want to drain the water. Of course, there may be other problems as well. But with all the diversity, the reason for their occurrence is always the same - a malfunction of the toilet drain system.
Beware: in the event of a power failure, sewage or sewage jet pumps will not work unless you have a backup power source. So don't count on continuing to use plumbing fixtures connected to one of these devices when there is no electricity.
Saddle Jet Pumps: Also, do not confuse a sewage jet pump with a sewage pump. gray color or a lift pump, which is sometimes installed to move gray water from the basement to sewerage building. Water-efficient toilets use several strategies to reduce the volume of water used to flush waste: changing the volume of flush, pressure, or power using a small volume of flush water, and reducing the volume of flush water using a reservoir barrier in a cistern or toilet tank.
It will be nice if the restoration of the product's performance results only in replacing the gasket or tightening the loose screw. And if not, and will the entire system need to be replaced as a whole? Sounds menacing. But don't worry.
Knowing the basic designs of drain systems, how they work, having basic skills in repair work, it is quite realistic to replace all the fittings yourself. But the question arises, where to start?
Criteria for the right choice of plumbing
Compressed air is what forces the water into the bowl, so instead of the "pulling" or siphoning action of the gravity unit, the pressure assist device "pushes" the waste. In the upper left is a modern squat toilet in Japan; below is a more typical waterless squat toilet used in Mexico and widely used in India and other Asian countries.
Squats vs Sitting on a Seat Safety Safety Signs
When Western-style hosiery is installed in areas where people are mostly familiar with squat toilets, we find instructive signs such as the one below. A toilet instruction sign above the left front seat asks users to sit rather than stand when urinating in the toilet. Upstairs, on the right, toilet users are warned not to squat on the toilet seat.
Before starting work, well, you just need to take 5 minutes of time and carefully consider how the drain system of our toilet bowl is arranged. This will save both time and money.
The real owner must know the basic designs of drain tanks
You may not even know how to replace the fittings in the toilet bowl of a certain model. But all the work can be done the first time, if at least approximately navigate the device of the main types of tanks. In fact, according to the principle of work, everything is the same. The only difference is in the material of manufacture, the water intake system, and the drain control. Consider the main models.
Old-style tank - "sovdepovsky"
It has two modifications: with a rope - pulled, the water ran, and a newer one, what they began to call "compact" - without a pipe, with an upper stem to open the valve.
The first armature was made of metal. Only in the first case, the tank is mounted on a pipe, it has only one bottom hole. In the second - stands on the toilet. It has two pairs of holes at the bottom: one pair for attaching the drain rod, the second for attaching the tank to the toilet, plus an additional hole for the overflow tube.
Cisterns with one or two button flush control
Such fittings have plastic parts, with the main fastening in the center.
They differ from one another only in functionality:
- With one button - the water drains all at once.
- With two buttons - water can be "dosed". One drains the entire volume of water, the other only part of it.
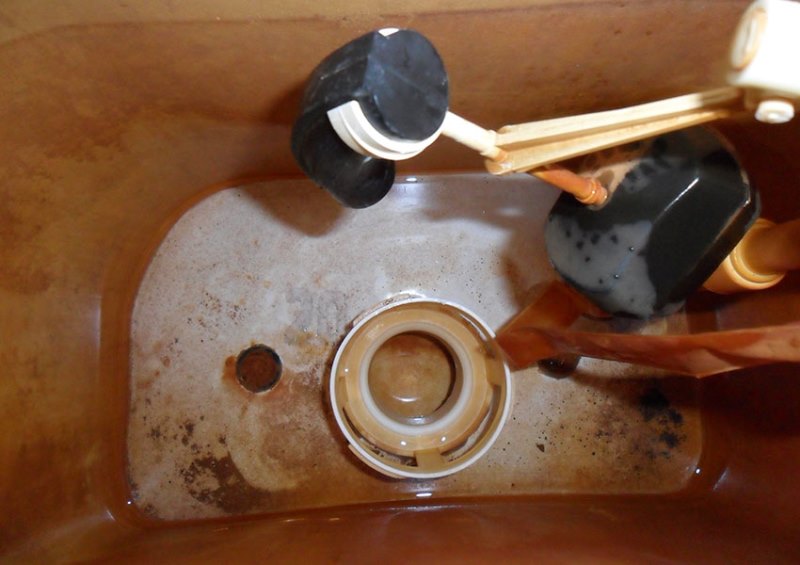
Tank with water supply from below
Modification of previous pushbuttons. Everything, in principle, is the same: fastening, material, principle of operation. Only the branch pipe connected to the water supply is located not on the side, but on the bottom.
We begin work on the dismantling of old fittings
Step by step, all the preliminary work looks like this:
- We close the tap on the riser, which is responsible for supplying water to the tank. Disconnect the water supply hose.
After the faucet is closed, it is necessary to drain all the water and soak up its remnants with a rag. Sometimes, in a hurry, they forget to do it. They begin to unscrew the fastening screws - and the “flood”.
Disconnect the tank from the drain pipe ( old model) or toilet in new products. In the first case, unscrew the large metal nut located on the pipe. In the second - two nuts located below, under the toilet bowl platform. In older modifications, there are difficulties with dismantling - the iron mount rusts and is poorly unscrewed. There was a problem - we cut off the nuts. This can be done with a hacksaw blade or a file.
- We shoot;
- We lay the removed tank on a wide stable surface;
- We first dismantle the float and the water pipe with a valve;
- We remove the main drain system.
When removing the drain mechanism, this applies more to older structures, you should be careful. A metal tool poorly used will damage the surface of the plumbing fixture.
Removing old fittings, wash the tank, wipe it dry. We make an audit for damage in the form of chips on the holes or possible cracks that appear on the surface of the sanitary ware.
Putting the new valve in place
It was said above that older models of drain systems have more holes for attaching fittings. It does not matter if new fittings, similar in design, are installed in place of worn fittings. But often, in order to complete our old plumbing with a more reliable new “stuffing”, there is nothing left for us but to replace the toilet cistern fittings that have become unusable with modern fittings. In particular, we will devote a few lines to this in the general assembly process.
Let's start:
- In older models, we attach a bracket with a rod and a pear to the bottom of the tank metal mount. In the new ones, the drain system is fixed in the center with one plastic nut.
- Let's be careful! We work with plastic fasteners gently. Excessive tightening force may damage one of the fasteners.
- Install a water supply pipe. In older systems, we will then attach a spoke with a float to it. In new ones, the nozzle can be combined with a water level control system. That is, the float and the intake pipe are combined into one design. We install everything together.
![]()
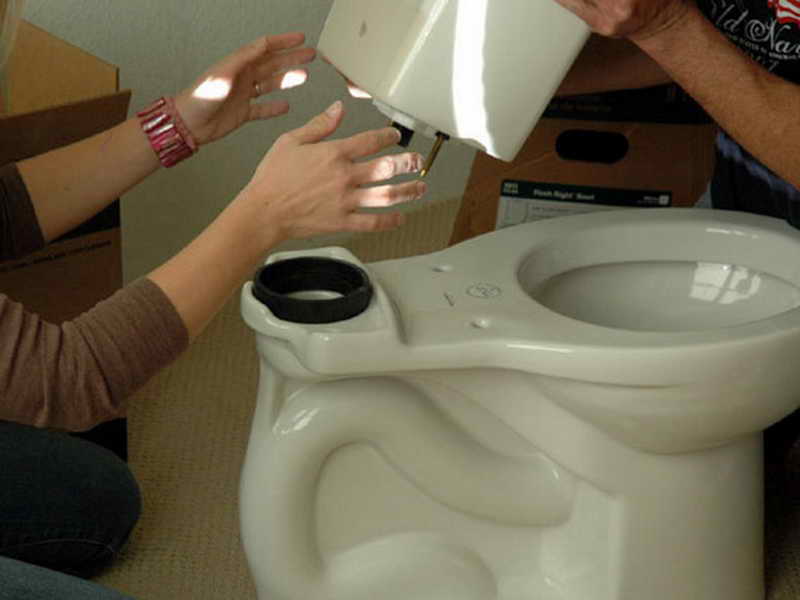
- Next is the tank with the collected drain system needs to be installed on the toilet.
- In older models, between the cistern and the toilet, we use a large elongated rubber shock absorber. It "captures" two holes: a drain, and a hole for overflowing water. If the "sovdepovsky" compact is installed modern system drain, we close the additional hole for the water overflow tube with a plug.
- Compact today it is completed with a gasket-shock absorber in the form of a ring.
- We put a tank on the gasket installed on top of the toilet bowl. We press it to the toilet with two fixing bolts and nuts.
When buying fittings, you need to focus on original products, from a “branded” manufacturer. It will last longer, there will be fewer problems during operation.
The assembled drain system needs to be adjusted
For this:
- we adjust the position of the float so that the distance from the surface of the water to the top of the tank, with the tank filled and the valve in the water supply pipe closed, is within 4-5 centimeters. Or the water was below the edge of the opening of the water supply pipe by 1-2 centimeters;
- the top of the overflow pipe should be approximately 2 centimeters above the water level.
All. We close the lid, we can use.


