If you suddenly need a television antenna while staying at the dacha or on vacation, and you don’t have a factory model at hand, you can do without your favorite TV programs, but it’s much more interesting and faster to make such a device yourself. It can be made to receive certain channels in the meter or decimeter range. Next, we will look at how to make a TV antenna with your own hands in several ways, from which you can choose the most suitable one for yourself.
A fairly simple version of an indoor antenna that can easily be implemented at home in a short period of time. Designed to receive television channels broadcast in the UHF range. To make it, you will need a piece of coaxial cable, plywood or other sheet material as a base, electrical tape for fixing, a knife and a soldering iron.
Rice. 1: Coaxial cable antenna
- Take a piece of coaxial cable 0.53 m long and bend it into a ring shape (1) with open edges and fix it in this shape on a sheet of plywood;
- From the same cable, cut a piece 0.175 m long for the loop (2) and connect as shown in the figure.
- Connect the cable (3), at the other end of which install a connector for connecting to the TV.
The simplest antenna is ready, but it may not be enough to receive the signal, so you will need an active amplification unit. Or make a more complex figure-eight model.
Figure-of-eight antenna
A fairly simple version of a homemade antenna, it can be assembled within a few minutes. To do this, you will need any cardboard box, in this case you will use a shoe box, a plug, a utility knife, a soldering iron, tape, foil and glue.
The manufacturing process consists of sequentially performing the following steps:
- Open the box and clean the inner surface of accumulated dust and debris; if there is none, you can immediately proceed to pasting.
- Apply a thin layer of glue to the bottom of the box; it is important that it does not change the geometric parameters of the foil located on it. Cover the bottom with foil - it will act as a signal reflector.
 Rice. 2. Cover the bottom of the box with foil
 - Close the box and seal it with tape so that it cannot open spontaneously.
- Place two pieces of cable on the cover in the shape of a figure eight, the sides of which are secured with tape.
 Rice. 3: make a figure eight and secure with tape
 - In the middle of the figure eight, strip the cable and make two leads from the metal braid to connect the antenna.
 Rice. 4: in the middle of the figure eight, trim the ends
 - Cut a piece of conductor to connect the antenna to the TV; its length is selected in accordance with the distance from the installation site to the TV or.
- Strip one end of the connecting cord under the connector, strip the other in such a way as to assemble the lead from the screen and the lead from the central core through 1 - 2 cm of insulation.
 Rice. 5: Strip the cable
 - Connect the cable leads to the figure eight pins as shown in the figure.
 Rice. 6: Connect the cable leads to the figure eight pins
Connect the TV connector to the second end and connect to the TV.
The G8 antenna is ready for use; today it will be an excellent replacement for satellite television, since the picture of a digital signal is in no way inferior to it.
Double and triple square
Unlike the previous version, assembling an antenna in the shape of a double and triple square will require significantly more effort. But such a device will allow you to receive even weak television signals, the main thing is to ensure precise orientation to the repeater. At the same time, the quality does not depend on the distance to the source; the main thing is to maintain the overall dimensions. To make it you will need: metal tubes (copper, brass, aluminum) or rods, a dielectric rod, a wooden base for the supporting structure, connecting wires.
Depending on the diameter of the tubes, the antenna will be able to receive a different number of channels in a certain frequency range:
- 10 – 20mm is suitable for reception in the meter range, can catch from 1 to 5 channels.
- 8 – 15mm is suitable for reception in the meter range, can catch from 6 to 12 channels.
- 3 – 6mm is suitable for channels in the decimeter range.
 Rice. 7: double and triple square antenna diagram
 As you can see in the figure, structurally, a double and triple square consists of two and three frames of regular shape, differing in size. Depending on the overall dimensions, the received wavelength will also change.
| Wavelength | 1 | 2 | 3 | 4 | 5 | 6 | 7 | 8 | 9 | 10 | 11 | 12 |
| IN | 1450 | 1220 | 930 | 840 | 770 | 410 | 390 | 370 | 360 | 345 | 330 | 320 |
| R | 1630 | 1370 | 1050 | 950 | 870 | 460 | 440 | 420 | 405 | 390 | 375 | 360 |
| A | 900 | 760 | 580 | 530 | 480 | 250 | 240 | 230 | 220 | 210 | 210 | 200 |
| Sh | 1500 | 1260 | 970 | 880 | 800 | 430 | 410 | 390 | 375 | 360 | 350 | 335 |
| Channels, pcs. | IN | R | A | Sh |
| 21-26 | 158 | 170 | 91 | 152 |
| 27 – 32 | 144 | 155 | 83 | 139 |
| 33 – 40 | 131 | 141 | 75 | 126 |
| 41 – 49 | 117 | 126 | 68 | 113 |
| 50 – 60 | 105 | 113 | 60 | 101 |
For a triple square, the dimensions are shown in the table below
Table: dependence of dimensions on the received wave of the meter range, mm
| Channels | 1 | 2 | 3 | 4 | 5 | 6 | 7 | 8 | 9 | 10 | 11 | 12 |
| D | 1255 | 1060 | 825 | 750 | 688 | 370 | 354 | 340 | 325 | 312 | 300 | 290 |
| IN | 1485 | 1260 | 975 | 890 | 812 | 438 | 418 | 400 | 385 | 370 | 357 | 345 |
| R | 1810 | 1530 | 1190 | 1080 | 990 | 532 | 510 | 488 | 470 | 450 | 435 | 420 |
| A | 630 | 532 | 412 | 375 | 345 | 185 | 177 | 170 | 163 | 157 | 150 | 145 |
| B | 915 | 775 | 600 | 545 | 500 | 270 | 258 | 246 | 237 | 228 | 220 | 210 |
| Sh | 1500 | 1260 | 970 | 880 | 800 | 430 | 410 | 390 | 375 | 360 | 350 | 335 |
Table: dependence of dimensions on the received wave of the decimeter range, mm
| Channels, pcs. | D | IN | R | A | B | Sh |
| 21-26 | 134 | 158 | 193 | 67 | 98 | 152 |
| 27 – 32 | 122 | 144 | 176 | 61 | 89 | 139 |
| 33 – 40 | 110 | 131 | 160 | 55 | 80 | 126 |
| 41 – 49 | 99 | 117 | 143 | 50 | 72 | 112 |
| 50 – 60 | 89 | 105 | 129 | 45 | 65 | 102 |
The short-circuited bridge shown in the figure is designed to connect a symmetrical frame to an asymmetrical cable and acts as a matching block.
The manufacturing process consists of the following stages:
- Bend the tube into squares according to the dimensions given;
- Connect them at the top with an arrow made of conductive material, and at the bottom with an arrow made of dielectric material;
- Install the outdoor antenna on a wooden base;
- Cut the cable and separate the braid into a separate terminal;
- Connect the cable to the antenna, and plug the other end under the antenna plug to transmit television broadcasts to the TV.
The antenna is ready, this option is suitable for outdoor placement, so it is best to install it on the roof or a free-standing support.
From metal cans
If you can find a couple of straight beer cans made of tin or aluminum at home, then you have the opportunity to quickly assemble a good TV receiver. To do this, you need to take two cans of the largest possible volume, a good result will be achieved with a volume of 1 liter, but if they are not available, then 0.5 liters will do, a screwdriver or screwdriver with a pair of screws, a soldering iron, tape, a television cable, a dielectric base material (in this case, a wooden trempel is used).
The process of making an antenna from metal cans consists of the following steps:

Make loops for connection at the terminal of the braid and core.

After installation, you should configure the channels by changing the distance between the banks. The optimal position is selected based on the quality of the signal on the TV. Such an antenna will receive about seven analog TV channels.
In the form of a frame
To make such an antenna you will need aluminum plates, a metal mesh for making a reflector (from a barbecue, for plaster, etc.), bolts with nuts or rivets for fixing frame parts, a cable with a plug for connecting to an indoor TV, a drill, a screwdriver and pliers.
 Rice. 10: frame antenna
 The antenna manufacturing process is as follows:
- Cut the aluminum strips to the required size and drill holes at the ends for bolt connections.
- Assemble the frame as shown in the figure above, the joints are overlapped. To prevent oxidation of these points, it is advisable to cover them with paint or varnish.
- Connect a television cable with an antenna connector to points A and B on the antenna.
- Attach the frame to the reflector, most importantly, pay attention that the latter does not short-circuit the electrical circuit of the antenna itself.
- Install it on the mast and place it in the designated place.
If the signal turns out to be weak, you can get a more powerful antenna by connecting it to the circuit.
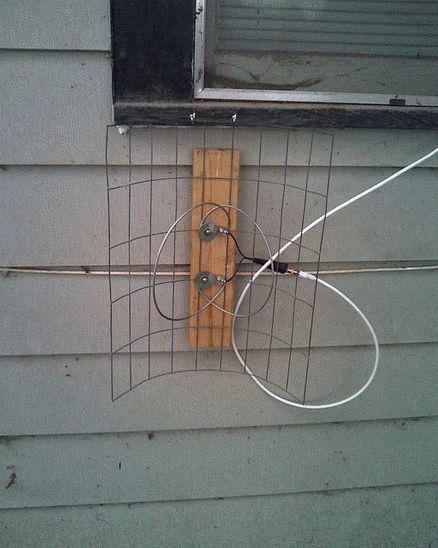
Butterfly shaped
Another version of an all-wave antenna, which allows you to receive a fairly large number of channels in good quality. Due to this, its work can replace the use, but the manufacturing process also requires utmost attention, accuracy and time. Structurally, it will consist of a wooden board and several pieces of copper wire with a 4mm core, bent in the shape of butterfly wings, which is where the name of the model comes from. Initially, you need to mark the location of the holes on the board and drill them according to the diagram:
 Rice. 11: Butterfly antenna hole pattern
The broadband antenna is ready for use; you can install it in the most suitable place in the room for receiving television signals.
Kharchenko zigzag antenna
This antenna option is designed for broadcasting digital television, which is carried out in the decimeter range. The main advantage is that there is either a digital signal or there is no signal at all, so the image is of fairly high quality.
Structurally, Kharchenko antennas consist of two rhombuses, which are made of conductive materials. Copper or aluminum wire, rod, angle or tire are suitable for them. A schematic representation of a zigzag antenna is shown in the figure below.
 Rice. 15: diagram and practical implementation of the Kharchenko antenna
 In this case, the dimensions must be calculated based on the wavelength. To receive digital broadcasting, the wavelength is divided by 4 - this will be the dimension B1, and to configure the antenna for a wider range, side B2 needs to be made 1 cm smaller than B1, for example, in the ratio of 12.5 and 11.5 cm. You can use pliers, a vice, or a hammer to bend copper wire. There is a reflector on the back of the antenna for better TV signal reception, but this modification was relevant for analog television; it is not necessary to install it in digital TV.
In addition to the wire to make the device, you will need a television cable, a frame for placing the receiver, insulating materials, and a plug for connection. From the tools, take an abrasive wheel or sandpaper, a soldering iron.
The manufacturing process includes the following steps:
- Prepare the wire of the required length, in this case 112mm is used; if you use other sizes, you should not forget about the reserve for the bend points.
- Bend the wire antenna as shown in the diagram, maintaining 90º angles and making a smooth turn at the bend points.
 Rice. 16: bend the wire
 - To connect the ends, make grooves and connect with thin wire or make two loops and connect them together, for better contact and to prevent oxidation, tin them. If there is varnish on the conductor, it should be removed before tinning.
 Rice. 17: Tin the ends
 - Repeat the same procedure on the opposite side to create a second contact. The distance between them should be about 2cm.
- Strip the coaxial cable on both sides - one for connecting to the antenna, the other for entering the signal into the receiver. For the antenna, you need to remove 3–5 cm of outer insulation and assemble the multi-wire braid into a separate terminal. For a TV, strip about 1 - 2cm and solder to the plug.
- Place the antenna on the base and solder the cable to it.
 Rice. 18: Connect the cable to the terminals
 - To protect against atmospheric influences and provide additional rigidity, the soldering area is treated with hot-melt adhesive.
 Rice. 19: treat the soldering area with hot glue
The antenna is ready for connection to a TV; if all the requirements specified by the designer are met, you will receive an excellent version of the device, the parameters of which are not inferior to the factory models.
Video ideas
If you live in the suburbs, cable TV connection problems are not uncommon. Maybe, for example, the signal often disappears - this deteriorates the quality of the picture. But the situation can always be corrected, and you can do it yourself, you don’t even need a television technician. A TV antenna made with your own hands from scrap materials is not fantasy, but reality, and the result is a very powerful device that can receive a signal without any problems.
Television "battery" design
How can you make a TV antenna with your own hands if you don’t even have an idea of basic technical concepts? It's simple. You need to find copper or brass wire and arm yourself with a penknife. The method is good for people living in an ordinary city high-rise building. The wire is stripped from each end. One of them should be wound to the central heating radiator, the other should be connected to the TV connector. That's all - the signal will reach without problems immediately after such a connection. The secret is simple: pipes are located throughout the home - including near the roof, due to this the signal is amplified, from five to seven channels will definitely be “caught”.

Antenna dryer
You can make a DIY TV antenna without using batteries. Copper wire can always be tied to the balcony dryer, or more precisely, to its metal strings. The procedure in this case is exactly the same as in the example above. This technique will not only increase the number of television channels - it will also improve the overall picture quality.

"Can" antenna
We present to you another version of a homemade antenna, designed especially for a limited budget. By the way, this method of “catching” TV has been known for a long time. All you need is a few beer (or soda) cans, a TV cable or copper wire, and a clothes hanger. If you have a soldering iron, it’s good, it won’t hurt: the design will be more reliable, the signal will be of much better quality.
Cans of carbonated water or beer are washed and dried well. Then they are carefully secured at both ends of the hanger. This work can be done with electrical tape or tape. The ends of the TV cable are stripped, two copper wires need to be released from under the sheath. Next, the copper ends of the wires are threaded into the “ears” (the same ones with which the can is opened). A wire is clamped between the surface of the container and these “openers”. The entire structure is exposed outside the window - the free end of the TV wire must be inserted into the cavity of the connector. What can I say - the antenna is completely ready for use, it's time to start testing!
Indoor antenna
To make an excellent device that will ensure reliable signal reception, you need a copper wire with a diameter of 2-3 mm. You also need a standard TV cable, a plug, and a small amount of double-sided fiberglass. If copper is not available, aluminum can be used. When there is no antenna for digital television, this option will definitely help.
First, a copper wire is bent into a ring (about 200 mm in diameter) - often using a paint bucket as a guide.
Fiberglass is needed to make the board; without it, the TV antenna will not work. You can do this with your own hands, the main thing is that the size of this element is at least 0.25 by 0.30 cm. To make the board, you need to have some experience - current-carrying paths are transferred from the drawings, they are laid with copper wire, and excess foil is removed.
To ensure that the structure is protected from mechanical damage, it is recommended to secure it in a plastic or metal box. Holes are made in the side faces for the cable and antenna.
When the preparation of the elements is completed, you can assemble the device. The ends of the antenna ring are inserted into the box, bent at right angles, inserted into the board and soldered. Then the front side of the board is turned to the bottom of the box and secured with a nut and screw. A TV cable is threaded into the hole on the box, the central core is soldered to the right end of the antenna ring, and the shielding braid is attached to the foil of the board. All that remains is to close everything, install the cable plug into the connector, and start setting up the channels.

3G antenna
To get the simplest design of a homemade 3G antenna, you need to make two squares from bent wire. The side of each should be 5.3 cm. The ends of the squares are soldered - this way a continuous system is obtained. To make such an antenna with your own hands, the thickness of the copper wire should be from 1 to 4 mm.
What preparatory work should be done? First of all, the RG6U (antenna wire) is stripped, a connector is put on it so that the end protrudes 1 cm from it. That's all, we can say that the device is done. Now you need to make a reflector - plywood is often chosen for this. A 120 by 135 mm tile is wrapped in foil (metal).

GSM antenna
To begin, take an RG6U television cable and strip it from one end. Next, the copper wire is soldered to the central conductor. It can have any thickness, the optimal length is 820 mm (if you are interested in the 900 MHz range). A do-it-yourself GSM antenna is quite possible: a wire is attached vertically upward, a second exactly the same one is soldered to the braid, after which it is attached vertically downward. The other end of the cable is connected to the phone using an adapter - an excellent amplifier for cellular communications is ready.
As can be seen from the numerous examples above, it is indeed possible to make antennas at home for a variety of purposes. But some manufacturing options are quite complex - to get the optimal result, you need certain tools and special skills.
This is a very simple and effective antenna for receiving digital and analogue television. Suitable for use both at home and outdoors. The antenna is a "bi-square" (double square) - this is the simplest and most popular design to replicate.
To build an antenna you will need very little:
- - Coaxial cable.
- - TV connector.
- - Copper wire is about a meter long, with a diameter of 2 - 4 mm. Any one will do, even steel.
- - Flux with solder.
- - Plastic round junction box for the housing. Or any other.
Making an antenna for receiving digital television (DVB-T)
I will make an antenna to receive digital television channels. To begin manufacturing, you first need to calculate the dimensions of the future antenna. And to calculate the dimensions, you need to know the middle of the reception range of digital channels. The average frequency is approximately 690 MHz. If you want to make an antenna for analog channels, then take, say, 470 MHz for UHF, etc. (TV channel ranges can be viewed)Next we go here -
Enter the frequency and press “CALCULATE” and see what L1 is equal to. L1 is the square arm for the antenna. In my case, for a frequency of 690 MHz it is approximately 105 mm. The required number has been found, nothing else is needed.
Now we proceed directly to the construction of the bi-square antenna. We measure out approximately 90 cm of thick copper wire and bite it off either with wire cutters or pliers.


Next, we straighten the wire with our hands, making it smooth without the waves that formed after winding it from the reel.
We measure four 10.5 cm segments in a row on this wire.


Then we bend the double square. The wire is thick and bends with difficulty, which is good - it will not bend from accidental influences.

We bite off the excess wire, leaving an allowance of about a centimeter in order to solder the closed circuit.

We clean the connection points and future soldering.

We solder the circuit with solder and flux. Here it is better to use a more powerful soldering iron, since thick copper wire is difficult to heat up.


We strip the television cable and solder it to the antenna as in the photo.


In principle, the antenna is ready for operation. I won't stop there and will make a body for the central part.
Here's what I need.

Since the round box is too deep, I cut off exactly half with a hacksaw.

Then I will melt the grooves for the antenna with a soldering iron. This can be done with the same hacksaw.

I fill the connections of the wires with the body and the soldering points with glue.

All is ready. I'll hang the antenna outside the window on a nail.
Watch the video on how to make an antenna for a TV
So, imagine this situation: in the evening you decided to watch your favorite TV program, and suddenly the TV stopped showing - the cable TV was turned off. Or another case: you arrived at the dacha, already prepared for a vacation and discovered that you forgot to buy an antenna for the TV - not a single channel works. What to do in this case? The answer is simple - you need to make an antenna for the TV with your own hands from scrap materials, because most likely the cause of the breakdown is in this device. Next, we will look at the simplest manufacturing options, which will require a minimum of available parts and time.
Idea #1 – Use beer cans!
This version of a homemade television antenna is the simplest and fastest to manufacture. The maximum number of channels that you can catch is 7, but this figure can vary significantly depending on the region, terrain features and distance to the TV tower.
To make a TV antenna from beer cans, you will need the following materials:
- 2 small self-tapping screws, also called “bugs” (not needed if you have a soldering iron);
- 2 prepared beer cans (empty, washed and dried);
- from 3 to 5 meters of television cable (can be taken from a failed device);
- soldering iron and tin (for better fixation of contacts), availability is optional;
- screwdriver;
- wooden trempel (hanger);
- electrical tape or tape.
Finding all the materials in the house will not be a problem, so having prepared them, we immediately get down to business.
In order to make a homemade antenna from cans, you need to complete the following steps:
- We prepare the cable. First, at a distance of 10 cm from the edge, you need to make a shallow circular cut and remove the top layer of insulation. Having opened access to the screen, we collapse it into one bundle. After this, we cut off the middle insulating layer, exposing the copper core of the cable by a few cm. At the second end of the wire there should be a regular antenna plug.
- We prepare the jars. There will also be no difficulties with containers that will act as signal receivers. First you need to choose the optimal dimensions of beer cans. It is better to use liter ones, but if these are not available, containers with a volume of 0.5 and 0.75 liters will also cope well with the task.
- Let's make contacts. At this stage, the twisted cable screen is fixed to one can, and the copper core itself is fixed to the other. Fixation is carried out by bedbugs using a screwdriver or a regular screwdriver. However, it is recommended to fasten the wire not with bugs, but with a soldering iron. The result should look like this:

- We assemble a homemade antenna for a TV. The signal receiver is ready, now we make a supporting structure, which we use as a trempel or a regular hanger. Under no circumstances should it be made of wire or metal. Using electrical tape, we fix the containers to the trempel (as shown in the photo). We draw your attention to the fact that the banks must be strictly on the same straight line, otherwise the homemade product will not work and receive the signal stably.

- Setting up an antenna for the TV. Now you need to experiment with the optimal distance between the cans, as well as where to hang the device and its position so that the homemade product catches many channels. We turn on the TV and determine exactly how the receivers should be located and where is the most suitable place for their work. This completes the technology for creating the device.

As you can see, the whole process is quite simple and does not represent anything complicated. The optimal distance is 75 mm between the ends of the cans, and the best installation location is near a window or on an external mast. In individual cases, the distance between the banks can be made larger or smaller.
Visual video instructions for creating a simple antenna from cans
Idea No. 2 – Use wire
Another equally good option that is advisable to use in the village is a homemade antenna made of copper wire with an amplifier.
All you need for production is:
- amplifier (suitable from an old device, for example, a non-working or disassembled antenna);
- two pieces of wire 180 cm each, it is advisable to choose thick and stiff so that the wind does not damage the device;
- a piece of metal (or wood) plate 15*15 cm;
- electric drill with a set of drills (a welding machine is desirable);
- small bolts;
- hammer;
- iron pipe;
- a television cable of suitable length with a plug (sold in radio stores, not expensive, can be removed from a non-working device).
So, to make your own TV antenna from copper wire, you need to complete the following steps:

Please note that in the photo examples, both the amplifier, the reflector, and the wire are covered with paint. Painting protects the structure from corrosion and other adverse factors, significantly extending the life of a homemade TV antenna.
Idea No. 3 – Home HDTV device
If the first 2 options worked at a frequency of no more than 270 MHz, then the next manufacturing method will allow you to enjoy a higher quality picture, because The signal range can reach up to 490 MHz. The only part that is unlikely to be found among household items is a matching transformer from 300 to 75 Ohms. You will need to buy it in advance at a specialized store, but some plugs already contain this part.
Although, there are instructions on the Internet for making a homemade transformer, you can find and use it, this will significantly improve your skills in assembling homemade antennas.


Materials you will need:
- Scotch
- Cardboard
- Stationery knife
- Foil
- Stapler
- Scissors
- Marker
- Roulette
- Glue (pencil or PVA)
Having prepared all this school kit, let's get down to business!
First you need to draw (or print on a computer) this diagram:


Now, according to the diagram, we cut out all the spare parts, including the necessary pieces of foil:


After this, you need to make a reflector with dimensions of 35 * 32.5 cm (height and width). Cover one side with foil.


In the middle we cut out two identical rectangles, which are necessary in order to completely assemble the signal catcher for a homemade antenna for a TV. The rectangle should be 3.5 cm long, its purpose is to maintain the distance between the reflector and the auxiliary parts.


We glue the parts onto the rectangle, and when the glue sets, we drill holes for the television cable.


We connect the transformer and cable using twists, tape or a soldering iron. A more powerful TV antenna is ready for use! It should also be noted that this homemade version is only suitable for indoor use, because The paper will quickly become wet from being used outdoors.
Assembling a digital antenna from a TV cable and a cardboard box
Another option for a powerful device made at home:
HDTV antenna made from improvised means
Idea No. 4 – Apartment option
There is another way to make a powerful antenna for a TV from improvised materials, which is suitable for both outdoor and indoor use.
To make the device you will need the following materials and tools:
- 4-meter copper wire, cross-section 4 mm2;
- board of arbitrary thickness, 55 cm long and 7 cm wide;
- wood screws;
- ruler or tape measure;
- a simple pencil;
- screwdriver;
- soldering iron;
- antenna plug.
So, first, we transfer the drawing to the workpiece and drill holes in the board: 
Then we transfer the drawing data to the board and drill in the appropriate fastening points. 
Next, the copper wire must be straightened and cut into 8 equal pieces of 37.5 cm each. 
In the middle of each of the 37.5 cm sections, the insulation must be removed (as shown in the picture). To do this, use a sharp knife; a stationery knife is perfect. 
We cut off 2 more pieces of wire 22 cm long and divide them into 3 equal parts, bend them slightly and, again, remove the insulation in these places. 
We bend the prepared wire in exposed areas. We draw your attention to the fact that for those segments that are bent in half, the distance between the ends should be 7.5 cm (the optimal value for receiving a signal from a homemade television antenna). 
Next, we attach the plug to the finished homemade product, and connect the television cable to it. 
 This concludes the manufacturing process. We select a suitable location and direction where signal reception is best, and install the device.
We tried to select the simplest instructions. We hope that now you know how to make a home TV antenna with your own hands! We draw your attention to the fact that today on the Internet you can find many other options in which inventors come up with more and more new manufacturing options, using, for example, copper and aluminum tubes, disks, electrodes... The choice of components for assembly is usually determined only by their availability, so don’t be afraid to experiment and come up with your own original manufacturing methods.
Related materials:
Examples are known when they made satellite antennas with their own hands. One day, a factory working for the defense industry produced a defect; the clerks couldn’t come up with anything better than selling it to the population through a children’s toy store: they put out sleds for kids. The goods were snapped up instantly when a rumor spread among local radio amateurs: it was possible to buy a satellite dish for a TV at a low price. The focus is a fraction of a millimeter off, the form factor is not maintained thoroughly, the gain is reduced by a couple of dB! This fact was of little concern to radio amateurs who received UHF paraboloid antennas. Much cooler than “wave channels”, quarter-wave vibrators. DIY TV antenna? Easy - if you find a sled nearby...
Before making an antenna with your own hands
First things first, consider this: Today, public broadcasting is being replaced by digital. First of all it concerns television. There are several multiplexes in Moscow, a dozen channels are transmitted on one frequency, and then it’s radio’s turn. The advantage of the approach is the ability to design highly specialized devices that can cope with the reception of a specific frequency. An outdoor antenna for digital television is composed of several simple elements and forms a pronounced resonance of the desired wavelength. There was no longer a need to provide broadband, and a significant gain in amplification was achieved. The option of buying a TV with an antenna is not necessarily ideal.
There is no opportunity to improve the design of satellite antennas. The toroidal model, hung with irradiators, looks so-so; equivalents for reception from several spacecraft have not been invented. A phased array antenna with a deflecting radiation pattern would be suitable, but today the implementation of the design is not only expensive, it is simply impossible.
Which antenna to choose for receiving television broadcasts
Television broadcasting is mastering the UHF range (300 - 900 MHz), horizontal polarization is used. To fish, take the trouble to find a paraboloid with a correctly configured feed; you will need direct visibility to the television center or precise adjustment to the reflected signal, which is changed by weather conditions, even by the wind. It is not customary to use paraboloids when receiving terrestrial broadcasts. The satellite hangs inexorably in one place, the positioning point is periodically adjusted by ground stations, it’s easy to get by with a dish. Naturally, direct visibility must be present.
Among the many devices, a do-it-yourself outdoor television antenna is easier to assemble using the wave channel type (Udo-Yagi antenna). The device has excellent characteristics; today we will consider this class of devices for receiving television broadcasts.
DIY wave channel class receiving antennas
Antenna design
First of all, about the number of elements. The wave channel has a traverse on which they are attached parallel to each other, starting from the rear:
- Reflector.
- Active vibrator.
- Passive vibrators (directors).
For meter range channels it is necessary to sacrifice gain in order to increase the operating bandwidth of the device. Achieved by reducing the number of directors.

It looks almost like this:
- The range below 70 MHz will require a single director. This results in a three-element wave channel antenna. It is formed by a reflector, active and passive vibrators.
- The range below 110 MHz is handled by a four-element antenna with two directors.
- It is customary to catch 170 – 240 MHz with wave channels with five passive vibrators.
- 470 MHz and higher (digital multiplexes) - it is recommended to use antennas of 15 elements: reflector, active vibrator, 13 directors.
Use antennas to receive FM radio, be aware that the polarization is vertical. The elements that we will discuss below are located perpendicular to the ground. Now the sizes. The nodes, except for the active vibrator, are pieces of wire attached to a traverse parallel to each other. The active vibrator looks like an elongated rectangle with rounded sides. The angles are right; in practice, when bending from thick material, it is impossible to make them accurately. Let us distinguish four types of distances in the wave channel:
- Between a reflector and an active vibrator.
- From an active vibrator to the first director.
- From first director to second director.
- Between the other directors.

In practice, the design shows itself to be excellent, where the directors have the same length, shorter than that of an active vibrator. The reflector must be longer than each individual reflector. The elements are made from round copper, brass, and aluminum wire of round cross-section. It is allowed to use the central cores of 4-core cables. Others will distort the reception, you are allowed to try.
The traverse should be made from a country shovel handle and a high-density polyethylene (polypropylene) pipe. The elements are fastened transversely with bolted connections; if necessary, long directors are equipped with guides made of durable dielectric (wood). If possible, the elements are located in the same plane, be horizontal.
The mast will be located behind the active vibrator; it is recommended to use one or two inclined struts. None should fall into the gap between the first director and the active vibrator. Otherwise, the digital television antenna will work disgustingly, knocked down by signal distortions from the fasteners.
The mast itself is installed on guy wires made of steel wire. It is permissible to use two sets if necessary. According to the standards, the cable for the television antenna is 75 ohms. The wave impedances of the connectors of plasma and LCD TVs are of the same importance. As a result, the reflection of power is blocked, and specialists achieve reliable signal reception with minimal energy and technical resources. When over-amplifying, reduce the transmission coefficient with attenuators.
Dimensions of a homemade wave channel antenna
The first multiplex in Moscow is on the frequency 559.25 MHz. Let's see what dimensions the antenna for a portable TV of the corresponding wavelength will have. This falls on approximately channel 32 of Soviet broadcasting. The literature indicates the following device dimensions:
- Reflector length 26.9 cm.
- The length of the active vibrator is 21.3 cm.
- The height of the active vibrator is 5 cm.
- The length of the directors is 20.2 cm.
- Distance 1 – 11.9 cm.
- Distance 2 – 7 cm.
- Distance 3 – 13.1 cm.
- Distance 4 – 15.8 cm.
The signal is taken from the gap of the active vibrator below. The length of the slot does not matter; for the UHF range it is 1.5 - 3 cm. Now we will have digital television, the antenna is made with our own hands, all that remains is to install it in a room or on the roof. It is recommended that if you have direct visibility, but the tower is located beyond the horizon, use a compass or map. If you observe the transmitting station directly, aim the antenna at the wave channel using your vision. Further adjustment is made based on the maximum signal level (in practice, image quality). Afterwards, the device should be secured, as shown above.
Please note: in the city there is no question of line of sight. We will catch the reflected signal coming from absolutely any direction. Even from the opposite location of the television center. We'll have to look hard to see where the broadcast is coming from. If the quality is unsatisfactory, it is recommended to use an amplifier for the television signal, connected near the antenna. You will have to run the power cable to the roof. It is possible to install a wave channel in the room; an amplifier may not be needed. The main losses are caused by the cable; the length is kept to a minimum. A DIY indoor television antenna is made using the same principle. No mast or guy ropes required. Where to place it is everyone’s personal choice. Depends on your imagination.
If you use a bracket for a television antenna, it is possible to strengthen a number of wave channels on one mast, this will allow you to receive all frequencies with maximum quality and catch radio broadcasts. Please note that matching devices that help achieve the lowest SWR value were not discussed in the review. In this case, less power will be reflected. An experienced designer should take care of this himself!


