MeArm robotic arm - pocket version industrial manipulator. MeArm is an easy-to-assemble and control robot, mechanical arm. The manipulator has four degrees of freedom, which makes it easy to grasp and move various small objects.
This product is presented as a kit for assembly. Includes the following parts:
- set of transparent acrylic parts for assembly mechanical manipulator;
- 4 servos;
- control board on which the Arduino Pro micro microcontroller and Nokia 5110 graphic display are located;
- joystick board containing two two-axis analog joysticks;
- USB power cable.


Before assembling the mechanical manipulator, it is necessary to calibrate the servos. For calibration we will use the Arduino controller. We connect the servos to Arduino board(required external source power supply 5-6V 2A).

Servo middle, left, right, claw ; // create 4 Servo objects
Void setup()
{
Serial.begin(9600);
middle.attach(11); // attaches a servo to pin 11 to rotate the platform
left.attach(10); // attaches servo to pin 10 on left shoulder
right.attach(9); // attaches a servo to pin 11 on the right shoulder
claw.attach(6); // attaches a servo to pin 6 claw (capture)
}
void loop()
{
// sets the servo position by magnitude (in degrees)
middle.write(90);
left.write(90);
right.write(90);
claw.write(25);
delay(300);
}
Using a marker, make a line through the servo motor body and spindle. Connect the plastic rocker included in the kit to the servo as shown below using the small screw included in the servo mounting kit. We will use them in this position when assembling the mechanical part of the MeArm. Be careful not to move the spindle position. 
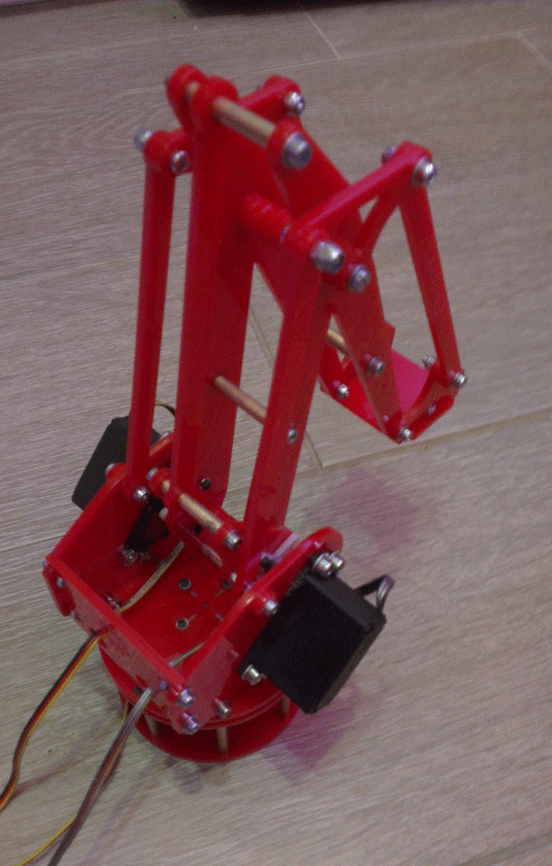
Now you can assemble the mechanical manipulator.
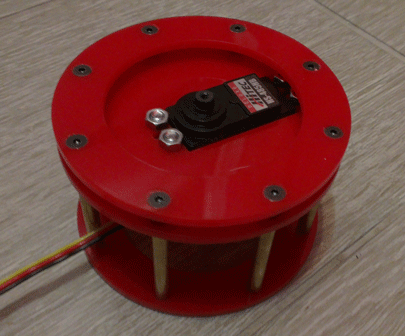
Take the base and attach the legs to its corners. Then install four 20 mm bolts and screw nuts on them (half the total length).

Now we attach the central servo with two 8mm bolts to a small plate, and attach the resulting structure to the base using 20mm bolts.


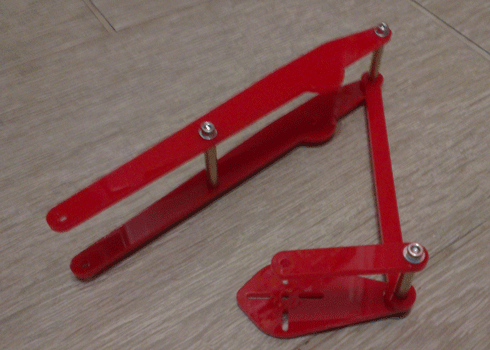
We assemble the left section of the structure.


We assemble the right section of the structure.


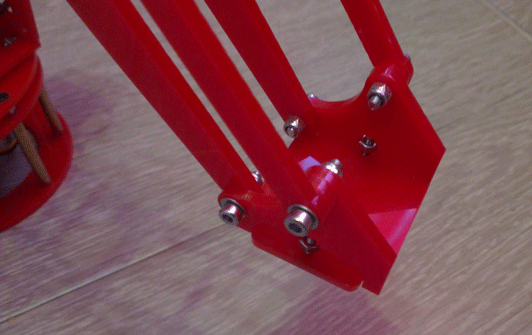
Now you need to connect the left and right sections. First I go to the adapter plate


Then right, and we get

Connecting the structure to the platform

And we collect the “claw”

We attach the “claw”

For assembly, you can use the following manual (in English) or a manual for assembling a similar manipulator (in Russian).
Pinout diagram

Now you can start writing Arduino code. To control the manipulator, along with the ability to control the control using a joystick, it would be nice to direct the manipulator to a specific point in Cartesian coordinates (x, y, z). There is a corresponding library that can be downloaded from github - https://github.com/mimeindustries/MeArm/tree/master/Code/Arduino/BobStonesArduinoCode.
Coordinates are measured in mm from the center of rotation. The starting position is at the point (0, 100, 50), that is, 100 mm forward from the base and 50 mm from the ground.
An example of using the library to install a manipulator at a specific point in Cartesian coordinates:
#include "meArm.h"
#include
Void setup() (
arm.begin(11, 10, 9, 6);
arm.openGripper();
}
Void loop() (
// up and left
arm.gotoPoint(-80,100,140);
// grab
arm.closeGripper();
// down, harm and right
arm.gotoPoint(70,200,10);
// release the grip
arm.openGripper();
// return to starting point
arm.gotoPoint(0,100,50);
}
Methods of the meArm class:
void begin(int pinBase,
int pinShoulder,
int pinElbow,
int pinGripper)
- launch meArm, specify connection pins for middle, left, right, claw servos. Must be called in setup();
void openGripper()
- open the grip;
void closeGripper()
- capture;
void gotoPoint(float x,
float y,
float z)
- move the manipulator to the position of Cartesian coordinates (x, y, z);
float getX()
- current X coordinate;
float getY()
- current Y coordinate;
float getZ()
- current Z coordinate.
Assembly Guide (English)
Hello Giktimes!
The uArm project from uFactory raised funds on Kickstarter more than two years ago. They said from the very beginning that it would be open project, but immediately after the end of the campaign they were in no hurry to publish the source code. I just wanted to cut the plexiglass according to their drawings and that’s it, but since there were no source materials and there was no sign of it in the foreseeable future, I began to repeat the design from photographs.
Now my robotic arm looks like this:
Working slowly in two years, I managed to make four versions and gained quite a lot of experience. You can find the description, history of the project and all project files under the cut.
Trial and error
When I started working on the drawings, I wanted not just to repeat uArm, but to improve it. It seemed to me that in my conditions it was quite possible to do without bearings. I also didn’t like the fact that the electronics rotated along with the entire manipulator and I wanted to simplify the design of the lower part of the hinge. Plus I started drawing him a little smaller right away.With such input parameters I drew the first version. Unfortunately, I do not have photographs of that version of the manipulator (which was made in yellow color). The mistakes in it were simply epic. Firstly, it was almost impossible to assemble. As a rule, the mechanics that I drew before the manipulator were quite simple, and I did not have to think about the assembly process. But still, I assembled it and tried to start it, and my hand hardly moved! All the parts revolved around the screws and if I tightened them so that there was less play, she could not move. If I loosened it so that it could move, incredible play appeared. As a result, the concept did not survive even three days. And he started working on the second version of the manipulator.

Red was already quite suitable for work. It assembled normally and could move with lubrication. I was able to test the software on it, but still the lack of bearings and large losses on different thrusts made it very weak.
Then I abandoned work on the project for some time, but soon decided to bring it to fruition. I decided to use more powerful and popular servos, increase the size and add bearings. Moreover, I decided that I would not try to do everything perfectly at once. I sketched out the drawings hastily, without drawing out beautiful connections, and ordered cutting from transparent plexiglass. Using the resulting manipulator, I was able to debug the assembly process, identified areas that needed additional strengthening, and learned how to use bearings.

After I had a lot of fun with the transparent manipulator, I started drawing the final white version. So, now all the mechanics are completely debugged, they suit me and I’m ready to say that I don’t want to change anything else in this design:

It depresses me that I could not bring anything fundamentally new to the uArm project. By the time I started drawing the final version, they had already rolled out the 3D models on GrabCad. As a result, I just simplified the claw a little, prepared the files in a convenient format and used very simple and standard components.
Features of the manipulator
Before the advent of uArm, desktop manipulators of this class looked rather dull. They either had no electronics at all, or had some kind of control with resistors, or had their own proprietary software. Secondly, they usually did not have a system of parallel hinges and the grip itself changed its position during operation. If you collect all the advantages of my manipulator, you get a fairly long list:- A system of rods that allows powerful and heavy motors to be placed at the base of the manipulator, as well as holding the gripper parallel or perpendicular to the base
- A simple set of components that are easy to buy or cut from plexiglass
- Bearings in almost all components of the manipulator
- Easy to assemble. This turned out to be a really difficult task. It was especially difficult to think through the process of assembling the base
- The grip position can be changed by 90 degrees
- Open source and documentation. Everything is prepared in accessible formats. I will provide download links for 3D models, cutting files, list of materials, electronics and software
- Arduino compatible. There are many detractors of Arduino, but I believe this is an opportunity to expand the audience. Professionals can easily write their software in C - this is a regular controller from Atmel!
Mechanics
To assemble, you need to cut out parts from 5mm thick plexiglass:

They charged me about $10 to cut all these parts.
The base is mounted on a large bearing:

It was especially difficult to think through the base from the point of view of the assembly process, but I kept an eye on the engineers from uArm. The rockers sit on a pin with a diameter of 6mm. It should be noted that my elbow pull is held on a U-shaped holder, while uFactory’s is held on an L-shaped one. It's hard to explain what the difference is, but I think I did better.

The grip is assembled separately. It can rotate around its axis. The claw itself sits directly on the motor shaft:

At the end of the article I will provide a link to super detailed assembly instructions in photographs. You can confidently twist it all together in a couple of hours if you have everything you need at hand. I also prepared a 3D model in a free SketchUp program. You can download it, play it and see what and how it was assembled.


Electronics
To make the hand work, all you need to do is connect five servos to the Arduino and supply them with power from a good source. uArm uses some kind of motors with feedback. I installed three regular MG995 motors and two small metal geared motors to control the gripper.Here my narrative is closely intertwined with previous projects. I started some time ago and even prepared my own Arduino-compatible board for these purposes. On the other hand, one day I had the opportunity to make boards cheaply (which is what I’m talking about too). In the end, it all ended with me using my own Arduino-compatible board and a specialized shield to control the manipulator.

This shield is actually very simple. It has four variable resistors, two buttons, five servo connectors and a power connector. This is very convenient from a debugging point of view. You can upload a test sketch and record some macro for control or something like that. I will also give a link to download the board file at the end of the article, but it is prepared for manufacturing with metallized holes, so it is of little use for home production.

Programming
The most interesting thing is controlling the manipulator from a computer. uArm has a convenient application for controlling the manipulator and a protocol for working with it. The computer sends 11 bytes to the COM port. The first one is always 0xFF, the second one is 0xAA and some of the remaining ones are signals for servos. Next, these data are normalized and sent to the engines for processing. My servos are connected to digital inputs/outputs 9-12, but this can be easily changed.uArm's terminal program allows you to change five parameters when controlling the mouse. As the mouse moves across the surface, the position of the manipulator in the XY plane changes. Rotating the wheel changes the height. LMB/RMB - compress/uncompress the claw. RMB + wheel - rotate the grip. It's actually very convenient. If you wish, you can write any terminal software that will communicate with the manipulator using the same protocol.
I will not provide sketches here - you can download them at the end of the article.
Video of work
And, finally, the video of the manipulator itself. It shows how to control a mouse, resistors, and a pre-recorded program.Links
Files for cutting plexiglass, 3D models, a purchase list, board drawings and software can be downloaded at the end of myWe are creating a robotic manipulator using a rangefinder and implementing backlighting.
We will cut the base from acrylic. We use servo drives as motors.
General description of the robotic manipulator project
The project uses 6 servo motors. For the mechanical part, acrylic 2 mm thick was used. The base from a disco ball came in handy as a tripod (one of the motors is mounted inside). An ultrasonic distance sensor and a 10 mm LED are also used.
An Arduino power board is used to control the robot. The power source itself is the computer power supply.
The project provides comprehensive explanations for the development of a robotic arm. The issues of power supply of the developed design are considered separately.


Main components for the manipulator project
Let's start development. You will need:
- 6 servomotors (I used 2 models mg946, 2 mg995, 2 futuba s3003 (mg995/mg946 have better characteristics than futuba s3003, but the latter are much cheaper);
- acrylic 2 millimeters thick (and a small piece 4 mm thick);
- ultrasonic distance sensor hc-sr04;
- LEDs 10 mm (color - at your discretion);
- tripod (used as a base);
- aluminum grip (costs about 10-15 dollars).
For driving:
- Arduino Uno board (used in the project homemade board, which is completely similar to Arduino);
- power board (you will have to make it yourself, we will return to this issue later, it requires special attention);
- power supply (in this case, a computer power supply is used);
- computer for programming your manipulator (if you are using Arduino programming, means Arduino IDE)
Of course, you will need cables and some basic tools like screwdrivers and the like. Now we can move on to design.
Mechanical assembly


Before starting to develop the mechanical part of the manipulator, it is worth noting that I do not have drawings. All knots were made “on the knee”. But the principle is very simple. You have two acrylic links, between which you need to install servo motors. And the other two links. Also for installing engines. Well, the grab itself. The easiest way to buy such a grip is on the Internet. Almost everything is installed using screws.
The length of the first part is about 19 cm; the second - about 17.5; The length of the front link is about 5.5 cm. Select the remaining dimensions in accordance with the dimensions of your project. In principle, the sizes of the remaining nodes are not so important.
The mechanical arm must provide a rotation angle of 180 degrees at the base. So we have to install a servo motor at the bottom. In this case, it is installed in the same disco ball. In your case, this could be any suitable box. The robot is mounted on this servo motor. You can, as shown in the figure, install an additional metal flange ring. You can do without it.
To install the ultrasonic sensor, 2 mm thick acrylic is used. You can install an LED right below.
It is difficult to explain in detail exactly how to construct such a manipulator. Much depends on the components and parts that you have in stock or purchase. For example, if the dimensions of your servos are different, the acrylic armature links will also change. If the dimensions change, the calibration of the manipulator will also be different.
You will definitely have to extend the servo motor cables after completing the development of the mechanical part of the manipulator. For these purposes, this project used wires from an Internet cable. In order for all this to look like, don’t be lazy and install adapters on the free ends of the extended cables - female or male, depending on the outputs of your Arduino board, shield or power source.
After assembling the mechanical part, we can move on to the “brains” of our manipulator.
Manipulator grip


To install the grip you will need a servo motor and some screws.
So what exactly needs to be done.
Take the rocker from the servo and shorten it until it fits your grip. After this, tighten the two small screws.
After installing the servo, turn it to the extreme left position and squeeze the gripper jaws.
Now you can install the servo with 4 bolts. At the same time, make sure that the engine is still in the extreme left position and the gripper jaws are closed.
You can connect the servo drive to the Arduino board and check the functionality of the gripper.
Please note that gripper operation problems may occur if the bolts/screws are over-tightened.
Adding lighting to the pointer

You can brighten up your project by adding lighting to it. LEDs were used for this. It's easy to do and looks very impressive in the dark.
Places for installing LEDs depend on your creativity and imagination.
Electrical diagram


You can use a 100 kOhm potentiometer instead of resistor R1 to manually adjust the brightness. 118 Ohm resistors were used as resistance R2.
List of main components that were used:
- R1 - 100 kOhm resistor
- R2 - 118 Ohm resistor
- Transistor bc547
- Photoresistor
- 7 LEDs
- Switch
- Connection to Arduino board
An Arduino board was used as a microcontroller. The power supply from a personal computer was used as power supply. By connecting the multimeter to the red and black cables, you will see 5 volts (which are used for the servo motors and ultrasonic distance sensor). Yellow and black will give you 12 volts (for Arduino). We make 5 connectors for the servomotors, in parallel we connect the positive ones to 5 V, and the negative ones to ground. Same with the distance sensor.
After this, connect the remaining connectors (one from each servo and two from the rangefinder) to the board we soldered and the Arduino. At the same time, do not forget to correctly indicate the pins that you used in the program in the future.
In addition, a power LED indicator was installed on the power board. This is easy to implement. Additionally a 100 ohm resistor was used between 5V and ground.
The 10mm LED on the robot is also connected to the Arduino. A 100 ohm resistor goes from pin 13 to the positive leg of the LED. Negative - to the ground. You can disable it in the program.
For 6 servo motors, 6 connectors are used, since the 2 servo motors below use the same control signal. The corresponding conductors are connected and connected to one pin.
I repeat that the power supply from a personal computer is used as power supply. Or, of course, you can purchase a separate power supply. But taking into account the fact that we have 6 drives, each of which can consume about 2 A, such a powerful power supply will not be cheap.
Please note that the connectors from the servos are connected to the PWM outputs of the Arduino. Near each such pin on the board there is symbol~. An ultrasonic distance sensor can be connected to pins 6, 7. An LED can be connected to pin 13 and ground. These are all the pins we need.
Now we can move on to Arduino programming.
Before connecting the board via USB to your computer, make sure you turn off the power. When you test the program, also turn off the power to your robotic arm. If the power is not turned off, the Arduino will receive 5 volts from the usb and 12 volts from the power supply. Accordingly, the power from usb will transfer to the power source and it will “sag” a little.
The wiring diagram shows that potentiometers have been added to control the servos. Potentiometers are optional, but the code above will not work without them. Potentiometers can be connected to pins 0,1,2,3 and 4.
Programming and first launch
5 potentiometers are used for control (you can completely replace this with 1 potentiometer and two joysticks). The connection diagram with potentiometers is shown in the previous part. The Arduino sketch is here.
Below are several videos of the robotic arm in action. I hope you will enjoy.
The video above shows the latest modifications of the armament. I had to change the design a little and replace a few parts. It turned out that the futuba s3003 servos were rather weak. They turned out to be used only for gripping or turning the hand. So they installed mg995. Well, mg946 will generally be an excellent option.
Control program and explanations for it
// drives are controlled using variable resistors - potentiometers.
int potpin = 0; // analog pin for connecting a potentiometer
int val; // variable for reading data from the analog pin
myservo1.attach(3);
myservo2.attach(5);
myservo3.attach(9);
myservo4.attach(10);
myservo5.attach(11);
pinMode(led, OUTPUT);
( //servo 1 analog pin 0
val = analogRead(potpin); // reads the potentiometer value (value between 0 and 1023)
// scales the resulting value for use with servos (getting a value in the range from 0 to 180)
myservo1.write(val); // brings the servo to a position in accordance with the calculated value
delay(15); // waits for the servomotor to reach the specified position
val = analogRead(potpin1); // servo 2 on analog pin 1
val = map(val, 0, 1023, 0, 179);
myservo2.write(val);
val = analogRead(potpin2); // servo 3 on analog pin 2
val = map(val, 0, 1023, 0, 179);
myservo3.write(val);
val = analogRead(potpin3); // servo 4 on analog pin 3
val = map(val, 0, 1023, 0, 179);
myservo4.write(val);
val = analogRead(potpin4); //serva 5 on analog pin 4
val = map(val, 0, 1023, 0, 179);
myservo5.write(val);
Sketch using an ultrasonic distance sensor
This is probably one of the most impressive parts of the project. A distance sensor is installed on the manipulator, which reacts to obstacles around.
Basic explanations of the code are presented below
#define trigPin 7
The following piece of code:
We assigned names to all 5 signals (for 6 drives) (can be anything)
Following:
Serial.begin(9600);
pinMode(trigPin, OUTPUT);
pinMode(echoPin, INPUT);
pinMode(led, OUTPUT);
myservo1.attach(3);
myservo2.attach(5);
myservo3.attach(9);
myservo4.attach(10);
myservo5.attach(11);
We tell the Arduino board which pins the LEDs, servo motors and distance sensor are connected to. There is no need to change anything here.
void position1())(
digitalWrite(led, HIGH);
myservo2.writeMicroseconds(1300);
myservo4.writeMicroseconds(800);
myservo5.writeMicroseconds(1000);
There are some things you can change here. I set a position and called it position1. It will be used in the future program. If you want to provide different movement, change the values in brackets from 0 to 3000.
After that:
void position2())(
digitalWrite(led,LOW);
myservo2.writeMicroseconds(1200);
myservo3.writeMicroseconds(1300);
myservo4.writeMicroseconds(1400);
myservo5.writeMicroseconds(2200);
Similar to the previous piece, only in this case it is position2. Using the same principle, you can add new positions for movement.
long duration, distance;
digitalWrite(trigPin, LOW);
delayMicroseconds(2);
digitalWrite(trigPin, HIGH);
delayMicroseconds(10);
digitalWrite(trigPin, LOW);
duration = pulseIn(echoPin, HIGH);
distance = (duration/2) / 29.1;
Now the main code of the program begins to work out. You shouldn't change it. The main task of the above lines is to configure the distance sensor.
After that:
if (distance<= 30) {
if (distance< 10) {
myservo5.writeMicroseconds(2200); //open grabber
myservo5.writeMicroseconds(1000); //close the grabber
You can now add new movements based on the distance measured by the ultrasonic sensor.
if(distance<=30){ // данная строка обеспечивает переход в position1, если расстояние меньше 30 см.
position1(); //essentially the arm will work out whatever you specify between the brackets ( )
else( // if the distance is greater than 30 cm, go to position2
position()2 // similar to the previous line
You can change the distance in the code and do whatever you want.
Last lines of code
if (distance > 30 || distance<= 0){
Serial.println("Out of range"); //output a message in the serial monitor that we have gone beyond the specified range
Serial.print(distance);
Serial.println("cm"); //distance in centimeters
delay(500); //delay 0.5 seconds
Of course, you can convert everything here into millimeters, meters, change the displayed message, etc. You can play around with the delay a little.
That's all. Enjoy, upgrade your own manipulators, share ideas and results!
We have developed a robotic hand that anyone can assemble on their own. In this article we will talk about how to assemble the mechanical parts of our manipulator.
Note! This is an old article! You can read it if you are interested in the history of the project. Current version.
Manipulator from the site
Here's a video of her working:
Description of design
We took as a basis the manipulator presented on the Kickstarter website, which was called uArm. The authors of this project promised that after completion the company would post all the sources, but this did not happen. Their project is an excellent combination of well-made hardware and software. Inspired by their experience, we decided to make a similar manipulator ourselves.
Most existing manipulators involve the placement of motors directly in the joints. This is simpler in design, but it turns out that the engines must lift not only the payload, but also other engines. The Kickstarter project does not have this drawback, since the forces are transmitted through the rods and all the motors are located at the base.
The second advantage of the design is that the platform for placing the tool (gripper, suction cup, etc.) is always located parallel to the working surface.

As a result, the manipulator has three servos (three degrees of freedom), which allow it to move the tool along all three axes.
Servo drives
For our manipulator we used Hitec HS-485 servos. These are quite expensive digital servos, but for their money they provide an honest force of 4.8 kg/cm, accurate position control and acceptable speed.
They can be replaced with others with the same dimensions
Manipulator development
To begin, we created a model in SketchUp. The structure was checked for assembly and mobility.

We had to simplify the design a little. The original design used bearings that are difficult to purchase. We also decided not to make a capture at the initial stage. To begin with, we plan to make a controlled lamp out of the manipulator.
We decided to make the manipulator from plexiglass. It is quite cheap, looks good and is easy to cut with a laser. To cut, just draw the required parts in any vector editor. We did this in NanoCad:

Plexiglas cutting
We order plexiglass cutting from a company located near Yekaterinburg. They do it quickly, efficiently and do not refuse small orders. Cutting such parts will cost about 800 rubles. As a result, you will receive cut out parts with plastic film on both sides. This film is needed to protect the material from scale formation.

This film must be removed from both sides.

We also ordered engraving on the surface of some parts. For engraving, simply draw the image on a separate layer and indicate this when ordering. The engraving areas must be cleaned with a toothbrush and wiped with dust. It turned out very well:

As a result, after removing the film and grout, we got this:

Assembly of the manipulator
First you need to assemble five parts: 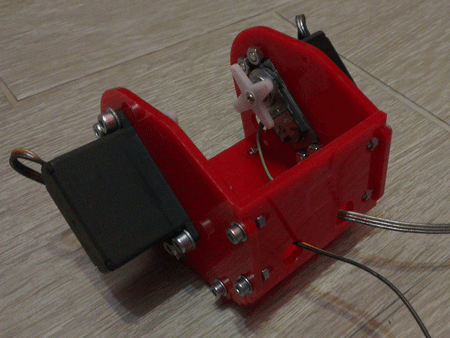

It is necessary to use countersunk screws at the base. You will have to drill out the holes a little so that the arm can rotate.
After these parts are assembled, all that remains is to screw them to the servo drives and add rods to position the tool. It is quite difficult to screw exactly two drives into the base:

First you need to install a 40mm long pin (shown by the yellow line in the photo), and then screw on the rockers.
For the hinges, we used regular M3 screws and nuts with a nylon insert to prevent self-loosening. These nuts are clearly visible at the end of the manipulator:
For now, this is just a flat area on which we first plan to attach a light bulb.
Assembled manipulator

Results
We are currently working on the electronics and software and will soon tell you about the continuation of the project, so we do not have the opportunity to demonstrate its work yet.
In the future, we plan to equip the manipulator with a gripper and add bearings.
If you would like to make your own manipulator, you can download the cutting file.
List of fasteners that will be required:
- M4x10 socket head screw, 12 pcs.
- M3x60 screw, 1 piece
- M3x40 hairpin, 1 pc (you may have to shorten it a little with a file)
- M3x16 screw with goal. for H/W, 4pcs
- M3x16 screw with countersunk head, 8 pcs
- M3x12 screw with goal. for H/W, 6 pcs.
- M3x10 screw with goal. for H/W, 22pcs
- M3x10 screw with countersunk head, 8 pcs
- M2x6 screw with goal. for H/W, 12pcs
- M3x40 brass stand female-female, 8 pcs
- M3x27 brass stand female-female, 5 pcs
- M4 nut, 12pcs
- M3 nut, 33pcs
- M3 nut with nylon lock, 11pcs
- M2 nut, 12pcs
- Washers
UPD1
A lot of time has passed since this article was published. Her first formation was yellow and it was extremely terrible. The red arm was no longer ashamed to show on the site, but without bearings it still did not work well enough, and it was also difficult to assemble.
We made a transparent version with bearings, which began to work much better and the assembly process was better thought out. This version of the manipulator even managed to visit several exhibitions.
– a simple desktop manipulator made of plexiglass with servo drives.
The uArm project from uFactory raised funds on Kickstarter more than two years ago. They said from the very beginning that it would be an open project, but immediately after the end of the company they were in no hurry to publish the source code. I just wanted to cut the plexiglass according to their drawings and that’s it, but since there were no source materials and there was no sign of it in the foreseeable future, I began to repeat the design from photographs.
Now my robotic arm looks like this:
Working slowly in two years, I managed to make four versions and gained quite a lot of experience. You can find the description, history of the project and all project files under the cut.
Trial and error
When I started working on the drawings, I wanted not just to repeat uArm, but to improve it. It seemed to me that in my conditions it was quite possible to do without bearings. I also didn’t like the fact that the electronics rotated along with the entire manipulator and I wanted to simplify the design of the lower part of the hinge. Plus I started drawing him a little smaller right away.
With these input parameters I drew the first version. Unfortunately, I do not have any photographs of that version of the manipulator (which was made in yellow). The mistakes in it were simply epic. Firstly, it was almost impossible to assemble. As a rule, the mechanics that I drew before the manipulator were quite simple, and I did not have to think about the assembly process. But still, I assembled it and tried to start it, and my hand hardly moved! All the parts revolved around the screws and if I tightened them so that there was less play, she could not move. If I loosened it so that it could move, incredible play appeared. As a result, the concept did not survive even three days. And he started working on the second version of the manipulator.

Red was already quite suitable for work. It assembled normally and could move with lubrication. I was able to test the software on it, but still the lack of bearings and large losses on different thrusts made it very weak.
Then I abandoned work on the project for some time, but soon decided to bring it to fruition. I decided to use more powerful and popular servos, increase the size and add bearings. Moreover, I decided that I would not try to do everything perfectly at once. I sketched out the drawings hastily, without drawing out beautiful connections, and ordered cutting from transparent plexiglass. Using the resulting manipulator, I was able to debug the assembly process, identified areas that needed additional strengthening, and learned how to use bearings.

After I had a lot of fun with the transparent manipulator, I started drawing the final white version. So, now all the mechanics are completely debugged, they suit me and I’m ready to say that I don’t want to change anything else in this design:

It depresses me that I could not bring anything fundamentally new to the uArm project. By the time I started drawing the final version, they had already rolled out the 3D models on GrabCad. As a result, I just simplified the claw a little, prepared the files in a convenient format and used very simple and standard components.
Features of the manipulator
Before the advent of uArm, desktop manipulators of this class looked rather dull. They either had no electronics at all, or had some kind of control with resistors, or had their own proprietary software. Secondly, they usually did not have a system of parallel hinges and the grip itself changed its position during operation. If you collect all the advantages of my manipulator, you get a fairly long list:
- A system of rods that allows powerful and heavy motors to be placed at the base of the manipulator, as well as holding the gripper parallel or perpendicular to the base
- A simple set of components that are easy to buy or cut from plexiglass
- Bearings in almost all components of the manipulator
- Easy to assemble. This turned out to be a really difficult task. It was especially difficult to think through the process of assembling the base
- The grip position can be changed by 90 degrees
- Open source and documentation. Everything is prepared in accessible formats. I will provide download links for 3D models, cutting files, list of materials, electronics and software
- Arduino compatible. There are many detractors of Arduino, but I believe this is an opportunity to expand the audience. Professionals can easily write their software in C - this is a regular controller from Atmel!
Mechanics
To assemble, you need to cut out parts from 5mm thick plexiglass:


They charged me about $10 to cut all these parts.
The base is mounted on a large bearing:

It was especially difficult to think through the base from the point of view of the assembly process, but I kept an eye on the engineers from uArm. The rockers sit on a pin with a diameter of 6mm. It should be noted that my elbow pull is held on a U-shaped holder, while uFactory’s is held on an L-shaped one. It's hard to explain what the difference is, but I think I did better.

The grip is assembled separately. It can rotate around its axis. The claw itself sits directly on the motor shaft:

At the end of the article I will provide a link to super detailed assembly instructions in photographs. You can confidently twist it all together in a couple of hours if you have everything you need at hand. I also prepared a 3D model in free program SketchUp. You can download it, play it and see what and how it was assembled.


Electronics
To make the hand work, all you need to do is connect five servos to the Arduino and supply them with power from a good source. uArm uses some kind of feedback motors. I installed three regular MG995 motors and two small metal geared motors to control the gripper.
Here my narrative is closely intertwined with previous projects. Some time ago I started teaching Arduino programming and even prepared my own Arduino-compatible board for these purposes. On the other hand, one day I had the opportunity to make boards cheaply (which I also wrote about). In the end, it all ended with me using my own Arduino-compatible board and a specialized shield to control the manipulator.

This shield is actually very simple. It has four variable resistors, two buttons, five servo connectors and a power connector. This is very convenient from a debugging point of view. You can upload a test sketch and record some macro for control or something like that. I will also give a link to download the board file at the end of the article, but it is prepared for manufacturing with metallized holes, so it is of little use for home production.

Programming
The most interesting thing is controlling the manipulator from a computer. uArm has a convenient application for controlling the manipulator and a protocol for working with it. The computer sends 11 bytes to the COM port. The first one is always 0xFF, the second one is 0xAA and some of the remaining ones are signals for servos. Next, these data are normalized and sent to the engines for processing. My servos are connected to digital inputs/outputs 9-12, but this can be easily changed.
The terminal program from uArm allows you to change five parameters when controlling the mouse. As the mouse moves across the surface, the position of the manipulator in the XY plane changes. Rotating the wheel changes the height. LMB/RMB - compress/uncompress the claw. RMB + wheel - rotate the grip. It's actually very convenient. If you wish, you can write any terminal software that will communicate with the manipulator using the same protocol.
I will provide sketches here - you can download them at the end of the article.
Video of work
And, finally, the video of the manipulator itself. It shows how to control a mouse, resistors, and a pre-recorded program.
Links
Files for cutting plexiglass, 3D models, a purchase list, board drawings and software can be downloaded at the end of my main article.
(beware of traffic).