Wall Clock- this is a very practical interior detail. In the kitchen, they make it possible to keep track of time without being distracted from cooking or turning on the phone for this (especially since your hands may be covered in flour, oil or something else while cooking). Located in the room, they allow you to quickly find out the time without reaching into your pocket for your mobile phone. Eco-style lovers can make a watch out of wood with their own hands.
What are the benefits of wooden watches?
Wood is a special material, objects made from it have a number of advantages:
- Naturalness.
- Low cost(provided that the product is made by hand, because processing by a craftsman is often quite expensive, especially if it is an individual order).
- Originality. Many people like to look at interior items from natural wood, however, not everyone decides to keep such things in their home.
A watch made from juniper or other healing wood will disinfect the air. To do this, they should not be varnished. The look will be more natural if you carefully rub the sandpaper over the surface.
If you make a clock from a cut tree with your own hands, you can leave a layer of bark. This will give the product a more natural look.
How to choose a tree
The first step is to decide on the type. Will it be linden, soft enough and easy to process, hard oak or healing juniper? You can choose what is easier to get or buy, and then cover it with stain to suit the desired look.
After selecting the type, you should find suitable material. There are several possible options in this matter:
- You can purchase ready-made sawn timber at a sawmill, in souvenir or specialized stores, or via the Internet.
- Make it yourself if you have a suitable stump or log, a chainsaw and the ability to use it.
- Wait until the annual sanitary inspections are carried out and ask the workers to cut off the required piece. Or take a whole block of wood from them and continue to act in accordance with paragraph 2.

How to prepare material
Before making a wooden clock with your own hands, you should spend time preparing for work. Once the material is found, it should be left in a dry place for two weeks to dry. This is not necessary if the cut was purchased in a store, but even wood purchased at a sawmill can be damp. If the material was taken from freshly cut trees, the moisture level in it is many times higher than permissible. Such a workpiece, not previously dried, should not be used.
If you neglect to dry the wood, cracks may form in the finished watch. In the worst case, the saw will split, and all the work done will be ruined, and you will have to start all over again.
Materials and tools
There is nothing difficult in making a wooden watch with your own hands if you have high-quality raw materials and tools. What you need to prepare before you start:
- Dry sleep.
- Watch mechanism (you can disassemble old ones or buy cheap ones).
- Paint either burning apparatus(if the numbers are planned not to be drawn, but to be burned).
- Scissors.
- Electrical tape or paper
- Hot glue gun.
- Fine-grit sandpaper or sander.
- Hammer and chisel.
You can avoid an unpleasant situation when, during the work process, it suddenly turns out that something is missing, if you make a list of what you need in advance and check it.
How to make a clock out of wood with your own hands
In order not to complicate your life by sanding the cut or preparing the dial after installing the mechanism, it is important to follow correct sequence actions:

- Drill a hole for the arrows in the center of the cut.
- Use a chisel and hammer to make a recess for the mechanism with reverse side.
- Sand the dial and recess with sandpaper or a sander.
- Install the mechanism, attach it with electrical tape and secure the box in which it is located using a heat gun.
- Draw or burn numbers on the dial.
- Set arrows.
- Install the mount on the reverse side so that the clock can be hung on the wall.
Without spending too much time and effort, you can make a clock out of wood with your own hands. An item made by hand in a single copy looks much more interesting than a mass-produced product.
Variety of wooden clocks
A watch made from sawn wood is one of the simplest options. By analogy with them, it can be made not from a transverse, but from a longitudinal die. The product will turn out irregular shape, therefore it is important to select the material so that the longitudinal section has a beautiful shape.
There are many options on how to make a beautiful wooden clock. Wall-mounted, with your own hands, made for yourself or as a gift, they will delight their owners for a long time.
Possible design options for wooden clocks:

- Cut out furniture board the basis of the desired shape.
- Make non-standard symbols for numbers. For example, in the form of coins or wooden balls. You can do without numbers and their designations completely
- Take a lot of thin dies or wooden rulers, fasten them so that you get a volumetric circle with a thickness equal to the short side of the dies. You will get an original dial.
- You can use birch bark, stretched in a frame of beautiful branches cleared of bark, as a dial.
Craftsmen can make more complex wooden watches with their own hands.

Mechanism drawings can be found on the Internet on specialized resources. In order to create similar models, you must have certain experience and skills. More simple options, described above, can be done by anyone with such a desire and a little patience.
Original watch from natural materials as a useful decorative element own home you can do it yourself. This process is very simple and you do not need any special woodworking skills or tools. See step-by-step instructions for how to make them.
Material
To make a clock from cut wood with your own hands, prepare:
- I slept myself;
- clock mechanism with battery;
- thick cardboard;
- black paint;
- scissors;
- adhesive tape;
- hot glue sticks and hot glue gun;
- grinder or sandpaper;
- chisel and hammer for it.
You can purchase the saw cut ready-made or make it yourself if you have a suitable stump (dry, but not rotten) and a chainsaw or similar hand tool.
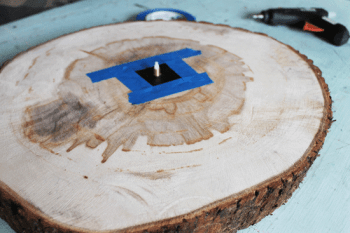
Step 1. First of all, you will need to process the resulting cut. It is necessary to make a hole in it for the clock mechanism. In this case, it had a lid that completely hid the box underneath, so the hole could be made through.

If you have a mechanism of a different type, use a hammer and chisel to make a kind of groove for the box on the back side of the cut. Make it so deep that the box fits completely into it.
In the center of the prepared groove in the place where the arrows will be attached to the mechanism, use a drill of a suitable diameter to make a through hole.
Step 2. Take sandpaper and sand the surface of the cut and the groove itself. Try to make the workpiece as even and smooth as possible.
Step 3. Attach the clock mechanism with duct tape and secure the plastic box with hot glue.

Step 4. Print or hand-draw the dial numbers on cardboard. Carefully cut them out. You will get templates.
Lay them out on a piece of wood and paint them with spray paint or with simple paint and a sponge brush.
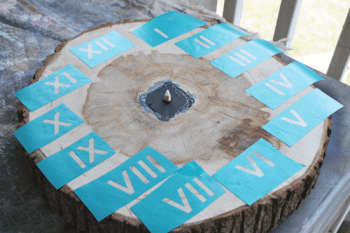
Step 5. After the paint has dried, attach the arrows to the cut and decorative element watch, which will hide the box.

Stylish watches made of natural wood will fit into any interior. In this case, the versatility of the design is supported by the saw cut, which became the basis for their production. Adjust the watch to color scheme you can experiment with types of wood, shades of stain or varnish.
Materials
To make a clock from cut wood, prepare:
- he himself cut any breed;
- a block of wood or board of contrasting color;
- wood stain or varnish;
- clock mechanism with simple shaped hands;
- wooden dowel;
- wood glue;
- pencil;
- ruler;
- compass;
- stationery erasers;
- clamps;
- circular saw;
- band saw;
- grinding machine and whetstone;
- drill and hole saws.
In this master class, the saw cut was made from alder, and a walnut board was used to contrast the color.
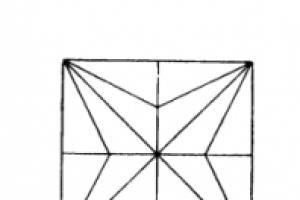
Step 1. On a piece of paper, sketch out the layout of the future clock. The cut itself will become the basis of the dial, and the role of marks instead of numbers will go to small strips that will need to be cut out of the board.
Step 2. First, carefully process the cut, making its surface perfectly smooth.


Step 3. Draw out the cut using a compass, pencil and ruler. This step is very important for the watch to show the time correctly. For details of the drawing and marking process, watch the video.
Step 4. Carefully cut off the bark from the saw cut without damaging it.

Step 5. Cut the central part of the cut along the marked lines. You will get triangles.
Step 6. Cut the board into sections of equal length, width and thickness. Their length should be slightly greater than the length of the resulting triangles along with the thickness of the bark. Otherwise, the parameters must exactly match the existing blanks.
Step 7. Sand all parts of the dial using sandpaper or a sanding machine.
Step 8. Take wood glue and a brush and glue the triangles to the wooden planks in pairs. Secure the parts with rubber bands and leave them until the glue dries completely. Also continue to glue the parts of the dial step by step, using rubber bands and then clamps as fastening.
Step 9. In the center of the resulting dial, make a hole for a wooden dowel. Glue it in the center and cut off the excess so that the surface is even. Make another hole of a smaller diameter in the resulting core. It is necessary for attaching the hands and the clock mechanism.
Step 10. Please note that the dial is not straight along the outer edge. To level it, draw a circle with a compass and carefully cut off any excess.
Step 11. Use a sanding block to sand down the cuts along the outer edge of the dial.
Step 12. Cut the bark into pieces and glue them to the outside of the clock with wood glue.

Step 13. Take wooden blocks and mechanism, and secure them to the back of the dial.
Step 14. Use a small wooden circle to make a neat plug for the arrow rod. Drill a small hole in it and glue a threaded fastener into it.
Step 15. Treat the watch with wood stain or varnish. Leave the product until completely dry.
Step 16. Completely assemble the clock mechanism and insert the battery.

The sawn watch is ready!
IN this material I want to tell you how to make a simple watch from cut wood with your own hands.
Before making a watch, the first thing you need to do is acquire a clock mechanism. There are no problems purchasing a clock mechanism and the prices are quite reasonable. Starting from the dimensions of the clock mechanism, we will begin making watches. For the dial, a cut of birch 20 mm thick with a diameter of 220 mm was used. Naturally, your sizes may differ depending on the availability of material.

Photo. 1 Prepare the processed wood cut for marking.

Photo 2. Marking of the clock mechanism.
The most difficult part of making a watch can be considered the insertion of a clock mechanism into our improvised dial - a cut of wood.

Photo. 3. A recess in a birch cut for a clock mechanism.
This operation was performed with an angle grinder using a grinding disc, it is possible to use it better manual frezer(I didn’t have it at hand), which is simpler and neater.
Angle grinder disc used in work.
To design the dial, we used saw cuts of branches of different diameters, burnt with a torch. Which were glued to pre-marked places.
You can make an original clock from natural materials as a useful decorative element of your own home with your own hands. This process is very simple and you do not need any special woodworking skills or tools. See step-by-step instructions for how to make them.
Material
To make a clock from cut wood with your own hands, prepare:
- I slept myself;
- clock mechanism with battery;
- thick cardboard;
- black paint;
- scissors;
- adhesive tape;
- hot glue sticks and hot glue gun;
- grinding machine or sandpaper;
- chisel and hammer for it.
You can purchase the saw cut ready-made or make it yourself if you have a suitable stump (dry, but not rotten) and a chainsaw or similar hand tool.
Step 1. First of all, you will need to process the resulting cut. It is necessary to make a hole in it for the clock mechanism. In this case, it had a lid that completely hid the box underneath, so the hole could be made through.
If you have a mechanism of a different type, use a hammer and chisel to make a kind of groove for the box on the back side of the cut. Make it so deep that the box fits completely into it.
In the center of the prepared groove in the place where the arrows will be attached to the mechanism, use a drill of a suitable diameter to make a through hole.
Step 2. Take sandpaper and sand the surface of the cut and the groove itself. Try to make the workpiece as even and smooth as possible.
Step 3. Attach the clock mechanism with duct tape and secure the plastic box with hot glue.
Step 4. Print or hand-draw the dial numbers on cardboard. Carefully cut them out. You will get templates.
Lay them out on a piece of wood and paint them with spray paint or with simple paint and a sponge brush.
Step 5. After the paint has dried, attach the hands and a decorative element of the clock to the saw cut, which will hide the box.