Hello friends!
Even when work was underway on the creation of a Children's collection of gift boxes, one of the models just “begged” to be decorated using the paper cutting technique. I'm talking about an accordion box. Well, you must admit, the carved patterns on its sides look simply magnificent! And very harmonious :). Thanks to MK and templates prepared by Olga Kachurovskaya, now you and I can make this lovely paper accordion. All in our hands!
But first, a little announcement: recently the author of the blog “Domovenok-Art” Elena Goloshtenko took it from me interview, and I invite you to take part in our conversation :). By the way, Elena is also interested in creativity, and in its most varied forms - from home cooking to soap making, scrapbooking and creating children's toys. You should have seen what a toy elevator made of cardboard Elena and her husband made for their son - it’s something! With an electro-mechanical drive, on a control panel - it’s worth taking a look, or even doing it yourself.
Let's return to our paper toys. And before you start creating an accordion box, make sure you have the following materials and tools at hand:
— paper for pastels of 2 colors (A4 sheets);
- breadboard or stationery knife;
- ruler;
— a creasing tool (or just a knitting needle, a thin crochet hook, etc.);
- double-sided tape or glue.
We start, as usual, by printing the templates on paper (the templates themselves can be downloaded below).

We cut out the patterns, and then all the details of the future accordion along the contour.

We crease and bend the parts, observing the correct bend direction (different bend directions on details 1 indicated by lines of different types). When folding “fur,” origami skills will be very useful. And for those who don’t have them yet, this will be a good way to practice =).
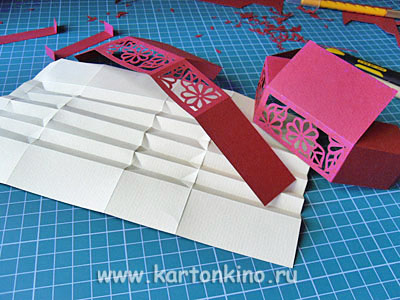
Then apply a strip of double-sided tape to the valve details 1(on the front side), having previously straightened this area.

We collect and glue the “fur” of the paper accordion. This is what it should look like:

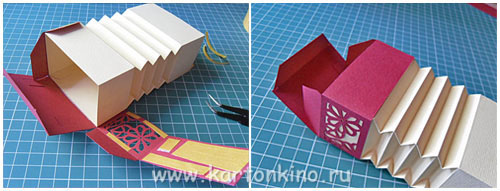
Now let's move on to the side parts. We insert “straps” into the slots of parts 2-1 and 2-2 ( parts 3-1 and 3-2). We glue them on the inside with double-sided tape.

We glue the edges of the sides on the wrong side, as shown in the photo:

And glue the side parts to the “fur”.

It’s actually easier to cut and paste patterns onto the “straps” even before gluing the latter to the sides. It’s just that in this case, the very idea of additional decorations arose after assembling the accordion from paper. And we had to finish it almost by weight, which is not very convenient.

This is how ours looked gift box after modification:

In the file with templates, patterns for straps are already present (this parts 4-1 and 4-2). Therefore, templates for all parts can be immediately printed on pastel paper and assembly can begin, taking into account the adjustments made.

As a gift wrapping, the accordion turned out to be quite roomy, but how paper toy - miniature, but that makes it even more attractive. Although the length of the straps is designed in such a way that a child’s hand (a child under 5-6 years old) can easily fit under them.

And here is another version of an accordion box with carved patterns, but in a more “boyish” design:

Download templates for cutting this model here:
Do you like the idea of gift wrapping? And even more children's boxes, which can also be used as paper toys, you can find in the 3rd issue of the DIY Gift Wrapping series - "Children's collection" .
If you soon have to congratulate relatives or friends on such an important event for every family as the birth of a baby, then I would like to advise you set of touching boxes created Tatiana Okselenko(author of the blog “My World of Beauty”) especially to congratulate parents and newborns.
And finally, since we are talking about harmonics, a small musical surprise for you - a bewitchingly passionate Libertango Astor Piazzola performed by Peter Dranga (accordion) and Dmitry Kogan (violin):
A paper accordion is a very original and beautiful product. Origami is the most beautiful form of art, which has not lost its popularity for many years. Origami masters are able to create a unique thing from a simple piece of paper. It is also worth considering that origami has a positive effect on the state of the human nervous system, and also develops fine motor skills in children’s hands. And this is all scientifically proven! The accordion, as an ancient musical instrument, is a symbol of fun and joy in the home. This article will help you quickly and easily make an “Accordion” craft with your own hands.


Unusual option
The first step is to print the base with fold lines, dotted or dotted. Schemes can be found on the Internet. Bend all dotted lines upward. And the lines marked with dots are down. The gray areas on the parts are needed to apply glue to them.
Start gradually bending step by step.

Then glue the workpiece into a tube.


Bend the lines along the edges in a different way: the dotted line is at the bottom, and the dotted line is at the top.

Then start assembling the parts of the side parts of the accordion.

Fold the parts along the fold lines, apply glue to the gray area.


Place everything in the casing and secure it in place with glue.


It is imperative to ensure that all parts of the craft are evenly located in their places.


In the photo you can see the hole for sound.

All that remains is to insert the blank into place and the paper accordion is ready!


Paper accordion
This is the easiest way that even a child can handle. First you need to print all the parts of the accordion on a printer. Each fold of the accordion has an empty window where you can place calendar pages.


Crocodile Genes Tool
This is a very special type of accordion without a ready-made marking diagram. How to do it?

Cut A4 sheet in half along a horizontal line. Then divide the sheet with 31 folds into 32 equal parts.
The photo shows how to bend it in half:

Steps 2, 3, 4, 5 fold in half. The top layer should be divided into ½, ¼, 1/8, 1/16 and 1/32. Expand. Divide each zone in half to divide the entire sheet into 32 equal parts. Even lines remain convex, and odd lines remain concave.


Then make a fold of arbitrary height (from 0.8 to 1 cm), parallel to the horizontal side. Bend the finished piece in half.


Bend the workpiece along line 2.

Then repeat the fold of the outer line to the central one - between points A2 and B2 to the 32nd line.

Repeat all previous steps from the bottom line, which is located 8-10mm from the edge. On the reverse side, repeat all folds.

Through all points B and make a fold.
It's time to assemble the accordion parts. To do this, use all the previously obtained folds.


During the New Year holidays, you want to amuse the children and do something with your own hands. But I want the children to take part in the process of exciting joint creativity, to do something interesting, and at the end to be able to admire the creation of their own hands. I had to tinker, look for something to make, until I found an accordion that can be made using the origami method or simply constructed and glued from ordinary paper.
The making itself seemed simple, but it took a lot of work before the accordion acquired its characteristic appearance. The production required a minimum of ingredients and a maximum of patience and diligence. So, if you want, you can try making a paper accordion; this will keep the children busy and will also provide them with another toy.
Paper accordion using origami technique
The very principle of making origami crafts is to alternate the same movements, as a result of which something new appears, some kind of figure from an ordinary sheet of paper.
What is origami
Origami is a Japanese word, and this art of folding paper crafts came from the land of the rising sun. In ancient times, when paper was just invented and was very expensive, such crafts, folded into figures of butterflies or birds, also had a great value. This is how notes were written for a dear person.
It has become an art, a sign of sophistication and subtlety of manners. The Japanese nobility mastered origami along with good manners and science. With the spread of paper throughout the world, origami ceased to be the art of the elite.

You need to know this in order to understand that origami crafts do not use glue; all manipulations in manufacturing come down to the basic principle of bending and unbending paper. In order to better understand how this works out, you need to look at the diagrams.
A4 paper accordion
The accordion is made from a standard sheet of A4 paper. You can take thick cardboard, but when making folds, problems may arise due to its density. The accordion can be made as an independent toy. Or it can be done as an addition to the “Crocodile Gena” craft, since Gena the crocodile is not rated without an accordion.
Cut a sheet of paper in half along the long side. After this, it is necessary to divide the remaining half into parts, the number of parts is thirty-one. This must be done using folds, since this is the main operation for making origami.

To perform this operation, the sheet is folded in half on the short side. We bend the half that is on top in half several times until one sixteenth of the sheet of paper remains. After this, we perform the same operation on the other side. Thus, the sheet will be divided into thirty-two compartments.
The lines are the fold points of the resulting fan. If you look at them, you can understand that the even lines are located in the ravine, and the odd lines are located both on the hill and in the ravine. The distribution on the line will help in the future not to get confused in the formation of the accordion.
Next, a fold is made on the long side of the imaginary fan, which has a width of no more than ten millimeters. It will serve as a reinforcement so that the accordion does not fall apart when finished. Next, we fold what remains of the sheet of paper in half again, also along the long side.

Subsequent operations are carried out after unfolding all the folds that have been made. Since the folds need to be well fixed, they should be clearly visible on a sheet of paper. Thus, we find the fold lines of the accordion and begin to bend the corner from the upper left side. This is done alternately, that is, first the corner is bent so that the bottom side of the triangle is parallel to the long side of the sheet of paper. Then it unfolds, the edge of the accordion is bent to one line, and the procedure with bending the corner is repeated again.
This must be done thirty-two times - until the end of the accordion. The same actions must be done with the bottom line, which has a curved edge. In order for the accordion to have a finished look when assembled, it is necessary to repeat the same thing on the back side of the sheet.

Then you can begin to shape the musical instrument, while additionally fixing all the lines. To do this, a tube-shaped blank is formed, and you can begin to accustom the paper to all the folds that are made on its surface. After forming the accordion, its edges can be secured with a stapler or paper clips.
Using the origami method, you can make an accordion from two sheets of paper. In this case, the sheets are glued together, characteristic accordion folds are formed, and cardboard blanks with drawn keys are glued to the sides. Such an accordion can take part in games much longer than ordinary origami.
Video on the topic of the article
Remember how, as children, we folded a piece of paper into an accordion shape and entertained our classmates? If your love for it never went away, and the origami technique gradually grew into a hobby, you can remember those very days and make an origami accordion out of paper. Moreover, simply folding the edge of a sheet of paper is not enough; here we will use something like a real technique of folding paper along the lines. True, in its simplest and most understandable version. What if such a hand-made paper accordion actually produces a couple of notes? There are even entire communities where craftsmen post complete tutorials on gluing such models and provide complete diagrams for cutting out parts.
How to make an accordion out of paper - a simplified version
The easiest way to make a paper accordion is to simply cut out its two bases in detail and fold its bellows using the simplest method. Here is the actual method:

This is such a wonderful paper accordion, glued together with your own hands, that you can make.
Origami paper accordion
If you already have some experience working with paper, you can complicate the process. This time the accordion bellows will be made much more difficult. Let's look at how to make an accordion out of paper, which will also produce a couple of notes:
- First of all, print out the base. On it you will find fold lines indicated by dotted and dotted lines. We bend everything that is indicated by the dotted line upward. We bend all the lines marked with dots downwards. The gray areas on the parts are for applying glue.
- So, we begin to gradually bend step by step.
- Next, glue the workpiece into a tube.
- We begin to gradually bend the accordion fur lines.
- Along the edges the lines are marked in a different way. We will also bend them using the reverse method: the dotted line down and the dotted line up.
- Next, we begin to assemble the details of the side parts of the accordion.
- Fold the parts according to the fold lines, apply glue to the gray area.
- Next, we place everything in the casing and fix it in place with glue.


 |
 |
Want to learn how to make an accordion out of paper? Read how. Even a child can handle the simplest method, but even an adult can make complex versions using the origami technique only using a template. As for the size and appearance of the product, the accordion can be either a very small decorative, souvenir, or a life-size model. In a word, here you will find information both about options for children’s creative activities or hobbies for adults, and the possibility of creating attributes for a holiday at school or preschool.
Materials and tools
If you decide to learn how to make an accordion out of paper, then most likely you already have the items necessary for the work. Depending on the complexity of the manufacturing method, different requirements may be required. A sample list is:
- paper (A4 sheet, roll, printed template) or cardboard;
- glue;
- pencil;
- ruler;
- paints, felt-tip pens for coloring the product or other decor.
The most important tool here is skillful hands and fingers.
Different ideas
If a child comes to you with a question about how to make an accordion out of paper, offer him the easiest way in which the child can fold the object himself. If you prefer to practice with children, make a more complex example. Let the baby color the finished product.
If origami has become an interesting hobby for you, and you have enough patience, try to implement the most complex options. They not only look like the real thing, but, in general, are unique masterpieces and a great opportunity to show off your skills.

If you need to make a natural size accordion, you will need colored dark and light cardboard, as well as a creasing tool. Before creating a fold, a guide is drawn on the sheet, which prevents the thick cardboard from creasing and gives a smooth, neat line. There are also more complex methods, where the product is made from several parts with the manufacture of a frame. Both cardboard and paper are used.
The simplest preparation option
This product essentially looks like a relief and is made from a small rectangle of paper. The easiest task for children's creativity.

The sequence of actions is as follows:
- Cut out a rectangle of the desired size. It is better when the length is significantly greater than the width.
- The child should make markings in the form of vertical lines at equal distances. Moreover, those that need to be folded inward should be made solid, and if they need to be folded outward, dotted or with any different shading or color. This way the child will definitely not make a mistake in which direction to bend.
- The resulting accordion blank can be used for further creative work. If you need to make a product in the form of a musical instrument, simply step back some distance to the right and left and draw buttons and keys in these rectangles.
If the product is created for decorative purposes, you can decorate the top side with a figured edge made using a special hole punch.
Product of non-standard proportions
Don't know how to make a long accordion out of paper? The pattern is independent of length. You just need to take a large sheet and cut a strip. If there is no appropriate format, it is enough to carefully glue several A4 sheets together with tape or with a small overlap using glue. It is better if the seam is exactly as wide as the fold.
How to make an accordion out of paper: diagram
Here are options for manufacturing three-dimensional objects. Below is a template that is easy to assemble. This product is made from a regular album sheet. Step-by-step instructions are presented below.
If you want to figure out how to make origami out of paper, the accordion is made according to the template shown in the next photo.

If you want to create such a masterpiece, you will have to work hard. First you will need to print the parts blanks. They already have marking lines along which the folds should be made, and it is indicated in which direction.

How to make an accordion out of paper step by step
Let's look at the sequence of making a paper musical instrument from an album sheet. The scheme of work is as follows:
- Place the sheet horizontally in front of you.
- Measure a strip of about 1 cm along the long edge. This will be the seam (gluing area).
- Fold the sheet in half along the long side. Perform gluing.
- Fold the resulting rectangle in half.
- Stepping back about 5 cm from the left edge, begin making accordion folds. Do them until there is also 5 cm left to the right edge.
- Carefully open the structure from one edge and blow inward. Straighten the resulting workpiece exactly so as not to damage the folds.
- Fold the side elements and draw keys on them.
So, you have learned how to make a paper accordion with your own hands. In addition to the usual white sheet, you can take colored paper with embossing, and stick the keys from another.
Of course, the instructions given do not show the implementation in the most complicated way, but the accordion will look quite realistic. And the child will quickly master the technology. It turns out to be a good option for children's creativity.
Large accordion for a school event: what you need
To make such a musical instrument you will need the following:
- or wallpaper.
- Cardboard (for example, corrugated).
- Masking tape.
- Glue "Moment" or other quick fixation.
- Pencil, ruler.
- Clips or clothespins.
- Details for decoration.
Although the manufacturing technology is more labor-intensive and will take more time, the materials are practically the same as in the case of a small decorative product.

Instructions for making holiday props
The work sequence is as follows:
- Cut out 4 rectangles from the wallpaper. Take the sizes you need, for example, 12x40 and 7x40 (two each, respectively). Furs will be made from them.
- Apply masking tape to the underside of the parts.
- Make markings on the workpieces (stripes at equal distances) along which to make the folds.
- On the inner folds (when viewed from the front side), make cuts about 1.5 cm deep. To prevent thin wallpaper from tearing further, apply masking tape.
- For those parts that will be placed vertically on the accordion (in this example, 12x40 cm), you need to make corner bends from the resulting cuts.
- Cut out rectangles from cardboard that correspond to the height and “depth” of the accordion (here 12x7 cm). Their number should be equal to the number of folds on the workpieces. These will be a kind of stiffening ribs for the bellows.
- Apply Moment glue to the smaller end of the cardboard blank and insert it into the first fold of the paper accordion strip with cuts. Secure with clips for added stability.
- Do the same with all cardboard rectangles. This will be the top part of the furs.
- Also do the bottom side.
- When the structure has completely dried and stuck together, cover the resulting “skeleton” with the front and back.
- Make the side parts in the form of two cardboard boxes of the appropriate size or find ready-made ones. It is also better to decorate these details with colored paper or wallpaper.
- For greater realism, make an element on one side on which the keys are located. It is easy to assemble from several cardboard blanks glued one on top of the other (to add thickness), preferably with rounded edges.
- Keys and buttons can be drawn or designed in the form of an applique, cut out of paper. Round elements are easier to make using a hole punch.
The main thing is to understand the principle of creating the structure itself. You can come up with absolutely any design.
As you can see, there are quite a few ways to make an accordion out of paper. Choose the one that suits your complexity. Make your own and teach your children. This is a useful and interesting activity.