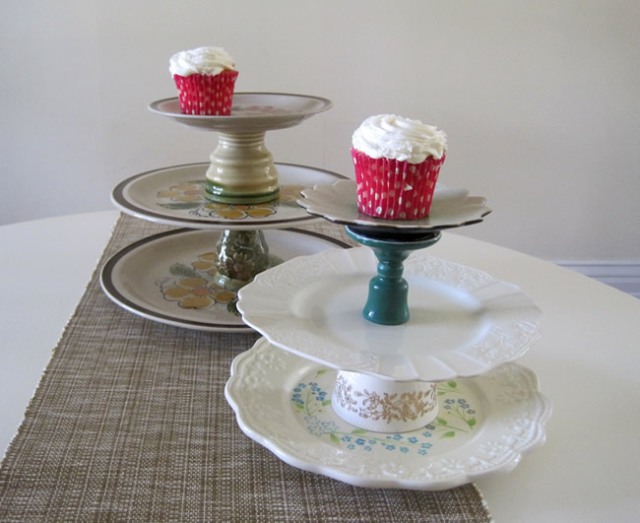
An appetizing, airy, creamy cake in itself is the best decoration festive table during dessert. This means that the best place for him to stand is in the center of the table on a small pedestal - stand which is easy to do with your own hands. If you add a few more “floors” to the stand, you will get an original multi-tiered stand for fruits, sweets and cakes.
To create such an original dessert stand with your own hands, you will need different utensils - cups, vases, glasses, glasses, bowls, saucers and plates! Look behind the doors of your sideboard or cupboard - you will probably find very rarely or never used dishes that you would be sorry to throw away and have nowhere to put them. Why not give it a second chance to be the centerpiece of any holiday feast?

Such stands can become independent decor interior or used for storing jewelry, decorations and other small items.

All parts are attached to each other with glue for glass (porcelain, ceramic) surfaces. You can purchase this glue at almost any hardware or construction store. If the stand will be used for food products, be sure to check the glue label to see if it is suitable for gluing dishes!

The technology is very simple. Prepare the dishes from which you will make the stand. Wash it well, dry it and degrease the surfaces that will stick. Ordinary nail polish remover is also suitable for degreasing.

Saucers and plates will act as trays, and connecting elements- cups, vases and glasses. We turn the plate over and mark with a pencil the place where it joins the next dish, preferably exactly in the middle. Then the entire structure will be neatly level and without distortions. Then apply a thin layer of glue to both grease-free surfaces, press well for a few seconds and press down the glued parts with some heavy object (a heavy volume of a book will do). Immediately use a cloth to carefully remove excess glue.

Leave the press on for 15-20 minutes and then repeat the entire procedure for the next tier if you are making a multi-tier stand.

Interesting compositions are obtained by combining a variety of dishes. Try experimenting with any container to create original and unique trays for fruits, desserts, cakes and decorations!

An appetizing, airy, creamy cake in itself is the best decoration for a holiday table during dessert. This means that the best place for him to stand is in the center of the table on a small pedestal - stand which is easy to do with your own hands. If you add a few more “floors” to the stand, you will get an original multi-tiered stand for fruits, sweets and cakes.
To create such an original dessert stand with your own hands, you will need different utensils - cups, vases, glasses, glasses, bowls, saucers and plates! Look behind the doors of your sideboard or cupboard - you will probably find very rarely or never used dishes that you would be sorry to throw away and have nowhere to put them. Why not give it a second chance to be the centerpiece of any holiday feast?
Such stands can become independent interior decor or used to store jewelry, decorations and other small items.
All parts are attached to each other with glue for glass (porcelain, ceramic) surfaces. You can purchase this glue at almost any hardware or construction store. If the stand will be used for food products, be sure to check the glue label to see if it is suitable for gluing dishes!
The technology is very simple. Prepare the dishes from which you will make the stand. Wash it well, dry it and degrease the surfaces that will stick. Ordinary nail polish remover is also suitable for degreasing.
The trays will be saucers and plates, and the connecting elements will be cups, vases and glasses. We turn the plate over and mark with a pencil the place where it joins the next dish, preferably exactly in the middle. Then the entire structure will be neatly level and without distortions. Then apply a thin layer of glue to both grease-free surfaces, press well for a few seconds and press down the glued parts with some heavy object (a heavy volume of a book will do). Immediately use a cloth to carefully remove excess glue.
Leave the press on for 15-20 minutes and then repeat the entire procedure for the next tier if you are making a multi-tier stand.
Interesting compositions are obtained by combining a variety of dishes. Try experimenting with any container to create original and unique trays for fruits, desserts, cakes and decorations!
Ingredients: Expanded polystyrene
Styrofoam
Double sided tape
Blade
Glue
Decorative ribbons
Laminated substrates
They asked, I show.
I don't make cakes weighing less than 2 kg. Therefore, just a laminated substrate is not enough. We have to strengthen it. If the cake is 2-2.5 kg I make it from polystyrene foam. If more - polystyrene foam (both are bought in construction stores. On average, three substrates come out of 1 sheet)
If I use polystyrene foam, it means there is a gold backing on top, it is denser; if polystyrene foam is a white thin backing (nothing to waste)))) it can withstand up to 4 kg with a thickness of 2 cm and 3 cm - up to 7 kg
The backing can be glued with double-sided tape, but if you have time, it’s cheaper to use glue.
My husband cuts out the substrates with a stationery knife, a narrow blade, I can’t do it so evenly and perpendicularly
Now we need to refine the side of the substrate. Any decorative tape will do. Sometimes the width of the tape is larger or smaller. If more paper tape, it cuts perfectly with a blade. If the tape is fabric, then I leave the excess width sticking out at the top. If the tape is narrower than the backing, you can “cover” the empty space with another, narrower tape of a suitable color.
You can stick it with the same double-sided tape (I buy a wide one and cut it into narrower strips, it’s cheaper than taking a narrow one at once). If you do it in advance, it’s quite possible to stick the tape with dry glue with a pencil. Paper tape is more suitable for polystyrene foam, the structure of the foam plastic is more porous and grains can be seen through the adjacent fabric tape, but paper tape hides this defect better
If the tape is paper, it can be glued joint to joint. This won’t work with fabric, the edge is not beautiful no matter how you cut it. I gave away the first cake with just the edge cut off. So I remembered that! Everyone was tormented by the question: does it really look so ugly for such meters as Alesya? The second one singed the edge with a match (what a sight)))) Then I asked, it turned out that they make BOWTS! But I didn’t even think of that!!! (that’s why I describe everything this way, maybe someone like me is slow-witted)


It all started with a wedding. My daughter was planning to get married in rustic style. Everything had to be using natural materials in its original form. I was asked to make an arch, but since I love working with wood, and everyone knows it, I decided to make an original cake stand from natural materials with my own hands.
The basis of everything - plywood sheet, 0.7 cm thick. A wooden base circle was cut out of it. Diameter - 38 cm.


The edges of the circle (protruding pieces of the base) are leveled using hand jigsaw. A jigsaw will not work as it will tear off pieces.

Next comes the move epoxy resin(two-component, transparent). Using pieces of plasticine, we seal the edges of the circle so that closed grooves are formed from the space between the pieces of wood. This is done so that the resin does not drain. Next, carefully fill the space between the cuts with resin.


We coat everything with wood varnish on both sides. We glue special felt pads onto the legs. Let it dry.


The stand is ready! In principle, it can be used for different purposes. Including as a stand for bidding, cottage cheese, cookies and much more. Good luck!
Beautiful cakes, decorated with fondant, glaze, ganache and other tasty treats, need to be presented properly.
An amazing culinary dessert needs a beautiful stand, especially if the cake must “travel” to the celebration on its own.
You can, of course, put the cake on a tray or a large plate, but then bother with this stuff.
A plate or tray certainly will not work if you need to present a cake for a celebration in which you will not be a participant. This more option for household use.

There are special culinary products on sale decorative coasters for baking, and cupcakes the most different types, and from a wide variety of materials. With such products you can immediately assemble the cake and decorate it.

So, there are many ways you can make a cake stand, which can also be called a cake stand. Today we will look at the 3 main and easiest to manufacture and most common options.
Fiberboard material is sold at any hardware store. We have the form of a thin and dense sheet of a certain size (for example, 120*240cm). Looks like enough thin sheet Can withstand a weight of about 5 kg exactly.

Cutting a circle from fiberboard yourself is a hassle at home if there is no one to help. You won't be able to cut a regular circle with a knife; you need to work with a jigsaw. Plus, there's a lot of garbage.

There is a way out of this situation: many hardware stores offer cutting services. fiberboard sheet- so use it. Unfortunately, this is not done everywhere, so find out.
You can cover the surface and edges of a not entirely attractive, but thin material using food foil or self-adhesive.
Cardboard cake stand
Cardboard, as a separate type of material, rather than a box, is also available for sale. To create a cardboard backing for a cake, we need to stock up on some materials and tools:

We will not cut out a cake shape from cardboard. We simply cover, for example, a square-shaped stand with wrapping paper, which we secure with wrong side pieces of tape.
We will assemble the cake on a base, only on baking paper cut to fit the circumference of the cake. And first, we will cover the substrate with additional polyethylene.

It will turn out neatly and very convenient to carry and serve dessert.

Cake stand made of penoplex (or polystyrene foam)
To create a beautiful and convenient stand, we need:
- penoplex - sheet with a thickness of 20 to 50 mm (you can buy it at any construction store);
- a stationery knife with a thin blade or a simple kitchen knife, but heated over a fire - this way you can cut polystyrene foam easier and cleaner;
- cling film;
- sandpaper (fine grit) to clean the edges if it was not possible to cut the shape evenly;
- double-sided tape;
- satin, which is equal in thickness to the thickness of the material (penoplex).
On a sheet building material Let's draw a circle of the required diameter for the cake.

Or we draw any other figure that fits the theme of the future dessert. And cut out the shape with a knife.

We need it exactly, so we will process its edges with sandpaper.

This is how the cake stand blank will look neat.

We will wrap the workpiece in cling film so that the cake itself and all its edible parts do not touch the building material.

The surface of the substrate can be decorated in several ways: