Installations are used to securely secure plumbing units and connect them to water supply and sewerage systems. Such designs allow you to hide all communications and thereby improve the appearance of a bathroom or bathroom. How to install a toilet installation with your own hands will be discussed in this article.
Preparation for installation
Before proceeding with the installation, it is necessary to prepare the site. Such structures are attached to the wall, but the choice of location greatly depends on the type of installation. There are two types:
- block;
- frame
The first option should be mounted in a niche in the wall. This design consists of a plastic tank, fittings and fastenings for the toilet. The latter should only be of the suspended type.
If you bought a frame installation (which costs more), then the choice of installation location and toilet is at your discretion. Such structures are a frame that is attached to a wall, two walls, a partition or a floor. The toilet and all communications are attached to the frame.
If you have decided on a place, then it’s worth preparing necessary tools and accessories:
- hammer drill or electric drill, drills that match the diameter of the installation fasteners;
- wrenches for fastening bolts;
- building level, ruler, pencil;
- the installation itself and the toilet.
Now you can get to work.
Installation procedure
How to install the installation will depend on its type. First, we will analyze the stages of installing the frame structure. To install it, you must sequentially perform the following work:
- We make markings for installing the frame. Everything will depend on the installation location. As a rule, the frame is attached with two fastenings to the floor and additionally to the wall or partition. When marking, use a level and plumb line to ensure the installation is level.
- We make holes at the marked points using a hammer drill or electric drill. Dowels are placed in them and the frame is secured. You can use anchor bolts, so the structure will be secured more securely.
- The next step is to connect the water supply to the tank. Here everything will depend on the device of the latter. Tanks with side and bottom entrance are available. When connecting, use a flexible metal hose.
- Now the installation is connected to the sewer. To do this, you can use a pipe or corrugation. Typically, the drain diameter is 110 mm. Now you can temporarily connect the toilet and check the tightness of all connections. The smoothness of the shutter button is also checked.
- Now you need to sheathe the installation. For this you can use various materials. For example, the combination of drywall and ceramic tiles. When carrying out this work, it is necessary to first secure the profile around the perimeter of the installation. Drywall will be mounted on it. Then the tiles are laid (you can learn how to lay tiles on drywall by watching the video below). When performing these works, do not forget about the hole for the drain button. This place is protected by a special cuff that will prevent construction debris from penetrating inside.
- After this, the toilet is installed and everything is ready for use. Modern frame installations are universal. You can easily connect a toilet of any design to them. During installation, special studs and bolts are used.
- The installation of a block installation is slightly different. First of all, as in the case of the frame structure, we make markings for the tank. Here you need to follow the instructions for the installation itself. The tank itself is usually installed at a height of one meter from the toilet. The number and location of mounting points will depend on the selected model.
- After marking, we make holes using a hammer drill. Using a drill can make work difficult, because such structures are attached to a wall (usually a load-bearing one). Make holes with a drill without an impact mechanism in brickwork or concrete is quite difficult.
- The next step will be to install the tank and connect it to the water supply. It is also necessary to mount special pins for fastening wall hung toilet. They are screwed into pre-prepared holes in the wall.
- After this, you can install the toilet and check the tightness of the connections. The last stage there will be a niche filling. To do this, you can use drywall or other suitable material.
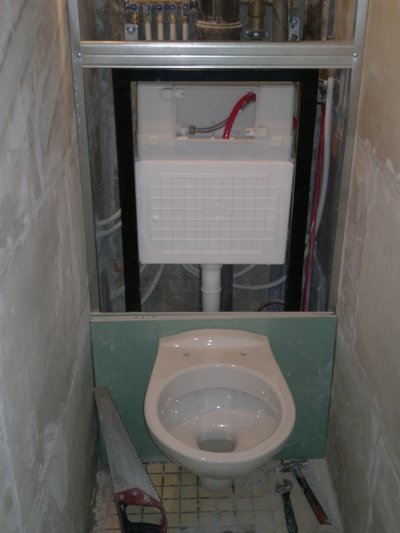
The installation principle is illustrated in the following photos:
When choosing a tank, choose a design with a water saving system. In this case, a drain button with two keys is used. In this case, when you press one button, the water is completely drained, and when you press another, only half of the tank is drained.
When covering the installation with tiles, start working from the drain button. It should be located either at the joint or in the center of the tile.
When finishing, provide a service hatch under the buttons. This will give you the opportunity to repair the drainage systems and the tank itself.
Hanging or wall models toilets are gaining more and more popularity, especially often preferred by residents of new buildings.
When refurbishing old bathrooms, this type of plumbing fixture is also often chosen. Which is not surprising - after all, the choice, in addition to aesthetic preferences, is determined by purely practical considerations.
Firstly, bathrooms are regularly cleaned and damp-cleaned. Therefore, objects standing on the floor are often insurmountable obstacles for a vacuum cleaner or mop. As a result, dirt remains in the corners, and especially around the base of the toilet.
Secondly, wall-hung toilets with installation save useful space in a small toilet room, since the pipes and cistern are hidden in the wall.
Which wall-hung toilet with installation is best to choose for your home? First of all, let's take a look at the material from which toilet bowls are made. The vast majority of them made of earthenware or porcelain coated with glaze to ensure moisture resistance. There are also metal models, but they are not very common.
There are even products on sale from natural and artificial stone, wood, plastic. But such models are not in wide demand, but are rather made to order.
Based on the shape of the bowl, this type of plumbing equipment is divided into:
- Funnel-shaped- This is the most common bowl shape. In this case, the waste immediately falls into a special hole, from which it is then removed, but the disadvantage of this design is that the water can splash heavily when flushed.
- Disc-shaped– characterized by the presence of a special shelf, onto which waste products first fall. The advantage of such a device is that less splashes are generated during use.
- With visor bowl– they are the most convenient to use, since with this design there is almost no splashing.
As for the sizes, then Standard wall-mounted toilets have the following parameters:
- length– from 50 to 60 cm;
- bowl height– from 30 to 40 cm;
- width– also from 30 to 40 cm.
However designer models may vary in size– aesthetics come to the fore here, rather than convenience and compactness. So they are unlikely to be suitable for typical bathrooms. See more about the sizes of toilets and their calculation.
The above parameters should be considered when purchasing. Before choosing your favorite wall-hung toilet with installation, you need to find out the dimensions of the room where you are going to install the new equipment. It should be remembered that the distance from the bowl to the toilet door or the opposite wall should not be less than 60 cm– only in this case will using the toilet be most comfortable.
Installation selection
Wall-mounted toilet models are mounted on a special structure called an installation. It contains tank, water supply and sewer outlet. Let's look at how and what installation to choose for a new toilet.

The tank for such devices is usually made of plastic and has a flatter shape compared to. This allows it takes up little space when installed. In popular frame installations, the cistern is already built into the structure.
Installations are:
- Block– this option is inexpensive, but can only be mounted on a solid wall. Such a structure cannot be mounted on thin partitions. It consists of a flat cistern, water supply and sewer fittings, and fasteners for the toilet bowl.
- Frame- the most common design. Its basis is a frame to which all elements of the system are attached: bowl, tank, liner, sewer outlet.
This option allows you to install the toilet anywhere, regardless of the quality and material of the wall. The frame installation is attached to the floor and walls, or only to the floor. Along with straight lines, there are angular variations. The disadvantage of such systems is their rather high price.
When deciding to install a wall-hung toilet, you should not forget that in addition to the size of the bowl, It is also necessary to take into account the installation parameters:
- depth it is usually from 10 to 15 cm for block installations, from 15 to 30 cm for frame installations;
- width– 50 - 60 cm for both types;
- structure height– up to 100 cm for block installations, from 80 to 140 cm – for frame installations.
Thus, when choosing one or another installation system, First of all, measure the bathroom space, and also decide on the installation location of the structure. Select the location so as to make maximum use of the free space so that installation is not interfered with by any communications (risers).
Remember that the shorter the distance from sewer and water pipes, to which you connect the toilet, the more reliable it will be in use.
If it is possible to hide the mounting system behind load-bearing wall– purchase a block design. If this is not possible, do not take risks, but choose a frame one. It is more expensive, but is able to ensure the safe operation of a wall-hung toilet, designed for heavy loads (the design can withstand up to 400 kg). In addition, it can be installed in any suitable place.
Required tools and materials
You can do the installation of this plumbing equipment yourself, saving a considerable amount. If you know what to do in what order, the result will not disappoint you. So for this you will need the following materials:
- toilet;
- installation with cistern;
- fastening elements;
- building level;
- soundproofing pad;
- air valves for sewerage (not included) or plugs;
- flush button;
- tow, FUM tape and sealant.
Almost every home craftsman has the tools that he will need when working:
- hammer drill or drill, set of drills and drill bits for concrete;
- screwdriver;
- hacksaw for metal;
- adjustable wrench;
- mites;
- angle grinder (grinder).
How to install?
The first step is to install the installation frame, and then build a false wall that will camouflage it, hiding the cistern, sewer and water pipes.
Let's get down to business
Before erecting a false wall, it is necessary to test the operation of the mounted sewer system . To do this, you should temporarily hang the toilet bowl, and then, after connecting the water, check for the presence or absence of leaks in the pipe connections. If the test test is successful, the water is turned off again and the toilet is removed before finishing the false wall.
Connection to water supply and sewerage
After the mounting structure has been mounted and sealed, You can start installing the toilet itself. Let's look at this process step by step:
- Remove the plastic sleeves from the studs for hanging the bowl, remove the plugs from the sewer pipes. After this, attach the soundproofing pad. To do this, simply thread it through the studs and water inlet and outlet holes.
- Then the toilet is connected to pipes fixed to the installation frame: the outlet is connected to the sewer outlet, pre-lubricated with sealant, the flush pipe from the cistern is also connected to the corresponding hole of the plumbing product.
- Now the toilet bowl can be secured with pins, which should protrude from mounting holes approximately 20 mm. It is fastened with nuts and spacers, then protective sleeves with caps are again put on the studs.
- Remove any parts of the soundproofing pad protruding from the edge of the bowl, treat the place where it comes into contact with the wall with sanitary sealant.
- Mount the flush button. To do this, remove the cover from the hole intended for the button, install the lower part of the key, then the key itself.
Installation completed - equipment is ready for use. You can turn on the water and enjoy!
Video on the topic
For a better understanding of the topic, watch a video about installing a wall-hung toilet in a toilet with your own hands and installing the plumbing fixture on it:
As you can see, choosing a wall-hung toilet is not difficult, and installation and connection are practically no different from. The most important thing is to securely and correctly fasten the installation frame. Yes - it will require more time, money and effort compared to installing traditional floor equipment. But the result will not disappoint, because the bathroom will look modern and stylish, cleaning it will become easier, and there will be more space in the toilet.
Metal structure with special devices designed for securing plumbing fixtures, called installation. It is used for installing bidets, sinks, and toilets. Plumbing fixtures attached to the wall help save space and create a feeling of lightness. In addition, installation installation helps hide all communications and pipes, which are located in the wall, allowing you to achieve an attractive appearance rooms and hygiene.
Types of toilet installations
Today, there are 2 types of installations that have their own design features.
Block structures They are mounted only on main walls and consist of a plastic tank with fittings. A set of fastenings is additionally included with the toilet. This type of installation for toilets is installed in a pre-prepared niche and is completely hidden in the wall. The main advantage of this design is accessibility, however, if there are no main walls in the bathroom, then installation is impossible.
When purchasing a toilet, many people look at the shape and color scheme, few people think about the reliability of the product. A completely different attitude towards the installation - guarantees of strength and absence of problems with plumbing for the next 10-20 years. Installing a toilet installation requires the technician to have certain knowledge and skills.
The leaders in this market segment are considered to be German manufacturers - Grohe Vega and Geberit. By purchasing equipment from a renowned manufacturer, the owner of the toilet does not have to worry about the quality, which is carefully checked at all stages of production. There are two types of frame designs for DIY installation:
- Block;
- Frame.
The latter option is more popular among plumbers, because... provides more space design ideas. This applies most of all to the installation for the toilet, which must be mounted on feet to the floor surface.
Tools
Installation of a toilet installation involves the use of certain tools for work:
- Hammer drill with a drill diameter equal to the size of the dowels (supplied as standard);
- A set of adjustable wrenches to make installation on your own faster;
- Construction level required to align the frame in all planes without distortion;
- Tape measure for measuring the distance of the toilet relative to the floor (approximately 41-45 cm).
Important: when measuring height, it is necessary to take into account that tile placed on the floor will raise the lower level by a few cm.
At the preparatory stage, the master must carefully study the composition of the package Supplies to installation. If anything is missing, these spare parts will have to be purchased. Unscrupulous manufacturers do not worry about the comfort of craftsmen who install the frame with their own hands and forget to put anchors or a damper gasket installed between the wall and the body of the toilet.
Important: some mechanics replace the above-mentioned gasket with a layer of adhesive-sealant; this does not affect the reliability of the fastener.
Installation process
Installation of the toilet installation is carried out before finishing works in the toilet, i.e. before laying the tiles. An algorithm for doing this process yourself:

Important: DIY installation must include maintenance of the structure afterwards. To do this, a technological hatch hole is often made under the drain button.
Economical models are considered to be those models of drain buttons that are bifurcated or have a “start/stop” function.
This article aims to clarify home handyman question of installing the toilet frame. If some nuances remain unclear, you can always watch thematic videos on YouTube
Wall-hung toilets have firmly entered the lives of citizens due to their compactness and interesting looking. Unlike ordinary specimens, they are attached not to the floor, but to the wall. With this mounting, the tank is hidden, and the connection to the sewer and the drainage system are hidden in the toilet installation itself. Thus, the wall-mounted toilet design looks aesthetically pleasing and modern. In addition, it is very reliable and can support weights of up to 400 kg.
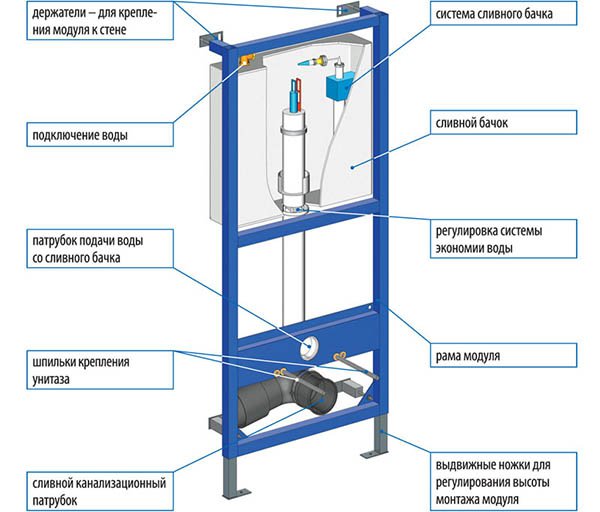
Design of a hanging tank with installation
Before considering how to install a wall-hung toilet with an installation, you should select it (about the rules), and also determine the main components of the fastening mechanism.The service life of the plumbing fixture will depend on the quality of the chosen design. In general, a wall-hung toilet consists of the following parts:
- steel frame;
- toilet bowls;
- tank;
- exhaust pipe;
- sound insulation;
- flush keys;
- fasteners.
The durable frame is attached both to the floor and to the wall with special studs. It has rods for adjusting the height of the product. The drainage container of the structure is made of plastic, coated with a condensate coating. On the front of the tank there is a special cutout in which the drainage system is installed.
Choosing a location and installation diagram for the toilet
A good location for the device is considered to be a low-traffic area away from the door, so you can choose the far wall. But it should be taken into account that all communications should be close to the toilet so that they do not have to be routed across the entire room.As preparatory work The location of the future structure is marked. On the floor and wall on which the toilet will be mounted, lines indicate the location of the frame and its connections to the surface. Marking begins from the place where the central axis of the device will be located. Finally, you need to mark the mounting points for the installation frame on the wall and floor.
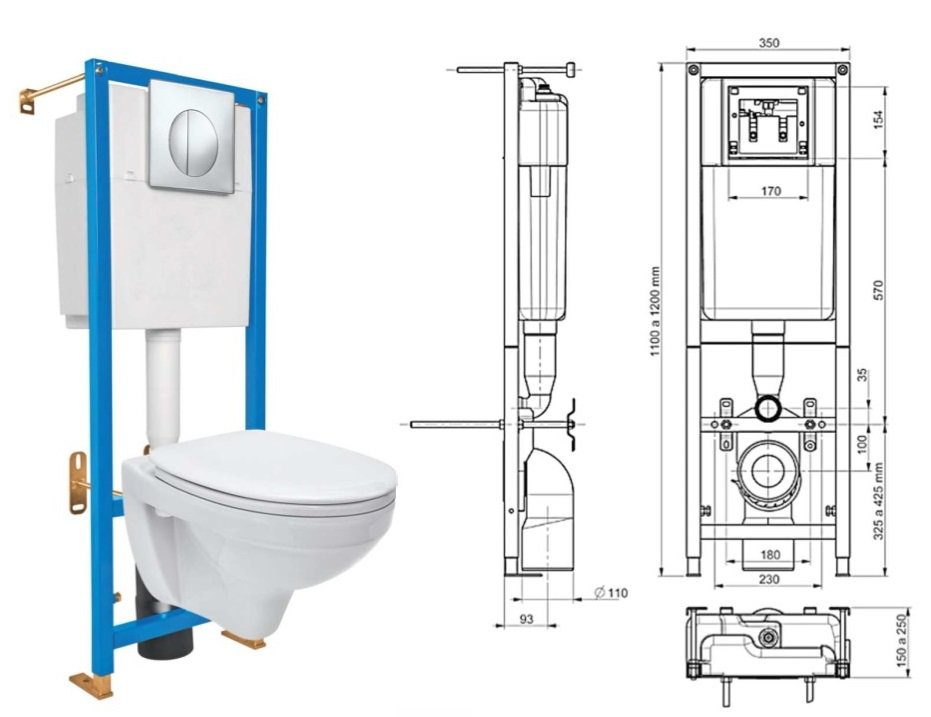
Before installation work It is worth studying a typical installation diagram for a toilet installation.
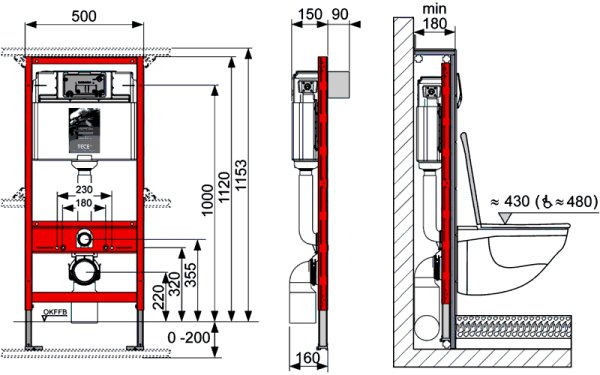
The main parameters for fastening the structure are:
- toilet height – average size is 430 mm;
- the drain button should be approximately 1 meter above the facing floor;
- minimum distance from wall to outer surface installation frame – 150 mm;
- A gap of 20 mm must be maintained between the cistern and the wall.
Installation Tools
To complete all the installation work for the toilet, you need to have the following tools:- laser or regular level;
- marker or construction pencil;
- hammer drill, concrete drill;
- yardstick;
- overhead open-end wrenches.
Installation instructions
Before carrying out installation work, you first need to bring sewer pipe with a diameter of 110 mm, and then - water pipes.Here are the step-by-step steps on how to install a toilet installation:
- Preparing the mount . Holes are made in the wall at previously marked places using a hammer drill. Dowels are inserted into them. Fastenings can be made both diagonally and vertically. The installation frame has 4 mandatory fastenings: 2 on the wall and 2 on the floor.
- Installation metal structure . Produced by fastening starting from the floor. Then the position of the frame is checked by level and adjusted using the sliding devices provided on it.
- Attaching the frame to the wall . This is done using special brackets, and in some cases you can use self-tapping screws or anchor screws.
After installing the frame, you need to check the reliability of the structure and prevent it from oscillating to the sides, otherwise it may tilt under heavy loads. After these steps, do-it-yourself frame installation is complete.
Connecting water pipes and sewerage
This is the most important part of installing a new toilet, because if a leak appears in one of the pipes, the entire structure and the lining of the wall on which the wall-hung toilet is located will have to be dismantled.For such a toilet, only time-tested materials are used - it is better to choose pipes made of copper, and if material possibilities do not allow, then they should be replaced with polypropylene analogues. The seams are sealed with tow. If it is necessary to use flexible hoses, they must be made of stainless steel.
The last step is to check all connections, which can be done by running water. Confirmation correct installation installations for the toilet - smooth operation of the entire system without leaks.
After a test run of water, you need to install the pipes to which the toilet will be connected. The frame has a crossbar to which a special plate with a diametrical recess is attached. Thanks to him a drain pipe fixed on the installation. All steps for connecting pipes are carried out according to the instructions.
Facing the false panel
It is carried out after all plumbing work before installing the toilet. Since the structure is located in a kind of niche, it does not matter what material it will be sheathed with. Typically, plasterboard is used for these purposes, and it is moisture resistant.Using this material, you can easily close the front wall with the frame placed on it. Drywall can be attached to self-tapping screws, or to a pre-made frame made of guide profiles.
After lining the front of the tank, you need to insert the restrictive cuff, and then close the tank with a safety lid.
Any tile or other tile can be laid on drywall facing material.
Securing a wall-hung toilet
Do-it-yourself toilet installation must be carried out taking into account the following rule: a rubber backing must be laid between the tiles and the toilet, which will protect not only the facing material from cracking, but also the bidet itself. If for some reason the factory backing is lost, it can be replaced with a thick layer of sealant. When it hardens, it will act as a shock-absorbing cushion.Tightening the nuts and bolts on the toilet is also fraught with cracks and the subsequent formation of chips, therefore, when fastening them, it is necessary to use softening substrates.
The final stage of installation work is the installation of the drain button. How to install it correctly is described in the installation instructions. Before necessary work you need to open the water and insert the cables from the tank into the holes located on the button.
The installation process ends with checking the functionality of the structure, which then puts it into operation.
How to install a toilet installation? (video)
You can clearly see the installation of the toilet installation in the video below:A wall-hung toilet is aesthetically pleasing, stylish and reliable. All work on its installation can be done with your own hands, taking into account the tips given above and the installation instructions.