Text: Nikita Sidorov
 Hello, Nikita. I want to paint the tiles in my apartment. We have tiles in one room, in the kitchen and in the bathroom. The budget does not yet allow for changing the tiles. Is it possible to paint ceramic tiles, or is that not done? Please tell me the truth, is this a stupid idea, as my husband says, or can I then rightfully brag to him and to our friends?
Daria Kuznetsova.
 Hello, Daria! I'm telling the truth: if you paint the tiles, then you will have to blush for a long time... from all the compliments and praise that your friends will tell you when they see the updated tiles. But the best thing is that with the money you save you will be able to take your unbelieving husband, Thomas, to a good restaurant several times. After this, he will definitely listen to you more.
How to achieve good results for many years?
In such a project, the most important thing is to achieve a long-lasting result. Therefore, let's discuss which ceramic tiles can be painted and which cannot. You can paint any tile that will not be in regular contact with water. This means that you can paint the tiles on the walls, floors and in the kitchen, even those next to the stove. You can even paint entire pictures on ceramic tiles. BUT! The only tile that I would never paint is the one that is on the shower floor or directly above the bathtub. The paint on the tiles will peel off very quickly due to large quantity a couple in these parts.
 The first thing to be done is deep cleaning tiles and grout. You will need to completely remove all dirt, grease, mold, etc. This can be done with any detergent. But personally, I would use a bathroom cleaner that contains mild abrasives. Here you need to remember that the better you wash the tiles before painting, the better results you will get later. I highly recommend using a stiff brush for the most aggressive cleaning. After all, any paint is nothing more than glue that contains a coloring substance. And most of all, any glue likes to bond with a perfectly clean surface. And it’s even better if this surface is a little rough.
From my experience I can say that the most best results when painting tiles, I achieved when I used paints on oil based. Nowadays they have become a little more difficult to find due to the production method that is not the most environmentally friendly. But such paints, in fact, firmly adhere to the surface after they dry and harden. Paints on water based peel off very quickly from a smooth surface ceramic tiles. Epoxy paints can also give you amazing results. But before using it, practice on a small area first, because when you first get acquainted with epoxy paint you may have some difficulties.
To paint tiles, use gloss or semi-gloss paint. If the paint is too thick and it is difficult to use a brush or roller, then use a little thinner to thin the paint a little. Be sure to follow the instructions on the paint can to ensure you do not exceed the maximum amount of solvent allowed.
Use masking tape to protect surfaces closest to the tile from paint. It is most convenient to use masking tape that contains a less aggressive acrylic adhesive. These tapes do not leave marks or damage the surface when they are torn off.
 The process of painting tiles itself should not cause any difficulties. Moreover, this may become a most exciting activity. After all, you have countless options. design solutions for painting absolutely any surface of ceramic tiles. For example, you can use stencils or mix different colors. Feel free to paint different tiles in different colors and thus create different geometric patterns. It looks great. In addition, you can easily draw frames or stripes.
Let your imagination run wild and experiment on a small section of tiles. If you don't like what you get, start over. And remember, if you ever get tired of this tile design, you can always layer a new design on top of the old one.
 As for the question of whether or not to paint the grout between the tiles, this is a matter of taste. Of course, if you paint the seams in the color of the tiles, this will make the whole job much easier and faster. If you want to create a contrast and paint the seams a different color, then you will have to spend a long time and painstakingly covering them with a special masking tape that does not stick to fresh paint.
If you want the grout color to remain natural and you need to regrout, do it before painting the tiles. The regrouting process will ruin freshly painted tiles. But keep in mind: in order to ensure that when painting tiles the paint does not get into the seams, you need a lot of patience and skill.
How to protect paint on ceramic tiles for years to come.
After you paint your tiles, you need to protect the paint so that they always look like new. This is especially important if you have painted ceramic tiles on the floor. Give fresh paint two or three days to dry. Then apply two coats of water-based varnish. It will adhere very well to fresh paint. I do not recommend using oil-based varnish because... over time it turns slightly yellow ( however, this yellowish patina can be used for design purposes), and water-based varnish always remains pure and transparent.
 In general, varnishing is an integral part of such a project as painting ceramic tiles. Varnish is very durable and does an amazing job of protecting the paint from things like foot traffic, constant movement of glasses, plates, pots, pans, etc. on kitchen countertop. Everyone knows how well varnish protects wooden surfaces from wear. The same can be said about painted surfaces. This is especially true for painted ceramic floor tiles. The varnish coating will protect the paint and give you many years of beauty. I can give the following example as proof. Think about the gym at your school or your children's school. There is also a painted floor. And it can withstand super-heavy use while requiring only minimal maintenance.
Related materials: "Ceramic tile. How to get several pieces out of the floor and replace them with new ones?
"
,
"How to drill tiles ", "Grout for large joints"
, " ",
"Granite tiles"

Expert advice
Prev Next
To Oil paint does not dry out during storage and so that a film does not form on it, place a circle of thick paper and “fill it with a thin layer of drying oil.
" Polyethylene film, covering a balcony or greenhouse, is protected from being torn off by the wind by a string stretched on both sides at intervals of 10-15 cm."
"To work with concrete mixture it was easier, clay is usually added to it, but clay reduces the strength of the mixture. Add a spoonful of washing powder to it per bucket of water. "
"To prevent the screw, the head of which is hidden behind the obstacle, from rotating along with the tightened nut, you need to throw several turns of thread or thin wire over it and lightly tighten the ends. Due to friction, the screw is held well in place. The ends of the thread can be cut off after tightening."
"You can cut out a birdhouse entrance without a brace. It is enough to split front side boards in the center and cut out half-holes of the required size with a chisel or hatchet, and then connect the halves again. "
Wooden screw plugs crumble and fall out of the wall. Take your time to cut out the new plug. Fill the hole in the wall tightly with nylon from an old stocking. Using a nail of a suitable diameter heated red hot, melt a hole for the screw. The fused nylon will turn into a strong cork.
"It is not difficult to turn a carpenter's level into a theodolite by equipping it with an aiming device from a slot and a front sight."
"In order for two strips of linoleum to lie end to end, it is convenient to use a self-adhesive decorative film, placing it under the base of noleum. "
"So that the nail goes in the right direction and does not bend when driven into deep hole or groove, you should place it inside the tube, securing it with crumpled paper or plasticine. "
Before drilling a hole in concrete wall, secure a piece of paper just below. Dust and concrete fragments will not fly around the room.
"To cut a pipe exactly at a right angle, we recommend doing this. Take an even strip of paper and screw it onto the pipe along the sawing line. The plane passing through the edge of the paper will be strictly perpendicular to the axis of the pipe."
"Roll over logs or wooden beams A simple device will help - a piece of a motorcycle or bicycle chain, equipped with a hook on one side and secured to a crowbar on the other side. "
"In order for one person to be able to work with a two-handed saw, we recommend using a simple technique: move the saw handle from the top to the bottom position."
You can cut a piece of slate of the required size with a saw, but it is better and easier to punch holes along the line of the intended cut with a nail at a frequency of 2-3 cm, and then break off the slate on the support.
" The best way glue the tile to the wall: take bitumen, melt it and drop just four drops on the corners of the tile. Stuck on dead. "
When making shaped window casings, it is most convenient to cut shaped holes with a hacksaw with a sharpened blade.
"Making stained glass is a long and difficult task. You can make a quick imitation of stained glass. To do this, take thin slats or rods of vines, glue them to a sheet of glass, and then paint the glass and cover it with varnish."
"If you don't have a dowel at hand, you can make one from a piece of plastic tube. The body of a ballpoint pen can also be suitable for this. By sawing off a piece required length, make a longitudinal cut, about halfway, and the dowel is ready. "
"It is known how difficult it is to hang a door when working alone. But just shorten the bottom pin by 2-3 mm and the work will become much easier."
"A very durable, non-shrinking and fairly waterproof putty is made from bustylate mixed with any powder - chalk, gypsum, cement!, sawdust, etc."
"If you need to screw a screw into the end of a particle board, drill a hole slightly smaller than the diameter of the screw, fill the hole with Moment glue (not epoxy!), screw the screw in a day later. The board does not delaminate. However, the resulting connection can only be placed under load through day. "
"Attach portraits, photographs, paintings to wooden frames It is more convenient to work with glass not with nails, but with the help of pushpins bent at right angles. The buttons are gently pressed with a screwdriver. Compared to nails, the risk of splitting thin frames is reduced to a minimum. "
" Screw the screw into hard rocks wood is not so easy. If you poke a hole for the screw with an awl, and rub the screw itself generously with soap, then after such an operation the work will go like clockwork. "
To save time, the edge of the wallpaper can be trimmed with a sharp knife without unrolling the roll. To do this, you must first align the end of the roll and with a simple pencil outline the edge border on the outside. Working with a knife, the roll must be gradually turned in the direction of rolling.
To carry large sheets of plywood, glass or thin iron at home, it is convenient to use a wire holder with three hooks at the bottom and a handle at the top.
IF you need to saw a round stick into the distance, this work is most conveniently done using a template. It is made of a metal tube with a groove in the middle. The diameter is chosen so that the template slides freely along the stick.
It will be better and easier to work with a hacksaw if in the middle part you increase the height of the teeth by 1/3.
If you attach a weight weighing about a kilogram to the front of the bow saw machine, the work will become easier. The load must be made removable so that the saw can be used to perform other work.
"A wax-like coating can be obtained by painting the surface with diluted PVA glue. To obtain the desired color, you need to dilute the glue with water tinted with watercolors."
"Making a cover for an ax blade is as easy as shelling pears. Take a piece of rubber tube, cut it lengthwise and put it on the blade. It is protected from slipping off by a ring cut from an old car camera."
" Avoid using clamps when gluing wooden frames A laundry cord will help. You should put four short loops on the corners of the frame and two long ones to tighten the frames diagonally. The angles are adjusted using sticks that twist the middle loops. "
It often happens that it is necessary to update the bathroom interior, and the old tiles do not fit the new design. To solve the problem, it is possible to paint the surface of the ceramic.
Today on sale you can find various shades of paints that tolerate temperature changes and high humidity. With the help of brushes, stencils and decorations, tiles can become a real decoration of the bathroom.
It is worth learning more about how to paint tiles in the bathroom and what tools you will need for this.
Painting features
Before you consider modern options how to paint tiles in the bathroom, you should learn about some painting features.
As experts say, it is better to apply the new coating to the tiles used on the walls, since the ceiling and floor material will quickly deteriorate under the influence of high temperature and humidity.
When choosing paint and varnish material used for painting, you should pay attention to its base. Many owners wonder whether it is possible to paint bathroom tiles using a water-based composition. In fact, it's better not to do this, although the paint is great for interior finishing works, but at the same time it is easily washed off with water.
It is best to pay attention to paints based on latex or acrylic; they do not have a strong odor, dry very quickly and do not contain toxic components. It is these compositions that are recommended for use in residential premises, and are perfect for finishing the bathroom.
The epoxy composition is no less popular, but working with such a dye requires experience and skills, so you should first try to paint other surfaces with the product. By painting you can quickly change appearance premises.
For those who want to figure out how to paint ceramic tiles in the bathroom, experts suggest car paint. This color composition is specially formulated to withstand moisture.

When the coating is completely dry, it can be washed. Regardless of the painting method, the surface will not lose its original appearance.
Possible color options
It is possible to use various options painting the walls in the bathroom. Still, the following methods are considered the most popular:
- The coloring is complete. This method involves painting the entire surface. You can use any type of paint, as long as it withstands high humidity well. The color is selected at the discretion of the owner; the tiles can even be painted in a contrasting shade to the original shade.
- Partial. In this case, only coloring of some elements is used. For example, if the tile is plain, then leave the main color, adding another shade. As a result, you can get a checkerboard pattern or stripes on the wall.
- Return of color. Here they do not make a radical change of color; they take the same shade of paint that was previously painted on the surface, and then the composition is applied to the ceramics, giving the walls brightness. This method is necessary if the tiles have faded over time.
- Drawing. First, part of the tile is painted with a single shade of paint; basic colors are usually used. Once the paint has dried, a design is applied to it using a stencil or by hand.
You can use other methods to change the interior of your bathroom. For example, if the owner has artistic skills, then he can apply a full-fledged drawing to the wall.
Before painting begins, the surface to be painted is prepared. But such projects are not very popular, since they are more difficult to implement.

Materials and tools
Before we tell you in detail how to paint tiles in the bathroom, and how to do this work, you should decide on the tools and materials.
For painting, a standard set of tools is used, but you should also select some auxiliary materials; they may be useful in the process. You will need the following set of tools:
- primer and paint for ceramic surfaces;
- a set of wide brushes;
- primer solution;
- roller and brushes are narrow;
- cellophane film;
- masking tape;
- palette for mixing paints;
- varnish for fixing;
- solvent.
By and large, all these tools and materials are available; they can be purchased at any hardware store. It is enough to use this set of tools to paint tiles.
It is worth noting that it is better to choose those paints that can tolerate high temperatures so that the coating does not eventually crack. Acrylic paint is also suitable, it is specially formulated to maintain its brightness even when high humidity.

Surface preparation
Before starting work, you should prepare the surface of the tile for painting. First, remove all contaminants from the material; to do this, just take any powder and a hard sponge.
To clean off all the excess, you will have to make some effort, since even old dirt must be removed. As soon as the cleaning of the tiles is completed, the surface is wiped with ordinary alcohol, this will make it possible to degrease the material and also improve the quality of grinding.
The next step is to carefully remove the glossy layer. It is very important, before carrying out sanding work, to protect other coatings and surfaces, for example, the floor is covered with cardboard. Plumbing also needs protection; it is enough to cover it with cellophane film.
When the removal of the glossy layer is completed, the remaining debris is carefully removed, and then the surface is wiped with a damp cloth. The ceramics are degreased again and allowed to dry for several minutes.
The next step is to apply a primer to the surface, although this step is not necessary, the primer will still help improve the adhesion of the paint to the ceramic surface. It is worth giving preference to materials that tolerate changes in temperature and humidity well.

Coloring
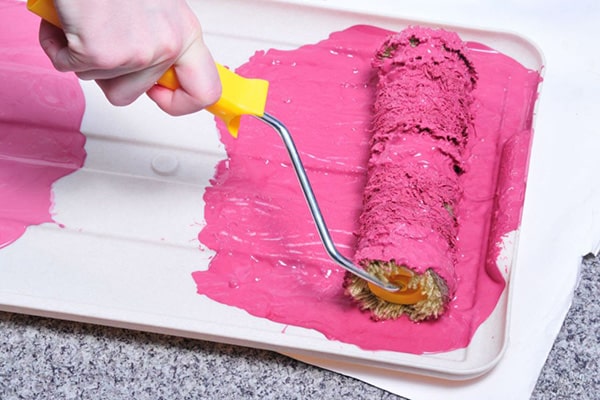
There are several methods of painting surfaces to update the color and interior. Experts recommend using a special bar or gun so that the material is sprayed evenly. If you use a regular brush, then the paint should be applied in even strokes.
Solid coloring
This is the simplest method of painting the material. Simply select the paint of the desired color, and then use a roller and brushes. The paint should be applied in even layers, so squeeze the roller slightly before applying the paint to the wall.
The seams can be painted along with the main surface, or left in their original form, but then only a brush is used for the work.
Painting tiles in different colors
Many people wonder whether it is possible to paint tiles in the bathroom, and in what ways can this be done? The most common and simple option decoration of the tile surface is the application of paint in different shades.
You can create a geometry of two or more colors, decorate the wall in the form of a mosaic, or use checkerboard coloring. To ensure that the borders are smooth and that paint of a different color does not fall on the elements, you should use masking tape.

Drawing
This is a bathroom design option that is suitable for complementing the main interior, as well as creating a main theme. The drawing requires a thinner layer of paint so that it does not stand out too much against the general background.
With the help of such an element, you can decorate one wall or just a corner of the room. The design is applied using a template; usually it is drawn with a brush, but some people use a roller to draw the designs if the template is too large.
Using a stencil
You can purchase various stencils in stores building materials, or simply print them from the Internet. First, the tile is painted with the main color, and then, using a stencil, a pattern is applied, but in a different shade.
First of all, print out the desired design, then cut it out and apply it to the surface. The drawing process is not complicated, just fix the sheet on the wall and then paint it.
Use masking tape to seal the edges of the stencil so that it adheres well. If the wall is decorated with a pattern, then you should use pastel or classic colors for the base.

Decorating tiles
You can decorate the tiles, usually for this purpose the surface is partially painted, or some kind of pattern is applied to it. To do the work you need:
- Choose a drawing. The patterns on the tiles will look attractive only if you choose the right pattern. The easiest way is to make a geometric pattern; all you need is masking tape. With its help, they create the necessary shape; it can be a rhombus, stripes or a square.
- Apply markings. To do this, use a level and use it to stick tape between the tiles.
- Primer. A thin layer of primer is applied with a brush, after which the composition is allowed to dry thoroughly.
- Coloring. Paint of a suitable shade is applied to the surface of the tile.
3d effect
This is one of the most fashionable trends in bathroom wall decoration. You can create a three-dimensional pattern on ceramic tiles with your own hands.
Still, it is best to purchase a special tile with a three-dimensional pattern effect, but since you need to paint the surface, you can create a three-dimensional effect with your own hands.
To do this, just take gauze and cut out certain shapes from it, after which the blanks are attached to the surface of the tile. The first layer of enamel is applied, and when it dries, the surface is painted over with a different shade of paint using a rough roller.

Applying varnish
When the paint is completely dry, protect it. For this, a regular water-based varnish is used. This coating will protect against moisture, fading and cracking.
In addition, a thin transparent film gives the surface an additional glossy shine and enhances the brightness of the color.
Painting tiles with your own hands is not difficult, just choose suitable material, and also decide on the type of surface painting. You don't need to have any specific skills or knowledge to do this.
If old cladding has become ugly, but you can’t just wash it off - paint for ceramic tiles can help renew the coating without completely replacing it. In addition, such methods are sometimes used by designers to paint and create a unique pattern on tiles.
There are several ways to paint tiles:
- Paint for tiles and glass (stained glass). It can be applied directly to a smooth surface without preparation. Typically the outline is applied first, followed by the acrylic background paint. Due to the high price, it makes sense to use it only as decorative effect. As alternative option You can use vinyl stickers.
- Epoxy paint. It is harder to find on sale and is more expensive.
- Latex or oil paint. It is necessary to first apply a special primer, for example, Tikkurila Otex.
Quick navigation through the article
Preparatory work
Before painting the cladding, you need to remove the remaining cement adhesive and excess grout from the surface with abrasive materials. The fallen tiles are glued to cement glue or liquid nails and left to dry completely. If they are lost, you can replace them with tiles of a different color. Chip tiles also need to be replaced.
Glue the old tiles in place and grout the seams
See also the article: .
The surface is degreased using acetone, alcohol or solvent.
Apply Tikkurila Otex primer with a short-haired roller and leave it to dry for 12 hours. She has White color, therefore, it will partially help hide the old color of the texture.

Tikkurila Otex primer
Painting
Tile paint is applied in several layers to completely hide the old pattern and achieve a uniform color. A new layer should be applied only after the old one has completely dried.

Apply the first coat of white primer
If you do not want to get a monochromatic surface, but divide it into several parts or diversify it with ornaments, use masking tape to get straight lines of the intended design.
Painting tape to create an ornament is glued only after applying the base coat of paint. The easiest way is to make a geometric pattern out of it.
After the paint has dried, the masking tape can be removed.


The video shows the result of painting oil enamel apron in the kitchen with a white and red ornament:
The joints can be additionally painted using a special tile marker (Edding 8200, PUFAS FRISCHE FUGE paint).
Using stencils
A stunning effect can be achieved if you use ready-made stencils. The photo below shows an example of decorating a backsplash made of white tiles with paint. 
Conclusion
After painting, you should not expect to get a great result for a long time, because along with a layer of paint, the tile will lose many of its important properties. The decorative layer will no longer be protected by the glaze. It will be more difficult to wash, fungus and mold can form on it, the seams will have the same color, and over time the paint will begin to peel off. I would not recommend that you do such repairs to the tiles in the bathroom unless absolutely necessary; it would be safer to replace the tiles.
comments powered by HyperCommentsNo similar entries found.
When the appearance kitchen apron gets bored, there is an irresistible desire to change something about it. And change it so that you don’t have to undertake large-scale repairs, and get by with small means. Painting the tiles is the most acceptable option here. And how to do all this quickly, accurately and aesthetically will be discussed below.
What is this article about?
The need to paint tiles
Although this way of decorating a room comes to mind, in fact, many do not know for sure whether it is possible to paint tiles in the kitchen. This method is really not very common. Therefore, it is worth noting especially in what cases there may be a need for such an emergency mini-repair of kitchen ceramics.
- Updating the kitchen space from an aesthetic point of view. The painting method is the most elementary and least expensive of all, so it is ideal for quickly transforming the kitchen, bathroom and any other room where it is needed. With this approach, it is possible to radically change the design of walls and floors without unnecessary hassle and dust;
- Change of furniture. Replacing furniture elements inevitably entails replacing wall and floor cladding. This option involves changing the color of the tiles according to the new design project;
- A change in the style direction in the interior entails a revision of everything existing species finishing. Including - the appearance of ceramic tiles;
- The need to disguise tile defects. Painting individual sections of the tile allows you to hide small flaws in the coating that have arisen during its intensive use. Moreover, you can do this completely independently, you just need to be able to hold a brush in your hands and use paint;
- Applying decor to a tiled surface allows you to complement the design with some colorful patterns and even images.
You don’t need much to decide to paint your backsplash. The main thing is to gain creative inspiration and create your own masterpiece, albeit small, where a smooth ceramic surface will act as a canvas.
Choosing a coloring agent
To ensure that nothing can distract from the process, the paint should be selected and purchased in advance. Since we are talking about a residential apartment, especially a kitchen, preference in this case should be given to the following types of compositions:
- acrylic - bright shades, easy to use;
- epoxy - quick-drying, odorless compounds;
- car enamels - ideal for smooth surfaces, including for ceramics.
If you need to maintain the shine of the composition, then it makes sense to choose glossy paint.
Satin semi-gloss paint is also a good choice. It does not attract stains and dirt special attention. An attractive velvety effect results.
It is best to purchase enamel from a well-known manufacturer with a proven reputation. There is no need to spare money here, because cheap paints may contain low-quality substances, some of which, under the right circumstances, can produce toxins. And this is possible in the kitchen, since the apron is heated by the stove.
Many paints are suitable for painting tiles, the range of which is large in the construction supermarket. If it is not at all clear what to choose, you should consult the seller. He will definitely suggest a suitable option.
Any expensive brand of paint is also suitable for these purposes, along with special compounds. A good effect can be achieved by choosing auto enamel.
Preparation of materials
Painting ceramics itself is not difficult. Especially if the materials were chosen correctly.
To paint a ceramic surface, you need to stock up on the following materials:
- primer mixture (for example, epoxy);
- paint for ceramics;
- rollers;
- a set of brushes with different bristles;
- gloves to protect hands.

Instructions for painting tiles
The entire dyeing process consists of a series of sequential steps. By following them, you can create new decor DIY kitchen apron.
- First of all, the tiles are cleaned of various kinds dirt - stains, grease, splashes, various deposits on the apron. This is usually done using warm water and any detergent for dishes (from laundry soap and to imported gels, for example, Fairy). Either it is prepared from the product soap solution for processing tiles. Either they moisten the material, and the product is dripped onto a cloth and applied to the surface of the tile, and rubbed;
- After washing the soap solution from the wall, it is treated with a weak vinegar solution or an alcohol-containing substance;
- The cleaned ceramic surface is ground with fine-grained sandpaper;
- A primer is applied to the tiles, carefully going through the joint spaces;
- Allow the tiles to dry, pausing work for one day. Then the dry surface is sanded well, which will allow the paint to reliably adhere to the primer layer;
- Apply exactly as much primer and paint as will be required for a one-time treatment. The paint is applied again to the second layer. This is done so that the compositions do not lose their properties while in the open state. The best effect is obtained from a composition that is consumed within the time specified by the manufacturer (usually up to 6 hours).

The staining procedure is carried out by applying uniform strokes. After applying the first layer of paint, the surface is left alone for some time - it takes about 12 hours to dry.
After the first layer has dried, apply the second. To do this, add another portion of the coloring composition, mix it well and begin to apply. The coupling at the roller is thoroughly cleaned of paint or a new, unstained one is put on.
If the task is to obtain a dark coating, then a third layer is applied. However, the previous one is allowed to dry completely before this.
If you plan to make a small image on the wall or paint individual elements apron, then choose not a roller, but a set of brushes. At the same time, to create a lightweight texture and relief of the design, use a brush with soft bristles, because hard brushes leave grooves from the bristles when painting.
The work is also carried out in two stages. First, apply a base layer of paint, and then apply a second layer of perpendicular strokes. For a pattern, one application of paint is enough, but then a little more of it is put on the brush and applied a little thicker.
After painting is completed, the ceramic surface is dried for three days. To make the drying process of the coating go faster, the room is kept temperature regime. The coating takes longer to harden in the cold. When processing a large surface, work can be distributed over several passes so as not to block access to the room for a long time.
Selecting an image for tiles
What can you do on tiles using paint yourself? There are a lot of options for the creative process; they cannot exist only because of the narrow-mindedness of the decorator-artist himself. However, design ideas still exist and you can borrow them. After all, on the basis ready-made solutions It's always easier to create your own unique creations.

- Total staining of ceramic tiles with a complete color change;
- Updating the color of the tile involves maintaining the existing background, but with some deviation - it should freshen up and become more dynamic. It is allowed to select not the entire background, but individual elements on the cladding;
- Complementing a plain finish with a pattern or ornament;
- Drawing. This idea is applicable for interior design in the same style. To do this, attention is focused on separate fragments floor or wall tiles or on the corner of a room. To create a highly artistic image (still life, landscape, portrait) you need special drawing skills.
Protecting images on ceramics
The image applied to the ceramic base requires special protection from the effects of aggressive external factors. In particular, protection is required for drawings that are located in a room with fluctuating humidity conditions (in a bathroom, bathroom, kitchen).
To prevent rapid abrasion of the design, apply a layer or two of varnish on top of it. To do this, use a water-based composition. The drying time of this composition is short, moreover, it does not emit specific odors in environment. And the colorless film it creates on the surface of the tile is distinguished by a good degree of strength. This is a suitable composition for residential premises.
Even a person who is not naturally endowed with artistic talent can paint the surface of a tile. To do this, you only need to choose more simple solutions and be able to apply strokes with a roller or brush. And for creative individuals, a ceramic surface for painting is a wide field for demonstrating their abilities. Moreover, by painting tiles you can not only update the appearance, but also create something completely new and unexpected on it.