Probably each of us has seen pictures made with the help of burners. Today you will learn how you can make a simple metal burner yourself. Sometimes it becomes necessary to leave a sign or autograph on metal surface. Many methods have been devised for this, ranging from labor-intensive engraving that requires special talent to fully automated chemical etching. But there is a way available to everyone - metal burning. 
The device circuit is quite simple and consists of two elements: a transformer and a diode bridge. It is better to use an autotransformer - it will be easier to adjust the thickness (“pressure”) of the line. A television transformer is quite suitable for this purpose, they faithfully served the Soviet people until the 90s. 
Unfortunately, I didn’t have this for the burner either, I used a transformer from an old player, a BR 1010 diode bridge, a ballpoint pen case and a couple of the smallest “crocodiles” 
I passed the electric wire through the fountain pen and equipped it with a "crocodile". This will be the pencil for burning on metal. 
The free end of the wire will need to be connected to the “+” of the bridge. And "-", subsequently, will need to be equipped with another "crocodile". 
The whole device looks very simple, but, nevertheless, greatly expands the possibilities for creativity.

An ordinary lead can be used as an electrode, copper wire or any other conductor. Each of them leaves its own shade on the surface of the metal. 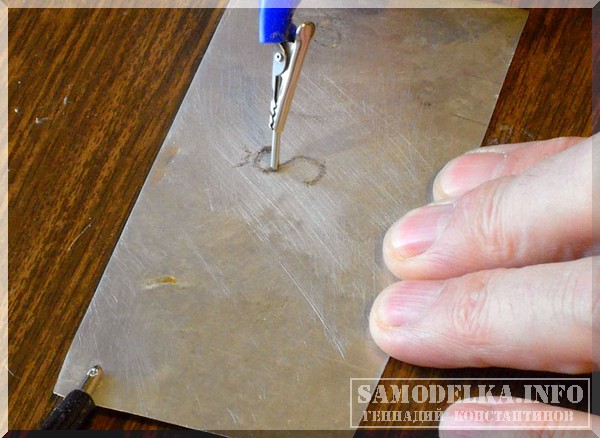
The first test of the pen I carried out using a regular nail. Of course, far from a work of art, but the method is quite working.
The art of wood burning is a hobby for many people. different ages and floor, so in this article we will look at how to make a simple mini wood burner. This tool has worked well.
To make a mini-burner we need a soldering iron, an old unnecessary power supply from mobile phone or from charging for a screwdriver. It is better that it be a powerful power supply, as far as possible. For example, a power supply from an iPhone for 5.1 volts and 2 amperes is well suited for our crafts. You will also need a barbecue skewer, three needles, two of which are from a syringe and one more, for example, sewing. You also need thread, flux and solder.
First, we must bite off the nose of the needle of the syringe, since we will not be using it. You can do this with round nose pliers or tongs. The next thing to do is attach two needles to the barbecue skewer with threads. This should be done in such a way that they are placed parallel to each other. Now you need to bend the end of the sewing needle so that it just barely touches the tip of the syringe needle.
Next, we must solder the wires from the power supply to the needles, in this case the polarity does not matter. Apply a little flux and tin the joints. We must solder the first wire, and then the second. Then attach the wires to the skewers with thread, cut off the excess end of the wooden skewer.
We can say that the burning tool is almost ready. To make it more reliable, you can also soak the threads with superglue and then put on heat shrink tubing.
Step 1: First of all, take the needle from the syringe and bite off the nose with round nose pliers.


Step 3: Next, we need to bend the tip of the sewing needle so that it barely touches the tip of the syringe needle.


Step 6: Then cut off the excess end of the wooden skewer.

Step 7: For reliability, you can soak the threads with super glue.

Step 8: Stretch the heat shrink tubing.

The mini burner is ready and it works very easily. When current is applied, the needle from the syringe begins to heat up, this is because it has thin walls. Now we can test our tool. The game is heating up despite the PSU only having 2 amps and 5.1 volts. This is an excellent result, as you can already see, despite the small size, this device shows an excellent result. It is possible to make a hole in wooden lath up to 1 cm thick.
Today, many people, both adults and children, want to burn wood. This type of hobby even has a name - pyrography. Since ancient times, this type of art has arisen, its essence lies in the depiction of drawings on wood on a solid surface in such a way as to capture the picture on long time. To do this, use a very hot object that will melt the surface, thereby leaving traces.
What materials should be used? In particular, wood is chosen as the basis for the future image, since it is one of the most malleable, cheap and most available materials for burning out.
Undoubtedly, every person at least once, but still saw the fruits of pyrography live. In translation, this word means an image with the help of fire. Looks really bewitching.
Surely every person had to be surprised more than once by the beauty of drawings and patterns on wood. Wood burning, like drawing, is painstaking and great work. Those who create with the help of "fire", as well as sculptors and artists, are very receptive to the world around them, because this is the main condition for creating masterpieces. A masterpiece, in this case, is not just to depict someone's face or an element of nature, but to convey every line, even the smallest detail, to display the mood, the expression of the eyes (if it is a person). And all this on one small board.
There are several types of burning
With the help of a store device (meaning bought in a store for the development of any company).
- Using homemade wood burners (that is, the element that you make from your materials).
- With the help of the sun and lenses. This method is used by many children who have nothing to do in the sun, but it was used by ancient people to get a fire or transfer any information to other tribes using a pattern on the bark.
To date, the most relevant is homemade burner on wood, since the sun is not always there, and we are not ancient people in a hopeless situation. And when buying a new device, you will have to spend a considerable amount of money.
To make it yourself, you need to have an idea about the device of any store analogue. With the right approach, you can develop more functional and high-quality wood burners.
What is the shop element made of?
We can only see it externally. A inner part can be seen on the drawing. The scheme of the burner for wood is shown below in the photo.

By the way, most stores sell power tools. Therefore, it is worth looking at the main details, including the transformer for the wood burner. Also, for an extended concept of these elements, you should pay attention to the instruction manual. The main details and the material from which they are made will definitely be spelled out there.
How to make a wood burner with your own hands?
To implement this idea, it is necessary to apply a lot of ingenuity and perseverance, since this is not the easiest thing to do, and the scheme is very intricate. During manufacture, you will have to use a variety of equipment that is not available in the usual sale.
What will be needed for this?
It all depends on what kind of wood burners you decide to make. The only thing that will come in handy in any case - nichrome wire. The next required parts are the battery and wire. The battery is preferably of a rechargeable type, since with constant work with the device a lot of ordinary batteries will be used up, which can significantly hit your pocket.
There are also requirements for the wire. A good wire is a guarantee of your safety, so you should approach this issue very responsibly.
Where can I find a development schema?
The scheme can be developed by yourself. In our article, you can find many different types of circuits - from the most elementary to quite complex. All these inventions were designed for the nature of the developer, of course. You can easily choose any of the schemes and work on it.

It is worth recalling that each person is an individual, which means that everyone has his own character and his own requirements for life. In this case, it is worth remembering this, looking at a large number of proposed schemes and creating your own, even if it is a little more complicated and demanding than the rest.

Naturally, it will be easier to fulfill your idea for people who are closely familiar with physical laws, and especially with electrical circuits. If you do not understand this - no problem, you can find information about the graphical representation of the circuits, deal with the images and find out what is what in reality.
Where to start?
You need to start by modeling the burner, first in your head, and then on paper. When there are clearly defined ideas, you can start looking for parts for the device. It will not take so much time, since everyone has the main spare parts in the house. Of course, it will be more difficult if you choose a pyrograph with the ability to change nozzles and change the temperature.
How to make the easiest burner?
Probably not many a large number time to do difficult option burner. Therefore, consider hiking option.
To make the device, we need:
Needle from a medical syringe;
- one sewing needle;
- 9 volt rechargeable battery;
- double wire.

The needle should be given more attention, since the quality of your masterpieces in the future will depend on its quality. It is desirable that it be sharp and thin. During operation, it will be the needle from under the syringe that will heat up red-hot. The second will barely touch it. This will cause resistance and will help warm up the needle.
In the manufacture, a cap from a syringe needle, as well as a sewing needle (with a threaded thread) are also useful. It is necessary to pierce the cap with a needle and stretch the thread to the end - so that the needle fits snugly against the cap. To secure it, wrap it with the rest of the thread. In this case, the needle should extend beyond the cap and be located strictly parallel to it.
Now back to the syringe part. The cone-shaped cap is useless, so it must be eliminated. We fasten this needle to the opposite side of the cap with another thread, parallel to the sewing needle. Now you need to slightly bend the tip of the needle so that it touches the sewing needle with its tip. As stated above, than less area contact between games - the better it is for warm-up speed.
Next step
Next, you need to take a high-quality double wire. It must be stripped from both sides and two holes must be made in the cap to bring the wire out. Having done this, you need to connect each wire to the corresponding needle. It is advisable to screw the wires very tightly, since the quality of the current conduction depends on this.

For safety and quality, it is necessary to finally secure the wire (including threads) with electrical tape.
At the end of the work, it is necessary to use an unnecessary button (preferably from an old tape recorder) and a rechargeable battery. The main thing is not to confuse the polarity, otherwise homemade apparatus will not heat up (more precisely, its tip).
All is ready! It remains only to test the device in operation.
Summarizing
It is worth noting that now burning out is not only a form of spending time, but also a way to earn money. Every day the demand for burning portraits and landscapes is increasing. Now this occupation competes with woodcarving. Woodcarving was originally created to diversify the interior of old houses of the nineteenth and twentieth centuries. After all, when there were no beautiful furniture in the stores, they created it themselves. Recently they began to try to use wood burning on furniture instead of woodcarving. This decision will make the interior not only beautiful, but also unique.
The price depends on the number of necessary strokes and the requirements for the quality of work.

In fact, you can make any wood burners in a short time. A drawn sketch or drawing will greatly simplify the assembly or even the creation of your own model of the device.
It doesn't matter how complicated its model will be, the most important thing in this device is the correctness of the tip. This is what can affect the quality of your future paintings. The burner performs a pattern on wood very accurately, so the image can be of any degree of complexity. By the way, as shown in the previous photos, the shape of the tip for this electrical appliance can be changed depending on the complexity of the work.
So, we figured out how to make an electric wood burner with our own hands.
Many people today, both adults and children, love to burn wood. This hobby even has its own name - pyrography. This type of art appeared a long time ago, and its essence lies in the depiction of drawings on solid surfaces of wood in such a way as to capture the picture for a long time. This requires a heated object that can melt the surface and leave traces.
What materials are needed? Wood is suitable for the basis for the future image, since this material is one of the most inexpensive and pliable to burning.
Undoubtedly, every person at least once in his life had to see the result of pyrography. This word is translated as "image with the help of fire." The drawings look really original.

Like drawing, wood burning is a rather voluminous and painstaking work. To create a masterpiece of pyrography, it is not enough to depict an element or someone's face. It is necessary to convey every stroke, even the most insignificant, displaying the expression of the eyes and mood.
How to make a burner yourself?
To create a burner with your own hands, you will need quick wit and perseverance, since this is not the easiest thing to do, and the scheme is quite confusing. In the manufacture, you will have to use different equipment that is not in the usual sale.
What will we need?
The list of required items depends on what kind of wood burner you want to make. The only thing you need in any case is a nichrome thread. The next required parts are the wire and the battery. It is good if the battery is rechargeable, since constant work with the device will consume a lot of simple batteries- it will hit you in the pocket.

There are also some requirements for the wire. A good wire will be the key to your safety, so approach the issue responsibly.
Where can I get a diagram?
You can develop the scheme yourself. We also present several different schemes from elementary to complex. All inventions were calculated according to the requirements of the developer, and you can choose the appropriate option.

It should be noted that each person is individual and has his own character and requirements. There are a lot of options for schemes, so you can try to make your own, even if it is more complicated and demanding than those presented.
Of course, it will be easier to implement your own scheme for those people who are familiar with the laws of physics and who have encountered electrical circuits. If you do not understand this, find information and a picture of the circuits, understand them and find out what works and how.

Where to begin?
You should always start with modeling the burner in your head, and then you need to transfer the drawing to paper. When there are clear ideas, you can start looking for components. This will take a little time, since the main details are available in almost any home. If you need a pyrograph with interchangeable nozzles and temperature changes, things get more complicated.

How to make a simple burner?
Few people have enough time to create a complex burner, so let's consider a simple option.
materials
To assemble this device, you will need the following:
- sewing needle;
- needle from a medical syringe;
- double wire.

The needle is very important as its quality will affect the quality of your masterpieces. It is better to choose a thin and sharp needle. The needle from the syringe will heat up to red when working, and the sewing needle will lightly touch it - this will cause resistance and help warm the needle.
Assembly process
To make a burner, you will need a cap from a syringe needle and a sewing needle with a threaded thread. It is necessary to pierce the cap with a needle and stretch the thread to the end so that the needle lies against the cap. To secure, wrap it with the rest of the thread, and the needle should go beyond the cap and be placed parallel to it.

We return to the syringe part. We do not need a cone-shaped cap - we remove it. We attach the needle to the opposite part of the cap with another thread and a sewing needle. Now we slightly bend the tip of the needle so that it barely touches the sewing needle with its tip. As we said, the smaller the contact area, the faster the burner will heat up.
Nutrition
We take a good double wire - it should be stripped on both sides and two holes should be made in the cap to bring the wire out. After that, connect each wire to the needles - screw them as tightly as possible, since the quality of the current flow will depend on this.
For quality and safety, finally secure the wire with electrical tape.

Finally, use an unnecessary button, for example, from an old tape recorder, and a battery. The main thing is not to reverse the polarity, otherwise the device will not warm up.
Summing up
It should be noted that burning today is not just a kind of hobby, but can become a way to earn money. Every day, the demand for burning landscapes and portraits is increasing - this occupation competes with woodcarving. Initially, it was created to diversify the interiors of old houses of the 19th-20th centuries. When it was impossible to buy in stores beautiful furniture, it had to be created by hand.
In fact, you can make any kind of wood burner in no time. A drawn drawing or sketch will simplify the assembly process and the creation of the device.
It doesn't matter how complex your device will be - the main thing is to get the tip right. The quality of all created paintings depends on it. If the burner draws patterns on wood as accurately as possible, you can draw images of any complexity.
Why a homemade burner? There are many domestic and imported models of electric burners for wood on sale: Orbita, Uzor, Elm (ours), Stayer, Qiddycome (Chinese) and others. But lovers of art painting with a hardened needle on wood are not always satisfied with this choice.
Domestic devices usually have only one needle, imported ones have from 4 to 21 nozzles with different needles, but suffer from fragility. And you can’t always buy the right device in the right place in right time. Here we will talk about the experience of manufacturing by one Siberian enthusiast, amateur, a solid home-made electric wood burner with 39 (!) Needles (see photo). We will conduct, so to speak, a master class on his behalf.
First of all, we set three basic requirements for the design:
1. Sufficiently large capacity of the power supply unit, allowing the use of needles of large sections.
2. The possibility of step voltage adjustment for working with needles of different sections and smooth adjustment for changing the temperature of the needles in a wide range.
3. Convenient change of working needles.
Simple circuit diagram device is shown in the figure. 
Now let's move on to the process of its manufacture.
We take any power transformer of at least 200 W (other characteristics are insignificant), for example, OSM 380/36V (250 kW). At lower power, the transformer will overheat during operation with needles of large cross sections. Completely remove the secondary (top) winding. The primary (network) remains in place.
We rewind the secondary winding: one or two layers of flexible insulated wire with a cross section of 6 mm 2 (for example, PV-3). You should first calculate the number of turns per 1 V of the output voltage (by selection: wind a few turns, turn on the transformer in the network and measure the output voltage).
Let, for example, it turned out to be 4 turns per 1 V. Having determined the value of 2 V for the lower limit of the output voltage, we wind 8 turns first, and then we make taps after every two turns. This will give a resolution of 0.5 V for step adjustment. To ensure a resolution of 0.25 V, add another turn (in the diagram, the top tap is 0.25 V).

In addition to stepwise, we also use continuous adjustment of the output voltage by inserting a variable wire resistor PPB-25 100 Ω (in the diagram - R1) into the primary winding circuit.
In view of high power of the device, we will abandon the “father-mother” connector, and securely connect the working handle with the needle to the body with galvanized M6 bolts. We will equip the taps and ends of the secondary winding with tinned copper lugs 6/6.
Working with needles of large cross-sections requires a current of at least 30 A. Therefore, the cross-section of the wires of the operating handle must be at least 4 mm². You can take two cores with rubber insulation from a KG 4x4 cable (vinyl insulation of a wire of the same cross section does not provide it with the necessary flexibility).
We turn the handle on lathe from ebonite. We firmly insert a fluoroplastic plug with two brass rods into the front end of the handle for attaching the working needle (see photo). These rods fit snugly into the holes drilled in the cork. At the ends of the rods, recesses of 8-10 mm are drilled. Tinned contacts are pressed into the recesses inside the handle. A needle is attached to the outer recesses. M4 screws are suitable for clamping the needle.

Anything can be used as a case, you just need to remember about safety. Very good, for example, is the case from a megohmmeter of the last century: it is fantastically strong and durable.


