Master Class. Autumn bouquet of maple leaves
Master class for children of the preparatory group and their parents
Description of work:
Here is a maple leaf on a branch.
Now it's just like new!
All ruddy and golden.
Where are you going, leaf? Wait!
Autumn has come, the last roses are blooming in the gardens and front gardens, which for a long time delighted us with their beauty. Don’t be upset, because you can fix the situation, and do it yourself with a little imagination! It is quite possible to create an unreal creation - real roses! First you need to collect a large armful of beautiful autumn leaves. You need to collect large maple leaves; small, diseased, torn, dry leaves are best left in the park, we will not need them. The leaves can be of any color, so you can collect whatever you find attractive.

We select a sheet and fold it in half across the central vein. (for the next rose petal we fold glue each time new leaf in half)

And we begin to roll it into a tube. This will be the center of the rose.


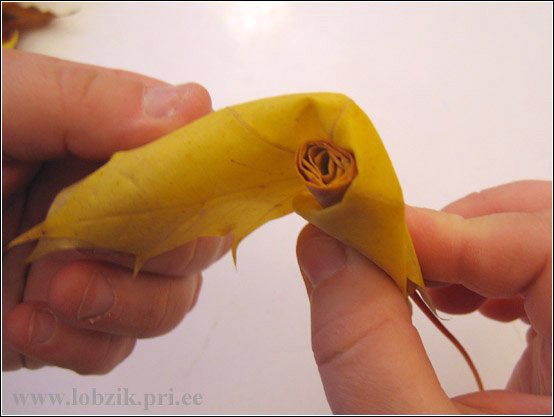
Now we will place the petals around our center. To do this, take a sheet and place the previously made core in its center. The front side of the maple leaf should be inside the flower, this is important.

We bend this sheet outward so that the edge of the bend is located above the middle roll by 1-1.5 centimeters. Then the side edges of our twice folded leaf need to be wrapped on both sides of the core, i.e. round.
Today we will tell you and show you how to make “live” roses with your own hands from maple leaves. Maple leaves are quite durable, and roses from them do not always come out beautiful: more often they look like a tight winding of layers, only vaguely reminiscent of the grace of the queen of flowers. But with our master class you can step by step make a rose that looks exactly like a flower. We propose to use both important qualities of maple leaves: their strength and large area, which we will use to form voluminous wrapped petals.

To make a rose from maple leaves with your own hands, you will need:
fresh autumn maple leaves (quite a lot);
sewing thread on a spool of any suitable color- beige, yellow, orange.

How to make roses from maple leaves with your own hands: step by step and accessible

First we take a thin and small leaf. We bend it in half, bending the top of the sheet back. The fold should form on its own; there is no need to crease it, otherwise the sheet may tear at the bend, and even if it survives, the bud will not be voluminous.

Now we roll this sheet into a tube. Soft and neat.

We take the next sheet of approximately the same size or a little larger. In our work, we focused more not on the size of the sheet, but on its color. I wanted the leaves in the finished rose to fit well with each other, but at the same time I really wanted to add color to the monotonous yellow.

We combine the stems of both leaves, bend the second leaf back, as we did with the first leaf.

We bend the right edge from the center of the sheet down at an angle of 45 degrees to the fold, also without compacting the fold, everything should be natural.


We also bend the left edge of the same leaf down.

This is how we formed the petal. We take another sheet, apply it so that the center of the fold falls on the second sheet, but with an offset. It is advisable to lay rose petals from maple leaves in a spiral relative to each other. We also gently bend the right and left edges of this third leaf, forming a voluminous petal.


If you feel that it is difficult to hold the petals with one hand, remember that we have a thread, and tightly wind the rose bud at the bottom, moving to the stems of the leaves. We do not cut or break the thread, but we fasten it so that it is convenient to work further.

As you can see, a small rose has already turned out.

But we don’t give up and turn it into a full-fledged rose by adding and adding leaves and petals. It is important that the folded edges on the right and left do not meet at an angle in the center of the sheet, and that there is free space between them. In addition, large leaves had to be folded at the edges not once, but twice or even three times. As you work, your hands will “catch” the style of twisting roses from maple leaves and everything will fall into place, even if the description seems not entirely clear.


The rose can be decorated with a bed of leaves. You can arrange the bouquet around the perimeter, or you can edge each rose this way. Or leave the roses as they are.

Your handmade rose from maple leaves is ready. We hope our step-by-step master class was both understandable and useful.


This is what our roses look like two weeks after making them - the leaves, of course, are already completely dry.

Eva Casio specially for the site Handicraft Master Classes
Naturally, the first thing we do is collect the leaves. Leaves that are too small, dry, diseased, or torn are NOT suitable for us. We will use different colors.
For one flower, it is better to choose leaves of the same color.
We fold the first sheet in half across the central vein so that the front side is on the outside.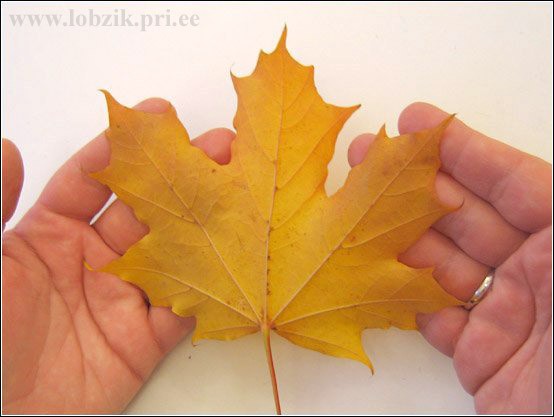

Now we roll this folded sheet into a tight roll.


This roll will be the core of the future rose.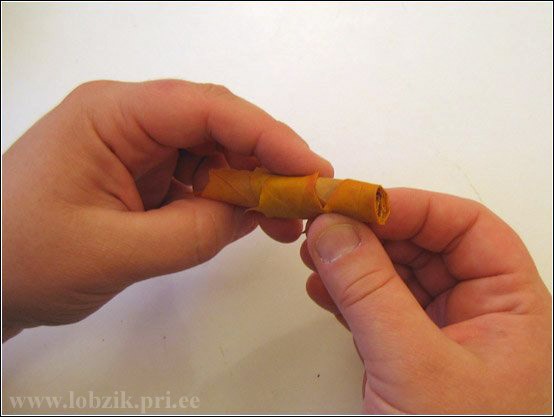
Now we begin to lay “petals” around this core.
To begin with, take a sheet and place the core in its center. Notice that the front side of the leaf is inside the flower!
We bend this sheet outward in half. The edge of the bend is located above the core by a centimeter and a half.

And now we also bend this protruding edge outward. But we no longer smooth out the fold...
... and we wrap the side edges of this double-folded sheet on both sides around the core.


We pinch the lower edges of the leaf at the very base of the flower.
We take a new sheet for the next “petal” and repeat the operation just performed, only this petal is located on the side opposite to the first sheet.


Here, several stages of the same type, shown above, when the petals gather into a bud, are skipped. Add them until you feel like you have enough.
When the bud is ready, we tie threads around its base to secure the flower.

How many flowers there will be in your bouquet is up to you. For this “photo shoot” three were enough for us.
Now let's deal with the "greens". The most variegated leaves are suitable here.
To prevent these leaves from curling into a tube the next day when drying, it is better to first iron them between sheets of newspaper. They will become more fragile, but careful handling will not damage them.
We evenly place these leaves in a circle under the buds and fix the now finished bouquet at the base with the same threads.
On top of the threads, by the way, you can wrap this knot with yellow paper tape (painting tape), this will hide the threads and make the look more neat and complete (in the photographs paper tape No).


Here the autumn bouquet is ready.
ADVICE: “In order to last longer, you need to lubricate the already rolled roses with vegetable oil (with a brush). It is absorbed after two days, the leaves become soft, do not dry out, do not lose color and do not shrink. This dawned on me the day before yesterday. :) I smeared half of the roses - today is the difference on the face."
Happy beautiful autumn everyone!
The long-awaited one has arrived autumn time. A time of dreams and new achievements. Right now, nature delights us more than ever with its beauty, a riot of colors, a refreshing but still warm breeze, rustling leaves under our feet. And I really want to preserve the feeling of complete harmony and warmth for as long as possible, not only in my memories, but also in my home! Autumn foliage will come in handy, and flowers made from tree leaves with your own hands will be a wonderful interior decoration or an unusual gift for a loved one.
This work will not require you to spend a lot of money or time, but in its originality and beauty it is in no way inferior to other crafts made from scrap materials.
Flowers from tree leaves: master class
They look most impressive and natural in compositions and simple bouquets made from rose leaves. The process is quite exciting and very simple, so the whole family, including children, can take part in it.
Once you start making such a craft, you will understand that the stage of collecting leaves is much longer and more tedious than the creative process itself. The following trees are best suited, the foliage of which is preferable to use for making autumn roses: maple, ash and Try to choose bright leaves in colorful shades (yellow, red, maroon, green). If possible, use leaves from trees rather than those picked from the ground. They will not only be cleaner and less damaged, but more importantly, they will also be quite elastic due to the retained moisture, it will be much easier to work with them, and the composition using them will turn out to be more realistic. Collect leaves different sizes. The splendor of the rose will depend on the number of leaf petals used.
So, the basic material is already in your hands, are you full of desire and enthusiasm? Then let's quickly look at how to make flowers from tree leaves with your own hands.
Necessary tools
To make this craft you will need:
- leaves;
- scissors;
- threads or thin rope;
- sunflower oil or hairspray;
- iron.
Use flowers from tree leaves of different colors or alternate different colored leaves in one rose - it all depends on your taste.
To create not just a bouquet, but a separate composition, you can use other natural materials (rowan berries, pine cones, spruce branches, chestnuts, acorns, etc.).
Step-by-step execution
First take a leaf reverse side towards you so that its front side is directed towards your palms, and fold it in half.

So let's get started. Making flowers from tree leaves step by step:
1. Roll the resulting half of the leaf into a tight tube - this will be the core of our future flower.
2. Take the second sheet. It needs to be positioned front side inside.
3. Bend this sheet outward so that its top protrudes 1-2 mm above the previous one. Wrap the resulting half around the base.

4. Repeat this manipulation several more times. Depending on how many leaves you make will determine the size of the rose.
5. Each subsequent row of leaves must be moved slightly lower. This way the finished rose will be more fluffy, voluminous and beautiful.
6. Secure the base of the resulting flower tightly with thread.

7. On top, lightly soak the flowers from tree leaves with sunflower oil. This will give finished product shine and will help preserve it longer.
8. Instead of oil, you can use hairspray. By lightly sprinkling the flowers, you will also give them shine, and this manipulation will also protect them from fragility.
9. If desired, you can make individual strokes of gold paint or glitter over the roses.

10. Finally, all that remains is to arrange the resulting autumn flowers into a bouquet and decorate them with the most colorful and neat leaves. Be sure to iron these leaves through fabric or a double sheet of paper first.
Flowers made from tree leaves, made by yourself, are ready. You and your loved ones will certainly like them. In addition, such a bouquet can become a wonderful gift, preserving the love and warmth of your hands.
Flowers from tree leaves: photo
The completed composition may look like this.

Although, just as there are no identical colors in nature, yours will be completely unique and unique.
Chrysanthemum flower
In addition to a rose, you can also make, for example, a chrysanthemum flower. This will, of course, require more time and leaves to complete, but it's still worth a try.
You need to wind it up enough a large number of tubes (about 50 pieces for one lush flower). If you combine them into one bunch, you get a chrysanthemum.
Features of blanks
You can form tubes by winding them on long skewers, pencils, knitting needles or other oblong devices. The size and density of the finished petals will depend on the diameter of the rod used. Give them the desired shape according to your desire and artistic taste.
The resulting flowers from tree leaves must be securely fixed with glue and thread. You can first coat each leaf with glue and roll it into a tube, or, conversely, glue the finished piece and fix it with a thread for the drying period, not forgetting to remove it at the end of the cooking process.
After all the blanks are ready and the tubes have been wound in sufficient quantities, proceed directly to the formation of the flower.
It is best to play with the resulting blank and give it the appearance of a real plant by fixing the flower on a long skewer or thick wire. At the base (for the sepals) it is recommended to use small green leaves or make them yourself from corrugated or colored paper. Be sure to wrap the stem itself with the same green corrugated paper or special tape.
As you can see, just a little effort and ready flower chrysanthemums from unusual natural material are already ready. Now you can complement any of them, or by making a few more of these flowers, you can create a separate lush bouquet of chrysanthemums. Place such a bouquet in a vase, decorate it and enjoy the beauty of this wonderful autumn flower for a long time yet.
Conclusion
For any creative process, the most important thing is desire and inspiration. And even at first glance, such a simple process of creating flowers will become a godsend for you and will certainly please you with its result. Be creative, please yourself and those around you, and the presented master class on how to make flowers from tree leaves, we hope, helped you with this.
Any process of creation carries only positive emotions. Having created such beauty yourself, and even from natural materials, you will feel a surge of creative strength and new ideas. In addition, this kind of activity can be done by the whole family, from collecting leaves while walking in the park to creating flowers and decorating them. Try it!
Well, a new autumn has come. And that means our golden autumn bouquet becomes relevant again. Well, another retrospective. But for some it will probably be a discovery.
Just some kind of miracle! The reality of unreality! Make a rose from a maple leaf!
Virtual lesson from Natalia. The entire sequence of making such a wonderful bouquet is in photographs and comments.
Naturally, first of all, we collect the leaves. Leaves that are too small, dry, diseased, or torn are NOT suitable for us. We will use different colors.

For one flower, it is better to choose leaves of the same color.
We fold the first sheet in half across the central vein so that the front side is on the outside.


Now we roll this folded sheet into a tight roll.


This roll will be the core of the future rose.

Now we begin to lay “petals” around this core.
To begin with, take a sheet and place the core in its center. Notice that the front side of the leaf is inside the flower!

We bend this sheet outward in half. The edge of the bend is located above the core by a centimeter and a half.


And now we also bend this protruding edge outward. But we no longer smooth out the fold...

And we wrap the side edges of this double-folded sheet on both sides around the core.


We pinch the lower edges of the leaf at the very base of the flower.

We take a new sheet for the next “petal” and repeat the operation just performed, only this petal is located on the side opposite to the first sheet.


Here, several stages of the same type, shown above, when the petals gather into a bud, are skipped. Add them until you feel like you have enough.

When the bud is ready, we tie threads around its base to secure the flower.


How many flowers there will be in your bouquet is up to you. For this “photo shoot” three were enough for us.

Now let's deal with the "greens". The most variegated leaves are suitable here.
To prevent these leaves from curling into a tube the next day when drying, it is better to first iron them between sheets of newspaper. They will become more fragile, but careful handling will not damage them.
We evenly place these leaves in a circle under the buds and fix the now finished bouquet at the base with the same threads.
On top of the threads, by the way, you can wrap this knot with yellow paper tape (painting tape), this will hide the threads and make the look more neat and complete (there is no paper tape in the photographs).


Here the autumn bouquet is ready.

I’ll tell you a secret, I folded one of these three roses. I think it’s easy to recognize.
P.S. Here's some advice from forum users on www.EVA.RU:
“In order to last longer, you need to lubricate the already rolled roses with vegetable oil (with a brush). It is absorbed after two days, the leaves become soft, do not dry out, do not lose color and do not shrink. This dawned on me the day before yesterday. :) I smeared half of the roses - today the difference is obvious. "