Drawing technology
The method is based on the thermal transfer of the toner and is quite often used to make printed circuit boards at home.
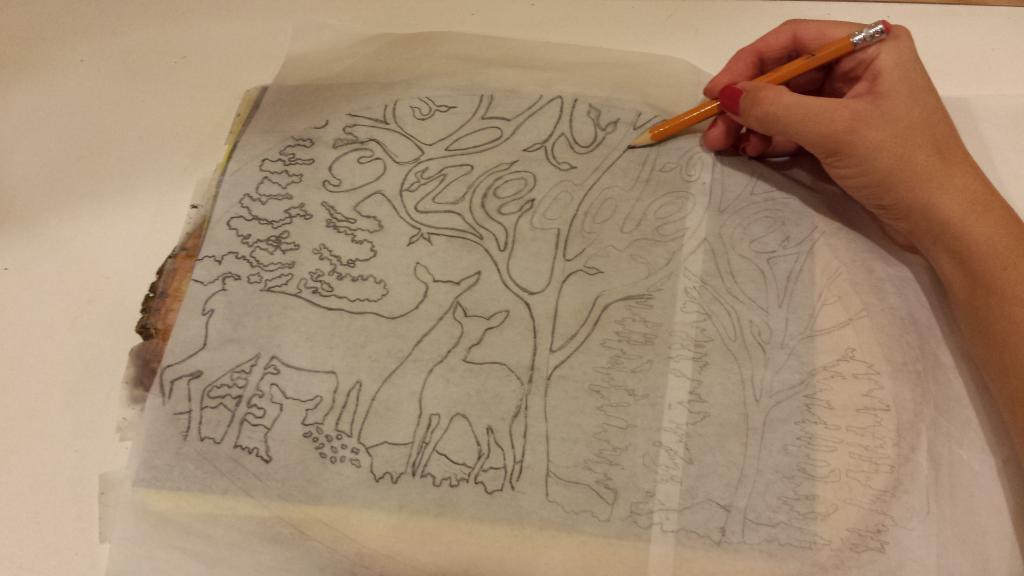
We will use this method for drawing a pattern on plywood. So let's get started.
First we need to prepare a drawing and paper.
Drawing
You can download it on our website among the crafts you like, or read how to prepare a drawing yourself in the next article.
Paper
We will need glossy paper, the main quality of which will be a low toner retention rate. For example, it could be paper glossy magazine, but personally I use a backing paper for labels. If you don’t have any of the above recommended at hand, then you can take plain paper, this technology will also work.
Printing a pattern
When printing, you need to remember that the image will be translated as a mirror image, so you need to prepare your layout in advance by "reflecting it horizontally". You can do this programmatically or select the appropriate setting in the printer settings, provided that your printer supports this function.
Also, in the settings, it is worth turning on high-quality printing - this will give a larger amount of toner on the sheet and, as a result, a faster transfer of the drawing to plywood.
Transferring a picture
To transfer the drawing, place the printed layout with the toner down on the plywood, and slowly smooth it out reverse side iron. It takes about one minute to transfer an A4 size pattern.
Iron
An ordinary iron can be used as a toner transfer oven. If you decide to take an iron, which is also used in everyday life, then take care of its safety - use a pad of paper and cloth to avoid the formation of carbon deposits on its surface.
As for me, I use an iron for trimming aircraft models, it is quite convenient, since you can set the required temperature on it - 190 degrees. The surface of the iron has long been accustomed to various experiments, so I do not use a gasket.
Alternatively, you can use a blow dryer and roller to transfer the design.
Removing paper
After evenly smoothing the layout with an iron, before removing the paper layer, you should wait for some time, allowing the transferred toner to cool down.
When the paper is removed, you should check the lines of the drawing, how successfully they were transferred, and, if necessary, draw the missing elements with a pencil.
At this stage, the transfer of the drawing to plywood is completed.
Conclusion
This technology also has one minus, in the pursuit of saving time, the development of a number of important human qualities is missed, such as:
concentration, patience, perseverance, concentration, accuracy, slowness, thoroughness.
According to this beginners, children school age, I would recommend that you first try the traditional methods of drawing a drawing on plywood:
Translation through carbon copy or template making.
All photos from the article
hallmark of the century high technology is the ease with which beauty is replicated and originality is put on stream. But if not everyone can become an artist and paint great canvases, then create unique images with the help of simple technologies under the power of many.
The tree is one of suitable materials on which a photograph or favorite drawing will look great. In addition to the fact that the quality of the product will remain unchanged for many years, it will be a kind of masterpiece or piece goods, depending on how you dispose of it.

The essence of technology
Don't let buzzwords like technology scare you. sublimation printing or graverton, because they are one and the same, therefore, already less incomprehensible. The technology is based on the principle of sublimation, when a substance under the influence high temperature"Jumps" from the gaseous state immediately to the solid, bypassing the wet stage.
Graverton technology allows you to transfer a pattern to wood, metal, glass, fabric, and the process itself takes place in a certain order:
- An image is printed on sublimation paper;
- The front side is applied to the object being processed;
- It is placed in a heat press for a certain time.
expose artistic processing a huge number of things are possible - from shoes, dishes, fabrics to corporate symbols, puzzles and all sorts of other unexpected things.
The main disadvantage of the graverton technology is the need for special equipment and its high price:
- sublimation printer(starting from 500 thousand rubles with kopecks);
- thermal transfer press(from 9 to 30 thousand rubles).

And since you want to transfer a drawing to a tree at home from time to time, it makes sense to purchase expensive equipment only if you put things on a grand scale.
We create for ourselves
With a minimum of tools, you can also figure out how to translate an image onto a tree no worse than using high-tech equipment. Perhaps the most important thing is to decide on the topic, because erasing "nonsense" will be, oh, how difficult.
There are several rules that will teach you how to transfer a drawing to a tree so that it looks right:
- The work surface should be bright and clean;
- The direction of the wood fibers should not spoil the drawing, for example, oblique lines can add photos of extra wrinkles;
- A theme with words/numbers is printed in a mirror image (a photo editor will help rotate the image);


Elements in the interior made of wood make it more elegant and attractive. This decor can be done by hand. by the most simple option there will be a wooden board with a pattern that is applied to the surface in accordance with a certain technique. To make the product correctly and beautifully, you need to know exactly how to transfer the pattern to the tree in several ways.
How to decorate a tree with a drawing
There are several techniques in which a pattern can be projected onto a wooden surface. In each situation, you should know exactly how to transfer the drawing to the tree:
- Burning with a special device. The drawing is clear and embossed. Outlines are noticeably limited, you can create the effect of a shadow or shadow transition.
- Decoupage is the most popular and simple technique creating a drawing. As a result, the image can turn out to be color or black and white, the drawing can be of any complexity.
- Wood carving requires a sketch, which is projected onto the surface in several ways: using carbon paper, redrawing, embossing with sharp tools.
You can partially combine several techniques in one work. This is possible, provided that the person has artistic talent, which will help to abstractly present the result of the work.
Wood surface preparation
Before transferring the drawing to the tree at home, it is worth preparing the surface correctly. Both the process of work and the result depend on the quality of the wooden base. The service life is also directly determined by the quality of the preparation of the tree.

Preparation wooden surface:
- Choose right tree. It is best to work with pressed sheets of plywood, chipboard and other analogues, but also natural material quite suitable.
- Decide on the parameters and shape of the wooden base. Immediately get rid of excess parts, sand the edges.
- The surface itself should be smooth and even. For this you should use grinder, A hard-to-reach places handle sandpaper or a file.
- Only then is a sketch of the image itself prepared for transfer.
Thus, the preparation consists of three simple steps that even a child can do.
on wood
In order for the burning procedure to be carried out quickly and efficiently, it is necessary that the pattern on the surface of the wood be as accurate and of high quality as possible. To transfer the image to the surface, several methods are used. The most popular option is transfer by carbon copy.

How to transfer a drawing to a tree for burning using a carbon paper:
- You need to take a sheet of paper. It is advisable to use paper that has been used more than once.
- Lay the carbon paper with the ink side against the wooden surface. Lay out a sheet with a pattern on top and secure the structure with tape or electrical tape.
- Trace the lines with a graphite pencil. You need to work carefully, limiting the interaction of hands with paper as much as possible.
- After completing the stroke of the lines, remove the layers of paper. The drawing for burning is ready.
This method is very reliable, but requires special care in execution. During the translation process, traces of carbon paper may remain, which are almost impossible to clean from the surface of the tree.
Drawing without carbon paper
In order to learn how to transfer a drawing to a tree without carbon paper, you can use several methods. Each differs in a set of tools and materials, but is simple in terms of implementation.

Image transfer methods:
- Graphite print. Take a simple pencil with a soft core and trace the outlines of the drawing on paper. Rotate the image to the wooden base and quickly press without shifting. In order for the graphite to be imprinted with high quality, it is possible to draw a hard roller or a plastic strip over the paper.
- Thermal transfer. First you need to select an image taken on the right instrument. With the help of thermal exposure, a photocopy or printout made on a powder printer is printed. Attach the back side to the wooden base and heat the paper with an iron.
- Reprinted with white spirit. The picture must be printed on laser printer or copier. Attach the sheet with a pattern to the tree and wipe it with white spirit. On a cotton pad, it is worth applying a little means so that the paper does not become limp.
There are other options, but the implementation principle is much more complicated and requires more time and money.
Preparing wood for carving
To form an image on a board or plywood, you need to know just a few basic rules. If the work is done incorrectly, the carving process can become much more complicated.
How to transfer a drawing to a tree for carving in order to comply with all the rules:
- Draw a grid on the surface of transparent paper. The size of the cage will depend on the required size of the pattern.
- If you need to create an ornament, then put part of the image on tracing paper and fold the sheet in half. Circle the image on the second half of the tracing paper with a pencil.
- The symmetry of the pattern can be given through the use of carbon paper.
The method of transferring an ornament or image can be used from the options presented above. The main thing is to lay the sheet with the applied ornament so that the direction of the pattern coincides with the location of the fibers.
Decoupage technique - a simple option for transferring an image
Often, not only the manufacture interesting jewelry for an interior with an image on a tree, but also a more practical application of technology. Knowing how to transfer a drawing to a tree, you can restore old furniture, do wooden element design.
To implement such ideas, decoupage technique is used. The principle of such work is simple and does not require special skills, availability unusual materials or tools.

How to transfer a drawing to a tree using PVA glue using the simplest algorithm:
- The prepared surface must be coated with PVA glue. The layer should not be too thick. Strokes should be smooth and uniform.
- Lay the pattern on the surface of the tree and gently straighten the paper sheet. It is necessary to expel the air and position the edges of the cellulose base.
- From above, once again smear the image with a thin layer of PVA. Wait for everything to dry and duplicate the layer again.
Further processing is chosen according to the preferences of the "creator".
Additional finishing
After transferring the pattern to the tree and performing a secondary surface treatment, it is worth considering options for further surface treatment.
There are several options:
- Varnish.
- Paint.
- Prime.
- Leave the product untreated.
- Laminate.
Additional decoration includes the manufacture of stands, frames, pendants for finished product. Here you can show imagination and skills.
Different pieces of wood were lying around at home and you need to go somewhere with a gift? Here economical option original gift- photo on the tree.
- actual photograph
- light, flat piece of wood or plywood
- simple photo editor
- Ability to print on a laser printer
- scissors
- a bone knife for envelopes (a piece of
hard cardboard) - matte gel polish (can be found in the section
acrylic paints in art stores) - matt glue for blending Mod Podge (you can
and glossy - your choice) - 2 different brushes (bristle or foam)
- towel and rag
- workplace advocacy newspaper
STEP #1- Make a mirror image
Open the photo you want to use in an editing program (almost any image viewer/browser will do) and apply the "horizontal mirror" filter. This is necessary so that the final image is the same as the original.
Make sure your photo is 300 DPI so it can be printed in good quality. Pay attention to the size of the photo, it should be large enough to fit on the surface of your pile of wood.
STEP #2— Laser printing
Print your mirrored, precisely measured photo at 300 DPI on a laser printer on fairly thin paper (eg 24 lb paper or 90 g/m2).
The photo is best printed on thin paper because it will be easier in step 8 when you erase paper base.
For insurance in case the hand trembles while cutting along the contour, you can make two copies of the photo.
STEP #3- work with scissors
It's simple - carefully cut the image to the shape of your piece of wood.
STEP #4- Applying glue
Cover the table with newspaper to keep it clean.
Spread matte glue all over the surface of the cut out photo using one of the brushes.
Now very carefully place the photo front side down to the top of the piece of wood.
After that, use a bone knife or hard cardboard with a smooth edge to flatten the photo and expel air bubbles from under your photo.
Remove any excess glue that squeezed out from under the edges of the photo as you smoothed it out.
STEP #6- Let dry
Now it should take time for your photos to dry for at least 8 hours.
Therefore, it is convenient to start making this gift in the evening in order to continue in the morning. Or vice versa, get up early in the morning to finish in the evening.
STEP #7- Wet properly
After the photo has dried for 8 hours or so, it's time to properly wet it.
Lay out the towel first.
Then take a rag and wet it with water.
Squeeze out the excess water from the cloth—you don't want to get wet—and place it on top of the photo.
Press the wet cloth on the photo and make sure it is completely wet. Or just let the wet rag sit on the photo for a few minutes if you like.
STEP #8- Remove excess
First, it will take some time.
Now that the photo is wet, use the rag and/or your fingers to wipe off the backing paper and "release" your beautiful photo.
- To age the photo, use a wet rag to wipe off the paper fibers. The rag's own fibers will also erase some of the photo that has appeared.
- For a better, cleaner look, use your fingers to rub away the paper fibers.
Take breaks from erasing the paper to dry to see any paper fibers that need to be erased.
In my experience, the best condition to be able to see and erase all the fibers is when the photo is almost dry.
Reference: Depending on the size of your photo, this step may take some time. It took about 30 minutes to remove the paper from our small oval board. Anyway, don't rush into it so you don't mess up all your work.


