An orchid is a luxurious plant; its beauty surprises and delights everyone. And although many try to grow it at home, this is not always possible, because the flower is very whimsical.
However, if desired, the home can be decorated with a sophisticated branch. An orchid made from corrugated paper will be an excellent alternative to a living flower. By following the step-by-step instructions, you can make it in such a way that it looks like the real thing.
Paper orchid
A blooming orchid looks amazing, but it doesn't last long. Beautiful orchids made from corrugated paper with your own hands can be made quickly and without any problems. Such decorations will “bloom” all year round and delight everyone around with their appearance.
Required materials and tools
To create a luxurious orchid you will need corrugated paper of various shades, a tree branch, scissors, a flowerpot, silicone, hard foam rubber and glue (glue gun). In addition, an orchid can be made from crepe paper. The difference between these types of base is only in the degree of compression and thickness.
Orchid made of corrugated paper: master class on making
To create petals, the paper is cut into pieces measuring 5 by 4 cm. They are twisted with your fingers, giving the desired shape.
To make the middle you will need white corrugated paper. It needs to be slightly cut and twisted with your fingers. Next, all the details should be collected into a bud. To prevent the flower from falling apart, it must be secured with green corrugated paper.
In addition, you need to make several closed buds. You need to cut out a rectangular piece 10 by 4 cm from corrugated paper. The element needs to be twisted in the middle and folded in half. A small piece of paper is placed in the middle, the bud is shaped and the stem is twisted. The bud must be additionally fixed with green paper, coated with glue.
After this, you should start decorating the branch. To do this, you will need ribbons of corrugated paper 3-4 cm wide, the length does not matter. The main branch should be of such length that the pot does not tip over and the entire craft is stable. All branches must be wrapped in corrugated paper from top to bottom. Gradually, closed buds and flowers made earlier need to be tied to the branch.
The corrugated paper orchid is ready. Now you need to take a flower pot and cut the foam to its size. Using scissors, make cuts for the branches, insert them inside and fill them with silicone.

To imitate soil in a pot, you can use black corrugated paper. You just need to tear it into small pieces and glue it to the craft. Additionally, the flowerpot can be decorated with sea pebbles and cardboard butterflies.
Orchid made of corrugated paper and candies
Such a flower will look great not only as a decorative element for decorating a room. An orchid can be successfully used as a souvenir. Especially if small sweet surprises are hidden in a bouquet of luxurious flowers. To make an orchid made from corrugated paper and candies quickly and without any problems, you just need to follow the step-by-step recommendations.
Step-by-step instruction
When creating this exotic flower, you first need to choose an image with an orchid you like. It is better to choose a picture in which everything will be clearly visible.
If you don’t know how to make an orchid from corrugated paper, first prepare a strip 10 cm wide. You need to cut a petal from a piece of paper, as in the illustration, and color it along the edge (but do not paint it).

After this, the finished petal is slightly stretched with your fingers and twisted, pulling out the middle. Next you need to start forming the petals. Again, you should prepare a piece about 10 cm wide. You need to cut out a single petal from it, stretch its edges and pull out the middle. A paper orchid should have five identical petals.

Now the flower needs to be glued. To do this, take the candy and fix it on the wire with glue. This base should be wrapped in a decorated petal. After this, you need to attach the remaining single petals. First, the four elements are attached to the sides, and the top part is glued last. The petals at the top need to be slightly bent and the wire wrapped in green paper.

These instructions show that DIY corrugated paper orchids can be made quickly and easily. But you shouldn’t limit yourself to just one flower; this way you can make a charming bouquet that will delight your family and friends.
If you are a lover of flowering house plants, then this Master Class will not leave you indifferent. We'll make it exotic foamiran flower, from which you can make a composition. A very realistic orchid branch can deceive even an avid gardener; it can easily be confused with a real, living beauty. In one branch we will collect several orchid flowers with a closed bud at the beginning. Such a branch can be inserted into a flowerpot with orchids that have already bloomed. And your flower will always be beautiful.
For the master class you need to prepare:
- white foamiran for petals;
- purple foamiran for the middle;
- green foamiran for the bud;
- black beads with a diameter of 0.5 cm;
- thin wire;
- candle;
- awl;
- scissors;
- pen with purple paste;
- foil;
- green tape;
- floral wire;
- glue gun
How to make an orchid from foamiran
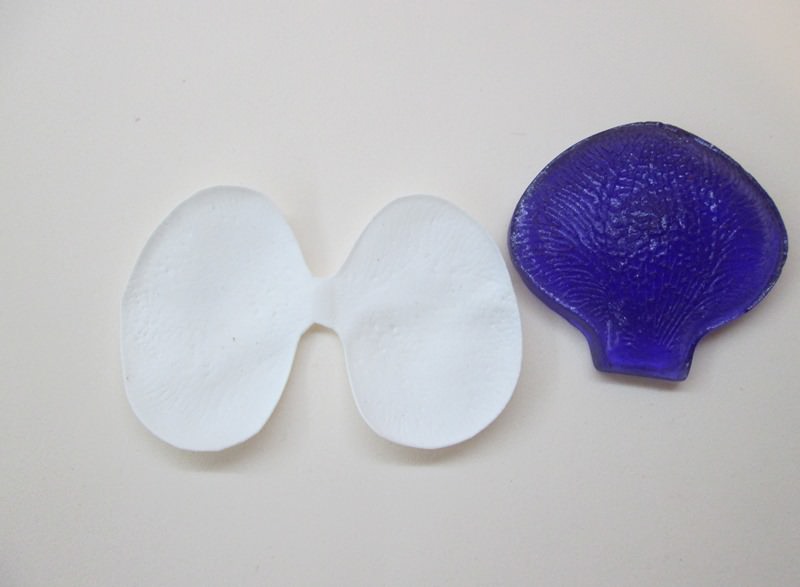
An orchid flower will consist of a center and 5 petals. We draw blank templates. The size of the orchid can be adjusted by changing the dimensions of the template.
The petal that is in the middle must be made double. Its narrow edge should connect two workpieces at once. Cut out three parts.
We trace the outline of the templates using an awl.

Using our fingers, we will add volume to the middle of each petal, stretching it a little.

Then we carefully stretch the edges, making them wavy.

We receive the petals ready for assembly.

We string each bead onto a wire and secure it by twisting the ends. The length of the wire when folded should be about 8 cm, that is, the total length is about 16 cm.

Using an awl, we make a hole in the upper part of the purple center, as shown in the figure, and thread a wire with a bead into this hole.

We light the candle and hold the purple blank above the flame at a distance of 20 cm parallel to the table.

The workpiece will begin to curl and at this moment we remove it.

Using an awl, we make a hole in the middle of the double petals and string them onto a wire. Apply glue to the back of the purple center in the area of the wire and fasten it together two layers of foamiran.

In the same way we attach the triple blank of petals, but making a hole at the base of the upper petal.

The flower is already becoming like an orchid.

Using a pen with purple paste, draw stripes on the double petals starting from the middle. They should fan out to the sides.

We form a drop 1 cm long from foil and string it onto a wire, securing it with glue.

From green foamiran we cut out petals 1.5 cm long and 1 cm wide. We scorch these petals over a candle flame. They should turn out voluminous.
We paste them over the foil blank.

Since all the orchid fragments are ready, we begin assembly. Take the floral wire and wrap the newly made bud around it. The end of this wire should rest against the base of the bud.

We retreat 6 cm from the end and wrap the first orchid flower. The distance from the wire to the flower should be about 1.5 cm.

In this way we wind the remaining 2 flowers.

Then from the bud we wrap the entire length with green tape.

We pay special attention to the junction of the orchid and the wire.

It is better to secure the ends of the tape with glue.

It turns out very tender.

An orchid sprig made of foamiran for interior decoration.
Tender twig orchids made with your own hands, beautiful. She deserves to decorate the interior of the room, a large hall for the holiday. Also, a tropical beauty can replace a bride’s bouquet; one branch is enough. The bride will seem like the most sophisticated person and extraordinary in her choice of bouquet.
Orchid meaning
An orchid is a symbol of beauty, perfection, luxury and love, wisdom, aristocracy. White orchid - pure love, red - passion. It is also a flower for all those born under the sign of Pisces. Orchids in a bouquet symbolize love and large families.

Symbol of tenderness and love. DIY orchid (master class by Antonina Mazur).
Did you know that in ancient sagas and legends, beautiful orchids were credited with the extraordinary ability to increase potency? Today, the most famous “beneficial orchid” is the flat-leaved Vanilla. Its pleasant aroma can be found in the food and cosmetics industries.
In China, orchids were used in making love potions and in magical rituals to drive out evil spirits. Contemplation on a beautiful flower helps to endure loss and cope with grief.
In South America, the orchid is considered a talisman that helps to find a groom and protects against evil.
Having done DIY orchid, you will thereby make yourself a talisman that will help you find a life partner and give you love. There is a rule that an orchid should only be given to loved ones.
Flowers from foamiran Today it can be found not only in home decoration, but also in women’s jewelry. These are hair clips, headbands, brooches, bracelets, boutonnieres for the bride’s hand. It turns out incredibly beautiful poppy from foamiran, its passionate red color beckons.
Especially for the site Handicraft Lessons Antonina Mazur and Galina Dukhnova.
It is difficult to find a more bewitching and exquisite flower among plants than an orchid. The plant has a unique structure and captivates with the variety of its shapes and colors. If you don’t already have an orchid in your interior, you can make one yourself. Artificial flowers do not require maintenance, and you will definitely receive an aesthetic appearance and moral pleasure.
The structure of an orchid is slightly different from that of a regular flower. It has 3 sepals, 2 side petals and a central petal, which is very similar to a baby's lips. The color range is varied, from soft white to red and dark purple.
One of the most beautiful subspecies of orchids is the cymbidium. Made from foamiran, plastic suede, it looks very natural and will decorate any corner of your home.

Foamiran easily stretches when heated, acquiring the desired shape, which allows you to make magnificent petals.
In addition, he:
- Environmentally friendly;
- Easy to cut with scissors, which is very important for children's creativity;
- Products can be washed with water without fear of losing shape;
- A wide range of colors allows you to produce a flower as close to life as possible.
Today this material is very popular among needlewomen. Foamiran can be found in any craft store.
Orchid pattern from foamiran: simple and tasteful
Unique orchids are considered a symbol of the tropics. They are so colorful and diverse that they sometimes amaze with their shapes. The basis of the flower are the petals; depending on the type, their shapes are slightly different from each other.

Almost all patterns consist of:
- 5 petals;
- Lips;
- The center of the flower;
- In some more complex specimens, styles and stamens are added.
The most common species is the phalaenopsis orchid. Making a pattern for such a flower is not difficult at all. Flower sizes vary from 5 to 15 cm. It is enough to make a template of one petal and lip, transfer it to suede, and assemble the flower. You can make the lip pattern yourself by carefully looking at the flower, or you can borrow it from professionals without bothering.
For a subspecies such as cymbidium, you will additionally need to draw a template for the column of the middle of the flower, and cattleya will require the needlewoman to use a stencil of 2 different petal shapes.
Choose the flower you want, take a closer look and start creating.
Cymbidium or foamiran orchid: step-by-step master class
Making an orchid from foamiran is not at all difficult.
The main thing is to have a great desire, a little imagination and free time.
Following the instructions for beginners, you will certainly make a beautiful and unique flower. To work you will need foamiran, the required shade, scissors, a toothpick or a knitting needle, a Cattleya orchid mold, wire, green tape, an iron, Moment glue, beads and a stencil. It is necessary to maintain consistency in work.

Stages of work:
- Making flower templates;
- Preparing orchid parts;
- Adding texture and color;
- Flower assembly.
That's all you need to get the job done.
We prepare templates for orchids from foamiran with our own hands
Let's move on to one of the critical parts - making templates. You need to make templates from ordinary cardboard or thick paper, which you then transfer to foamiran.
To design a cymbidium, you need to make 5 petals, a tongue and a column. You can look at ready-made templates from others, or, if you use a creative approach, you can draw them yourself.
For the petal, draw a vertical line 6 cm long. At a height of 3 cm, draw a horizontal line perpendicularly, and put 1.5 cm on it on the left and right sides. We connect the resulting points with smooth lines, giving the shape of a leaf. We get the column by drawing a rectangle, 6.5 cm high and 1 cm wide. Smoothly round the corners of the rectangle and make a cut on one side, 3 cm long. The “tongue” consists of 2 shapes - a circle and a heart. Draw a heart shape 3 cm high and 4.5 cm wide, then place a circle over the heart with a radius of 1.5 cm so that the shapes touch. Circle the resulting drawing around the office - this is the “tongue”. We apply the finished templates to the suede and carefully trace them with a knitting needle or a wooden stick. Carefully cut out the details of the orchid along the contour.
It depends on your imagination what color the cymbidium will be. We tint the petals with acrylic paints or pastel pencils. Usually the bright spot of a flower is its lip, the color of which is decorated with many lines, specks and combs. Look for an idea in the photographs or come up with a pattern yourself.

The next stage is creating the texture of the product. In stores you can find ready-made molds, cast molds, to give the petals a realistic texture, characteristic of fresh flowers. If the mold is not available, it can be replaced with corrugation. In this case, each petal will need a separate piece of corrugation so that they do not lose their characteristic structure.
Step-by-step technique:
- We apply foamiran to the iron. The temperature should be the same as for ironing wool or silk items.
- We form petals on the mold. If there is no mold, place the warm petal on a sheet of corrugated paper and quickly roll it into a tube, then, straightening it, give it the desired shape, stretching and pressing on the part.
- We process the column with an iron, applying the edges one by one so that they bend inward.
All the parts are ready, you can start assembling the flower. The easiest way is to plant the entire bud on one wire.
For this:
- We put a bead on the wire, bend the metal in half and twist it slightly, we get the eye of a flower.
- We pierce the foamiran in the middle of the column, then place the tongue and, finally, the petals on the wire.
- We carefully secure all the parts of the orchid together with glue.
- We form the reverse side of the cymbidium from the remaining pieces of suede, twisting it into a tube in a spiral at the base.
- We wrap the twisted foamiran in a circle with a green tape, and then, obliquely downwards, around the wire.
Such an orchid can be added to ready-made compositions or made into an accessory element. It is perfect for a romantic evening and will decorate a festive table. Place several flowers in a large transparent wine glass, and your guests will appreciate your taste and originality. A black brooch, hairpin or headband decorated with orchids will be a wonderful addition to your spring and summer wardrobe. Fantasize and give yourself and those around you joy.
Beautiful orchid flowers from foamiran: design of a branch
An orchid is a light-loving plant, and if it is not possible to provide the flower with a lot of light, but you really want to fill the interior with delicate beauty, foamiran compositions will be an excellent alternative.
If we want to make an orchid branch, then, in addition to several flowers, we need to make buds. They will add naturalness and completeness to the image.
A live orchid in a pot has bloomed; add a branch of artificial flowers to the real plant. Flowers look very laconic when decorating an interior in Japanese style.

Master class on making buds:
- To do this, we make a hook at one end of the wire;
- Wrap the hook with cotton to the desired size of the oval bud;
- We wrap a light green tape around the wire at the base of the structure in a spiral, going down 3-4 cm;
- We cut out 3 small petals from foamiran, giving them a slightly curved shape with an iron;
- Carefully glue it to the cotton bud - the petals should be adjacent to each other, forming an unopened small flower;
- Paint it in the color desired for the composition.
Our flowers and buds are ready, let's start forming a branch. Its basis will be the wire to which flowers and buds are screwed. The arrangement of flowers on the branch should be asymmetrical, one above the other. Treat the stem of the product in a spiral with green tape. That's all, the unique orchid branch is ready. A twig planted in a pot will look very gentle and natural. The soil for such a beauty does not require watering, but for the varied decor of the pot, your imagination may not be limited to the soil.
Foamiran orchid: master class (video)
In conclusion, it is worth noting that glass vases and pots with decorative stones and orchid branches will effectively highlight and lighten the interior. A white orchid always looks gentle and impressive even on a white background. A branch of a black orchid looks fantastic, combined with shades of gray and white tones. When designing a room, the orchid should become the main accent in the room.
The orchid is a beautiful exotic flower that people like to decorate modern interiors with. Caring for orchids is quite difficult, so we will make this exotic flower from foamiran. Flowers made from foamiran look beautiful and do not require any care. You can make any orchid from foamiran. I will tell you how to make a white orchid, phalaenopsis orchid, cymbidium orchid and other types of these flowers.
White orchid from foamiran, master class with step-by-step photos
When talking about white orchids, the variety most often meant is phalaenopsis. In the photo you will see what kind of orchid we should end up with.
Photo of a white orchid from foamiran
To create an orchid from white foamiran you will need:
- white foamiran;
- yellow, lilac oil pastels, as well as a sponge for application and shading;
- phalaenopsis orchid mold and cattleya mold;
- iron;
- second glue;
- scissors;
- cotton swab.
Pattern for a white orchid

The pattern was developed by foamiran master Elena Semanova. For one flower we need only three parts.

We cut out all the details one blank from white foamiran.
White orchid flower assembly

We begin processing the orchid petals. We heat the three-petal circle on an iron, one petal at a time, at a wool-silk temperature and press it onto the Cattleya mold.
We also heat the double petal on an iron, one petal at a time, and press it one by one on the phalaenopsis orchid mold.

Before processing the orchid’s tongue, we will tint it with oil pastels. We apply tint on both sides. We tint the tail with lilac, the head with yellow, the wings along the edges with lilac, and in the middle we apply red dots.

Then we begin ironing at silk-wool temperature. We apply all the parts one by one with the front side so that they are slightly bent. Tail, head, wings. Then we collect them all together upwards and heat the base and treat it with a sponge.
The flowers are made of plastic suede without the use of special tools. Products made from this material are durable and easy to use.
And to make a twig we need to prepare the materials:
- - yellow plastic suede.
- - scissors.
- - wire.
- - ballpoint pen refill without paste.
- - acrylic paints.
- - lighter.
- - thin artistic brush.
- - sticky floral tape.
- - “Moment” glue.
- - foil.
- - paper tape.

Using the prepared templates, we trace and cut out the necessary parts from the selected suede. Don't forget that there are two flowers on the branch.

Then, in turn, each petal needs to be processed three times. First, use a rod to draw veins along the entire length of the petals. Next, take yellow paint and cover the front side a little, and the pressed stripes will be clearly visible. And for the third treatment, let's take a lighter. You should warm up the edges of the petals in small sections and immediately direct the bend of the edge onto the face of the petal with your hands.

Now let's move on to the middle of the flower. Using the template, cut out the desired part from the selected suede. Prepare a thin brush and red acrylic. You can take a picture of the desired orchid. And try to try to repeat a similar drawing with paint. We paint on both sides of our blank with a brush.


Next we move on to heat treatment of the same workpiece. Let's start with the central round part. Using a lighter, carefully heat the edge and make a small bend, repeating this several times.

Then we heat the area in the middle of the workpiece from the wrong side and use our finger to make an indentation on the wrong side as well.


All that remains is to tilt the small side circles towards the center. We use a lighter, heat the parts and tilt them in the desired direction.

There was a small unfinished area left on this part. This is the place to which we will attach the tongue. It also needs to be tilted slightly towards the center of the part. The workpiece turned out to be of a complex shape.

Let's move on to the part that will serve as the tongue in the flower. First, paint the rounded side with a red tone, on one side.

We direct the heat from the lighter from below and round this part and bend it into a semicircle.

Two parts of the center of the flower are ready.

All that remains is to glue the bottom edge of the tongue to the prepared place.

Now we will make the stamen. We cut off a small strip of suede and take a wire 8 cm long. We wrap the wire itself with adhesive floral tape.

Glue the yellow strip to the edge in the shape of a barrel.

And so, all the details of the orchid are ready. Let's move on to assembling the flower. First we glue the stamen, pierce it with wire under the base of the tongue. We glue the stamen, and the wire itself will serve as the stem of the flower.

We warm the bottom of all the petals with a lighter and slightly tilt the edge downwards, away from the front side.

Next we attach the two upper side petals. We place them horizontally relative to our middle, on its wrong side, near the wire.

Next we glue the top petal and only then place the two lower side petals. We glue all the parts at the bent bottom edges and place them around the wire. All petals should not be pressed tightly together. But if you get an unsightly edge on the reverse side, then it is better to cover it with a small circle of suede.

Don't forget that there will be two flowers on the branch. And we move on to making one bud. Cut a strip of yellow suede 1 cm wide and six cm long. Divide it into 3 parts and round two corners on one side. We get three long petal shapes. Then we tint the upper part of these blanks green. We wrap a small piece of wire with tape and attach a small ball of foil on top. The petals should be slightly higher than the foil part.

Then we simply glue all the petals in a circle onto the foil. The bud is ready.