First, let's look at the types of sundials. There are three types of solar timekeeping: horizontal, equatorial and vertical sundials. At home, the easiest way to do the first two types.
Equatorial. The surface of the dial is inclined relative to the ground level at an angle equal to 90 degrees - the latitude of the area and turned to the polar star (to the north). The arrow relative to the dial is perpendicular and can be a regular pin. The clock markings on the dial are every 15 degrees.

Horizontal. The dial is on the ground or stand strictly horizontally. The arrow is a triangle with an angle equal to the latitude of the area. The direction of the arrow is north. The division of the dial into hours-sectors is made according to the formula.

How to make a sundial
Equatorial.
- On a piece of plywood or plastic, we draw a dial with division into hourly sectors every 15 degrees.
- We insert a pin or stick of any length perpendicularly into the center of the dial.
Now you need to set the clock correctly.
- We give the finished dial an angle of inclination, using a stand. The height of the stand (tilt angle) is determined for each area separately. For example, for Moscow, the angle would be 90 degrees minus 55 degrees (northern latitude) = 35 degrees. Accordingly, if you live in Volgograd, then from 90 degrees you need to subtract the latitude of Volgograd (48 degrees).
The latitude of each city can be found on Wikipedia.
- Having found the angle of inclination of the dial, we orient it on the ground, directing the now inclined arrow to the north.
The disadvantage of such watches is that they will only show the time for half a year, but in winter they will be in the shade.

Horizontal.
These watches are very easy to make with your child.
- Cut out of plywood or plastic with a gnome (triangular arrow). One of the angles is straight (90 degrees), the second is the latitude of your city. That is, in Moscow, it will be a triangle with angles of 90 and 55 degrees, and in Volgograd - 90 and 48 degrees.
- We install a triangle in the area where we have planned hours, oriented by the compass, to the north.
- We start a timer, and every hour we go out and note the divisions.

This presentation presents step by step description creating a vertical sundial from improvised materials.
If anyone does not play the presentation, there is a written description:
You will need: Pencil Protractor Compasses Compass Square Clock locationIn the figure, line AB defines the surface of the wall on which we want to install the clock (top view). Panel 1234 installed perpendicular to the wall and aligned horizontally. Determine the meridian line NS , draw a line EW parallel to AB . From the point where the lines intersect D draw a DC line perpendicular to W.E. CDS angle there is a turn of the wall.
Now to calculate the vertical clock we need3 magnitudes 1. Size gnomon along the line of its orientation to the north SD (projection gnomon on the dial of the future hours) ; 2. In the height of the gnomon SH (angle , constituting a gnomon with dial surface) ; 3. Regulation hour lines on dial ● Step 1:
Draw a horizontal line AB. From point C draw a perpendicular cd so that would adb formed a semicircle centered at a point C
● Step 3:From point C from the opposite side CG draw CJ so that the angle DCJ equal to the angle of rotation of the wall. Dot K lies on the line CJ at a distance equal to GH (you can use a compass). From a point K parallel to AB a segment is drawn KL to the intersection with CD
● Step 5:Draw KP parallel to the line CD before crossing the line AB at point P . Define a point R on a semicircle so that the line MR was equal to the segment KP (use a compass). connect the dots C and R.
The last step is to define the hour lines. To do this, we will make a new drawing. From the previous constructions, we need segments AB , CD , CN and CR .
On the continuation of the line CN select point M and draw line ST perpendicular to CN. CM size will determine the final look of the watch face, so choose the appropriate paper size.
Draw ME so that CR was perpendicular. Define a point O on the extension of the line CN so that ME and MO are equal.
From the center O draw a circle of arbitrary radius. Line crossing CD and ST indicated by a dot d . connect the dot O with dot d .
From the Od line divide the circle into 15-degree sectors. Extending radii to a line ST determine hour marks.
ConclusionAll that remains to be done now is to make and fix the gnomon. The height and size of the gnomon were determined in the first two stages. It can be made in the form of a triangle, fixed at a point C perpendicular to the plane of the dial, along the segment CN.
When mounting the clock on the wall, align dial so that the noon line of 12:00 o'clock is vertical.
Very useful tool. And extremely entertaining for kids. In addition, if you approach the matter on a large scale and creatively, you can make not only a cardboard model, but also a whole composition that will decorate your garden or country cottage area. So let's see how to make a sundial with your own hands. And first of all, consider the device models.
What can be a sundial?
Throughout its history, mankind has invented four types of such watches:
- horizontal;
- vertical;
- polar;
- equatorial.
What can you do yourself?
Of the listed sundial with your own hands, it is easiest to build the following:

We already know approximately how to make a sundial with our own hands. But let's turn to detailed instructions?
Homemade equatorial clock
We will make a model of a sundial with our own hands according to the following scheme:
- We cut out a suitable circle from plywood, plastic or thick cardboard.
- We take the good old protractor and make markings every 15 degrees. In the middle we have 12. 11, 10, 9, 8, 7 go to the right side of the number. 1, 2, 3, 4, 5 and 6 go to the left side of twelve. Thus, we will have a kind of semicircle in front of us, which will "lie" on the most convex point.
- You can simply apply these numbers with a felt-tip pen or pen, or you can approach the matter with enthusiasm and arrange it all beautifully.
- In the middle of the semicircle, right above the "12" mark, we insert a straight stick, rod, pin, or something similar.
- How to make a sundial with your own hands next? Now the most important thing is to position the structure under right angle. As we said, it should be related to the latitude of the point where you are. This can be found out both on a geographical map and by turning to search engines, Internet encyclopedias.
- How do we determine the correct degree of inclination? From 90 we subtract the latitude of your location. For example, you are in Moscow. This is 55° north latitude. So 90 - 55 = 35°. At 35 degrees we will tilt our dial.
- Got it sorted out. Now we determine where the north is. It is there that the arrow and the "face" of our watch should look.

Do-it-yourself equatorial sundial can be done like this. Their disadvantage is that in winter the device will not correctly show the time.
Cardboard equatorial clock
It is possible to make a sundial with your own hands from cardboard. We act according to the instructions:

Horizontal sundial
The easiest way is to make a sundial of this type with your own hands for children. Begin:
- We cut out a gnome from a dense material - an arrow for our device. Here we also need a protractor - we make one corner straight, and the one that will lie on the dial must be determined - it will be equal to the latitude of your city. Let's take Moscow - for this settlement the given angle of the gnomon will be equal to 55 °.
- The arrow is installed at a calculated angle on a solid base - plastic, plywood, etc. You do not need to apply divisions yet.
- We set the sundial on the ground so that the tip of the calculated angle will look south, and the sides of the triangle emanating from it should rush to the north.
- It is important that our design is static.
- And now it's up to observations on a sunny day. Every hour we apply the appropriate division in the shadow of the gnomon.

Sundial in the country
It is not bad to make a sundial in the country with your own hands - horizontal or equatorial. It's not only useful craft, but also a curious thing for children, an element that decorates the landscape. Since the clock will be in an open space, not protected from the elements, these facts must be considered when making them:
- First of all, choose the sunniest area that is not obscured by buildings and trees, level it.
- Can be used as a dial ceramic tiles, stone with flat surface, cut logs, large decorative plate, a metal cover from a tank. Looks great on the photo sundial, equipped with their own hands on flower bed.
- You can simply level the area, fill it with sand, and then lay out the divisions and numbers with pebbles. You can use acrylic, enamel or other durable paint.
- Gnomon is also made of durable materials - plastic, wood. In the case of an equatorial clock, you can use a metal rod, a pin.

About other types of sundials
We have figured out how to make a sundial with your own hands - horizontal and equatorial. If this seemed not enough to you, then you can try to create experimental models of other varieties.
Polar sundials are characterized by the fact that their dial line is horizontal, elongated in the east-west direction. The gnomon is a rectangle lying in the middle of the dial on its wide side. Digital divisions are applied to the right side (from the gnomon) from 1 to 6, to the left side (from the gnomon) from 12 to 7. The markup is placed every hour along the shadow that lies from the rectangle. It is also important here, as in the case of equatorial clocks, to tilt the dial according to the latitude of your location.

Vertical sundials are difficult because they need to be made on a surface perpendicular to the earth, always on the south side (for the northern hemisphere). If this is a wall, then you should take care of how you will mount the arrow on it. The dial is parallel to the horizon. After you have set the hand (just above the base of the dial), a plumb line descends from it - it sets the time of noon. Other digital designations are applied in the shadow of the gnomon.

Note to the master
Here we have dismantled everything practical instructions. We would also like to conclude by presenting you practical advice:
- Sundial"work" while our main luminary is visible in the sky. Therefore, you should not put time on the dial after sunset or before dawn - this is extra work.
- The expression "works like clockwork" does not quite apply to our invention. Due to the peculiarities of the fluctuating daylight hours, time on them will rush in the spring and lag behind in the fall. Therefore, it is not necessary to make the construction monumental in order to be able to adjust the divisions of the hours in accordance with the season.

Making your own sundial is interesting, easy and educational. This is not only an educational toy for children, but also a great decoration for a summer cottage!
Hello, dear readers of KARTONKINO.ru! Spring ... Somewhere it is already in full swing, somewhere it is only expected to arrive, in a month or two, but the sun shines brighter and longer everywhere. And we have a great opportunity to put the sunshine into action by making do-it-yourself sundial. Of course, they will not replace the traditional - mechanical and electronic - watches, but this homemade product is very entertaining, and for the younger generation it is also educational, because the model of the sundial that we will be making is the most effective one, and its manufacturing will require certain knowledge in the field of astronomy and trigonometry.
There are many varieties of this ancient instrument for measuring time. But among all the variety of sundials ever used, the following types are distinguished as basic or classic:
— equatorial(for such a sundial, the plane of the frame (dial) is parallel to the equator, and the gnomon (the part that casts a shadow), usually a metal rod, is parallel to the earth's axis);

Equatorial sundial on the banks of the Thames (London, England)
— horizontal(the plane of the frame is parallel to the plane of the horizon, and the gnomon has the shape of a triangle, one of the sides of which is inclined to the plane of the frame at an angle equal to the geographical latitude of the place where the clock is set);

Horizontal Sundial (Limassol, Cyprus)
— vertical(as the name implies, the dial of such watches is placed in vertical plane usually on the walls of buildings).

Wall sundial (Ely Cathedral, England)
We will make an equatorial-type sundial, as the easiest to manufacture. Due to the fact that the dial is set parallel to the equator, and the sun moves almost uniformly across the celestial sphere, the shadow from the gnomon will shift by an angle of 15 ° every hour. Therefore, the hour divisions on the dial are applied in the same way as in ordinary watches, only the marks are needed not 12, but 24. It is clear that the upper part of the dial is unlikely to be useful, except for the inhabitants of the Arctic, when the polar day comes, and the sun will shine around the clock.
There is no need to draw the dial yourself, you can use ready-made templates - round or square (whichever you prefer):
Our task is to correctly orient the sundial in space. The angle of inclination of the dial relative to the horizontal plane is determined as follows:
α=90°-φ ,
where φ is the geographic latitude. You can find out the latitude of your place of residence on the map or on Wikipedia.
And knowing the required angles, it is very easy to make an inclined stand made of cardboard or paper for our sundial and then stick a printed dial on it or prepare a scan of the watch case with a printed image of the dial in a graphic editor.

We know the dimensions of the dial template. The side of the case is a right triangle. Thus, we know the length of the hypotenuse C and the angles of the triangle, and the lengths of the legs A and B are calculated using trigonometric formulas:
A=C×sinα
B=C×cosα
It remains only to draw a scan according to the obtained dimensions, even without side walls.
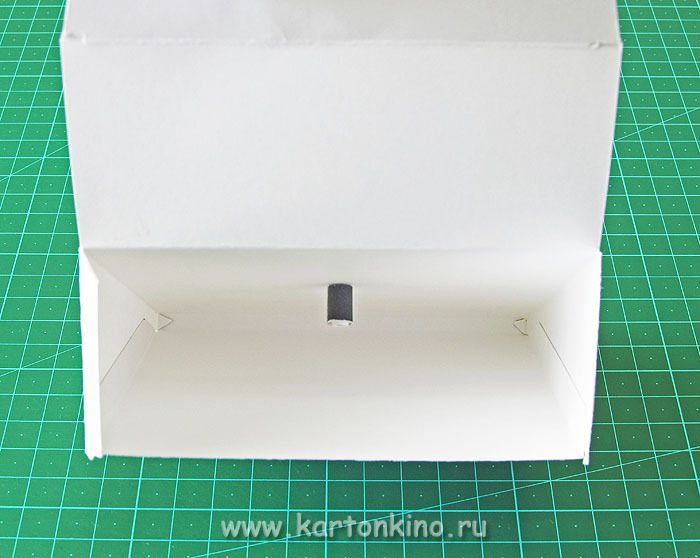
I made a case with opening back cover(I'll explain why below):


Whatever you do, you still get the box
Well, now in the center of the dial you need to install a gnomon. To do this, you can use any rod that is suitable in size (for example, a plastic tube from a juice bag). And you can also make it out of cardboard or paper:
- cut out a rectangular strip 60 mm wide (we determine the length empirically, by eye, so that when folding we get a dense tube with a diameter of about 5-6 mm with a small hole);

- stick double-sided tape on 1 edge and fold the tube;


- cut out another rectangular strip 15-20 mm wide and also fold it into a tube with a diameter that matches the diameter of the opening of the first tube;

- cut off part of the first tube at a distance of 10 mm from the edge (it will be something like a nut)
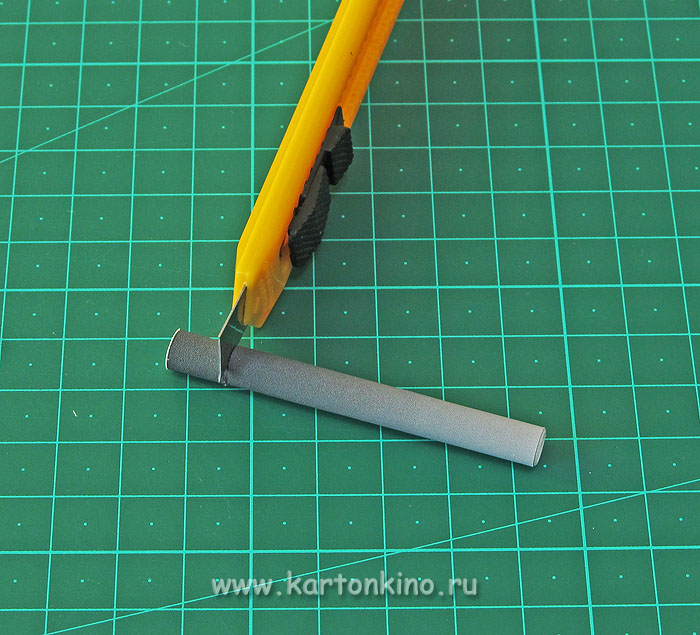

and connect the details;

- fix the gnomon on the dial, fixing it with reverse side“Nut” (this is where the opening lid came in handy).


The sundial is ready. Now, in order for them to work correctly, you need to put them in a place lit by the sun (on a windowsill, on a balcony, etc.) so that the gnomon “looks” to the north (we determine the direction by the compass).
Of course, to wait for the exact match of the readings of such a sundial with the readings conventional watches not worth it. First, a sundial showing the true solar time, do not take into account standard time in a particular area. Secondly, do not forget that the magnetic and geographic poles of the Earth have a discrepancy, and the fact that we oriented the clock along the magnetic pole will also introduce some error.
And finally, the main point, which will also have to be reckoned with, is that the equatorial clock works only between the days of the spring and autumn equinoxes. The rest of the time, the upper surface of the frame will be in shadow. But the day of the vernal equinox in the northern hemisphere is coming soon, so the wait is not long. Just enough time to make a sundial with your own hands and set it to work.
Successful experiments!
Liked the article? There is still a lot of interesting things ahead - subscribe to updates and receive announcements directly to your inbox!
By the way, a new master class on making a sundial is already ready. This time we are talking about a pocket watch model of a horizontal type.

See you soon in KARTONKINO!
In the modern world, a sundial looks at least exotic, and in most cases it is a banal decor - a decoration for a summer house or a plot of a residential building. But we should not forget that in ancient times it was a very useful and functional thing, the accuracy of which even some modern products of this type may well envy. If the sundial is made correctly, then it may well compete with yours. wrist watch. You can make three different ways, which will be discussed in this article. Together with the website, we will get acquainted with the question of how to make a sundial with our own hands - we will talk about three varieties of these items and their proper manufacture.
Equatorial Sundial: DIY
This is a very simple sundial to manufacture - this is due to the fact that the divisions of their dial are the same and are 15 degrees, which corresponds to one hour. In principle, this is where everything simple in these watches ends and difficulties begin - watches of this type must be correctly installed, which in itself is difficult. You need to install such a clock simultaneously in two planes.
As for the direct manufacture of equatorial sundials, everything is very simple here. For them, it is better to use a hard material like plastic. First you make a dial with a gnomon, then you think about how you can set it obliquely, but also orient it to the north, after which the clock will work. By the way, the angle of inclination of the gnomon can be easily adjusted with a protractor with rulers - the drawing tool has a special lock that allows you to install between a pair of rulers desired angle. By the way, for our hemisphere, the clock must be directed to the true north pole, but if you make a clock while in the southern hemisphere, then the gnomon and dial should look towards the true south pole. In this case, the dial will also be a little different - it will be a mirror image of a sundial for the northern hemisphere of the Earth.
You can see what a sundial can be in this video.
DIY horizontal sundial
A distinctive feature of watches of this type is the horizontal arrangement of the dial - only the gnomon is oriented to the true pole of the Earth. On the one hand, this is good easier technology manufacturing), but on the other hand, not so much, since setting the clock looks very problematic. In such hours, the shadow from the gnomon does not move the same distance during the hour, so you need to be patient and wrist watch. Divisions will have to be applied in accordance with a mechanical or electronic chronometer. Such watches are made as follows.

In even hours, we simply put marks where the shadow of the gnomon points.
After the marking of the dial is completed, the watch can be fully used. In principle, they can be used immediately after installation, but without divisions, you can determine the time exclusively intuitively.
How to make a polar sundial for the garden
The beauty of this solar chronometer lies in its dial - it is not round, like most illogical instruments, but linear. The shadow from the gnomon moves along it in a straight line, which greatly simplifies the technology of manufacturing a sundial. By and large, this is all the same equatorial sundial, only their gnomon is not a pin, but a stick located across the so-called dial. The divisions in such watches are also applied unevenly, which makes it possible to assert that this type of sundial is a kind of hybrid between the first two options. Do-it-yourself polar sundial is made as follows.

In principle, there is a fourth version of the sundial, which is very difficult to manufacture and set up - this is a vertical, or, as they are also called, wall-mounted sundial. They are more convenient to use, but for their assembly you need very accurate calculations and very jewelry (no less accurate) production.

DIY sundial photo
In conclusion, the topic of how to make a sundial with your own hands, I will say a few words about the materials. Their choice entirely depends on the purpose of manufacture. If this is pampering or just a teaching aid for children, then the chronometer can be made of cardboard. If you want to make a really working model and use it to determine the time, then you need to choose more reliable materials. In this case, the dial can be made of concrete (as an option, cut off the surface natural stone large size), and a steel gnomon - such watches can be safely left in the fresh air, and at the same time they will last a very long time.


