The game of darts is in great demand in the company, because it allows you to demonstrate your dexterity and accuracy. Darts can be played by adults and children, alone and in a crowded company, which is why everyone should have such a game. You can buy darts in toy stores or entertainment stores, but you can make such a game yourself. In addition, high-quality darts cost a lot, and there is no point in buying a cheap one, because even darts will not hold in it.
There is nothing difficult in the manufacture of darts, the main thing is to follow the manufacturing technology and choose quality materials. It will take no more than four hours to make this game.
It consists of a target board with drawn sectors and numbers, and it also comes with darts that must be balanced and easily stuck into the board.
How to make darts
Darts in ready-made games are a construction of four main parts: a metal body (in the form of a torpedo or a drop), a sting, a shank and plumage.

Now you can play darts, but you should remember some nuances. You should try to hold the dart in your hand so that its tip looks exactly at the intended point on the target. The body of the thrower should be slightly tilted forward and motionless. Choose a comfortable and stable posture. If a person is right-handed, then his sock right foot should touch the throw line with the little finger, but it is important not to step over it. The shoulder (also right for a right-hander and vice versa) must be turned forward, and left hand should be pressed against the stomach. This position not only allows you to free up space for the throwing hand, but also reduces the distance to the target. The throw of the dart is made by the movement of the elbow and wrist parts of the arm. You should not throw a dart like a heavy stone or ball, taking your hand far back and swinging sharply. The darts are light, and the distance to the target is usually not great. Even if something doesn’t work the first time, then after a while, training will help you throw darts easily and accurately.
Playing darts can be a great way to brighten up time with friends. Not everyone has a good darts, and it is expensive, and cheap toys are not even worth buying, as a rule, darts do not hold in them.
You can make a good darts with your own hands, in this article I will show you the simplest example, and what your imagination will reach, we will surely see in the photographs you published.
The most important thing in darts is good darts that fly smoothly and stick well into the target. In second place in the game is the goal itself, a board with drawn circles and numbers. I won't show you how to make a target, you can just print it out on paper, here's a drawing of a dart target:
ATTENTION! Playing darts can become unsafe! Throw darts only at the place intended for this - the "target". Place the target for darts in places where the passage for people is limited, in no case hang the target on the front door.
To make darts, you will need matches, thread, a piece of paper, a needle, scissors, a blade or a sharp knife, drawing supplies.

Draw and cut out an even square with sides about 9 centimeters. Next, we will bend our square diagonally.

Fold a square of paper as shown in the photo:

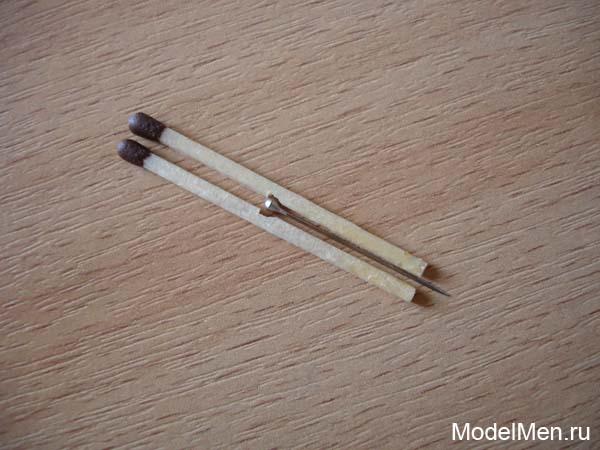
There are several ways to build a dart, let's start with the first. Take two matches and attach a needle to them so that it protrudes 5 mm forward. Where the hat (eye of the needle) lies, cut out the recesses, in the future they will not allow the needle to fall into the dart.
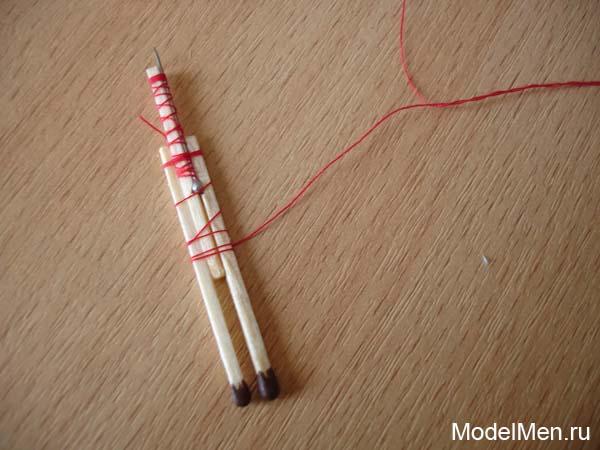
Now attach a needle to one of the matches with the help of threads.


Without cutting the threads, insert our previously prepared square of paper between the matches, now it will serve as a stabilizer for the dart.

Wrap the threads from two sides with one more match.

So our dart is ready, you can start the game, though it’s not very interesting to play with one dart, so I’ll show you the second option for making a dart.
Take a good even match and cut off the head with sulfur from it.

As in the first case, we cut out a recess in the match for the needle head and wind the needle with thread.

Without cutting the threads, we wind two more matches as shown in the photo.

Attach the target to the wall and start playing.

The darts we made will stick very well into any target, because they have a very thin and sharp needle. Homemade darts with high-quality assembly fly very smoothly and smoothly, enjoy the game of darts.
Darts - sport game in which the competitors throw three darts at a time at the target trying to knock out maximum amount points. Appeared over 200 years ago.
This is one of the most available species sports, where there are no criteria for the physical condition of the player.
What are darts for professionals made of?
The game is played with darts and special round target, labeled into sectors. The dart consists of several parts: plumage, shank, barrels (the main body of the dart) and the tip. Barrels are brass, nickel-silver, and tungsten. Brass- the metal is cheaper, but less dense than tungsten or nickel. Brass darts will be noticeably thicker than tungsten darts, which is why professionals choose tungsten, since thin darts are more convenient to hold and throw.

Intermediate players tend to get nickel-silver dart. They are stronger than brass. Brass is used by beginners.
Depending on sharpness tips, darts subdivided into "SOFTIP" and "STEELTIP". First variety- darts with a blunt end, which are used for playing electronic darts. Second- with a pointed tip for throwing at standard sisal targets.
The plumage is necessary to stabilize the flight of the dart. Allocate three main types of plumage: hard, flexible and nylon. solid(made of polyester) is the most durable. flexible plumage (made of soft plastic) - the most economical option. Nylon plumage, which is chosen by professional darters, the most durable and practical.
Targets for classic darts made from pressed sisal(fibers of the agave plant). The sisal array is attached to chipboard circles. Professionals use a target made by seamless formation technology canvases. The absence of seams makes the target more durable.
Sectors targets delimited by hard wire mesh. The grid is lamellar, round, or triangular. Pros choose lamellar mesh. It does not deform from hits, does not crawl out of sisal.

Photo 1. Sectional view of a professional sisal dartboard with Harrows Pro Matchplay wire.
Do-it-yourself paper and cardboard target
To create you will need:
- Thick cardboard.
- White paper.
- Acrylic paints or markers.
- Brush.
- Pencil.
- Ruler.
- Compass.
The target consists of several circles. On a piece of paper with a compass draw three circles:

- radius = 6.35mm("apple").
- radius = 107 mm(ring of "trebles").
- radius = 170 mm(ring of "doubles").
From each ring you need retreat inward by 8 mm and draw circles. Everything is round the field is divided into 20 equal sectors. Under each segment, a number is written indicating the number of points.
Now you need colorize target to be bright and clear. The colors that will be required for this - black, green, red, white. First, the wedges of the field are painted alternately in black and white colors (segment with 20 points - black, 1 - white etc.). The part of the ring rim above each black segment is painted over in red, and above the white segment in green. The center of the bullseye is red, the ring around it is green.
Attention! There are many options on the Internet, both black and white targets, and colored ones, which can be printed on a printer full size and, if necessary, colorize.
A sheet of paper is glued to a thick cardboard base. Once the product dries, it can be hung on the wall. Fix the target on the wall in such a way that from the center of the target to the floor was exactly 173 cm. The line from which players throw darts is located at 237 centimeters from the target.
You will also be interested in:
Making darts

Materials:
- toothpicks or small twig.
- Needle or acute pin.
- Insulating tape.
- Knife.
- A thread.
- Glue.
- Paper.
- Ruler.
- Pen or pencil.
How to make a wooden shank?
For the manufacture of a dart is taken 4 toothpicks, which are tightly wound with electrical tape in such a way that a square bundle is obtained. Instead of toothpicks, you can take thin branch of a tree(preferably elm). A fragment is cut off from a branch about 8-10 cm long. Further, the bark is removed from the workpiece and the electrical tape is wound on one edge of the wooden fragment, as well as in the middle. From the end, where there is no electrical tape, two perpendicular cuts are made. The plumage will subsequently be attached to these grooves.
A small sharp pin is inserted into the tip of the product or a needle. The tip of the future dart is wrapped tightly with thread until the point is firmly fixed in place. You can add some glue for strength.
Paper plumage attachment

To make plumage, it is taken paper. It depicts a small square (side is approximately 5 cm).
The dotted line inside the square denotes fold lines (only two lines, located either crosswise or perpendicular each other). The square is bent in such a way that an "asterisk" is obtained.
If the body of the dart was made from toothpicks, then the plumage fastened between toothpicks. Due to the fact that they are tightly pressed against each other, fixing the plumage is not difficult. If it is a branch, then the plumage is inserted in pre-made cuts - grooves.
Darts or darts is a game that many people like. In addition to being fun, this game is also good for concentration. The game of darts can be purchased in stores, but we suggest that you do not rush to the store, as we will look at how to make this game at home.
First, we will watch a video on making a darts game, after which we will repeat the process
What we need:
- A4 sheets;
- scissors;
- glue;
- needles;
- box;
- matches;
- a thread.

First of all, we must print the target on a sheet of paper with a regular printer. The target template can be downloaded from the Internet or made by yourself in a graphics editor.
Next, let's move on to making a dart. To do this, take four matches and a needle. We place the needle in the middle of four matches and wrap them with thread. The construction must be strong, so the thread must also be wrapped firmly and tightly.

We fold the square at the corners so that we get a triangle. Next, fold over the other two corners.

Now we need to fold our square so that we get an asterisk with four ends.


We put our asterisk between the matches with a sharp end to the needle and fix it with a thread.

Dart is ready.
Now you can start making the target. To do this, cut out a square from the box and stick a sheet with a target on it.

This is how you can make one of the most popular and beloved games in the world in a matter of minutes. At the same time, there are virtually no manufacturing costs, since all materials are probably present in all houses.
At the dawn of his darts, even before his first target made of Chinese pressed cardboard, the author of the text already understood that just a target on the wall was categorically wrong. The wall must somehow be protected from local snipers. Just coming to the store and buying is not an option at all, we do not live in England. It became clear that you need to somehow draw your own protection on the wall. And the author of the text had already begun to think about what size the protection would fulfill its task, but there was a collapse in the form of buying the first target from Chinese pressed cardboard.
It was not possible to fight with common sense for more than 7 minutes, and the target was hung on a bare wall. Well, just take a look at least with one eye with the whole family: what kind of thing is this - some kind of darts there. After another 15 minutes, it became clear that the decision to "see what kind of darts it is" was just common sense, because. no matter how large the protection on the wall was planned, it still would not have coped with its task.
It is completely incomprehensible to the author of the text for what reasons the standard protection on the target is made with a diameter of something around 70 cm (with a target diameter of 45 cm). The size of 70 cm, which is completely illogical from any side. Those who have been throwing for a year already, in principle, do not need protection on the target. For those who have just bought a target, protection one meter per meter will be too small, however. And who the standard ~ 70 cm are aimed at is a mystery shrouded in darkness. A protection of 70 cm is a completely useless and extremely incomprehensible size of the principle of "average temperature in a hospital" - for some it is absurdly large, for others it is categorically insufficient.
So what is the right size of protection, the attentive reader will ask. We in the family received the answer experimentally after the first 2-3 months of bullying the wall where the target hung. The area of irreparable damage was measured and at the same time the size of the correct protection for the target was found - it turned out 100 by 105 cm. 100 in width and 105 in height. It was decided to make a protective shield of such dimensions. Moreover, to make it beautiful and indestructible, and to cover all these terrible destructions with it.
The first shield was a variant of trial and error. It was decided that the main area will be made of hardboard (hardboard) with a thickness of 5 mm. Hardboard 5 mm thick is stitched with a dart at a time. Therefore, the hardboard was screwed onto a frame of wooden bars so that there was a gap between the wall and the hardboard. All this turned out to be long and dreary, because. it was still not clear what method of attaching the target to the shield would be used - accordingly, it was not clear in what places the hardboard with reverse side bars should be located so that the target fasteners are attached to them, and not to the air behind the hardboard. In the end, the frame of the bars was built so that it was suitable for two different types cool and expensive overseas fasteners, and the target was eventually hung on the backboard using the simplest standard fasteners that come with every normal target.
Hardboard on wooden bars was wrapped in carpet. The carpet is screwed to the bars. It turned out beautiful, powerful stationary protection. I hung it on the wall and forgot about the nerves from missing the target, and the eye rejoices. It cost about a piece for consumables, more than half of which is a carpet.
Turned out nice but loud. There is air between the hardboard and the wall. A hardboard sheet measuring one meter by a meter with air between itself and the wall, and after a good hit with a dart, makes a good and booming sound. Even a good carpet on hardboard does not save. Didn't change anything. That's how we live.
About a year later, another shield had to be made. His task is different. This is not a stationary backboard on the wall, but a mobile backboard on a portable stand to provide a warm-up game boundary in our tournaments. The second shield was made taking into account the mistakes of the first shield, and it cost not a piece, but one and a half. And all because of the same carpet - the most expensive component. There was twice as much carpet for this shield for one simple reason. He hung a stationary shield on the wall and nothing is visible from behind - which means that the carpet is not needed there from behind. And a mobile shield is a completely different shield - they can also look at it from behind. And there are a lot of people who can do it. Therefore, it must be completely wrapped in carpet, and have a presentation from everywhere, and therefore it is no longer a thing, but one and a half for consumables.
And of course, no hardboard on wooden bars. Plywood became the main bearing structure of the shield. I wanted to use plywood 4 mm thick, but there was no such thin one in the local store and I had to buy 6 mm. She is 4, that 6 mm will be sewn through with a dart if a novice throws a dart with a cry of "this is Sparta!", But this is not critical, because. there is no wall behind it, but it just hangs on a rack for itself and let it be stitched through itself - it’s neither hot nor cold for anyone. But the weight for a mobile shield is critical. Therefore, 4 mm plywood was planned, not 6. In the stationary shield version, I would highly recommend 1 cm plywood, and then do almost everything with it exactly the same way as I did with my 6 mm mobile shield.
First, we cut in size 100 by 105 cm - this is taking into account the fact that a person who is at the dawn of his darts can throw at a target in tournaments. By the way, for a stationary version, I might not even have sawn, but I would have made it from a standard plywood size one and a half meters by one and a half meters - it is so more reliable, more monumental and larger than the interior in the apartment, only there will be even more expenses for the carpet. Then, for sound absorption and dart-proofing, we glue the plywood on both sides over the entire area with 5 mm thick polyethylene foam. PVA glue is perfect. But actually, this is my shield with a 5 mm polyethylene foam layer. If I were now making another such shield, and even more so a stationary shield, and not a mobile one, then I would paste over it with polyethylene foam not 5, but 8 mm thick. A dart will definitely not pierce such a puff cake and the sound from the impact will be better swallowed. Then he wrapped the whole thing with a carpet and screwed the carpet to the plywood. All screws are screwed from the back side of the shield along the perimeter of the shield and along the edges of the carpet with 15 mm screws, where 1 or 3 layers of the carpet are screwed, and with 20 mm screws, where 5 layers of the carpet are screwed - after the bends of the carpet in the places of its layering, exactly 5 layers come out on these curves and layers. In front of the shield, the screw heads are completely absent. The carpet under the bends is cut very competently, as a result of which the shield looks perfect, both in front and behind. In the photo, the finished shield itself, plus a portable shield stand and a portable additional light on the sides of it.

In theory, it is more correct to mount the light on the shield, but so far there is not enough money for it, and therefore the shield is still without light in the kit. We'll fix it over time. The shield in this form can be safely mounted on any wall as a stationary protection - on screws of the correct length around the perimeter of the shield + 1-2 attachment points in the center so that they are strongly along the edges of the shield and under the target during operation.
But we have a mobile shield project, so we are finalizing the shield for a portable stand. Doing this is not very pleasant, because. you need to drill through the shield in 5 places, and if you drill in the wrong place, then the tears of disappointment can be even larger than unnecessary holes in the drilled carpet. Mdya. First, we drill 3 holes for the bolts on the fasteners, which will be the connecting link between the shield and the rack. Just in case, the washers are hefty on both sides, so that the holes in the carpet do not crawl out from under them. It is necessary to drill where the target will then close it all by itself. Here is the front view.

Above the central bolt is a homemade penny fastener for hanging a target on it. Fixture for the target became me consumable, because the target is busy with itself here and there, and everywhere it must be hung on something. It’s easier to leave the fasteners once in a new place than to install them again when you return there again. Therefore, fasteners for the target are a penny consumable, which is manufactured as follows. We go to the hardware store and buy a couple of such gizmos there.

Then we take a dremel, a grinder, a metal file (depending on what is available), we give it to our son and puzzle him to cut the whole thing as it should, so that he chews grubs for good reason. Then we do the same with a drill / screwdriver and get holes on the side of each homemade fastener and a bunch of such fasteners.

But we digress. Here is a rear view of our mobile shield. Not everything, but only the place for which it will be hung on a portable rack. By the way, the weight of the shield came out tightly under 10 kg. Plus 5 kg target.

But attaching a shield measuring a meter by a meter to a rack only in the center is not entirely correct. Or even completely wrong. You need at least 1 more point of attachment to the rack on the perimeter of the shield. This point should be as far as possible from the target, i.e. it turns out that it should be from below and as low as possible. We will fasten it with a clamp and under it we drill two holes in our carpet and drive two more bolts on washers there.

The reverse side of the two bolts. Above them you can see one of the screws with which the carpet was screwed to the shield from the back.

The collar is like this

And this is already a stand assembly and you can see how it is normal and correct, the shield is attached to the stand by means of a clamp.

Stand on the reverse side in full growth.

Full length front stand.

This is what the rack looks like with the target in a completely ready-to-use state.

And this is how the target looks on the new shield - if the target was only out of the box, then it would not be a shame even on the cover of any glossy magazine such a photo of such a shield.

By the way, all targets, except for the Winmau Blade 4 Dual Core target, which comes with 3 steep adjusting legs, are now attached to protective shields using two such corners for two screws.

Three birds with one stone are killed. Firstly, it is extremely easy, convenient and very fast. Secondly, the target will definitely not move after fixing. Thirdly, through the hard corners, the energy from the impact of the dart is much better transferred from the target to the shield than without them - and the target will last longer.
Well, in general, somehow this is how it happened. I hope my experience is useful and you will make fewer mistakes than me.
Who cares to look at the photo, you are right there - nevertheless, photos of 10 megapixels will be more visible than 500 pixels in size on sports.ru.


