A few days ago we showed 35 ideas, . Would you like to get such a handy thing, but don't know where to start? In this collection of tutorials, you will see 5 easy ways to make a DIY craft case.
- the basis - in most cases - were old suitcases ( different sizes and original form);
- the authors converted both the main compartment and the inside of the lid for storage;
- no special skills were required;
- if the suitcase is a travel suitcase, before starting the renovation, the old lining was completely removed from it so that the frame opens;
- all methods are extremely economical (with rare exceptions, you don’t have to buy anything - just what was found in the needlewoman’s house is enough).
Check out 5 tutorials on how to turn an old suitcase into a cute craft case and make yourself even better!
__________________________
do-it-yourself handicraft case, master class No. 1 “simple and tasteful”:

Needleworker Vanessa offers an easy way to transform even the oldest and most boring suitcase. For this you will need inexpensive materials and minimum skills.
before:
Even if the suitcase is pretty on the outside, its lining is rarely as beautiful. Feel free to remove it and paint the inside of the suitcase in some nice color - for example, green. Then cut out two blanks from cardboard (according to the shape of the bottom and the inside of the lid) and glue them with paper (or cotton cloth) in a flower. In the cardboard for the top, make holes for the elastic bands, thread the elastic bands and tie with reverse side, then glue the cardboard on the inside of the lid and frame it with a beautiful braid.
Now the lid of the suitcase will help you always keep scissors, reels, needles and other necessary little things at hand. And in the main compartment you can store the remains of fabrics, braid, needles, pins and buttons.
__________________________
do-it-yourself suitcase for needlework, master class No. 2 "journey to the land of creativity":

One Swiss needlewoman loves retro things self made and cannot imagine his life without traveling. All these hobbies were combined in a nice little case for needlework, which she made with her own hands.
The basis for the "magic chest" was an old boring suitcase. Its sides were painted white, and the standard upholstery was replaced with a floral fabric. And the shabby thing turned into a nice vintage hand-made.
The suitcase has also been transformed inside. The dark bottom was covered with a fabric in a bright cell. Inner part the lids were decorated with multi-colored fabric pockets — not only beautiful, but also functional. They can store large items. For skeins of braid and cuts of fabric, small baskets and containers are suitable. And elastic bands and small pockets on the sides will help organize the most small items(needles, pins, coils).
__________________________
do-it-yourself suitcase for needlework, master class No. 3 "sweet life":

Just look at this suitcase! Bright prints on the outside, old pages on the inside. Such a thing is usually expensive, but you are quite capable of making it yourself.
The base is the same old suitcase. We will decorate it not only inside, but also outside.
before:
For the design of the outer part, Amy chose a fabric with appetizing prints of sweets. If you do not find exactly the same, you can choose any other, but be sure to be bright and with an interesting pattern.
The interior looks especially luxurious. All thanks to the unusual decor from ... the pages of the old dictionary, which are pasted over the bottom and walls.
Amy made the lid of the suitcase not only beautiful, but also functional by attaching small plastic jars to it. They can be put on superglue or attached using double-sided tape.
__________________________
master class No. 4 “like mom” - do-it-yourself suitcase for children's needlework:

Does your daughter like to sew, knit or draw? Give your little fairy a magical craft box just like Megan did. All you need is a small suitcase (not necessarily an old one!), a sheet of colored cardboard and a little imagination.
Attach the cardboard to the lid of the suitcase from the inside and cut the blank according to its shape. If there is no multi-colored cardboard, take a regular one and glue it with a cloth. Then make holes to secure the holders for the spools and knitting needles (they can be made from ordinary elastic). Glue the cardboard to the inside of the lid - a cute craft case is ready!
It can be difficult for children to keep order, especially in small things. Help them in this difficult task by equipping the suitcase with a container with dividers. Now buttons, beads, pins and other necessary little things will lie in one place and will no longer scatter all over the suitcase.
Are you inspired and want to do something else? Do not limit your creative impulses! Sew a pillow for needles, a bag for small things, a pencil case for pencils and felt-tip pens to complete the suitcase - yourself or involve your daughter in this. Now your child will be able to boast of original handmade things.
Hi all!
What is the most important thing in children's gift wrapping? Of course, it should be bright and elegant, with its very appearance causing a burning desire to hold it in your hands and quickly look inside. =) But it's even better if it doesn't look like a traditional box, even if it's an exotic shape, but will be associated with items from Everyday life. And if such a gift package, in addition to fulfilling its main function, is worthy of going straight to the shelves with toys, then this is generally a delight!
All these criteria are fully met by our new box in the form of a children's suitcase. In our family, she has already passed the “tests” and now perfectly plays the role of luggage and storage for all sorts of needs in her son’s toy farm. :)
Well, how about we do "tailoring of suitcases"?)
To do this, as usual, we need:
- a clerical knife and scissors (to cut a suitcase handle, it is better to use scissors and a knife for artistic cutting);
- ruler;
- a creasing tool (for example, a knitting needle, etc.);
- double sided tape.
You will also need templates for the suitcase, which can be downloaded here:
The choice of paper depends on the way the suitcase is decorated. You can take colored or design paper (in this case, use templates 1 - for the wrong side). Or you can take thick photo paper and print on it a suitcase unfolding with your own design created in a graphic editor (templates 2 are designed for this - for front side).
I just used the second option - I printed the finished scan on Lomond design paper with the texture of lizard skin.
Then I cut out the details of the suitcase,

Broke and bent.

Here the scoring scheme is very simple, so I did without double-sided printing and did not print the wrong side with dashed lines. Just then on inside I drew the fold lines along the ruler, connecting the corresponding corners. Looking at the template, it is not difficult to navigate.


After that, you can start assembling the suitcase.
First, glue the rear side flaps to the side walls.

Then we glue the inner parts of the side walls, filling the front valves. At the same stage, you can fold and glue the handle.

Now the lid of the case can be closed.

So, the locks are latched, the straps are tightened :)

To enhance the surroundings, you can stick a special sticker on the suitcase - everything is like in life =). And since this is still gift wrapping, then the sticker is appropriate, with congratulatory inscription"Happy birthday!"

By the way, to make this sticker, I used a special Lomond self-adhesive paper, on which I printed the prepared picture. But in principle, such a sticker is very easy to make using plain paper and double-sided tape.


This is how a children's suitcase made of paper turned out. And it turned out to be quite roomy - 90 × 65 × 25 mm. A lot of things can be put into it, ... if not all at once =).
Next time you will find another packaging exclusive - a box in the form of a candy! This will be a visual imitation of a candy like "Little Red Riding Hood", etc., only several times larger in size.
Don't forget to subscribe for updates , so as not to miss our new items and receive announcements of master classes to your e-mail!
See you at KARTONKINO!
The suitcase is a universal thing. It can be used in various situations and serve for various important cases. And how to make a suitcase with your own hands or transform an outdated model, we will tell you in this article.
We give a second life
Never rush to throw an old suitcase in the trash, with the right attitude, it can serve you for more than a dozen years.
For example, you can make a restored suitcase a unique, exclusive piece of furniture that will be your pride in the future. Do not be lazy to connect your imagination, and you will get a truly amazing thing. We offer several ideas.
- Wonderful bedside table:


- Vintage coffee table:

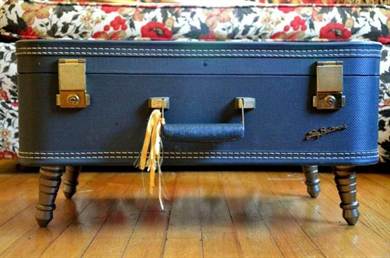
- The original bar with shelves inside, on which it is convenient to place glasses:

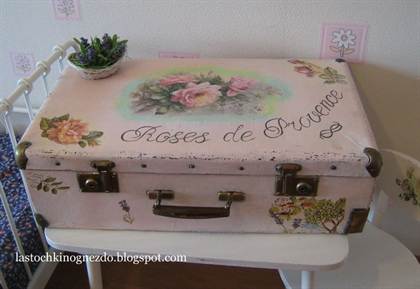
- Stunning vintage shabby chic suitcase. This style consists in the technique of aging things in a certain way: creating small scuffs and bumps with the help of a special paint application. Another feature of this style is the color scheme: delicate, pastel, pink, white colors. Floral motifs must also be present.
- Another, no less interesting performance in the steampunk style, as in the photo:
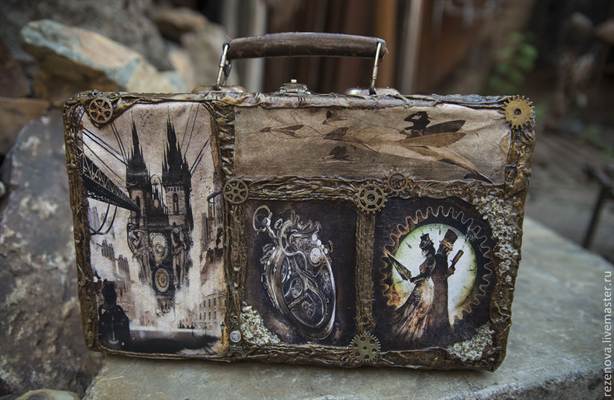

This style allows you to combine trendy things with antiquity. Things made mainly of leather are decorated with various metal decorative elements, chains. All these options will perfectly fit into the interior, add charm, zest and exclusivity.
But if you need a suitcase for more rational use, and at hand there is no suitable old model right size, then why not make it yourself from available material, for example, from plywood.

Great to store in this suitcase. the right tools and all sorts of little things.

You can also use the shape of a suitcase as all sorts of original gifts:
- Candy suitcase:


- A mastic suitcase that will perfectly decorate your cake and delight the birthday man with its originality:


- And a suitcase out of the box can serve not only as an original packaging for a gift made of cardboard, but also act as a present that needlewomen will appreciate with pleasure:
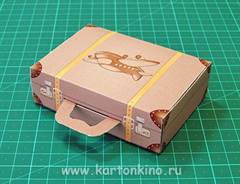

Well, if you want to decorate even a small present somehow in an original way, then we bring to your attention a master class on packaging in the form of a suitcase made of paper for chocolate.
small suitcase
We will need:
- 2 sheets of thick paper, preferably with some kind of image;
- thick white paper;
- kapron tape;
- glue "Moment".
- Transferring the template to thick paper and cut along the contour;


- We take background paper on which an interesting print is printed, and in the same way we cut out the details according to the template;
One of my favorite types of bags is the doctor's suitcase. This is a bag that has a metal frame-loop inside that closes the suitcase. Such frames can be bought, but they are expensive and of poor quality. Since I make the bag myself, I will make the frame myself too. In this master class, I will show you how to make a leather doctor's suitcase with your own hands.
See my other tutorials.
Tools and materials.


I bought all my leatherworking tools a long time ago. The photo does not show everything I have, this is what I use most often. You can start working with leather with a small set of tools. It can be: a knife, a ruler, an awl, leather needles. But the more complex your projects, the more diverse the tool you will need. And the more tools you have, the better your products will be. You also need a sponge for applying paint. Mat for cutting leather. I am using 4 cutting boards, which I screwed with screws to the desktop.
But first, the theory. In the photo I showed my favorite books.
I also have an engraver - drill - dremel, which I have been using for about 14 years. Helps a lot with tough skin. They can be used to drill holes or use an emery wheel to sand the ends of the glue or trim the handles of the bags.
The doctor's suitcase will also require a drill, a set of drills, a hacksaw and oil.
Materials.
- 10 square feet of vegetable tanned leather 8 oz thick. (You can read about the thickness of the skin here)
- 3 square feet of 5 oz thick vegetable tanned leather.
- steel strip dimensions 1.5mm*12mm*1200mm
- a metal sheet dimensions 18cm*40cm
- 4 half rings
- 2 belt screws
- padlock
- thread
- leather paint and finishing agent (how to make leather polish can be read here)
- leather glue
We paint the skin.


I paint the skin for my projects before I start cutting it. I came to the conclusion that it is much more convenient.
Cut out the details of the suitcase.


The dimensions of the parts are:
- front and back panels 35cm * 40.5cm
- lock strap 4cm*18cm
- bottom 18cm*40.5cm
- braid for steel frame 7.5cm*66cm, 2 pieces.
- two sidewalls 23*34cm
- two jumpers 18cm*38cm.
All parts are cut from 8 oz leather, except for the braid of the frame and sides, they are from 4-5 oz leather.
Steel frame.


I make a frame for a bag from a steel strip 1.5mm * 12mm * 1200mm. First I draw on paper to determine the dimensions. finished frame should have the shape of a rectangle 40cm19cm in the open position. Plan enough clearance for the skin you will wrap it in. The frame should open and close easily, the skin should not rub. At the ends of the halves of the frame at a distance of 10-12mm from the edge, drill holes for the size of the belt screws.
Wrap the frame in leather.


Moisten the steel frame strips center lengthwise with water and fold in half. Let it dry a little and you can apply glue. Wrap the parts of the frame in leather as shown in the photo. Punch holes in the leather for the belt screws and connect the halves of the frame. The ends of the skin do not need to be cut off yet, we will do this later.
We make handles for a suitcase.


I didn't make a pattern for the handles I put on this suitcase, but you can find it in Al Stolman's book. For the suitcase, I made two handles, which consist of two parts - the handle itself and the strap with which it will be attached to the body of the bag. Don't forget to paint the inside of the parts of the handles that can be seen when assembled.
Break.

Preparing the front and back panels.


Finish the top and bottom edges of the front and back panels. Using a bevel cutter, cut a groove for the seam at a distance of 6 mm from the edge. Punch holes for the thread. I glue the panels to the bottom of the suitcase. I sew, glue leather legs and sew too.
Frame and steel bottom.


I glue and sew the frame to the front and back panels. To make it easier to sew on, you can remove the strap screws. Then I glue the metal sheet to the bottom of the suitcase. This sheet will protect the suitcase from sagging. From top to bottom I glue thin skin to hide the metal sheet.
I sew jumpers to the sidewalls.


It is quite difficult to sew on the sides on this suitcase. I mark 12mm at the bottom and a 75mm strip in the center, see photo. Sidewalls will be sewn along two stripes in the center. I smear with glue and apply the sidewalls to the jumpers. I tap with a hammer and sew.
We sew the sidewalls with jumpers.


Now the hardest part of the job. The dimensions of the sidewalls have changed a little after stitching them with jumpers and I cut them a little from the bottom. I start by stretching and gluing the sidewall to the main part. You may have to try it on a few times to get it right. Probably needs to be trimmed a bit. Then I glue, sew and process the ends.
At the same stage, I cut and sew up the ends of the braid of the steel frame.
Handles and clasp.


I sew one of the straps of the fastener, stepping back about 75mm from the top of the suitcase. At this stage, I took a few photos, as I was in a hurry to finish. But, I hope that what is there should be enough to understand how to sew on a fastener and handles. Do not forget to glue everything, and then sew.


Translation: LeatherThoughts
More leather thoughts:


