With the advent of the new calendar year, every lover of growing vegetables own garden bed I am again preoccupied with searching for containers for sowing. Almost all gardeners have given up the habit of growing seedlings on the windowsill in bulky wooden boxes - they are too inconvenient to transport to the dacha. In addition, tender young seedlings have time to grow into the roots of neighboring plants. The optimal solution in choosing containers for sowing is a seedling cup.
Should I buy it in a store or make it myself?
Of course, production technologies do not stand still, and every hypermarket that respects its customers keeps in its assortment convenient containers for peat seedlings, which not only will not damage the root system of the young plant, but will simply dissolve in the soil. Why build your own cups when you can buy ready-made ones? The answer to this question is extremely simple. Experienced gardeners are accustomed to planting dozens or even hundreds of seeds of various vegetable and flower crops. Can you imagine how much money you will need to invest to stock up on containers for all the seeds? Therefore, we will save and craft peat cups for seedlings yourself. In the meantime, let’s determine if there are any available materials that could become a container for seedlings.
Simple solutions from scrap materials

Even during the winter, those who like to cultivate garden beds collect plastic cylinders, juice boxes, milk cartons, and sour cream containers. Literally everything is used: from paper to thick greenhouse film. And the imagination of gardeners knows no bounds. The film is stitched with thread, cleaved with a stapler, and wound in several layers. There is another simplest way to design containers. Two-liter beverage cylinders are cut at the desired height and converted into a container for planting. Plastic cups for seedlings, made in this way in a simple way, have one small minus. However, when replanting, the root system will have to be disturbed a little. Only the removal of those plants that, during the time spent on the windowsill, did not have time to acquire long and strong roots, occurs painlessly.
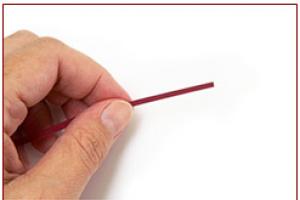
Making paper cups for seedlings

Some plants are so capricious that they cannot withstand transplantation, get sick for a long time and do not take root well. As a result, while the seedling is acclimatizing in a new place, the precious time allotted for growth will be lost. Therefore, we will make paper cups for seedlings. During the winter, you can collect unwanted newspapers. Pressed cellulose obtained from recycled materials is used to print publications. It will easily rot in the garden, serving as food for omnivores.
We cut the newspapers into pieces of 10x30 cm. The newspaper sheets are quite thin, and in order for the process to go faster, you can fold them in half or three. We take an ordinary glass and wrap it with the resulting blanks in several layers. We leave a small protrusion, which will later be needed to form the bottom. Now dip the bottom edge of the paper in a small amount of glue and crumple it thoroughly, forming a bottom and firmly fixing it to the bottom of the glass. Press down the newspaper blank with a glass and let the glue dry. We repeat this simple manipulation as many times as we plan to receive blanks. Paper cups for seedlings are ready! Now they can be put away in the pantry until the sowing time.
Peat container for planting

If we are not sure about the density of the newspaper sheets, then we can use a more complex technology for manufacturing the landing container. A peat cup will bring even more benefits to the painlessly transplanted plant. After all, when it dissolves in the soil, it actually becomes good fertilizer. You can make peat containers to your own order. We ourselves will determine the required dimensions of the cups and adjust the conical steel blank to fit them. We take into account the fact that in order to obtain an earlier harvest, it is necessary to sow the seeds in large, spacious containers. The root system in it will develop well, the transplant will be painless, and the plant will immediately be able to begin bearing fruit.
To make a peat cup for seedlings, we will need:
- steel conical shape of the required size;
- blank for forming cups;
- circle with a rod.
Composition of the nutritional mixture
Having found all the components of the mold for constructing future cups, we move on to making the peat base. We will need the following proportions: 50% peat, 40% cow manure and 10% black soil. Instead of black soil, you can use any other rich soil. Mix well and add azotobacterin, phosphorobacterin and water. The mixture should be quite thick in consistency.
Responsible stage of production
To begin, lower a circle with a pin to the bottom of a steel glass and fill it with the prepared peat mixture to a thickness of 2 cm. We thoroughly compact the future bottom with a blank. Now, without removing it, we will pour the solution along the edges, filling the entire gap between the steel glass and the blank. The seedling cup will not dry out if the mixture is immediately compacted when pouring. The blank can be immediately removed as soon as the peat composition fills the voids right up to the very top. It’s okay if the liner is difficult to remove; you can slightly rock it from side to side. Now all that remains is to carefully pull the rod and remove the finished glass.
Time to experiment

Not everyone gets peat cups for seedlings of perfect quality the first time. Sometimes homemade containers can disintegrate and dry out - perhaps this is because the mixture is not thick enough. Sometimes the resulting products are too dense and hard, which are difficult to dissolve in the ground when planted. The necessary skill and instinct will definitely come, even if it takes multiple repetitions.
A glass for seedlings made of polyethylene

To make a container 10 cm high and 7 cm in diameter, you will need a piece of thick film measuring 33x15 cm. Find or cut out a rectangular block to fit the size of the future cup. In the two edges of the block responsible for the bottom, we make grooves in such a way that a stapler can be placed in them. We cut the polyethylene blanks and begin to design the planting containers. Then we wrap the film blank around and secure it with a stapler and 5 staples. Using two of them, top and bottom, we fix the side edge, and with the rest we form the bottom, folding the ends of the film into an envelope. It's okay if more staples go on the bottom. This way you can model cups of various sizes.
Conclusion

We learned a lot about how to make seedling cups. Of course, peat or paper containers are seen the best solution compared to homemade polyethylene glasses. The idea of planting plants in the ground along with a natural glass that dissolves with water in the soil was revolutionary at one time. But only gardeners can decide which of the presented methods for making containers for seedlings is most acceptable for them. After all, not everyone will be able to find steel blanks for peat glasses, and not everyone will have the time and patience for painstaking work with glue and paper. Therefore, making cups for seedlings is a purely individual matter.
Perhaps you will use a proven method and sow the seeds in disposable plastic containers, besides, they clearly show the condition of the root system and the degree of soil spillage. And such containers can be reused many times. Whatever container you choose for sowing seeds, we wish you a rich harvest!
Homemade cups for seedlings - budget and convenient option for planting seeds. The beginning of the summer season hits your pockets, so any way to save is welcome. Traditionally, wooden and plastic pots are used as containers for seedlings. disposable cups and incised cans. You can make convenient and economical cups for seedlings with your own hands.
Each type of pot has a number of advantages and disadvantages. To do right choice, we need to consider all the options in more detail.
The following is used as a container for seedlings:
- wooden boxes;
- plastic cassettes;
- peat cups;
- plastic disposable cups or containers for sour cream, yoghurt and noodles instant cooking;
- Korean carrot buckets or sauerkraut;
- paper cups for hot drinks;
- cut Tetra-Pack packaging for juices and dairy products;
- homemade cups made from newsprint.
Let's talk about each type separately.
Wooden boxes
A large box is used for sowing seeds of tomatoes, peppers, and flowers. In a common box, the seedlings grow until they reach 10-15 cm. After this, picking is necessary: planting the seedlings in individual containers. Before planting, the inside of the box is covered with cling film (or ordinary polyethylene). There are small holes at the bottom of the box through which water can leak, so the box must be placed on a pallet.
The advantage of such a container is its low cost. You can make the box yourself by cutting and pinning together unnecessary boards. You can adjust the size yourself (taking into account the length and width of the window sill). The main disadvantage is the heaviness. The wooden box itself weighs a lot, and after filling with earth it can become heavy. The need for picking is another drawback. When dividing seedlings, there is a high risk of damaging the undeveloped root system.

Plastic cassettes
Plastic cassettes are very convenient device for growing seedlings. It has a similar structure to a mold for freezing ice, although the volume of the containers is much larger. A drainage hole is punched at the bottom of each recess. Simply fill the cassettes with special soil. Each cup is designed for one plant.
The cost of cassettes is modest. The cups for seedlings are not fastened together very tightly; they can be easily cut with scissors. They are light and compact. When transporting, you need to be careful: some cassettes are made of fragile material, and the cup may crack. It is better to plant peppers and eggplants in deeper containers.

Peat glasses
Peat containers are an innovation for gardeners. The main advantage of the product is planting in the ground directly with the form. Peat decomposes in the ground, so seedlings do not need to be removed from the container, risking damage to the roots. In addition, the cup itself is a ready-made fertilizer for the soil. However, some gardeners do not recommend sowing seeds in them. In their opinion, it is better to use peat glasses for picking.
The advantage of the product is the minimum of required manipulations: picking, transplanting. There is no risk of “hurting” the roots. There is only one minus - the likelihood of buying a low-quality product. In some cases, containers for seedlings begin to fall apart, crumble, and mold may appear on them. You can buy such pots only in trusted stores.

Peat tablets
Compressed peat “buns” are a more expensive analogue of cups. They differ in that you do not need to pour soil mixture for seedlings into the tablet. Dry tablets are placed in a tray with water. Over time they swell. Seeds are planted inside. Planting is as easy as shelling pears: a tablet with a sprouted plant is buried in the ground.
Advantage - minimum cost strength The disadvantage is the high cost. Tablets cost 5 times more than regular cups. However, you don't have to spend money on potting mix. Some gardeners use tablets only at the first stage of growing seedlings. After the plant has grown, they bury the tablet in a glass with soil.

These can be disposable plastic cups or yogurt cups, processed cheese or sauerkraut. You can use cardboard disposable cups for hot drinks left over from visiting a coffee shop. The main thing is to choose containers different sizes. If you buy disposable tableware, you need to purchase two sets: shot glasses (100 ml each) and beer glasses (500 ml each). The first set is convenient for sowing seeds. Large containers are used when picking.
The advantage is low cost and convenience. Such “pots” can be used for more than one year. The earthen ball along with the root system is easily removed from them. Disadvantages: inconvenience during transportation due to instability and lack of drainage. Before filling them with soil mixture, you need to make small holes in the bottom. This is convenient to do with a hot awl.

Milk and juice boxes
Cardboard packaging for juice or dairy products is convenient to use for planting seedlings. To do this they need to be trimmed. The height of the glass depends on the crop being planted. Eggplant and pepper need more soil for the full development of the root system. Despite the fact that the cups are made of paper, they should never be buried. They do not dissolve in the soil. Holes must be made in the bottom for drainage.
You can make pots for seedlings with your own hands. The height can be adjusted independently. Such containers can be easily transported: they are lightweight and stable. It is very easy to remove the earth ball. To do this, you just need to tear the glasses apart.
Homemade paper containers
DIY paper cups are completely free, non-toxic, and easy to use. True, you will need to spend about half an hour making a batch of containers. An old newspaper is folded in half and wrapped around a glass or bottle. Part of the newspaper sheet needs to be folded inward, forming the bottom. There is no need to make holes.
Such molds can be safely buried in holes in open ground. It is advisable to use paper without ink, but old newspapers will also work for this purpose. The height of the container for seedlings of peppers or eggplants should be about 12 cm, the diameter - 8-9 cm. For seedlings of tomatoes and cabbage, smaller glasses are suitable: 10 cm in height and 6-7 cm in diameter.
You can make cups for seedlings with your own hands from eggshells. Such small “pots” are suitable for planting small ornamental plants. Before planting, you need to lightly squeeze the shell in your hand so that it crumbles.
Any product option has disadvantages and advantages. Each gardener must take into account the specifics of the crop being planted and financial capabilities. If you have to transport for a long time, you need to choose denser pots. The main thing is to plant plants with love so that they thank you with a healthy harvest.
Next spring I plan to grow quite a lot of seedlings. A friend told me that you can save on cups. Tell me how to make cups for seedlings with your own hands?
All gardeners know that summer season requires financial investment. Here you need to buy seeds and seedlings. Let’s say you can grow seedlings yourself. But, again, the question arises - what to grow in? Buying special cups for seedlings is also expensive, especially when you plan to grow on a large scale. So, at this stage you can save a lot - with your own hands. And you don’t need to buy material - you can always find old newspapers, cans, bottles, packaging, and film at home. And in winter there will be something to occupy yourself with.
Material for cups for seedlings
The starting materials can be either ready-made containers or improvised means, namely:
- Cardboard boxes for juices or milk, both small (for one seedling) and large (cut lengthwise and seedlings are planted in groups).
- Large plastic cups for dairy products (small yogurt cups will not have enough space for a seedling).
- Disposable tableware (glasses).
- Used water bottles or carboys (these are treated in the same way as cardboard boxes).
- Tin cans containing canned food or beer.
- Cardboard boxes (such as shoe boxes) serve both for growing and as a pallet.
- Roll cylinder toilet paper(can be left round or made square for convenience).
- Cups made of paper (newspaper or toilet paper).
- Film cups.

Since the finished container can already be used, we will focus on the last two points that require human participation.
Paper cups for seedlings
In order to make paper cups, you will need paper (newspapers, magazines) and a blank (base) of the glass. The following is used as a preparation:
- a cut-off plastic bottle with a loop on the bottom (to make it easier to remove the blank from the made glass);
- cut off top of a tin can.

Cut strips of paper up to 40 cm long and 20 cm wide. Wrap them around the base for the glass so that the paper protrudes 5 centimeters beyond the edge. Then tuck this protruding edge and make the bottom of the glass. Now the base can be carefully pulled out, and the cup itself can be secured with paper clips or glued together for strength. Ready! All that remains is to pour the prepared soil and you can plant the seedlings. If you use toilet paper, first moisten it generously and then dry it well.

The advantage of paper cups is that they can be planted in the ground along with the seedling; during the growth process, the paper will decompose and will not interfere with the growth of the root system.
Cellophane cups

These cups are made using the same technology as paper cups, but with careful use they will serve you more than once. To do this, roll the film strips into a cylinder and secure the bottom and walls with a stapler.
You can do it even simpler and buy cellophane bags for packaging in bulk. Immediately fill them with soil and place them in a box for stability. Such bags are pre-pierced at the bottom so that moisture does not stagnate.
For more information on how to make cups for seedlings with your own hands, watch the video:
Nowadays, buying special containers for seedlings is not difficult. But are modern plastic cassettes, peat pots or tablets really good for growing high-quality planting material, as their manufacturers claim? Isn’t it better to use boxes, cups, kefir boxes or other improvised containers the old fashioned way?
Today we will try to find the pros and cons of the most popular containers for growing seedlings and choose the best option.
Perhaps the most ancient way growing seedlings - planting seeds in a common box and then picking. This is how our grandmothers grew seedlings. The box can be wooden, plastic or foam. As a rule, the box is placed on a pallet and the inside is lined plastic film and filled with earth.
Pros: You can grow more seedlings in a box than in individual cups; it is convenient to turn it over; no box required additional accessories during transportation; It's easy to put together yourself and save money.
Minuses: In the process of picking or planting seedlings in beds, there is a high probability of damage to the roots (which means a delay in growth and fruiting); a wooden box filled with earth is quite heavy.
Plastic cassettes

Plastic cassettes are small containers fastened together with drainage holes of varying lengths and widths. If desired, there will probably be a cassette for the entire width of your window sill.
In Russian stores, plastic cassettes are usually sold without pallets. In this case, you will have to make the pallet yourself. Otherwise, they are very easy to use: you just need to fill each cell with soil mixture and boldly plant the seeds.
Pros: Easy to fit right size, cutting with scissors; are inexpensive and last a long time; cassettes are light and compact; already have holes for good drainage; seedlings are easily removed from the cells.
Minuses:“Large format” cassettes are inconvenient for transportation because they are very flimsy and can crack under the weight of soil and plants; due to the fact that the cells are fastened together, when removing one seedling, you can accidentally disturb the earthen lump of another; not free; Not every crop has enough space in a small cell (for example, the roots of peppers and eggplants may not have enough “depth” of the cassette).
Peat cups

Peat cups are very popular among gardeners, especially among supporters of organic farming, because they are made from environmentally friendly materials and easily decompose in the ground. It is often recommended to use peat pots and glasses at the second stage - for transplanting (picking) seedlings, and not for sowing seeds.
Pros: Durable and safe, do not contain toxic substances; the walls of the cups are porous, allowing air and water to pass through, preventing the roots from “souring”; seedlings are planted on permanent place directly in the pot, which means the root system is not injured at all; seedlings take root almost 100%; decomposing peat serves as additional fertilizer.
Minuses: Not all commercially available peat cups are the same good quality; have a tendency to get wet; not cheap; may “bloom”, that is, become covered with mold; In peat containers, the soil loses moisture faster, which means you need to closely monitor the seedlings and prevent them from drying out.
Peat tablets

IN last years special ones are gaining popularity peat tablets– compressed fine peat with nutritional additives in a durable mesh shell. They are placed in a tray and filled with water. The tablets swell and increase in height several times, after which seeds are planted in the recesses on top.
Pros: Picking without unnecessary movements: the tablet is simply buried in the ground; excellent air and moisture permeability, which is important for the development of a powerful root system; there is no need to prepare or buy seedling soil, at least at the first stage of growing seedlings.
Minuses: Expensive pleasure; as is the case with peat pots Constant control of humidity is necessary - it is very easy to dry out the roots of seedlings.

However, resourceful gardeners will always find a way out. For example, to solve a moisture problem, peat tablets with seedlings are placed in a plastic container for sushi, pastries or cake. The container is filled with water to the brim, and the tablets themselves take as much moisture as needed.
Plastic cups

One of best options containers for seedlings are plastic cups of various capacities. They can be either specially “sharpened” for growing seedlings or regular transparent ones from kits disposable tableware. Moreover, you will need two sets of such glasses: one with a volume of 100-150 milliliters for the initial planting of seeds, and a second with a volume of 500 milliliters for the subsequent transplantation of young plants (picking).
Pros: The cups are cheap, but will last for years; plants are easily removed without damaging the earthen clod.
Minuses: Still worth the money; if you use transparent disposable cups, you must remember to make drainage holes (for example, with a hot nail); Difficulties may arise during transportation (usually cups are placed in shoe boxes to prevent them from tipping over).
Homemade containers for seedlings
And yet, the optimal containers for seedlings are those that do not need to be purchased. Because we always have them at hand! And instead of encouraging the production of excess plastic with your own blood, you should pay attention to the recycling of all kinds of packaging materials. This practice is flourishing abroad, and we, it must be said, are not lagging behind.
Dairy boxes

By cutting off the bottom of a dairy carton, you can easily create a wonderful container for seedlings. All that remains is to pierce the bottom in several places for drainage, put the boxes in a tray, fill them with soil - and sow.
Pros: Free; lungs; may be of different heights; ready seedlings It can be easily removed together with a lump of earth (just tear the box apart).
Minuses: It's easy to forget and throw the box in the trash instead of cutting it; a tray is required because water leaks through.
Cups of yoghurt, sour cream, instant noodles, etc.

Free replacement for special plastic cups. A yogurt container works well as a 100-milliliter glass, and in large 500-milliliter sour cream glasses, seedlings will feel no worse than in store-bought nurseries.
Pros: The same as store-bought plastic cups, plus free and a small contribution to the great cause of protecting the environment.
Minuses: The same as store-bought plastic cups.
Buckets for sauerkraut, cucumbers, etc.

Liter plastic buckets will cope with the role of a container for seedlings just as well as others. They are especially suitable for large seedlings. The good thing is that you can safely fill half the container with drainage, and only then with soil.
Pros: free, large, easy to carry, because each bucket has a handle, durable.
Cons: transparent; require modification (it is necessary to pierce holes to drain excess water)
Paper cups from newspapers

Those who do not eat sour cream or drink milk, but read newspapers, may find this interesting and extremely fashionable in the West method of making containers for seedlings useful.
An old newspaper is folded in half lengthwise and wrapped around a 1.5-liter bottle or jar in several layers. The main thing is not to forget to leave an allowance at the bottom for the bottom. The edges are fastened with a stapler, the bottom is simply folded inward. Ready! You can fill the cups with soil, lightly compacting it, and plant.
For tomatoes, peppers, eggplants and cucumbers, make paper cups with a diameter of about 8 centimeters and a height of 10-14 centimeters. Cups about 7 centimeters in height and 5 centimeters in diameter are suitable for cabbage seedlings.
Pros: Free, lightweight, non-toxic; You don’t have to take the seedlings out of the glass, just put it in the hole and cover it with soil.
Minuses: It is necessary to find time and work with your hands, which is not always possible; You need a pallet or box to place these cups in (close to each other).

What else can be adapted for growing seedlings? There are a lot of variations here! For example, cardboard tubes from toilet paper rolls can easily play the role of a cup.
Opaque cut plastic bottles with drainage holes in a circle (2-3 centimeters from the bottom) work great. Even “one and a half”, cut into two or three parts, turn into nurseries without a bottom. But this “problem” is easily solved with the help of a pallet or a low box, where you need to install homemade containers filled with soil. Some gardeners cut from plastic bottles rectangles, roll them into cylinders of the required diameter and fasten the edges with a regular paper clip. You don’t even have to shake the plant out of such a container: you remove the paperclip and the cylinder disintegrates.
Not easy. For the success of this business, you will need to comply with the conditions necessary for seed germination. One of these moments will be the choice of container.
Pots for seedlings
From an agronomic point of view, the optimal container for growing seedlings is peat or peat humus pots. They have 3 advantages over any container:
- ensure 100% survival rate of seedlings, since they are planted in the garden bed along with the container - and not a single root, even the smallest one, is injured;
- suitable for growing seedlings that do not tolerate transplantation: eggplants, cucumbers, melons, watermelons, sweet corn and delicate flowers.
- After planting the seedlings, the container turns into fertilizer useful for the young plant.
Peat pots for seedlings are pressed on special machines from peat or a nutritious peat-humus mixture. Products can be cylindrical or square in shape. The latter are more convenient, since they can be placed more compactly on the windowsill.
Important! To reduce the cost of production, unscrupulous manufacturers add cardboard to the mixture. Such pots are not suitable for growing plants, since the roots pass through a layer of cardboard with difficulty, and after planting in open ground plants will be stunted. Products with the addition of cardboard have smoother and denser walls than ordinary peat pots.
There are rules when growing seedlings in peat pots.
- The soil should always be moist; if it dries out, the plant's growth will sharply slow down.
- The pots are placed on a layer of gravel, expanded clay or sand.
- As the plants grow, the pots are placed, increasing the distance between them so that the roots of neighboring plants do not intertwine.
Growing in peat pots has one drawback - the soil quickly dries out, since evaporation occurs not only from the surface, but also through the air-permeable walls. This means you will have to water the seedlings almost daily.
Peat tablets
In recent years, peat tablets have appeared on the market. They are easier to use than pots, since there is no need to prepare and store the soil mixture until spring - the seed or cutting is placed in a tablet of compressed peat. Fungicides and growth stimulants have already been added to the peat, so the seeds germinate quickly, the seedlings do not get sick and grow quickly.
Before sowing or picking, the tablets are soaked in warm water. When swelling occurs, only the height of the tablet increases, but the diameter remains the same. After 10-15 minutes, the excess water is drained and a depression is made on the surface of the swollen tablet, into which a seed, preferably sprouted, or a cutting is placed.
Many gardeners grow seedlings in plastic containers. Plastic containers for seedlings come in two types: cassette, that is, divided into cells, and regular boxes.
Plastic
Plastic boxes are not suitable for seedlings. In such a container, the roots are so tightly intertwined that when planting them in the ground, you almost have to cut them with a knife. If low containers can still be used for gardening purposes - to keep seedlings in them until picking, then deep boxes are suitable only for balcony gardening.
Cassette
Cassette containers for seedlings are pots fastened together, each of which will contain one plant. The products are made of smooth plastic, so the seedlings are easily removed from such cells with a clod of soil and their roots are almost not damaged. When purchasing containers, it is better to choose models with a pallet, otherwise you will have to make the stand yourself.
The disadvantage of this method is that the cups cannot be spaced out and the grown seedlings will soon begin to crowd each other and stretch out. Containers are not suitable for seedlings that need to be grown for a long time, but they can be used for cabbage and asters - plants that do not gain a large mass of leaves before planting in the ground.
The best containers for seedlings with your own hands
Most gardeners rightly believe that the best containers for seedlings are not those that look beautiful, but those that do not require spending money on. To receive free containers, you only need to use the packaging materials a second time.
So, if you cut off the top part of a tetra pack from under any dairy product, then you can get a voluminous container with laminated, and therefore non-wetting walls. This is the most popular way to provide yourself with containers for the seedling period.
People over forty have seen a time when the only containers available for seedlings were homemade wooden boxes. Gardeners made them from boards, plywood and packing boards. The boxes were made of different depths and sizes, and they made do with this simple container. Then in middle lane did not grow many seedling crops. Mostly tomatoes were sown in the boxes, occasionally peppers, white cabbage, hardy flower crops. For a summer resident of those years, this was a standard set of seedlings. About leeks, celery root, few people heard of broccoli back then, and only a few were grown.