Also the product is different high content vitamins B2, C, B1 and PP.
How to collect garlic for drying?
Important! Do not wash the garlic after you dig it. You just have to separate the top dirty layers of the plant, and the problem will solve itself. If you wash the product, it may rot and it will be very difficult to dry it.
Garlic must be dried in a dry and cool room. It is best not to tear off the root, stem and leaves. You will still have time to chop the cloves into small pieces.
Methods for drying garlic
Drying the heads of garlic
How to dry garlic? Dig up the plant when it is ripe. Find a well-ventilated, cool room where the temperature is no higher than 10 degrees.
You can also store garlic in stockings. However, they should be placed in a dry, shaded place. Then you can chop the garlic. To do this, cut the cloves into 2 mm pieces.
Cutting will be easier if you use vegetable cutters with vertical and horizontal blades.
Pay attention to the condition of the knives, and also do not forget to constantly moisten them with water. This removes cell sap from the device, which prevents the product from darkening. It is recommended to store chopped garlic in an airtight container.
Drying peeled garlic
Take a mature and pure product. Carefully sort it and peel it from the hard shell.
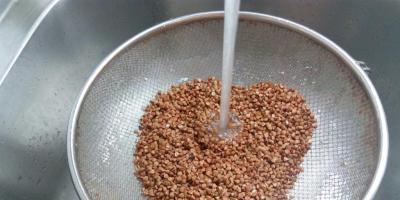
 Next, cut the garlic into pieces 6 millimeters thick and place it on a sieve and dry in the oven at 50 degrees.
Cool the dried garlic in sieves, place in jars and screw the lids on tightly.
If you wish, you can make powder from dried garlic. Pass the product through coffee mill. The resulting powder can be stored for 1 year.
Drying chopped garlic
Choose the most best garlic. Weed out damaged heads immediately. Peel the product. What to do next? You can dry the plant in various ways.
 Place the garlic in a food processor and chop it.
If you prefer the product sliced, use a knife to cut it.
Then you can dry the product in an oven at a temperature of 93 degrees.
Dry the garlic for 2 days at 35 degrees in a dehumidifier.
If you set the temperature to 45 degrees, you can dry the product faster. To do this, it is recommended to take large slices, but provided that the desiccant has large holes.
That's all! The garlic is ready. How to store the resulting product?
There are several storage methods:
- Garlic pieces can be stored in an airtight container for several months. In this case, it is necessary to ensure that the product is not exposed to direct sun rays and high temperatures.
- After the garlic has dried, chop it. In order for the quality of the powder to be excellent, it is recommended to pass the pieces through a sieve. The resulting mixture can be stored for 2 months.
- Freeze the garlic pieces in a covered container. This way it will be stored for 12 months. Before using the product for food, grind it in a coffee grinder.
The drying speed is affected by the quality of the garlic, as well as the size of the pieces, the air temperature during drying and the presence of scales on the surface of the plant.
Is it possible to dry garlic in the sun?
The answer to the question posed is ambiguous. If you are engaged in industrial cultivation of garlic, then you can! This way the product dries out faster, which is important, since manufacturers strive to sell garlic during the season.

The thing is that after drying in the sun, the shelf life of garlic is significantly reduced.
It is best to dry in the shade. In the sun, the outer covers of the product crack, which means the quality of the bulbs deteriorates. Because of this, if you are interested in using garlic for culinary purposes, dry it in the shade!
And plants intended for planting before winter can be dried in the sun for 3 days.
Good advice
If you opted for sun drying. The product pre-production process will be as follows:
- take a baking sheet and cover it with foil;
- cut the cloves into 2 halves;
- place garlic on a baking sheet, core side up;
- wait 3-5 days;
- If the garlic is crunchy, it is ready.
During cooking, regardless of the chosen method, the garlic must be stirred periodically using a wooden spatula. In order for the final product to be aromatic, it is better to give preference to spicy types of garlic.
Only ripe garlic is suitable for drying. In view of this, before starting the process, carefully examine each clove. If there are damaged areas, you need to cut them off.
So, any type of garlic is suitable for drying. Nevertheless, the best option Creole and silver-white garlic are considered.
The product can be dried in an oven, dehumidifier or in the sun. However, the latter option is suitable only for industrial purposes. Don't forget to pre-prepare the product before drying.
Use only mature and healthy heads, otherwise the garlic may rot or become moldy. The dried cloves can be crushed and used as an additive for culinary purposes.
If you find an error, please highlight a piece of text and click Ctrl+Enter.
It turns out that garlic is an expensive pleasure. Its average market price is in no way inferior to expensive exotic vegetables and fruits. Many summer residents, knowing the unpretentiousness of the plant, try to grow and prepare the crop for wintering on their own. This means it’s time to learn how to dry garlic and determine the features of its storage.
Features of harvesting
Well-dried soil is the key to successful garlic harvesting. As a rule, they stop watering the soil approximately 2-3 days before its scheduled collection. Garlic is simply pulled out (dug) out of the soil. At this point, the harvesting work can be considered completed.
Now we need to remove the most upper layer husks to remove dirt and clods of earth. At the same time, the teeth cannot be completely exposed.
Important! It is prohibited to wash garlic after digging, otherwise there is a risk of ending up with a moldy product.
Methods for preparing garlic for storage
The plant dug up after full ripening is dried in several ways:
- in room
- outside in the sun
- in the oven
- in an electric dryer.
In this case, the garlic heads can be dried entirely, or you can process only the cloves. Let's consider all the methods.
Drying indoors
Place the garlic in a single layer in a dry, well-ventilated room. We do not trim the stems, leaves and roots. Ultimately, it is by their condition that we will be able to determine the degree of readiness of the cloves for subsequent storage. Drying time is about 1 month. Uniform, discolored and brittle leaves are a signal that the crop is ready for further processing.
The time has come to cut off the roots, leaving about 0.3 cm from the head, and also get rid of the tops, leaving about 3-5 cm from the stem.
We put the finished product in boxes and put it in the attic or basement for storage.
By the way, many people like to store dried garlic in bundles, similar to onions. How do you like this option?
Drying outside
There are no particular difficulties in drying garlic outside. The algorithm of actions is similar to that described above.- harvested crops are not washed
- plants are laid out on a wooden or any other surface in one row
- During the drying process, the garlic is turned over and put away indoors at night (in case of unexpected precipitation).
- dried stems and roots are cut off, maintaining a ratio of 3-5 cm and 0.3 cm
- The garlic is put away in the pantry or other place prepared in advance for its storage.
Oven drying
Housewives have gotten used to drying garlic in a regular oven. They suggest the following method:
- garlic cloves are peeled, washed, cut into plates (petals) about 1 mm thick
- cover the baking sheet with cling film or foil
- Place chopped garlic on the prepared surface in 1 row
- Place the baking sheet in the oven for half an hour, setting the temperature to 50°C.
After the specified time has passed, the cooled dried garlic is placed in a container with an airtight lid.
Important! You must constantly monitor the product being prepared, otherwise it will burn out and acquire an unsightly brown tint.
Garlic in an electric dryer
Preparing aromatic spices for the winter can be done using an electric dryer. The cloves are first peeled, cut into rings or half-slices and placed on electric dryer trays with the cut side up. The heat treatment time of a product takes on average 5 – 18 hours and depends on the type household appliances.
To obtain granulated garlic or powder, the dried petals are ground using a coffee grinder.
Advice: do not make powder preparations for more than 1 month. This seasoning quickly cakes and becomes unsuitable for consumption. Store garlic in slabs and grind into powder only when necessary.
How to remove garlic skin without hassle?
This question is irrelevant for those who peel no more than one head, for example, for salad. However, when preparing garlic for the winter, you will have to peel more than one kilogram. If we take into account that from 2.5 kg of raw materials on average up to 0.5 kg of dried garlic is obtained, then preparatory work you will have to spend a lot of effort and time.
Plain water will help make the cleaning process easier. The cloves should be soaked for 20-30 minutes, after which, without harming your fingers, remove the softened skin with a knife.
And finally, about ready-made spices
Some housewives prefer to dry garlic along with other vegetables. The result is a ready-to-use seasoning, for example, for pizza.
First, cut into thin rings washed tomatoes of “not juicy” varieties such as “Cream”. If necessary, remove the watery core. We send the cuttings to the electric dryer. As the tomatoes dry out, add garlic slices and basil to the free space. Pour completely dried vegetables and herbs, along with garlic, into a jar with an airtight lid. Some of the pizza filling is ready.
To conclude the topic, we suggest you watch the video, which describes in detail one of the methods of drying garlic in an electric dryer:
All materials on the website are presented for informational purposes only. Before using any product, consultation with a doctor is MANDATORY!
Updated: 08-11-2019
To obtain good harvest garlic, you need to properly care for it during growth, and most importantly timely remove garlic from the beds, otherwise it will not store well.
Let's take a closer look: when to harvest garlic from the beds, external signs readiness of the garlic harvest, how to properly dig up garlic, storing garlic?
Overexposed garlic in the ground begins to crack in the ground and crumble into individual cloves.
External signs of garlic readiness
There are external signs that the garlic crop is ready for harvesting from the garden. The most obvious sign of harvest readiness– drying and yellowing of leaves in the lower part and yellowing in the upper part. Also, be sure to feel the stem of the plant - it should be soft and easily squeezed with your hands.

Typically, the harvesting period for winter garlic begins in the middle July until early August, and spring 2-3 weeks later. It all really depends on the weather in your region.

The second external sign is garlic arrows. If the arrow straightens, and at the same time the outer shell of the inflorescences begins to crack, and the bulbs themselves are already looking out, this is a signal that the harvest is ready.
A couple of weeks before harvesting, we completely stop all watering, thereby increasing the shelf life of the fruit.
How to properly harvest garlic
Garlic must be dug up during harvesting. Using your hand by the feathers, pull the root crop out of the ground.

Immediately after digging up vegetables, if there is a lot of stuck earth on the bulbs, you can clean it only with gloved hands (do not hit each other, on a shovel or the ground), as much as possible at the moment.
Later, when the vegetable dries out, the soil itself will easily fall behind.
How to dry garlic after harvesting

During drying, all the nutrients from the feather will transfer to the bulb, and the garlic will be well stored.
Garlic storage
When the garlic is dry, carefully trim its roots with scissors without damaging the bottom. Also cut off the dry tops, leaving tails 10-15 cm long and braid.

Most summer residents prefer to plant winter garlic before winter, while spring garlic in early spring. When to remove garlic from the garden? When should I dig it up for storage? How to determine the timing of garlic harvesting? Let's look into it in more detail. After all, this healthy and piquant-tasting vegetable can be found in almost every garden. It is extremely undesirable to keep garlic in the ground: it may begin to grow again, overripe heads will disintegrate into individual cloves, long-term storage such a harvest will be in great doubt. If you remove garlic from the soil ahead of time, it will be soft, unripe and loose. The keeping quality of this vegetable directly depends on the degree of its ripening and proper drying, so you should remember a few simple rules, which I will tell you about in this article.
Drying garlic (photo by Anna Nepetrovskaya from Novokubansk)
Signs of garlic ripening: when to harvest?
 Garlic is ready for harvesting - the lower leaves have turned yellow
 How to determine the ripeness of garlic? The surest signal is the drying and yellowing of the lower leaves of the plant. This process, of course, is influenced by the air temperature (sunny or rainy summer), the type of garlic, as well as the territorial location of your site (region). Among other things, gardeners have their own “signs” indicating the ripening of the crop. Someone in the process of growing garlic does not cut off all the arrows, but leaves a couple of pieces on individual plants. When the initially curly arrow becomes even, this is a sure sign that the garlic can be dug up.
 The arrows have straightened - you can remove the garlic
 Another summer resident looks at the flower heads: if they begin to burst and show “bulbs,” it means it’s time to harvest.
 The box with bulbs burst - a sign of ripening garlic
 There are a couple of techniques (folk) for enlarging the onion and cloves:
- When you break off the arrows on garlic, stick a burnt match in their place (at gas stove take the rest). A burnt match stops the secretion of juice - the teeth become juicier and larger.
- the greens from the garlic (feathers) after tearing off the arrows, tie them in a knot - the head of garlic will form faster and become larger.
 “Tied” garlic - the cloves become juicier and increase in size
 You should know that only winter varieties produce shoots, spring varieties do not shoot, a rare exception is the “Gulliver” variety.
Winter and spring varieties, photo:
 Winter garlic in the garden (photo by Anna Nepetrovskaya from Novokubansk)
  Winter garlic after harvesting
  Spring garlic
 Winter garlic is planted in September or early October (in Kuban it is better to do this later, for example, in early November), spring garlic - at the end of March or April.
And the timing of garlic harvesting depends on how hot the summer is. Most often they vary between the 20th of July/the first week of August - this applies to winter varieties.
Spring varieties of garlic always ripen later than winter varieties because they require more time to germinate. Around the 20th of August/in the first half of September, you can start harvesting summer (spring) varieties.
In any case, when the above-described external signs of ripening appear, you can always carefully dig up a couple of heads and visually verify the degree of their ripening.
How do you know when garlic is ready to harvest? The ripe head is always dense to the touch, the film covering the teeth is easily removed, and the teeth themselves are easily separated.
There is another effective technique: to speed up the ripening of garlic, gardeners use one effective technique: approximately 5-7 days before the intended digging, they lightly rake the soil from the bulbs (top layer).

The harvest time for winter garlic in Kuban is approximately mid-July. Again, look for external signs of ripeness and be sure to consider the type of garlic. The fact is that different winter varieties will have different terms maturation. Often, gardeners confuse different varieties and plant them all together in one garden bed. To avoid confusion, always pay attention to the shade of the outer shell of the head, as well as the shape and number of teeth in it. Thus, representatives of individual varieties can be planted in separate beds.
I would also like to focus on a question that novice gardeners often ask - do you need to roll and trample the garlic before harvesting? This method is sometimes used when growing onions to speed up their ripening and stop the growth of feathers. As for garlic, you don't need to do this! In order for the heads to finally ripen, you should stop watering the beds about 10 days before harvesting - let the soil dry out.

How to dry garlic after harvesting so it can be stored well
Harvesting garlic should be done on a dry and sunny day. The plants should first be dug up, preferably with a fork-shaped tool, the heads should be carefully removed and shaken off the ground. Of course, it is better to spend more time and remove the soil by hand, so you will be sure that there is no damage on the heads and they are suitable for further storage. If during the harvesting process you accidentally damage the head, then put it aside or immediately use it for food. Next, place the garlic on clean paper or wooden table, located under a canopy - if you are going to dry the heads outside. A well-ventilated area is also suitable.

Drying garlic after harvesting lasts approximately 7-10 days. Some summer residents prefer to dry garlic directly in the garden bed, in the same place where the crop was dug up. You can do this too, but it’s better to remove the garlic at night. dry room, it could be the attic or summer terrace. Complete and final drying of the heads is also carried out indoors (an additional 10 days), after which the remaining roots must be removed. The roots must be cut carefully so as not to injure the bottom! An interesting point is pruning garlic after harvesting, in which experienced gardeners strongly recommend leaving the stem and leaves intact.
The fact is that in the above-ground part of the plant there are many nutrients that “go” to the head during drying. It follows from this that uncut tops have a positive effect on preserving the healing qualities of garlic. By the way, one of the most useful ways storing this vegetable involves braiding braids, for which you will need the above-ground part of the plant that you did not cut off when harvesting the garlic. This ancient, but still relevant, method is successfully used today. One such bundle can contain up to 15 heads. A tight braid is woven from the stems, into which twine is woven for security, and a loop is made from it for further convenient hanging of the bundle. Leaves can be removed before weaving.
Garlic braided, photo:


In this form, garlic will be perfectly preserved even until the next harvest. Braids are hung in a dry, dark and cool room, they can also be used as decorative decoration in the kitchen. If you prefer a different storage method, then after complete drying, leave about 6-8 cm of the stem (cut off the rest), and then sort the heads by size and transfer to storage.
What can you plant after garlic?
To prevent the land from wasting away in vain, after harvesting the garlic, you can always sow greens. Parsley, cilantro, arugula, lettuce, dill, spinach grow quite quickly and especially well if their predecessor was garlic. Many gardeners successfully grow radishes, beets, radishes, and carrots - after garlic, they grow much faster, and their taste only gets better. In Kuban, you can even plant early-ripening cucumbers, and Chinese cabbage, as well as kohlrabi, generally grow well (they have a short growing season). Also, green beans and early ripening varieties of sugar peas will grow well after garlic.
Follow the rules of agricultural technology, watch appearance stems - no matter what region you live in, signs of ripening of this vegetable crop will always be the same. Now you know when to remove garlic from the garden, what is the best way to do it, and what to plant after harvesting it.

Since dried garlic cloves are a flavorful seasoning for soups, seafood, meat and poultry, many people are interested in how to dry garlic at home? There are several proven ways to properly dry garlic yourself so that it does not lose its flavor and useful qualities. Today you will learn about preparing the product for drying, drying without damaging the integrity of the bulbs, in a bunch, storing in powder form, and whether garlic can be dried in the sun.
Preparing for drying
You can use vegetables of the Kalininsky, Rostovsky, Kirovogradsky, Starobelsky White, Creole, Southern Violet, Ukrainian White and others varieties. In principle, any of the varieties known among gardeners can be dried. A few days before the planned digging, you should stop watering the crop. Since the soil must be dry, it is not recommended to dig up the plant after it has rained. Don't wait for the garlic to ripen. At this point, the foliage becomes characteristically yellow and is located on the surface of the ground.
In the process of digging up a vegetable of this degree of maturity, both the scales and the teeth themselves will inevitably be easily separated from the heads. They can get dirty with soil. It is forbidden to wash the teeth, as they can become moldy. It is also not recommended to dig up an unripe crop. Since its bulbs will have a loose and loose structure, which will make them difficult to dry and store. Garlic should be dried in a cool, dry place. Do not remove the roots, leaves and stem.
Many people practice drying this wonderful product, knowing about all its beneficial qualities.
Garlic improves immunity, exhibits antibacterial and antiviral properties, reduces bad cholesterol, reduces the risk of heart attack and stroke.
But it also effectively fights worms, helps treat joint pain, and is used as an adjuvant in the treatment of liver diseases.
It is an excellent prevention of impotence in men and diseases of the cardiovascular system in any person.
Drying in a bundle
How to dry garlic in a bunch? Its preliminary drying is carried out directly on the site. After digging it up, it is left there for a couple of days. After the roots and tops have dried and the scales have become more closely attached to the surface of the bulb, you can harvest the crop from the area. If there are cold and rainy days this year, the drying procedure should be carried out in a room with a temperature of +30 degrees and last no longer than 8 days. It is customary to braid garlic with tops into braids, which are hung in a dry place where it is somewhat cool.
After digging up mature garlic, you can dry its heads without chopping them. It is required to allocate a room for the product with a temperature of no more than + 10 degrees. Next, the garlic should be laid in 1 layer for several months. The roots should become shriveled and the leaves should change color to brown. It is necessary to remove some foliage and trim the roots. The stem should be cut at a height of about 2.5 cm from the head. Garlic is stored in this form in stockings. A dark and dry place is suitable.
You can dry the vegetable peeled. It is required to sort clean and mature product. After removing its top layer, the garlic should be cut into plates about 6 mm thick, spread on a sieve or baking sheet, after laying it with parchment paper. Next, drying is carried out in the oven or oven at a temperature of +50 degrees. Checking whether the slices have dried properly is not so difficult. Just bend one in your hand and it should break.
Dry garlic can be made into a flavorful powder. The product must be ground using a coffee grinder. This powder will not lose its smell and taste for 1 year. How to do it? To do this, good heads are selected and the husks are removed from them. You can grind it not only with a coffee grinder. Some people like to finely chop the garlic themselves, others use a food processor. Requires oven drying with exposure temperature regime at +93 degrees.
Sometimes this procedure is carried out in a special dehumidifier. Where the product is placed for 2 days at a temperature of about +35 degrees. By chopping dried garlic and passing it through a sieve, you can store the powder for about 2 months.
Can it be dried in the sun?
You can dry garlic in the sun if necessary to obtain large quantity product in season and its sale. This method cannot be called justified for self-drying. Since laying the vegetable out in the sun significantly reduces its shelf life in the future. Under the influence of scorching sunlight, the top layer of the vegetable cracks. Which does not have the best effect on the quality of the bulbs.
If you still want to use this method, place the dug garlic in the shade. Then its taste and aroma will not be affected. And you can add your favorite seasoning to various dishes to your taste and enjoy their unique taste qualities. It is also recommended to dry in the sun those plants that you plan to plant before winter. This should be done within 3 days.
Video “Drying garlic”
From this video you will learn how to properly dry garlic and store it in the form of garlic powder.