The desire to surround oneself with beautiful objects prompts a person to build fences that, among other things, serve a decorative role.
In this article we will tell you how to make a gate with your own hands. We will describe all the stages of work and what material to choose for its manufacture.
Choosing appropriate place To arrange a gate you need to take into account the simplest principles. For example, think about how to provide convenient access to buildings on a personal plot? Will there be a number of depressions and holes near the future gate? If this is the case, then water and dirt will certainly accumulate in them, which, as you understand, will be carried into the house.
Note! Don’t think that you can only install one gate on your property. In fact, there may be several of them. For example, one is the front door, intended for the entrance of household members and guests, and the second is the rear door, the so-called back door, which is designed to reduce the distances to be overcome or the needs associated with housekeeping.
Exist different types gates, however, ideally they should fit into the design of the fence and personal plot. In view of this it is worth paying attention Special attention choice of material and arrangement.
Kinds

Among the most common types of gates, it is worth noting several options that differ in structure, design and materials used:
- Gate made from wooden slats, will help you create a unique pattern. If it is decorated with carved wooden pillars, the gate can be used as an internal fence dividing the area.
- A metal gate consisting of forged elements looks very elegant. Usually it is installed in a fence with a similar pattern.
- A solid wooden gate looks good in combination with a stone or brick fence.
- A gate made of metal profiles is suitable for installation in a fence with the same design.
The choice of material for making the gate is yours. This largely depends on the financial capabilities, as well as the taste preferences of the owner of the site.
Metal gate
A metal gate can be decorated with various decorative elements, for example, forged ones. They will successfully complete the design of the structure you produce. First, clearly imagine the gate you want to see in the end. Once the installation location is determined, you need to take measurements. Draw a schematic diagram of the structure on paper. This will help you accurately calculate the material required for the job.

It is better to buy metal blanks containing a large number of carbon. This is explained by the fact that this particular material is less susceptible to corrosion, which means it will last much longer. So, you will need:
- A metal sheet with a minimum thickness of 1.5 mm.
- Profile pipe or angle with a cross-section of 25 mm.
- For the posts you need a pipe with a diameter of 100 mm.
- Primer mixture for metal surfaces.
- Special liquid or gasoline for anti-corrosion treatment.
- Dye.
- Electric drive or lock for the gate.

The following tools are needed to build a metal gate:
- Welding machine.
- Bulgarian.
- Nylon thread for marking.
- Hand drill or sledgehammer.
- Screwdriver.
- Metal scissors.
- Shovel.

The metal gate should be secured to appropriate posts. They are installed in the ground to a depth of at least 1 m. Now mark the area and, accordingly, the installation location. Cut the length of the post + 1 m with a grinder. Then treat the surface of the pillars: remove any traces of corrosion. An angle grinder will also help you with this, followed by anti-corrosion liquid. When the surface dries, it will appear white coating. It must be removed.

Make holes in the ground for the posts. Their diameter should exceed the diameter of the pipe by 10 cm. Then prepare a liquid solution. To do this, you need to mix cement with sand in a ratio of 1:3. Make a homogeneous mass, fill it with water and bring to a liquid state. Now install the pillars, fill the holes with crushed stone and compact it, fill this base with mortar.
Note! Installation of pillars is a critical process in the manufacture of a gate. Using a plumb line or level, check the installation is perpendicular. Do this before pouring the solution. Incorrect installation will require reworking the work due to misalignment of the structure.

The frame of the gate must be made of a profile or corner. To avoid disturbing the configuration, measurements should be taken carefully. Choose a place where it will be convenient for you to place the gate structure. Lay the channel around the perimeter, its size should be 20 cm smaller than the product. Maintain an ideal plane, a level will help you with this. Adjust the accuracy with shims.
Cut the profile to size. Remove hangnails. Lay the workpieces on the table and weld the joints. To give the structure greater rigidity, install spacers on it. Connect the top and bottom or side posts using a welding machine.

Perform welding work using a spot method. This will help you reduce the construction time. Now clean the seams with a grinder and a special wheel. Treat the surface with gasoline or anti-corrosion liquid.
The gate should only be mounted to the posts using strong and reliable fasteners. This way, you will extend the life of the product. Curtains with built-in bearings will make the gate move smoothly. Please also note that the gap between the ground and the gate must be at least 10 cm. This will help you avoid difficulties with the operation of the product in winter and in bad weather.
The final stage is securing the sheet of metal. Cut out the sheet the desired shape and size, using a grinder with a cutting wheel. Remove the burrs from the cut areas. Attach to frame a metal sheet. The sheets are joined on a plane using a continuous welding seam. Then clean the seam. Treat the product with anti-corrosion liquid and then paint it. Hang the hinges and install the lock. If you want to decorate the gate with forged elements, then do this before painting the gate, but after installing the structure.
Arrangement of a wooden gate
When producing a wooden gate, the choice of material is of paramount importance. You should choose lumber from coniferous or hardwood. It is worth noting that larch is the most durable wood material, so if you are concerned about the service life of the product, then choose this breed. It is better to buy ready-dried lumber, which has previously been planed planer. In addition, it is important that the thickness of the wooden blanks is the same.

Among the tools, you will definitely need a carpentry tool set, as well as a level, a screwdriver, a square and a pencil with a brush and rope. Then you should determine the design of the future gate. Think about what it should be like? Maybe solid or lattice, with or without bracing, completely wooden or wood-metal?
An ordinary lattice gate should be made of a 10 cm wide picket fence. It is secured with two screws or nails. This approach helps strengthen the product, which is why it will not sag over time. These gates are practical and lightweight. Here, as in the case of the production of metal gates, the structure is attached to support pillars. The frame consists of two crossbars connected by strapping slats. To make the gate more rigid, a strut is installed in the frame. The finished frame is attached to the post using hinges. The latch prevents the gate from opening spontaneously.
The frame, which serves as a base, can be connected either using metal-toothed plates or into a tenon. Of course, the tenon connection is more durable. It is closed and held together by gluing. It is worth noting that the tenon should fit into the groove with difficulty. The best glue For fastening the frame there will be ordinary PVA. After completing the frame, check it for proportionality and evenness. Its angles should be exactly 90°. In addition to securing the connection with glue, strengthen it with screws. The frame diagonals should be identical; if so, then you have achieved success in your work.
If you decide to connect the frame with metal-toothed plates, then drive them into the slats. This connection is made easier than with a tenon and subsequently withstands fairly high loads.
Note! Wood-metal doors are more durable than their counterparts that are made of pure wood.

When you install the gate to the support posts, align it vertically and horizontally. As for accessories, you may need:
- double-sided loop
- automatic latch,
- overhead loop,
- valve,
- manual latch,
- snap lock,
- latch with a ring.

The paint for the gate must be resistant to temperature changes and precipitation. All parts must be pre-treated with an antiseptic. Best fit universal types primers such as: pentaphthalic, glypthalic and for opaque coatings. First, the surface of the gate should be thoroughly sanded to eliminate all defects.
Maintaining a unified style

Wickets and gates made of metal are the most common type of fence arrangement in a suburban area. Metal as a material has a number of undeniable advantages. This is an opportunity to make a unique design, an affordable price, and the durability of the product. By choosing a metal gate, you can bring to life the most original design solutions. Your gate can become one and only, which will set you apart from the rest.
It is possible to make a metal gate with your own hands
You can try installing a metal gate yourself. This process is quite simple and understandable if you approach it responsibly. The main thing that is required of you is the ability to use welding machine. Stock up necessary tool, materials, choose a time and feel free to proceed with installation.
Preparatory work
Choose a location and take careful measurements. Decide on the pillars. They can also be metal, or they can be made of brick. If brick is used, its thickness is important.
The drawing of the gate must be done in detail on paper.
Please note that gates with forging elements look very impressive. Models of such gates can be viewed in photos on the Internet. But you can’t make such a gate yourself; you’ll have to turn to specialized companies. You can make a gate from a metal profile with your own hands.

Forged metal gate
Tools and materials
To work you will definitely need the following tools:
- welding machine
- protective mask or welder's mask
- angle grinder
- cutting and grinding discs for metal of the required size
- hammer, chisel, crowbar
- goggles, respirator, protective gloves
Be sure to use the protective equipment listed above, this will protect you from unwanted injuries and burns.

Metal gates and wicket
Manufacturing and installation process
First, install the posts yourself. If you have them made of brick, then special metal inserts are made in the masonry for welding the gate hinges. If the pillars are metal, then each pillar needs to be poured with concrete separately. Don't forget about careful compaction. This will help avoid unwanted rolls and distortions of the gate in the future.
Using a grinder, we cut off the side posts of the gate from the profile pipe. Then we cut off the top and bottom parts, as well as a piece of pipe that will be attached in the middle. Let's start the welding process. The cut pieces must be placed on flat surface and carefully weld together. You can see a photo of the finished frame below.

Creative forged gate
Then we weld the hinges to the resulting frame or frame. We separate the loop into two parts. We weld the part with the pin onto the gate, the other part onto the fence posts. The hinges must be perfectly parallel to the gate and fit close to the profile pipe. Use a hammer to knock off any excess welding and clean the welding area using a grinder with a grinding disc.
To prevent metal corrosion, the gate must be treated with a degreaser and then with a primer. Attach corrugated sheet or weld profile pipe. Insert the lock and handles. In the photo you can see samples of finished metal gates made by yourself.
And finally, let's give a few useful tips from professionals.
- The minimum width of the gate should be at least 1 m. Keep in mind that you should be able to pass through the opening freely, even with bulky items. For example, with a construction wheelbarrow.
- If you use electric wires, then run the cable inside the pipes. There he will be more securely protected.
- Leave a gap of at least 10 cm between the gate and the ground plane. This is necessary for free opening in winter when snow falls outside.
- Fasten the corrugated sheets only with self-tapping screws. Do not use rivets; they become loose very quickly.

Do-it-yourself metal gate is a reality
Well, we hope that this article will be useful to you if you decide to install a metal gate with your own hands. If you have not received answers to all your questions, we suggest that you carefully review the photos and videos at the end of the article. Good luck!
A neat fence with a beautiful gate and wicket is a memorable business card of the owner.
Their appearance characterizes the owner, shows his wealth and thriftiness, because the fence and gate are the first thing that guests and passers-by see.
A good gate, and if it also has decorative elements, is not cheap. The price depends on the chosen material and the price for the work; usually the work comes out as material.
To save on work you need to know how to make a metal one.
Material selection
If the fence is brick, then the material from which the gate will be made is not important; if it is a fence, then it is better to make the gate from it.
The gate should stand out against the background of the fence, but at the same time be in harmony in color and material. In order to immediately know how much material will be needed, you can first sketch out drawings of the future gate.
Wicket material:
- The blanks are metal, the metal must be high-carbon, this will prevent rapid corrosion.
- For pillars, pipes or profiles with a diameter of at least 100 mm are suitable.
- Profile pipe or angle for the gate frame.
- A sheet of metal with a thickness of 1.5 mm or a sheet of metal profile for cladding.
- Metal curtains, preferably with a bearing mechanism.
- Lock.
- Primer.
- Dye.
- Liquid for anti-corrosion treatment.
Tools for work:
- For marking you will need a thread, a plumb line and a tape measure.
- Semi-automatic welding machine with a power of 220 W.
- A hand drill, if available, or a shovel.
- A sledgehammer for hammering in pillars.
- A screwdriver and a drill for fastening the sheathing to the frame.
- Grinder for cutting metal and cleaning weld seams.

Installation of poles
The pillars are the load-bearing part that holds the entire structure of the gate or wicket. The length of the pillars must exceed the height general design 1 meter so that they can be buried in the ground for reliable stability.
Using a drill, you need to make two holes in the ground at a distance of about 1 m, approximately 50-70 cm deep. Posts are inserted into these holes and driven in an additional 30 cm with a sledgehammer.
Afterwards, the pillars are leveled vertically and filled with concrete at the base. To give additional rigidity to the pillars, they are welded with a transverse profile at the top.

Frame assembly
The size of the frame of the future gate must be made smaller than the width of the opening of the pillars by 5-8 cm for comfortable rotation of the sash. The distance from the ground to the gate leaf should be from 15 to 20 cm, this is necessary in case of snowfall.
The metal frame is welded from a profile or angle metal with a thickness of 3 mm. The profiles are welded together at the corners of the frame. To make the frame rigid, an additional transverse bar is welded in the middle.
In the resulting frame halves, one additional profile is welded obliquely so that they resemble the Latin letter “Z” with each other. Afterwards, metal or iron sheathing will be attached to all the posts of the finished frame and additional stiffening ribs.

Preparatory work is a very important part. Before you start welding the frame, you need to cut the workpiece to size using a grinder, remove burrs from the cut areas, and degrease the cuts with gasoline or a special solution. And then start cooking on a flat, pre-prepared surface.
The surface on which you are going to assemble the frame with your own hands must be flat; if this is not the case, you may get a bend at one of the corners, and the frame will take the shape of a propeller.
After the frame is ready, the curtains are welded to it. They consist of two parts, one part is welded to the door frame, the second to the pillars. It is desirable that the curtains have a bearing mechanism.
Frame covering
For cladding, it is best to take a sheet of galvanized metal or a painted sheet of metal profile; it does not corrode and will last a long time.
From a sheet of metal that was prepared in advance, a whole piece is cut to the size of the welded frame of the gate. If there is no such thing big piece metal and you can’t cut a whole piece, then try to cut it so that the seam connecting the pieces of metal falls on the middle cross bar frames
Next, with your own hands, pressing the sheet of metal tightly to the frame, grab it around the perimeter. If you choose a metal profile sheet or galvanized metal, then attach it with rivets or self-tapping screws using a drill and screwdriver.

Lock and handle mortise
After you have finished with the casing, you need to embed the lock. For gates, it is best suited for three bolts that extend into the locking part of the frame. The handle can be selected complete with a lock or separately, all at the discretion of the owner.
Decoration
To decorate the resulting gate, various forged products can be welded to the outside. Such products in various construction stores and supermarkets are available in a large assortment. You can choose what you like and make any pattern or composition with your own hands.

Final stage
When the new gate is in place, all the parts are screwed on, the decorative forging pattern is welded, you need to clean everything metal surfaces and welds from traces of rust, and open it all with a rust converter. After the converter is covered with white film, it must be wiped off with a rag, and all metal parts must be primed. When the primer dries, apply paint on top in two layers.
That's all, our gate is ready!
The method described above for assembling a gate with your own hands is also suitable for gates. The assembly principle is the same for almost all materials.
Wood and metal look very attractive. If you decide to make a gate or wicket from wood, then you need to provide tools for processing wood in advance and at the end take the necessary measures to protect it from pests and the influence of natural factors.
Every summer resident tries to make his plot well-groomed and comfortable for relaxation. The easiest way to “revive” and distinguish your dacha from other gardens is to equip beautiful gate. It is the entrance composition that attracts attention in the first place and creates an impression of the site as a whole. Few people will be surprised by similar factory designs, and experienced summer residents They prefer to design and equip the entrance complex themselves.
Let's look at the features of various gates, and also give detailed instructions on planning and assembling fences made of wood and metal.
What should a country gate look like?
There are no clear requirements and standards for the placement and dimensions of the gate. When designing, it is important to take into account the purpose of the door, the presence of a fence on the site, the size and design of the site itself.

The nuances of arranging a gate for the entrance to a garden plot:
The width of the canvas is about 1 m. As a rule, this is enough to carry large items and pieces of furniture into the estate. A large fence requires strengthening of the support beams and the use of more durable fittings.
The height of the structure is limited to 2-2.2 m. This value depends on the height of the existing fence and the purpose of the sash.
Experienced summer residents agree that the optimal location of the front entrance is close to a residential building, so that the gate can be seen from the window.
Basic criteria for choosing a wicket
Let's consider the types of garden gates based on their main design characteristics: purpose, design and material of manufacture.
Purpose of the enclosing door
Conventionally, all country gates can be divided into three groups:

Design features of the gate
Based on the design of the frame and the connection with the fence, the following types of country gates are distinguished:
- free-standing fencing;
- wickets that are part of the gate;
- fences adjacent to the entrance gate.
By degree of openness door leaf There are: curtained, free and combined.
Blind gates protect the country estate from prying eyes and drafts. This option is very popular. To make the fence attractive, the canvas is framed with decorative elements made of wood or metal.
Free wickets partially block the view of the site. To create an openwork canvas, artistic forging is used - the elements are made in uniform style. Simpler products are made from wooden picket fence or metal mesh netting. Translucent models of gates are made of polycarbonate.

Combined entrance gates are created from several different fabrics. The bottom of the gate is made blank, and the upper part is decorated with forged inserts.
Fabric material
The most popular materials for arranging gates are metal, wood and polycomposite. Let's consider the features of using each of them.
Metal gate for the dacha it is considered the most durable, wear-resistant and mechanically strong. The disadvantage of the model is the difficulty of making it yourself. To implement the project, you will need specialized equipment and welding skills.
Types of metal fences: gates made of corrugated sheets, forged products or the use of sheet metal.
Features of fences made of corrugated sheets:
- the profiled sheet is made of steel, coated with a protective layer of zinc and polymer - this ensures the material’s resistance to corrosion;
- rigidity of the canvas due to the presence of rectangular waves;
- ease of fixing sheets to metal frame- fastening is carried out using special rivets;
- affordability and ease of use.

Corrugated sheets also have some disadvantages:
- there is a high probability of dents appearing due to mechanical damage;
- the formation of corrosion due to violation of the integrity of the top layer;
- "rustic" appearance.
Forged Products, on the contrary, are distinguished by sophistication and exclusivity. But for the presentability of the design you will have to pay a relatively high price. Forged elements make the gate very heavy. Some summer residents are alarmed by the transparency of such a fence, but this drawback can be easily eliminated by installing a polycarbonate “curtain”.
Wickets from sheet metal practical to use, but the material is difficult to process independently.
Wooden gate for a dacha it is appropriate if the fence on the site is also made of wood. The fence is organically combined with gabions, natural stone and brick. Advantages of wooden models:
- ease of wood processing;
- opportunity self-made gates;
- availability and environmental friendliness of the material;
- beautiful appearance.

Disadvantages of wooden products:
- exposure to moisture, rotting and burning processes;
- the need for regular treatment with protective agents and paintwork materials;
- service life is about 5-8 years.
Polycomposite and plastic models appeared on the market recently, but have already gained popularity among summer residents. Wickets are available for sale in various sizes, textures and colors. Assembly and installation of the fence does not cause any difficulties.
Wooden gate manufacturing technology
To work, you will need a hacksaw, a screwdriver with bits and drills, a level and a tape measure. From the materials you need to prepare:
- corners;
- loops;
- self-tapping screws;
- boards for door trim;
- thick wooden beams for the frame;
- support beams.
Advice. It is better to buy lumber already in finished form- dry planed boards of equal thickness on a planer
When choosing wood, it is advisable to give preference to:
- larch and cedar - dense material resistant to weather conditions;
- spruce or pine - affordable wood, easy to process;
- oak - durable, hard raw material with a beautiful texture;
- laminated veneer lumber assembled from hardwood.
Step-by-step instructions for making a garden gate:

Step-by-step installation of a calico made of corrugated sheets
The requirements for a country gate are fully met by a fence made of corrugated sheets. You can prepare a drawing and assemble the gate using it yourself.
Drawing development and materials procurement
Having examined the ready-made drawings of a garden gate, you can easily draw up your own plan, based on the parameters of the site and personal preferences.
The diagram should indicate:
- total length of support pillars;
- depth of the foundation for the racks;
- distance from the ground to the door leaf;
- width of the gate;
- frame design, number of jumpers;
- location of hinges and bolt.
Important! Support pillars must be buried below the freezing level of the soil. On heavy soils, a depth of 0.7 m is permissible, and on light, heaving soils - at least 1 m.

Based on the developed drawing, materials are selected:
- metal profile for pillars - two sections of 3.3 m each;
- blank plates for supports - two squares 80*80 mm;
- profiled wall sheet - 1*2 m;
- metal profile for frame 40*40 mm - 5.5 m;
- two hinges, a lock and a latch.
Additional Consumables: waterproofing film, sand-cement mortar, primer for metal and paint, rivets for fixing the corrugated sheet.
To assemble and install the gate with your own hands, you will need the following tools:
- grinder and drill;
- welding machine;
- hacksaw for metal;
- drill for digging a hole.
Installation of support posts
Pre-clean and level the area, mark the place for the support beams - the distance between them should be 4-5 cm greater than the width of the gate.
Procedure:
- Drill holes with a diameter of 40-50 cm.
- Cover the bottom of the blocks with waterproofing film.
- Build a “pillow” of crushed stone.
- The edges of the metal posts that will be immersed in the ground should be cleaned of rust and treated with a primer.
- Place the beams in the holes, level the supports and secure the position with stones.
- Fill the hole with cement-sand mortar.

After a day, check the parallelism of the beams by measuring the dimensions of the opening at the top and bottom.
Creating a frame and canvas
Sequence of work:
- Prepare the components of the frame - cut a pipe with a cross-section of 40*40 mm according to the drawing.
- Place the pieces on a flat surface and secure the structural elements with clamps.
- Check the evenness of the assembly.
- Seal the elements with a weld seam and once again check the evenness of the diagonals and the perpendicularity of the corners.
- Install the crossbar and reinforce the frame with metal corners.
- If the assembly is completed correctly, perform final welding.

“Try on” the frame by aligning the frame to the support posts. Mark the places for the hinges - the distance to the edges of the canvas should be about 25-30 cm. After welding the hinges to the frame, sand the welding seams, coat the frame with a primer and paint.
Frame covering:
- Cut the profiled sheet.
- Secure the metal sheet with rivets. A weak fastening will lead to loosening of the canvas during the wind, and a strong fastening will lead to its deformation. Therefore, you need to screw in the screw carefully.
Final assembly of the structure
Hanging the finished canvas onto the support posts is done after the foundation has completely hardened.
The order of assembling the gate:
- Place the fence in the opening, placing it under the canvas wooden beam 10 cm thick.
- On the beam he will mark the places for the counter loops.
- Weld the hinges and hang the gate.
- Check door movement. Spontaneous opening or closing of the calico is unacceptable.
- WITH reverse side place a limiter on the hinges so that the door only works in one direction.
Gates for a summer residence: photo ideas for decorating the entrance ensemble
Kalika and fence act as one decorative element thanks to the pattern applied across the entire fence fabric.

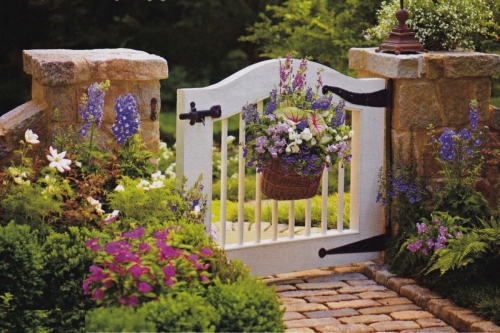
A low fence in the Provence style is suitable for separating the garden from the backyard summer cottage. The white gate looks great against the backdrop of lush greenery and natural stone.
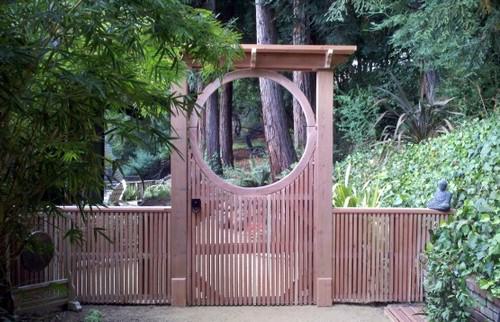
Original and at the same time simple form The entrance door emphasizes the laconicism and sophistication of the Japanese-style garden.
An unusual solution - the connection of forged elements and natural materials. Artfully crafted grape bunches are complemented by natural vineyard branches.

Eco-decor made from untreated wood is appropriate for a small country estate. The gate doors, like the fence, are designed in a rustic style.