professional processing and the manufacture of wooden parts is only possible using milling machine. You can make full use of this tool in special installation. This is the milling table. This installation is rare, and those options that are on sale are quite expensive. It makes no sense to spend a lot of money on the purchase of this design, since you can make it yourself.
Milling table: purpose, types
The convenience of using a router placed in the table lies in the optimization and safety of working with wood, as well as the speed of manufacturing parts. The principle of operation of this installation is quite simple, since the milling cutter does not move along the surface being machined, but the part moves relative to it. The milling cutter, fixed in the table, gives more wide opportunities detail processing. As a result, the blanks of products are obtained as in professional furniture workshops with the appropriate equipment. Before making a milling table, you need to decide on appearance and size. It is necessary to take into account the possibility of upgrading the table. It is important that the table is reliable and stable in use. The presence of drawers will create additional comfort in work.
Compact homemade design will replace the industrial machine
There are three main types of router tables:
- Stationary - a specialized design, usually bulky and unmovable.
- Portable - has compact dimensions and relatively low weight. This table is easy to move.
- Aggregate - the design provides for the expansion of the surface of the saw table.
Construction scheme
For self-manufacturing countertops usually use MDF boards pasted over with various plastic coatings, thick plywood or boards. These materials are easy to process, light in weight and durable.
Wooden structure is easy to handle and use
Some craftsmen believe that a metal countertop is the most durable and durable. They are right, but such a table with an electrical appliance will become an excellent conductor, which is unsafe. Also, the metal is prone to corrosion, so it must be painted.
Milling table tops must be smooth. Often they are made of plastic or metal. These tables are perfect flat surface which is immune to moisture. Phenolic plastics lend themselves well to processing. This is very convenient when making grooves for aluminum profile or when drilling holes for the longitudinal stop fasteners. Like MDF, plywood and boards, these materials have reasonable prices.
In branded worktops made of steel or aluminum, holes are already provided for a specific router model. If the manufactured models of countertops are made of MDF boards or plastic, then firms prepare only holes for the plates. Although this does not always happen.
There are holes in the sole of the plate through which the router is fastened with screws to its base. These plates can be made of metal, plastic, polycarbonate or aluminium. The plate for the router must be installed flush with the surface of the countertop. If any part of the insert protrudes above the surface, the workpieces will catch on it.
The table top is equipped with adjusting screws or other devices to level the plate. It is better to choose a plate with replaceable rings. This is necessary to select the holes of the rings according to the size of the diameter of the cutter. This makes it easier to remove chips and other debris from the work surface. milling table.
Create convenience in selecting the diameter of the cutter
When performing milling operations, it is often necessary longitudinal stop, which guides the workpiece under right angle. In order for the work to be done accurately, it must be even along its entire length, located strictly perpendicular to the table surface and easily reconfigured for various processes. The front parts of the stop can be made both solid and in the form of several overlays. To accumulate chips and debris, the side stop is equipped with a pipe. The hose of the vacuum cleaner is connected to it.
The front parts of the stop in the form of several fixed overlays
The milling table can be upgraded with a bed into which the grinder will be fixed. You can read more about the independent manufacture of this design.
Necessary tools and materials
- Joiner's glue.
- Bolts with nuts.
- Screws.
- MDF board and birch plywood
- Electric jigsaw.
- Spanners.
- Sandpaper.
- Ruler.
- Pencil
Drawings and calculation
To make a table for a router, you can use a separate surface, which is fixed in wooden poles or between two pedestals. Most in a simple way creating a countertop, a supporting part and parts for a milling table will use an MDF board or birch plywood with a thickness of 16 to 25 mm. If the plate is covered with plastic, then there will be less resistance during operation. The plate laminated on both sides will not warp during operation. In our case, in the manufacture of the milling table, we used:
- 1 MDF panel, size 19x1000x1800 mm.
- 1 plywood sheet, size 19x1000x1650 mm.
- 1 plate, size 4x30x30 mm.
- Aluminum rails - 2.3 m.
- Wheel support with brake - 4 pcs.
Photo gallery: Milling table schemes
Step-by-step instruction
The structure of the top of the table will consist of wooden parts that are sawn from a single 19mm MDF board. Birch plywood can be used as a replacement for this material.
- Sawing sheet material into fragments according to the specified sizes.
1 - working surface; 2 - emphasis base; 3 - its wall of the stop; 4 - scarf (4 pieces, dimensions for 19 mm plywood); 5 - tsarga (2 pcs.); 6 - side bar; 7 - connecting bar (4 pcs.)
Before sawing into parts, it is necessary to check the thickness of the MDF board, as often it may not match the specified parameters or be defective.
- It is necessary to remove the plastic lining from the sole of the router. In the future, it will serve as a template for marking the cutters on the surface of the countertop.
The plastic overlay will serve as a template when marking
- On the largest sawn part No. 1, 90x70 cm in size, make markings for the cutter. To do this, draw a line in the middle at a distance of 235 mm from the edge, putting a mark. Then place the overlay so that the router adjustment mechanisms are closer to the edge of the table. Having positioned the trim evenly, mark the places for drilling holes that will be fixed with screws.
Mounting holes must match the trim
- Measure the diameter of the lining and the distance from the outer edge to the cut of the sole, as shown in the image.
Determination of its diameter
- From the middle of the cut part of the sole, draw a line perpendicular to its center, where: S = D/2-(D-H).
Measurements are taken from the cut of the sole of the lining
- Using the holes in the sole of the lining, mark the future holes for the mounting screws.
Using an overlay as a template
- In parts No. 2 and 3, drill holes for fasteners and cutters. At the base and front of the stop, make markings for semicircular cutouts, as shown in the image. Using a jigsaw, cut semicircular cutouts. Sand the surfaces.
There are no semicircular cutouts in the diagram.
- Fasten four planks (parts No. 7) to the underside of the table top with screws.
Use carpentry or epoxy as glue.
- Glue the rest of the blanks and secure them with screws. Install a router on the bottom of the tabletop.
1 - side bar for fixing with clamps on the goats; 2 - tsarga; 3 - countersunk guide holes; 4 - front wall of the stop; 5 - self-tapping screw with countersunk head 4.5x42; 6 - scarf; 7 - stop base
- Now we need to make supporting structure table. In our case, its height will be 820 mm. For this, a sheet of birch plywood 19x1000x1650 mm was used.
1 - external side stand; 2 - internal rack; 3 - rear rack; 4 - base
- Cut plywood into pieces according to size.
- Assemble the table structure, fixing its parts with self-tapping screws, screws, glue. The result is a frame with free space in the cabinets, which are convenient to use for storing tools and consumables.
1 - side stand; 2 - support on wheels; 3 - the bottom of the structure; 4 - inner panel; 5 - rear pillar
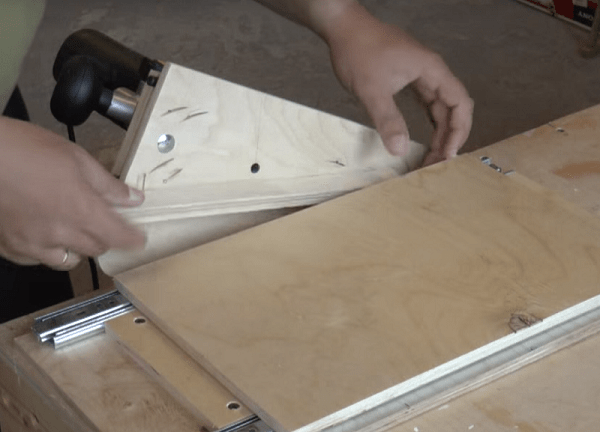
- Then you need to make a mounting plate, which will contribute to a greater overhang of the cutter due to the tool attached to it. For the manufacture of the plate, duralumin, getinax or polycarbonate with a thickness of 4 to 6 mm is required. Cut out a square from the specified material, the sides of which are equal to 300 mm. Glue the sole of the router on it (using double-sided tape). In this case, the overlay will be used as a template. Drill the plate through the holes in the lining. After that, remove the overlay and make recesses for the caps in the plate with a large drill.
Allows the cutter to handle the details as much as possible
- As shown in the image, you need to place the plate and trace its outline. On the countertop, draw and cut a cutout, the edges of which are processed with sandpaper.
A pre-drilled hole will make the process easier
- At the place where the cutter is attached, drill holes and widen them with reverse side countertops with a 11 mm drill. Lay the mounting plate on the prepared hole in the worktop, aligning them for bolting. Attach the part to the sole of the router. Insert the tool into the worktop and fasten it with screws.
The holes of the worktop and the plate must match
- For the convenience of working on the machine, it is necessary to modify the side stop and equip it with a rotary one. This will help further process the ends of narrow parts. To do this, you need to cut guides from a T-shaped profile into the surface of the plate.
Swivel and side stop make the process convenient
- Install the guide profile in the front plate of the stop for fastening clamps, linings and protective devices.
- To connect the vacuum cleaner to the machine, it is necessary to make a pipe for dust removal. To do this, you need to cut a piece of 140x178 mm in size from plywood. In the center of the part we do round hole for fastening the adapter for the vacuum cleaner.
The part is made of plywood
- For a stop, add a safety shield made of plywood and plexiglass.
Wing nuts are used for convenience.
- For milling small fragments, make clamps and clamps. To do this, cut out the details from plywood in accordance with the dimensions in the image. When making a clamp-comb, it is better to use maple wood. To cut the part, you need to choose a section with a straight direction of the wood fibers. Ridge slots are best done circular saw on the machine.
Allows you to fix details when processing small fragments
- Fix the guide with clamps. Sand all surfaces of the table, especially in places where milling work will be carried out. Clear All wooden elements from dust and cover with oil.
Safety
When working on a milling machine, accidents and injuries from contact with the rotating mechanisms of the cutter and particles of workpieces flying off from it are possible. Before starting the router, you need to remove all tools from the surface of the countertop, clean its surface from debris and small particles. It is also possible to equip the milling table with a protective screen that will prevent the scattering of particles.
While working at the table, it is unacceptable to clean and lubricate parts, remove the protective screen and measure workpieces. Protective goggles must be worn to prevent the flying particles from getting into the eyes. This is especially true for high-speed milling or processing of bronze elements, cast iron or silumin.
It is necessary to cut the cutter into the part gradually. The mechanical feed must be turned on until the part comes into contact with the cutter drill. During the rotation of the milling mechanism, it is unacceptable to place hands close to the rotation zone of the tool. Before installing the drills, you need to make sure that they are reliable and durable, as well as the integrity and correctness of sharpening. Drills should not contain metal chips and cracks. If such defects are found, they must be replaced.
Video: Making a do-it-yourself milling table
Thanks relatively inexpensive materials and your skill can build a compact design of the milling table. This will allow you to produce parts with high-precision cutouts and high-quality processing at home.
Everyone who is seriously involved in woodworking knows how important it is to have a good router. However, it is not at all necessary to pay exorbitant amounts for this tool - it is quite possible to make it yourself. How to do this will be discussed in this article.
A well-made milling table significantly increases the efficiency of working with a manual router. However, their purchase can cost a pretty penny, because it will be much easier to make such a table yourself, using special drawings for this. This will allow you to save a lot of money and, moreover, the process will not take too much time. There are several types of router tables: stationary, adaptive and portable. This article will focus on the stationary version, because it is the most difficult to implement. And, therefore, having learned how to make it, other types of milling cutters can be made without difficulty.
Selection of drawings and materials
Before starting any work, you should decide what kind of result you need to get. It will be easiest to make a milling table based on a regular workbench, but it’s better to do it anyway a separate structure. And if for this purpose it is nevertheless taken regular table, then it must be very strong and stable. It is important to choose the right dimensions: for example, optimal height is approximately 90-100 cm. An even more successful solution would be a table with adjustable height, because this will allow you to adjust the milling machine to the needs of the master. General form elements of the milling table can be seen below.

As for the materials, there are also subtleties here. Often, the covers for such a table are made of MDF board. In general, this is justified: they are inexpensive, light and easy to use. Phenolic plastic is also a popular material - it is stronger and more durable than MDF. But also more expensive - about 20%. You can make a tabletop from a sheet of metal. One thing is important - the surface must be absolutely smooth, since the workpieces must easily move along the surface of the table, without clinging or getting stuck anywhere. The thickness of the cover must not exceed 35 mm.
From the tools for work you will need:
- Electric drill.
- Chisel.
- Sander. In principle, grinding can be done manually with sandpaper, but it will take much more time.
- Plane.
- Screwdriver.
- Jigsaw.
As you can see, both materials and tools for making a milling table are not so difficult to get. But it is extremely important that everything be of high quality, because the durability and reliability of the product directly depends on this.
Stages of making a table
When all preparatory work completed, you can proceed directly to the manufacture of the product. Everything is done in several stages. They will be listed below.

There are some nuances associated with the implementation of each of the points. However, anyone who has experience working with wood products will be able to make a milling table. It is important to pay close attention to the task at hand.
How to make a router with your own hands + (Video)
Most people prefer to buy ready tools, but some of them can be done by hand. Refers to those manual frezer. Of course, we are not talking about building from scratch - it takes a lot of time. But the milling cutter can be made from another, simpler and cheaper tool. For example, from a drill. You can also make this tool from a grinder or a puncher. It is optimal to take a device with a power of 600 to 1000 W (it can be "Fiolent" or something like that). The whole structure will consist of a motor (that is, a drill itself) and a frame in which it will be fixed. How exactly the process will take place will be discussed below.
Milling process
First of all, a frame is made, in which then it will be necessary to install a drill. It is cut out of a chipboard, then a special iron clamp is installed on top for additional fixation. Parts of the structure are fastened together with self-tapping screws. A cutter is clamped into the drill chuck. In order for the structure to be sufficiently stable, the frame is attached to the table top with self-tapping screws. Of course, even with seemingly good fixation, the drill may stagger in the frame, which will lead to the fact that wooden details processed on such a router will look sloppy. A good solution would be to place the rotary lever on the side, and not on top - in this case, the motor will loosen less during operation.

Of course, this solution also has certain disadvantages. For example, such homemade device not suitable for long work: With constant use, it will quickly fail. And because of the low power with the help of such a tool, it is difficult to process wood. hard rock. But a milling cutter made from a drill will be inexpensive, it is easy to use, and even a beginner can assemble it. Therefore, this design is used quite often.
In conclusion, it is worth noting that you should not be afraid to make woodworking tools yourself: expensive factory equipment will undoubtedly be better in some ways, but sometimes availability and low price play a much larger role. Especially when it comes to products where it is not necessary to adhere to high accuracy. Such a self-assembled product is ideal for those who are just learning to work with wood, but sometimes it can help out more experienced craftsmen.
The presence of a milling machine will greatly simplify the process and the accuracy of processing products. It can be purchased at ready-made in a specialized store, or you can save your own savings and make a table with your own hands.
With such a device, you can cut not only different breeds trees, but also plastic, wood boards. Also with it you can independently make a figured selection of the profile, grooves, spike and slots.

With the help of a DIY router table, you can equip your workshop with a practical woodworking machine. All that is required for effective work- this is to fix the manual milling cutter itself on the product.
Type designs, the milling table can be:
- hinged. This option quite practical and easy to use. To do this, a separate unit unit is attached to saw machine on the clamps on the side. This design saves space. If necessary, it can be easily and quickly removed and left aside;
- portable. This option is in great demand, especially if the workshop small sizes. Also, this type of construction is suitable for those who often change their place of residence or take a router with them to construction sites;
- stationary. This option is suitable for a spacious workshop. This is a very comfortable model. Since with a stationary product you can equip a well-thought-out workplace.
Material
 For the manufacture of a milling table, you can use various materials:
Each individual option has its own advantages. The tree differs in the high durability, reliability and durability. But you need to be able to work with this material. It is more difficult to handle manually, unlike DPP or MDF. Yes and worth it natural array much more expensive.
As for chipboard and MDF, these materials are more affordable. They are easy to process with hand and power tools and have good technical characteristics.
Drawing of a homemade milling table for wood
Before proceeding with the manufacture of the milling table, it is necessary to make a drawing. It indicates the exact dimensions of each individual element and the materials of manufacture. As for making a drawing, you can do it yourself, you can use special programs on the computer or, order in furniture company . The last option is the most reliable. Since the experts will make a competent calculation of all the details, with an accuracy of one millimeter.

Tools
 For the manufacture of homemade design milling table you will need the following tools:
- hacksaw;
- electric jigsaw;
- grinder or sandpaper;
- drill;
- chisel;
- screwdriver or screwdriver.
Advice: the use of electric tools will greatly speed up the process of manufacturing and assembling the product.
From materials you will need:
- Chipboard or MDF. In order not to bend during work, it is worth choosing lumber with a section of 3.6 cm. Chipboard, 1.6 cm thick, is suitable for the side parts;
- plywood, textolite, metal (manufacturing of mounting plate);
- the milling cutter is purchased in a specialized store.
An easy way to make a table for a manual router
Countertop manufacturing
First you need to prepare the details for the table. They are cut with a jigsaw from selected lumber, according to the drawing.
Advice: detailing can be ordered from a specialized furniture company. Here you will be helped to immediately create a competent drawing and pick up lumber. The cost of services of a furniture company is fully justified by the quality and accuracy of work. All you need next is to simply assemble the product according to the diagram in your workshop.
The manufacturing process of the milling table is carried out in the following sequence:

Important: whether to do for the design of the table or not is a personal matter for everyone. worktop with installed router can be simply fixed between two tables.
How to make and install a plate yourself
Since the tabletop of a homemade milling table has a decent thickness, the mounting plate should have a small thickness. Then you can maximize the reach of the cutting tool.
Attention: a plate with a minimum thickness should be as strong and rigid as possible.
 It can be made from metal or from a material that is in no way inferior in strength, for example, from textolite. The thickness of the textolite should vary within 4-8 mm.
The plate manufacturing process is as follows:
- Referring to the drawing we cut out a rectangular part from a sheet of textolite.
- At the center of the rectangular piece make a hole. Its dimensions must correspond to the diameter of the hole in the sole of the router.
- We connect the plate with the sole of the router and the table.
- For fixing plates to the tabletop we make clamps for the machine located at the four corners. These dimensions must strictly correspond to the holes located on the tool itself.
Work area equipment
After the manufacture and assembly of the milling table, it is recommended to think over a competent working area. To maintain the accuracy of milling, it is worth installing on the countertop:
- guides. They can be made from chipboard or from the same materials as the countertop. The guides are installed at a right angle and fastened with four oblique stops.
- clamps. They can be made in the form of a wooden comb or from a ball bearing. the right sizes and weight.
Finishing
 After the construction of the milling table with your own hands, to give the product an aesthetic appearance and to extend its service life, you need all the working surfaces:
- grind;
- polish;
- bottom and sides - paint;
- open with varnish.
The electrical part of the product must be covered with a metal sleeve.
Photo
The result of the labors may be a table that looks like one of the following


Useful video
A detailed description of the manufacturing process can be viewed in the following video:
Conclusion
In conclusion, it is worth noting that the process of manufacturing a milling table is a rather responsible process. If you are sure that you will cope with such a task, you can save your own savings and make the product yourself. To do this, you will need: stock up on a well-drawn drawing, necessary materials and tools and free time.
In contact with
The use of various devices for a manual router significantly expands the capabilities of this unit, and also increases the comfort and safety when working with it. On sale there are ready-made models of devices designed to be used in tandem with a router, but, as a rule, they are expensive. Therefore, many craftsmen prefer to make fixtures for this unit with their own hands.
If you fix the hand router in a special way under the table, you get universal table This is a cutting machine that allows precise and fast processing of long and short pieces of wood. To make a table for a router with your own hands, you first need to prepare necessary details to assemble the entire structure. The figure below shows a cutting map, on which all the details of the future milling table are located. They are cut with a circular saw or format cutting machine.
The device can be made plywood, chipboard or MDF. The cutting chart shows a material thickness of 19 mm, but this is not a prerequisite. The table can also be assembled from slabs with a thickness of 16 or 18 mm. Of course, for the manufacture of countertops, it is better to use laminated or plastic-coated sheet materials that will allow the workpiece to easily slide over the surface.
It should also be taken into account that this homemade table intended for installation on goats. If you need desktop version, then the sides (5) must be made much wider than 150 mm. Their width should be slightly larger than the height of the machine so that it can fit under the tabletop.
If the details of the table are cut out of plywood or MDF, then their ends should be sanded. The ends of parts made of chipboard will need to be covered with a melamine edge using an ordinary iron.
Countertop manufacturing
The router can be installed on the table with or without a mounting plate. Countertop preparation for direct fastening to it the unit occurs as follows.

Fixing the unit with a mounting plate
When installing the machine on the main plate, its thickness significantly reduces the overhang of the cutter. Therefore, to install the unit on thick worktops, it is customary to use thinner mounting plates made of durable materials (steel, duralumin, polycarbonate, getinaks or fiberglass). The plate is made as follows.

Stop improvement
The rip fence can be modified to make setting up the router table more convenient and quick: to do this, you need to cut C-rails into the table top. The profile can be made of aluminium. For insertion, a straight groove cutter is used. The profile is placed in the prepared groove and screwed on with screws.


Next, you should choose bolts with a hex head of such a size that it can enter the C-shaped profile and not rotate in it. Drill 2 holes in the base of the rip fence to match the diameter of the bolt.

You should also cut the C-profile into the front stop bar to fix various clamps and protective covers on it.

The emphasis is screwed to the tabletop with the help of wing nuts.

On the back side of the stop, you can make camera for connecting a vacuum cleaner. To do this, it is enough to cut a square out of plywood, drill a hole in it for the nozzle of the vacuum cleaner and screw the resulting cover to the scarves.

You can also add to the emphasis safety shield, made of MDF or chipboard and a small rectangle of plexiglass. To select the grooves, you can use a jigsaw or a router with an installed groove cutter.

To be able to process small parts, it is necessary to make clamps and clamps from plywood or MDF.

It is made on a circular saw with a pitch between cuts of 2 mm.

If desired, you can make a milling table with tool boxes.

Making the table base
If required, make from a manual milling cutter stationary machine, then without making solid foundation not enough. Below is a cutting chart with the parts printed on it that will be required to assemble the table base. The dimensions of the parts will need to be corrected if using sheet material of a different thickness.


All details of the table for a manual router are assembled with the help of confirmations. For ease of movement of the table, rollers can be attached to its bottom. If you expand this table a little and attach a disk hand saw, then it will work universal table for milling cutter and circular saw.

For the machine to take less space, it can be made according to the principle of a book-table with tabletops descending on both sides.

Homemade fixtures for the router
To expand the functionality of this unit, quite expensive devices are commercially available. But the owners of milling cutters, in order to save money, try to make various devices with their own hands, which work no worse than factory ones.
A simple tenon cutter for a router is made from two pieces of plywood and a pair of telescopic furniture rails. The milling cutter is installed on a platform with a hole for the tool. The platform is attached to the workbench at an angle (for more convenient positioning of the equipment in height), as shown in the photo below.


So, the tenoning device is made in the following order.
- Cut out 2 pieces of plywood that are the same size. The size of the device can be any.
- Place two telescopic guides parallel to each other along the edges of the first platform and fasten them with screws.

- For more accurate positioning of the guides, two strips of the same length can be screwed between them.

- It is necessary to push the reciprocal strips and put a second platform under them flush with the first. Put a pencil on the second platform points through the bar, and then draw a line through them.
- Remove the strikers from the guides by pressing on the plastic “antennae” located on their reverse side.
- Lay the mounting strips on the marking platform so that the line passes through the center of the holes for the fasteners, and screw them with screws.

- Carefully align the 2 guides and slide them in (you should hear a click). If you insert the part skewed, you will break the telescopes, and balls will fall out of them.

- Between the vertical stop with the unit and the movable table, it is necessary keep a certain distance. This is done so that when lowering the cutter, it does not touch the table platform. Since in this case the maximum overhang of the cutter will be about 25 mm, it is possible to temporarily lay a bar of the same width between the table and the stop, that is, 25 mm. The bar will allow you to place the structure parallel to the vertical stop
 .
. - In the next step, holding the fixture, drill 2 holes for the dowels. They will allow you to quickly position the tenon cutter on the workbench. When the holes are ready, insert a couple of dowels into them. Now you can remove the bar laid between the stop and the fixture.

- Now that the movable table is fixed, it is necessary to install a vertical stop on its upper platform, as shown in the following figure. For rigidity, the stop is supported by two scarves.

- When all the elements of the tenon cutter are fixed, you can begin testing. Place the workpiece on the fixture table and press it against the stop. Set the desired cutter height, turn on the machine and mill the workpiece.

- After the first pass, turn the workpiece 180 degrees and repeat processing.

- Rotate the workpiece 90 degrees, placing it on the edge, and repeat the operation again.

- Rotate the part 180 degrees and finish the spike.

As a result, you will get a smooth and high-quality spike.

By changing the height of the cutter relative to the stud cutter platform, studs of various thicknesses can be obtained.
Copy sleeve
If your router did not come with a copy sleeve, then it can be made in just 30 minutes from improvised means. For homemade, you will need a metal or duralumin washer, which can be made from sheet metal, and a plumbing threaded extension.

The copy sleeve is made in the following way.
- Choose a nut suitable for the thread of the extension and cut it with a grinder so that you get a thin ring. After that, level it on the grinder.

- It is necessary to make a round platform for the bushing from sheet metal or aluminum 2 mm thick. Depending on the model of the unit, the hole in its sole may have different shape
. In this case, the site should have cuts on the sides, which are ground on a grinding machine.

- After grinding off the washer on both sides, place it on the sole of the unit.

- Put the unit vertically without removing the washer and mark with a pencil the places for fasteners through the holes in the sole of the unit.

- The places marked with a pencil must be punched for accurate positioning of the drill.


- First, drill holes with a thin drill, and then with a drill corresponding to the diameter of the mounting bolt.


- Put the washer on the threaded extension and tighten the ring nut. Clamp the part in a vise and cut off the excess thread flush with the nut using a grinder.


- Clamp the part in a vise with the other side and shorten it a little.

- Align the part to grinding wheel, insert into the soleplate of the device and fix it with screws. The ring nut should be just below the sole of the unit.


Guides for working with a router
If you need to select a very long groove in the workpiece, then you will need a device for the router, which is called a tire. Ready-made metal tires can be bought in specialized stores. But they are also easy to make with your own hands from plastic, plywood or MDF.
The thickness of the material should be about 10 mm so that the parts can be pulled together with screws.
The guide for the unit is very simple.
- Cut into three strips on a circular saw. One wide, about 200 mm, and 2 narrow - 140 and 40 mm each.
- Also make a small plank of the same material, about 300mm long and 20mm wide.
- Lay a piece 140 mm wide on a wide strip, align it along the edge and twist both parts with screws.
- Lay on top of the wide strip, opposite the screwed part, a narrow strip 40 mm wide. For precise positioning, lay a 20 mm wide bar between the upper parts and screw the narrow strip to the lower part with screws. Thus, you get a long tire with a groove 20 mm wide.
- Take a bar 20 mm wide and screw it to the sole of the apparatus, as shown in the following photo. For sampling the groove is selected straight or shaped groove cutter and fixed in the collet of the apparatus.

When all fixtures are ready, follow these steps. Place the workpiece to be processed along its entire length on the workbench, place the tire on it, securing it with clamps. Insert the bar attached to the base of the router into the groove of the guide. Start the machine and mill the workpiece along its entire length.
If you want to choose a deep groove, then the processing takes place in several passes, so that the equipment is immersed in the workpiece gradually.


For people involved in carpentry, the milling table is indispensable assistant. It will help to raise the quality of work performed, their efficiency.
The industry offers such tables in the factory, but not everyone is suitable for their cost. We propose to consider a do-it-yourself milling table, without expensive component materials.
Definition of a milling table, its design
Device with which you can perform: grooves in the workpiece, grooves, do spike connections, to process the edges of products, is called a milling table. It is inconvenient to use a milling cutter separately, the master will have to concentrate on the workpiece and at the same time on processing. A do-it-yourself milling table facilitates the work process, it can be mounted on a workbench or a special design can be made for it.
Important! When carrying out work on the manufacture of a specialized table, it must be remembered that the router is installed from below, free space must be allocated for it. The stationary part of any table is the bed, it is a strong frame with a tabletop.
frame material milling table can be:
- Wooden beam.
- Metal corners.
- Plates: MDF, chipboard.
The requirement for the frame is the creation of stability for the countertop and the rigidity of the structure. When a milling table is made with one's own hands, the overall parameters of the bed are determined from the materials that require processing.
How to make a frame for a milling machine
Despite the simplicity of manufacturing a frame for a tabletop, a homemade milling machine must correct operation Meet requirements:
The table design includes mounting plate, it is needed to mount the router.
How to make a mounting plate
Position the mounting plate at the point of attachment of the sole of the router. For its manufacture, a material is selected that meets the criteria:
- Strength.
- Thickness - the thinner the better.
Experts recommend using sheet metal, you can fiberglass or textolite. dimensions rectangular shape, thickness within 4 mm to 8 mm. It is necessary to make a hole in the center of the plate, which in diameter fits the hole on the sole of the hand router.
The router is equipped with a plastic pad that is attached to the threaded holes on the sole, these holes are used to attach it to the mounting plate. If there are no such holes, they must be made in the sole of the router. Another method of fastening the router is also proposed, this is with metal brackets-springs. Mounting plate attached to the tabletop at the corners.
Do-it-yourself milling table assembly instructions

To assemble the clamping device, rollers or a ball bearing of the desired diameter are used. It is mounted in a holding device, which is rigidly fixed at the right distance from the plane of the table top.
This device provides a tight pressing of the overall workpiece to the plane of the tabletop when it passes under the roller. This simple addition increases the accuracy of the work carried out, improves labor safety.
You can assemble a functional milling table with your own hands when the master has information about the electric drive that will be used in the work. Consider the power parameter to select an electric drive:

Important! Experts recommend that before assembling the milling machine, determine the power of the milling machine, it must not be less than 2 kW. This power enables the master to work with any wood. It is recommended to choose models of milling cutters with rotation speed control. The rotational speed of the router is very important for obtaining an even cut on the workpiece. If this parameter is high, the cut will be clean.
Safe use of the router table
When the milling table is assembled and the electric drive is installed, do not rush to immediately check it in operation, make sure that the work performed is correct. What experts recommend for safe work on the milling table:
- Recommended to be installed on a countertop. protective screen, it can be of its own design or industrial design.
- Be sure to check the presence of an emergency stop button for electrical equipment, it must be in the form of a “fungus” and located in the area where the master is located so that you can press it with your body.
- Equip the work area with light illumination.
- When the milling table is used for frequent cutter changes for work, it is recommended to equip it with automatic device cutter lift.
In equipping a homemade milling table no restrictions, there is only one requirement for them: to increase the safety and efficiency of the work being carried out.


