When the sun shines mercilessly outside the window, a breath of fresh wind seems like the highest pleasure. If it were colored, then not a single stream of it would go unnoticed: I saw a colorful air wave, stood in its path, raised my hands and... here it is - the bliss of “swimming” in the refreshing surf.
Yes, it is not easy to see the wind, but it is easy to detect its presence. How? Let's do this.
Preparatory stage
The pinwheel is a wonderful wind catcher. Children especially like this toy. How to make a pinwheel? From paper, of course. For beginners and children, colored paper is an ideal material that is easy to work with.

Check if you have everything you need at hand:
Square sheet of paper;
Scissors;
A small nail and two beads (or a pin, a button on a round stem, etc.);
A skewer (or pencil, cocktail straw, wooden stick and so on.).
Stage 1
Now let’s take a closer look at the question of how to make a pinwheel out of paper.
Place the beautiful piece of paper you have chosen on the table directly in front of you. Bend it exactly diagonally in half. Unbend. Fold again on the other side. Flatten the square. The sheet should form two lines intersecting in the center, obtained by folding.
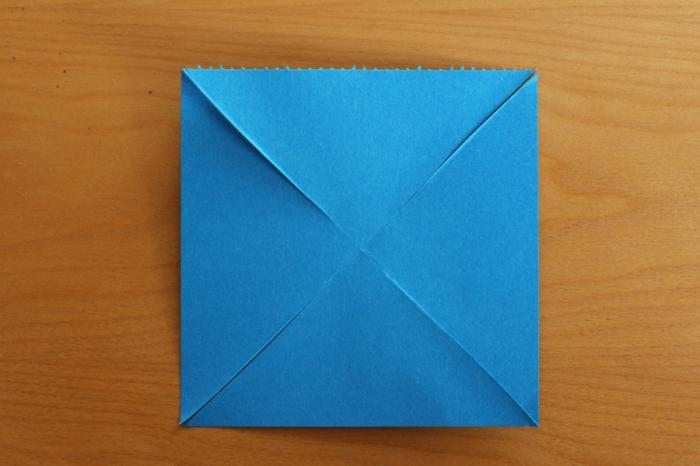
Make four cuts along the fold from each corner to the center. But do not cut to the intersection, leave one and a half centimeters to the “meeting point” of the two lines.
Stage 2
Use a nail to make preliminary punctures: in the center (just where the lines intersect) and one hole in each left corner of the triangle. This is what you should get:

Stage 3
Place the bead on the stud.

Stage 4
Let's proceed to the final stage of the process called "How to make a pinwheel out of paper." Connect all four ends to the holes in the center and thread a nail through each of them, as well as through the middle. On back side, where the point now sticks out, put a second bead on it.

Level 5
Attach the pinwheel “inflorescence” to a wooden stick.

The toy is ready! Now even your child can explain from paper. Stick a stick into a flower pot, and it will not only “bloom,” but also act as a stand as a reliable assistant guarding the breath of a fresh breeze.

By the way, this simple thing can become stylish element room design. An elegant pinwheel will decorate the office.
Hi Hi!
Today we’ll talk a little about scrap!
I really love decorations codenamed “windmill”.
They are very easy to make, anyone can make them the right size, any color. What is convenient in scrap is that you can take paper that perfectly matches the product, from the same collection as the paper in the product itself, for example. And to make such a simple, but at the same time effective decoration :) I most often make something small, but here it’s a real find!
I want to tell you how I make them, maybe it will be useful to someone.
I also want to draw your attention to the fact that you can use them in any way you like. There is only one limitation - our imagination 😉
For example, can be used as decoration flower pots.
Or for example on children's day birthday or party you can make windmills different sizes, big ones can serve decorative ornaments, decorate the cake less or, for example, cocktails.
And once I made such windmills to decorate the windows of one of the MEGA Kazan stores :) I used 30*30 cm squares, quite large. In general, anywhere and at your convenience!
So let's get started. For clarity, I made a video, where I also showed how I decorated the sticks on which my windmills were held for the display case.
We need cardboard, double-sided or single-sided, I use designer paper for scrapbooking, the thickness is suitable.

Here you can see the other side :) I chose the top paper.

I cut a square from my strip. The side of the square is 5 cm.

You need to draw invisible lines along the diagonals; I draw them using a scoring stick. You can also use a knitting needle or crochet hook. Or ballpoint pen, which has run out of ink. If you look closely you can see the lines on my square.

You need to cut along the lines from the corners to the center, not reaching the center 1-1.5 cm.

Each corner is now divided into two parts. It is necessary to make holes in the center and in one of the halves of each corner.

Now we need to decide in which direction we will bend some of the corners with holes. Usually the color or pattern on the two sides of the paper is different, so you need to decide which way to fold. In order for the folds to be soft and without creases, I soften the paper with an awl.


We select the matching color bras.

And we begin to thread the bratsik into each corner with a hole and, last of all, into the center. Let's strengthen it, brother.
So we're going to make a small wind generator. It can be made at home. 90% of the parts are made of plastic pipes and fittings, so it can be easily disassembled for transportation and reassembled. Let's start.
Manufacturing of blades


For this you will need a plastic pipe with a diameter of 8 cm and a length of 25 cm.
Cut it lengthwise into three equal parts. We cut each part lengthwise at an angle and cut out a blade from the resulting parts, as in the figure.
For the base of the screw, take any round plate with a diameter of 6 cm.
We make three equally spaced holes in it and, using small bolts and nuts, attach the blades to the plate.
Making the base

On the base and mast of the wind generator, a propeller, generator, tail and swivel mechanism. The base is very easy to make. To do this you will need several short pieces of plastic pipe and some fittings.
We connect 4 bends and 3 tees, as in the figure.
Making a tail

For normal operation of a wind generator, a tail is needed. What is its purpose? The tail is needed to automatically rotate the propeller axis when the wind direction changes.
To make it, you need to cut a galvanized steel plate, make a slot in plastic pipe, insert the plate into it and secure everything with a bolt.
Housing with generator


To make a housing with a generator you will need:
- electrical wire,
- plastic handle body,
- plastic tee,
- two bearings,
- motor (generator) direct current at 3 V.

Insert the generator into the tee.
Secure the bearings to a common axis.
You can use a section of the handle body as an axis.
One bearing must be attached to the tee.
Mini wind generator is ready

Place the wind generator opposite the fan.
Connect the probes to the output wires. Yes, the device will show what is being produced electricity. With an efficient generator, you can charge a 3-volt battery. In addition, in a similar way you can make a larger wind generator that can be used to charge a mobile phone.
We will send the material to you by e-mail
In the modern world, more and more money has to be given for public utilities, the list of which includes the supply of electricity. Therefore, owners of private houses are increasingly thinking about how to make a 220V wind generator with their own hands, which can provide uninterrupted electricity to the entire house.
Industrial wind generator
All wind turbines consist of a blade, turbine rotor, generator, generator axle, inverter and battery. All models can be roughly divided into industrial and home, but their operating principles will be the same.

Rotating, the rotor creates alternating current with three phases, which goes through the controller to the battery, and then in the inverter it is converted into a stable one for supply to electrical appliances.

The rotation of the blades occurs due to physical action using an impulse or lifting force, as a result of which the flywheel comes into action, as well as under the influence of a braking force. In the process, the flywheel begins to spin, and the rotor creates a magnetic field on the fixed part of the generator, after which the current is reproduced.
In general, wind generators are divided into vertical and horizontal. Which has to do with the location of the axis of rotation.
Vertical option
When planning to create a 220V windmill with your own hands, first of all think about vertical options. Among them are:
- Savonius rotor. The simplest one, which appeared back in 1924. It is based on two half-cylinders on a vertical axis. Disadvantages include low use of wind energy.

- With Daria rotor. Appeared in 1931, spinning occurs due to the difference in resistance between the aerodynamic hump and the tape pocket, so the disadvantages include low torque, as well as the need to mount an odd number of blades.
 A type of wind generator Daria
 - The blades have a twisted shape, reducing the load on the bearing and increasing service life. The disadvantage is the high price.

A homemade option will be cheaper if it is properly thought out and installed.
Related article:
RCD: what is it? Have you ever heard the abbreviation RCD? You will find out what it is by reading the review to the end. Briefly, I would like to add that this device is capable of protecting housing and all its inhabitants from emergency situations related to electricity.
Horizontal models
Horizontal models are divided by the number of blades. They have higher efficiency, but there is a need to install a weather vane to constantly search for the direction of the wind. All models have high rotation speeds; instead of blades, a counterweight is mounted, which affects air resistance.

Multi-blade models can have up to 50 blades with high inertia. They can be used to operate water pumps.
How to make a 220V wind generator with your own hands
To provide a private house constant flow of electricity average speed a wind of 4 m/s is enough:
- 0.15-0.2 kW, which is used for basic needs;
- 1-5 kW for electrical equipment;
- 20 kW for the whole house with heating.

It is worth considering that the wind does not always blow, so you should provide a DIY windmill for your home with a battery with a charge controller, as well as an inverter to which the devices are connected.
For any model of a homemade windmill you will need the following basic elements:
- rotor - the part that rotates from the wind;
- blades, usually they are mounted from wood or light metal;
- a generator that will convert wind power into electricity;
- tail, which helps determine the direction of air flow (for the horizontal version);
- horizontal yard to hold the generator, tail and turbine;
- match;
- connecting wire and shield.

The shield will include a battery, controller and inverter. Let's consider two options for how to implement wind generator with your own hands.
Related article:
You are familiar with the problem of power outages, which manifests itself in blinking light bulbs. In the article we will talk about how to choose the right 220V voltage stabilizer for your home in order to forget about this problem once and for all?
Features of assembling a wind generator from a washing machine with your own hands
Let's look at how to make a 220V wind generator with your own hands using an old-style engine.
Table 1. detailed instructions wind generator from washing machine with photo
| What to do | Photo example |
|---|---|
| You should buy neodymium magnets that are mounted in recesses on the engine rotor. The notches themselves are made on lathe, for correct placement, use the diagram. |  |
| The magnets must be glued with superglue into the prepared recesses. Then, they should be wrapped in paper, and the rest of the space should be filled with epoxy. |  |
| Next, we prepare the axle, which is best ordered from a turner. Inside the hollow structure there should be room for the cable and a hole for its entry. We mount the holder from an iron rod. For it we use a grinder, with which we cut off two tubes (you attach the generator to them), and weld them at the other end. |  |
| Let's move on to the blades, which can be made from a 16 cm pipe for external sewerage. In this case, use a jigsaw. |  |
| All that remains is to assemble the wind generator, securing all the elements. To begin with, we attach the generator, blades, rotor and tail to the support rail. Don't forget to cover the generator with a casing. |  |
| The power plant should be secured using a hinge mechanism, and the mast should be mounted in concrete base for 4 bolts. |  |
| Route the wire to the distribution panel. |  |
| Connect all elements and perform performance testing. |  |
To make it easier to understand the entire sequence of actions when assembling a wind power plant with your own hands from an old one, watch the video:
Features of assembling a vertical wind generator from a car generator with your own hands
When “homemade” people think about how to make 220V wind generators with their own hands, they most often use car generators as a basis. It is not difficult to assemble, but for work you will need:
- 12V generator from the car;
- battery;
- converter from 12 to 220 W with a power of 1.2 kW;
- aluminum or steel barrel or bucket for blades;
- car warning light;
- switch;
- voltmeter;
- copper wires with a cross-section of more than 2 mm;
- clamp for fastening.
To assemble a vertical wind generator with your own hands, you will need a tape measure and a pencil, a set of keys, an electric drill and a grinder, as well as metal scissors. Detailed installation instructions are given below.
Table 2. Assembly vertical wind generator from a car generator
| Action | Image |
|---|---|
| The prepared metal container must be marked and cut into 4 equal parts, but this must not be done completely. Drill holes for bolts in each part, which should be symmetrical. |  |
| Blades that are not completely cut are slightly bent; the speed of rotation directly depends on this process, so decide in advance in which direction the equipment should rotate. |  |
| It is necessary to secure the blades to the pulley, and install the generator on the mast using clamps, and also assemble the wiring according to the prepared diagram. |  |
| The main thing is to correctly connect the wires to which the battery is connected in the panel, as well as the converter. |  |
To make it easier for you to navigate, watch the video on how to assemble a wind generator from a car generator with your own hands.
greetings to all brain friends! And I share with you brain guidance about the creation crafts-windmill, clearly showing the conversion of mechanical energy into electrical energy.

Having collected this simple homemade and having understood the principle of operation, it is possible in the future to make a larger-scale and actually operating wind generator. And a simple windmill will delight you by lighting up your yard!
Step 1: Materials
- marker
- motor
- LED (mine is red)
- plastic or wooden plate
- PVC tee 3/4 - 1/2 - 1/2
- connector 1/2
- glue gun
- drill with bit for drilling
- blades
- flange 1/2
- pvc pipe scissors
- punch or awl
- sealing ring
- roulette
- 30cm PVC pipes 1/2
- and of course, the wind :)

In count necessary materials It may seem that the craft is complicated, but it is not. The motor can be taken from an old VCR or DVD, the blades can be easily made from spoons and a bottle cap. PVC pipes can be cut perfectly with a regular hacksaw, and not just with special pipe scissors.
Step 2: Cutting the Pipe


Mark on brain tube segments of 2.5 and 12.5 cm, and then cut them off with scissors. This will result in three segments of 5, 12.5 and 15 cm.
Step 3: Marking the Hole


On front side motor, put on the O-ring, apply it to the tee and mark the hole for the LED, it will be located near the back of the motor.
Step 4: Drilling the Hole


Shilom or brainkerner We mark the center of the hole, so the drill will not slip, and drill a hole of such a diameter that you can easily install an LED in it.
Step 5: LED Mounting


We take the LED and determine the polarity of its contacts: the long leg of the LED is the positive contact, and then we connect the LED to the motor. The positive contact is to the “plus” of the motor, the negative contact, respectively, to the “minus”. We secure the LED legs by bending the motor contacts.
Step 6: Check functionality

We install the blades on the axis of the motor and blow on under the tree, strong enough for the LED to light up.
Step 7: Installing the Motor


Carefully bend the LED and insert it brain motor into the hole of the tee until it fits tightly, then insert the LED into the intended hole and straighten it.
Step 8: Fixing the Motor


By using glue gun fix the motor in the tee.
Step 9: Refinement of the connector


We put the tee with the motor aside and take the connector. Unscrew the connector and remove the O-ring that is located inside, this will allow the windmill to homemade rotate freely.
Step 10: Bushing Assembly


We insert the previously cut piece of 2.5cm tube into the connector, thereby obtaining something like a sleeve.
Step 11: Installing the Tee


We mount a tee with a motor on the bushing.
Step 12: Shank


As a “shank”, we tightly insert a piece into the tee braintubes 15cm, and insert a 12.5cm segment as a “stand”.
Step 13: Finishing the Shank


Using hot glue, attach the plate to the shank.
Step 14: The homemade product is ready!


We tighten or loosen the connector parts depending on your needs, mount the flange on the stand and glue all the fixed parts together. If desired, we paint the windmill and that’s it, brain trick ready!
Thank you for your attention, I hope this homemade worthy of being a visual aid!


