Round rolled O10, square #10. Cut out petal blanks from the sheet. 
We heat the rod O 10 and, stepping back from the edge by about 40 mm, we forge a transition to O8. 
Then we clamp the workpiece in a vice and press the remaining end to O 12-13. Let's trim the boss and use a backing chisel to make an undercut at a distance of 5-10 mm from the edge - this will be the rod for the rivet. 
Pull the rod back to #6-7mm.
When crimping, we roll the rod to Ø 6mm. 
Now let's move on to the spikes. To forge a thorn, the stem is forged to 8, leaving part of the rod (l = 10mm). 
Then, on the edge of the anvil, with two or three sharp blows of the hammer, we delay the protrusion. You have to hit very accurately. 
Then we clamp the workpiece in a vice and install the protrusion through the attachment (bar). 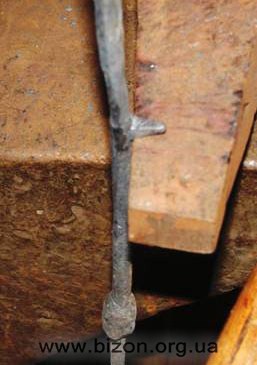
The thorn is ready. We forge others (as many as planned) and complete the stem. 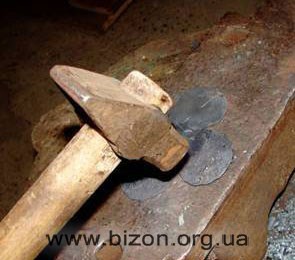
It's the petals' turn. On the petals you need to lower (make thinner) the edges and mark the veins. 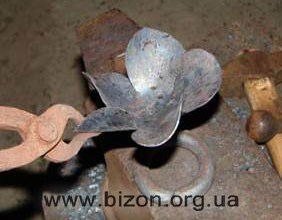
Well, it’s possible without veins, but I’ll do it. 
Let's form the petals. 
And also the lower petals. 
And the middle of the corolla. 
The time has come to “grow” the leaves. To do this, heat #10, pull the end onto a cone and leaving about 45mm, make a neck for the handle. 
We break the workpiece, giving it the shape of a sheet.
We apply veins on the leaf.
And we pull back the stalk.
You can collect "to the heap".
Assembly procedure for a forged rose
Let's start assembling the flower. We clamp the stem in a vice, put the rims on the rivet rod and seal them. Let's rivet st.
DIY tin roses
Good afternoon, in this letter I will try to tell you the whole process of making a rose from tin, which can be an excellent gift for loved ones.
To create a rose from tin you will need a minimum of tools:
Pliers
Metal scissors
Ruler
Pencil
Compass if possible
Tin roses step by step: So, we will need metal mugs - we can use roofing iron
2.
3.
or simple tin cans. We cut out circles with different diameters, approximately from 150 to 130 mm - the difference is 5 mm each, i.e. 150-145-140-135-130... You will need 5 of them - this is a blank for the flower itself.
Then we need a star - fashionably four-pointed. We cut it out from a circle with a diameter of 110 mm - this will be the lower part of the flower.
4.
We draw on a separate sheet of metal and then cut out the leaves themselves - 1 single and one triple is enough... I think this is better... then we cut the notches along the edges of the leaves - it appears real view of a real leaf... and you can use a simple screwdriver to knock out the veins in the middle of the leaf.
5.
Then we bend the stem of the leaf inward - with pliers... and we get a finished leaf... Here - we need another piece of wire - maybe 6 in diameter - I make these... and a piece can be copper tube to cut on one side internal thread under the M6 screw - this is to screw the entire assembled rose... bud... and on the other side we simply solder it into the wire.
6.
And so we cut out four-leaf flowers from metal circles and press each leaf as shown in the photo with pliers... squeeze it into a vase and turn away the edges a little - also with pliers... then when everything is ready, insert all the baskets one into the other and edit the folds of the leaves by eye ... then we drill a hole in the middle for a screw and twist it to the prepared tube - we solder the tube to the wire and screw the leaves with a metal strip prepared earlier ... - the edges can be soldered ... that's all ...
7.
From these tin roses you can make anything that comes to mind - a hanger, a lamp, used to decorate a gate, etc.
Metal jewelry has never gone out of style. Of course, you can easily buy them from folk craftsmen. But what could be more beautiful than a hand-made metal rose as a gift to your beloved woman, or a hand-made candlestick presented to friends on the occasion of a family celebration?
How to make a metal flower?
Manufacturing technology metal rose easy to master. You just need to show patience and practical savvy.
To make metal jewelry by doing the work yourself, you will need a sheet of roofing iron, which is best annealed to give it plasticity and softness. Next, you need to mark five star-shaped figures on the metal. Four stars have pointed petals, and the fifth has straight petals. The diameters of the circumscribed circles of pointed stars: 12 cm, 10 cm, two 6 cm each. The figure with straight petals has a diameter of 8 cm.
The next step is to make three mandrels cylindrical with base diameters - 1, 1.5, 2 cm. The material of the mandrels can be wood hard rocks or metal. The cut out star is placed on a slab of hard wood or lead. The mandrel is positioned along the line connecting the center and tip of the petal. With light blows of a hammer, bend the metal of the petal around the mandrel. All petals are processed in this way. The smaller the diameter of the sprocket, the smaller the diameter of the mandrel you need to take for processing it.
Next, the mandrel with its end rounded end is placed in turn in the center of each sprocket and hit with a hammer. The stars should take a neat cup shape. Using pliers, you need to bend the tips of the flower petals outward at your discretion and desire. For the inner sprocket of the smallest diameter, leave the tips straight. The processing must be carried out in such a way that after its completion all the stars easily fold into each other. Metal flowers, skillfully created with your own hands, can be made not only in the form of a rose, but also any other flower. It all depends on your desire and imagination.
Next step. Cut leaves with embossed veins from metal. As a stem
you can take thick wire. Attach the blanks to the end of the stem and grab them for strength.
To give the flower a finished look color range it must be heated until red, cooled in oil and washed in gasoline. After all these procedures, the product will have a beautiful, very dark shade.
DIY metal candlesticks
A unique candlestick can be made using simple materials and tools:
- a metal strip made of sheet 3 mm thick, 40 mm wide, 400 mm long and a strip of the same metal 20 mm wide and about 500 mm long;
- a piece of metal sheet 2 mm thick, dimensions 100 x 100 mm;
- green paint;
- hacksaw;
- files - flat and round;
- hammer;
- drill with 6 mm drill bit;
- ruler, needle and core for marking;
- for assembling parts.
Candlestick - sketch
Bracket part No. 1, which will be attached to the wall, is made from a strip with a cross-section of 3 mm x 40 mm and a length of 400 mm. The ornament of your choice is applied along the edge of the workpiece using a round file. A hole is drilled in the strip for hanging on a wall mount. The upper end of the strip can be bent using a hammer, holding the part in a vice.
A piece in the form of a circle is cut out of a sheet 2 mm thick to install a candle. This detail can be decorated with a flower, which is cup-shaped in the manner described in the previous section. A hole with a diameter of 6 mm is drilled in the center of the round part. Souvenirs made with soul and with your own hands require imagination and some skills when working with plumbing tools.
Next, bracket No. 2 is made with a cross-section of 3 mm x 20 mm and a length of about 50 cm. One of its ends will then be attached by welding to bracket No. 1. The second end is cut lengthwise into 100-150 mm. The ends are bent in different directions, they are given an arched shape. The resulting candle bowl is placed on the resulting stand and grabbed spot welding to the stripes.
Now you need to think about how to attach the candle to the candlestick. For this purpose, you need to take a piece of rod with a diameter of 8 mm and a length of 35-40 mm. One end of the 10 mm rod is machined to a diameter of 6 mm. On the second end lathe or using a file to create a point. The end with a diameter of 6 mm is inserted into the hole in the bowl of the candlestick.
After assembling all the parts, the candlestick is painted with metal enamel in a dark green color or patinated. If you like hand-made metal engraving as a decoration, then the best option is the electro-chemical method, which is accessible to everyone.
Curved gratings produced by cold forging
How can you decorate your site with imagination with your own hands? Curly bars, gates, wickets. But if you use products obtained by hot forging, then such improvement can result in a very decent amount. You can, of course, make all these structures from a 4 mm thick strip, bent using primitive devices. However, the appearance of such grilles, as well as their reliability, leave much more to be desired.
The most optimal is to use equipment that allows you to create parts from a rod with a cross-section of 1 cm x 1 cm and 1.2 cm x 1.2 cm that imitate hot forging products. The resulting products are much cheaper than hot-forged ones, but are also beautiful and reliable.
Various accessories in combination with welding work make it possible to make real patterns from metal by working with your own hands: multi-point spiral curls, a rod or strip twisted along the vertical axis, three-dimensional parts that are used in the production of “three-dimensional” lattices.
Particularly impressive is the figure obtained from square rods 6 mm x 6 mm welded together. It's called a "flashlight". By welding it is possible to obtain from bent method"" details periodic patterns "boyar" and "wave".
Using metal patterned parts obtained methods cold forging and assembled, you can make gazebos, pergolas, decorations for porches, stairs and canopies. Such shaped metal products go perfectly with all architectural styles and are able to decorate any premises and garden plots.
Let's start assembling the flower. We clamp the stem in a vice, put the rims on the rivet rod and seal them. Let's rivet st.
DIY tin roses
Good afternoon, in this letter I will try to tell you the whole process of making a rose from tin, which can be an excellent gift for loved ones.
To create a rose from tin you will need a minimum of tools:
Metal scissors
Ruler
Compass if possible
Compass if possible
So, we will need metal mugs - you can use roofing iron or simple tin cans. We cut out circles with different diameters, approximately from 150 to 130 mm - the difference is 5 mm each, i.e. 150-145-140-135-130... You will need 5 of them - this is a blank for the flower itself.


or simple tin cans. We cut out circles with different diameters, approximately from 150 to 130 mm - the difference is 5 mm each, i.e. 150-145-140-135-130... You will need 5 of them - this is a blank for the flower itself.
Then we need a star - fashionably four-pointed. We cut it out from a circle with a diameter of 110 mm - this will be the lower part of the flower.

On a separate sheet of metal we draw and then cut out the leaves themselves - 1 single and one triple is enough... I think this is better... then we cut notches along the edges of the leaves - a real appearance of a real leaf appears... and you can knock out the veins in the middle of the leaf with a simple screwdriver .

Then we bend the stem of the sheet inward - with pliers... and we get a finished sheet... Here - we need another piece of wire - maybe 6 in diameter - I make these... and a piece of copper tube can be used to cut an internal thread on one side under the M6 screw - this is to screw the entire assembled rose... bud... and on the other side we simply solder it into the wire.

And so we cut out four-leaf flowers from metal circles and press each leaf as shown in the photo with pliers... squeeze it into a vase and turn away the edges a little - also with pliers... then when everything is ready, insert all the baskets one into the other and edit the folds of the leaves by eye ... then we drill a hole in the middle for a screw and twist it to the prepared tube - we solder the tube to the wire and screw the leaves with a metal strip prepared earlier ... - the edges can be soldered ... that's all ...

From these tin roses you can make anything that comes to mind - a hanger, a lamp, used to decorate a gate, etc.
Metal rose is stylish decoration any interior. Such a flower will never lose its attractiveness, and if made with your own hands, it will become an original gift to a loved one. Making such an unusual flower is quite simple. You just need to be patient and have the necessary tools.
What you need to make a rose from metal
For creating metal flower You need to prepare the following materials:
- a smooth metal sheet, the thickness of which will be approximately 5 mm;
- a steel rod for a rose stem with a diameter of about 10 mm;
- anti-corrosion agent or motor oil for processing crafts.
Necessary tools to create decoration:
- grinder or grinding machine with two types of discs - for grinding and for cutting;
- drill for working on metal with drills up to 1 cm in diameter;
- pliers and pliers;
- wire cutters;
- welding machine;
- gas-burner;
- hammer and anvil.
It is better to make a flower on outdoors or in a ventilated area. It is important to follow safety precautions when working with tools and metal. Having provided all the necessary conditions, you can begin making roses.
The process of making petals for a metal rose
To make a flower bud, we cut out at least four 10x10 cm squares from a sheet of metal. The more petals there are, the more magnificent and luxurious our rose will be. Using a regular felt-tip pen, we draw sketches of the petals on the blanks, according to which we cut them out with a grinder or a grinder. There is no need to cut them until the very end.
Next, you need to give the workpieces the necessary texture. To do this we use a hammer and an anvil. Using gentle blows of a hammer, flatten the edges of the petals on one side. The same must then be done with future leaves of the stem.
To place our petals on the stem, you need to make a special hole in their center. To do this, you can use a drill or welding. When using a drill, drill a hole in the center of each petal equal in diameter to the flower stem. The use of welding involves burning holes of the required diameter using the electrode of a welding machine. We do this carefully so as not to make holes larger than necessary.

After the petal blanks are ready, we put them on a metal rod one by one and weld them to it. We put the first blank for the petal on the rod, leaving about 2 cm from its end. We arrange the petals crosswise. When connecting the petals to the flower stem, try to melt the rod more, since the metal of the petals is thin and can burn out. We bend the lower petals down, forming a sepal of a flower.
To give our petals the desired shape We use a gas burner with which we heat the products. Next, using pliers, bend the central petals inward and the rest around them. Having connected the petals, you need to slightly bend their edges.
Making metal rose leaves
In addition to the bud itself, it is necessary to supplement the flower stem with leaves. For this purpose on metal sheet draw a sketch of future leaves and cut them out using a grinder. We make small notches along the edges of the leaves and make them slightly wavy, so that it looks natural. We connect the finished leaves to the stem by welding.

In the same way, you can weld metal spikes to the stem of the flower, which are cut in the shape of small triangles. If the stem is too long, it can be trimmed with a grinder. The average length of such a stem is usually 40 - 50 cm.
Treatment of roses against corrosion
The final stages of creating a metal flower will be anti-corrosion treatment. If this is not done, the craft will lose its appeal over time. For these purposes, you can use varnish or spray paint. It is very convenient to purchase special paint in a can, which can be silver or golden in color. It is convenient and evenly applied to the product and dries quickly.
Another treatment method is to use unused motor oil. It is applied to a pre-heated product, processing all its elements. After this, the rose is heated again to remove excess oil. Using this method will give the flower a noble dark shade. An elegant souvenir is ready.
.
For the manufacture of of this flower the master used noble non-ferrous metals such as copper and brass, which become covered with a beautiful patina over time, giving the product a more mysterious and aesthetic appearance. Glass rhinestones were also added to the petals, which sparkle and shimmer when rays of light hit them.
The production of flowers today is very developed in blacksmith workshops, where they forge beauty from metal, but the guys from “Steampunk” are not lagging behind and do no less unique flowers from copper and brass.
The blanks are cut and given the required shape with a punch, then assembled into a single structure, the stem and leaves are added.
So, let's take a closer look at how the author created his flower and what exactly did he need for this?
Materials
1. sheet brass
2. sheet copper
3. glass rhinestones
4.solder
5. copper tube (from an old refrigerator)
6. copper wire
7. bolt
8. nut
9. super glue
Tools
1. drill
2. metal scissors
3. file
4. punch
5. board with recess
6. burner
7. tap
8 die
9. ruler
10. sandpaper
11. hacksaw for metal
The process of creating a metal flower with your own hands.
According to the author, there is nothing complicated in making a flower and anyone who wants to have such a miracle at home can do it. Having made such a rosette from copper and brass, you can then give it to your beloved wife, girlfriend, mother, grandmother, imagine how happy they will be from such a gift.
First of all, the master prepared all the tools necessary for the work; by the way, the author’s punch is an ordinary one spherical bearing from Lada.
Afterwards, a leaf-shaped blank is cut out of brass sheet, like this.

And with the help of a punch a convex shape is punched out.

A hole is drilled at the ends of the petals for subsequent assembly.

Gathers into a bud.


Gives a wave-like shape.

He takes the bolt and makes a cut in its upper part.

The edge of the brass plate is inserted into the cut site and soldered.

Rolls up into a roll.

And it is pulled out a little by the edge, thereby stretching it slightly.

The edges of the petals bend.

After which the master proceeds to create a cavity in wooden beam, namely, with a punch and a hammer, he presses it, hitting it properly on a homemade instrument.

I cut off 2 copper plates and pre-heated them with a torch, so the metal becomes softer and easier to process.

The copper blank is placed over the cavity in the beam and the following manipulations are performed using a punch and hammer, blow by blow the shape is given.

The edges are trimmed.

Inserted into each other.

This is the rose the master produces. Beautiful, is not it?

Then you should create a base for the flower; here the author takes these components.

He cuts and takes away the necessary tubes.

This is the telescope being assembled)))

The resulting elements are soldered and then bored in a drill.


Holes are drilled in the main stem.

Afterwards, the leaves are prepared, also from brass, cut out to shape and the design and relief are punched out.

And with the help of super glue the rhinestone is glued into the resulting seat.

That's all finished work you saw in the head photo. As you can see, the flower assembly process is quite simple and does not require complex instrument and skill, and most importantly the uniqueness of this product, which is very much appreciated today.
Do more creativity, develop your talent, create.
This concludes the article. Thank you very much for your attention!
Come visit more often, don't miss out on new items in the world of homemade products!
The article is presented for informational purposes only!
A gift made with your own hands is always more memorable and arouses admiration. You invest your time, effort and soul into it. Flowers are beautiful, but short-lived. An iron one, created by hand, is a wonderful gift that will delight for many years and make a lasting impression on the recipient.
Materials and tools for creating an iron rose
- welding machine (semiautomatic or inverter; for an inverter, use electrodes 2 mm thick at a current value of 50-70 A)
- corner Grinder or grinder (with cutting and grinding discs; it is better to use a cutting disc 1 mm thick, and a flap type grinding disc)
- drill with metal drills with a diameter of 0.5 - 1 cm
- iron rod with a diameter of 8-12 mm (for the flower stem)
- sheet iron 0.5 mm thick; (you can use metal from the hoods or wings of a car, its thickness according to GOST is 0.5 - 0.8 mm)
- gas burner, or any other heat source
- 300 g of motor oil (preferably not used)
- round pliers
- felt-tip pen
Cut 4 squares with a side of 10 cm from an iron sheet. If you want your rose to be more magnificent, prepare 5 squares.

Draw the shape of future petals on the squares, and on one of them - something like a “wind rose”. This will be a blank for the sepals, so don’t try to achieve perfect symmetry - nature makes each of its creations individual.


Take an iron rod and, if necessary, shorten it to required length- this is the stem of the future rose (40-50 cm).

Now you need to make holes for the stem in the cut out petal blanks. There are 2 methods - drilling and welding.
Using a drill, drill a hole strictly in the center; the diameter of the hole should correspond to the diameter of the rod. If the diameters do not match, suppose you chose a rod with a diameter of 12 mm, and the thickest drill you have is 8 mm, then drill 3 holes side by side so that you get one hole the right size. Inner edges bend with round nose pliers or thin pliers. The rod must fit tightly into the holes, otherwise it will be difficult to weld.

Use a 3 mm thick electrode and set the current value to about 100 A. Bring the electrode to the center of the blade and strike the arc. Press the electrode into the metal, piercing it all the way through. Since we are using thin sheet iron, it will burn through easily. But be careful, the hole should not be too large.

Tip: You don’t have to do it perfectly. round holes. They need to be made such that the rod is in contact with them by at least 50% of its diameter. This necessary condition for proper welding and strength of the entire structure. During the process of making holes, periodically apply a rod to them, this will allow you to control the process.
Step back 2 cm from the end of the rod. Now put the blanks with petals on it, starting with the sepals. Arrange each layer of petals so that the petals are criss-crossed. Secure each layer by welding. Carefully - thin metal burns out quickly, so melt more rods than petals.

Bend the leaves of the bottom layer down.

Now the most interesting part of the work is the formation of the petals. Heat the petals while they are still flat gas burner. It is not necessary to get it red hot, just a little heat is enough. Under the influence of temperature, the metal becomes ductile, easier to form, and the likelihood of unwanted deformations is reduced.
Using thin pliers or pliers, bend the 2 central petals so that they are wrapped in each other. Fold the remaining petals around them.

Layer by layer, bend all the petals, bending the tips in the opposite direction.

Now you need to make the rose leaves. Draw their outlines on a metal sheet. They may not be the same either.

Cut out the leaves with a grinder.

Make notches on both sides of the leaves, as shown in the photo.
Carefully! Hold the leaves only with pliers, never with your hands!!!
Change your grip as you make cuts. Hold the sheet by one edge and make notches on the other, then vice versa.

Bend the leaves with your hands and attach them to the rose stem using weld points. Be careful not to burn them.


The rose is ready. But untreated metal will rust over time, and corrosion processes must be prevented. There are many options - spraying, varnishing, you can even paint a rose in the colors of a living flower.
I preferred to do the bluing. To do this, you need to heat the rose, cover it with motor oil and heat it again so that the excess oil burns off. Work should be carried out only in a ventilated area, or better yet, in the open air, since the oil will smoke when heated.
Good afternoon, in this letter I will try to tell you the whole process of making a rose from tin, which can be an excellent gift for loved ones.
To create a rose from tin you will need a minimum of tools:
Pliers
Metal scissors
Ruler
Pencil
Compass if possible
Tin roses step by step:
So, we will need metal mugs - you can use roofing iron or simple tin cans. We cut out circles with different diameters, approximately from 150 to 130 mm - the difference is 5 mm each, i.e. 150-145-140-135-130... You will need 5 of them - this is a blank for the flower itself.


Then cut out two strips approximately 2.5 cm wide. One should be 110 mm long, and the other 125 mm - this is for the inner leaves of the flower.
Then we need a star - fashionably four-pointed. We cut it out from a circle with a diameter of 110 mm - this will be the lower part of the flower.

On a separate sheet of metal we draw and then cut out the leaves themselves - 1 single and one triple is enough... I think this is better... then we cut notches along the edges of the leaves - a real appearance of a real leaf appears... and you can knock out the veins in the middle of the leaf with a simple screwdriver .

Then we bend the stem of the sheet inward - with pliers... and we get a finished sheet... Here - we need another piece of wire - maybe 6 in diameter - I make these... and a piece of copper tube can be used to cut an internal thread on one side under the M6 screw - this is to screw the entire assembled rose... bud... and on the other side we simply solder it into the wire.

And so we cut out four-leaf flowers from metal circles and press each leaf as shown in the photo with pliers... squeeze it into a vase and turn away the edges a little - also with pliers... then when everything is ready, insert all the baskets one into the other and edit the folds of the leaves by eye ... then we drill a hole in the middle for a screw and twist it to the prepared tube - we solder the tube to the wire and screw the leaves with a metal strip prepared earlier ... - the edges can be soldered ... that's all ...

From these tin roses you can make anything that comes to mind - a hanger, a lamp, used to decorate a gate, etc.
We present to your attention one of the largest organizations in St. Petersburg for the production of metal structures, ferrous and stainless steel products, painting of metal products and artistic forging (forging of visors).
Good luck to you and all the best!!!
Attention! Any use (copying) of the article is permitted only with the written permission of the author of the material and the site administration.