The toy box is necessary element any children's room. Cleaning should be an exciting activity for the child, and each toy to have its own place. You can buy a basket or chest of drawers in the store, but it is much more interesting to create a beautiful box yourself.
This item can be easily made with my own hands and realize your best creative ideas pleasantly surprising the children. In addition, the implementation of this design will take only a few evenings.
A do-it-yourself toy box can be made of cardboard, chipboard or sewn from fabric. Get a capacious container in which you can put everything Board games with toys.
Cardboard box
The simplest option is cardboard box. To work, you need the following set of tools and materials:
- Thick cardboard box.
- Decoration fabric or self-adhesive film.
- Scissors, needle, thread and glue.
- Tape and ruler.
First you need to cut off the upper part, glue the sections with tape.
Option to decorate a regular cardboard box with colored paper and curly scissors
If it is planned to make a product with handles, then the holes must be made in advance and also smooth the cuts with tape.
Then make measurements of the exact parameters of the box. An inner and outer cover is sewn from the fabric, and then both parts are sewn on top. For sheathing, a dense, well-cleaned material is selected.
Another option to decorate the box is to glue it with a cloth or self-adhesive film. This is a very simple procedure. To implement it, you need to cut out several pieces of fabric or film according to the dimensions of the walls and bottom. At the same time, do not forget to leave 1-2 centimeters for bends. First, the outer part is glued, then the inner.
Important! Corners and joints should be given Special attention if glued poorly, the fabric may disperse.

Children will be happy to decorate the box with unusual patches with you.
If you need handles for the box, they are cut out of fabric, sewn together and inserted into the slots. You can choose any method of fastening - glue or, alternatively, simply tie the ends of the fabric together.
Decor options
- On top of the fabric or film on the box, you can stick a variety of patterns. For example, make smiles or faces with eyes and a mustache.
- Ordinary jeans for decorating the box will add additional pockets to the design.
- The toy basket is diversified with buttons, zippers and opening elements.
- If you decorate a box for storing children's toys with colored paper, then images of cartoon characters or children's photographs are suitable as decor. Bright colorful images can be cut from gift bags.
Tip: Another option is a fabric toy bag. It can be in the form of a backpack or a fabulous house.

Original boxes can be woven with your own hands from newspaper vines dyed with food coloring
Chipboard product
To store children's toys, you can make a product from plywood or chipboard.
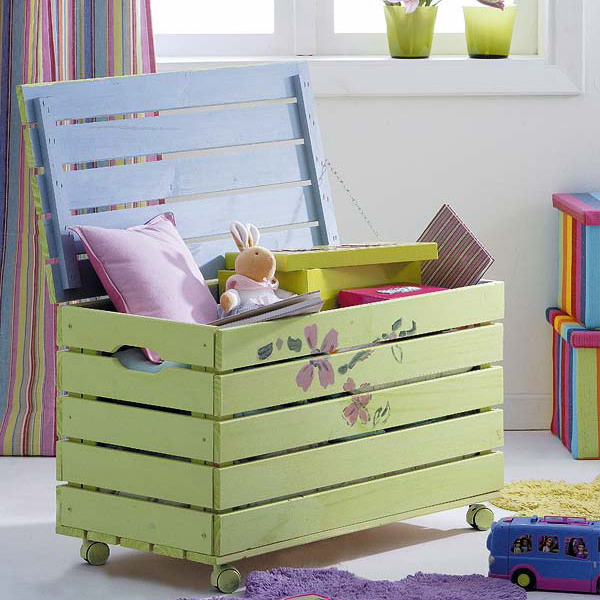
The walls and bottom of the box are fastened together with self-tapping screws, here, of course, male help is required. To fix the lid of the box, it is best to use special spring holders. This design will prevent children from pinching their fingers. For easy movement of the storage box, it is better to install special wheels on it. They are sold in every hardware store.
The product must be varnished. The varnish must be transparent and non-toxic. The walls of the product can be decorated with various figures, numbers or letters. These parts can be easily made from wood with a jigsaw and painted in different colors, or consult with the children, perhaps they already have ready-made parts in their bins, for example, from puzzles. Then glue the decoration to the surface with glue.
You can decorate a wooden basket using a stencil and bright colors.
Important! For very young children, you can fit wooden structure foam rubber, and on top - colored fabric.
There are many interesting ways create convenient system to store toys.
- An old suitcase preserved in the attic can become an unusual box for children's toys. Such a suitcase is easily pasted over with colored paper or sheathed with a colorful fabric.
- A great way to store is to use plastic boxes. They can be placed throughout the room or attached to the walls in a chaotic manner.
- If you have your own yard, then you can make a great place to store outdoor toys. To do this, 1-2 tires are painted in bright colors and placed on top of each other. It turns out a great tank for baby supplies.
- An original solution for the interior of a children's room can be the use of metal and plastic buckets. Buckets must first be painted and arranged in different parts rooms. Plastic products can be connected using drilled holes.
- From fabric, there are many options for roomy and practical products. For example, you can do beautiful basket or sew wall structure from pockets for storing small toys.
Having spent a little time and showing imagination, you can please your child and create a fabulous atmosphere in his children's room.
is a task of increased complexity. After all, small family members sometimes have the largest arsenal of home belongings than other household members combined. Educational toys, cubes, books, designers, dolls - all this tends to pile up in a children's room in a chaotic mess.
But modern prepared parents will not be afraid of either the abundance of game "props" or the activity of the kids - they come to the aid of ergonomic boxes, shelves and toy containers , as well as other thoughtful options for storing children's toys, which we will discuss in more detail later.

Toy box
The easiest and most obvious way to use for the orderly storage of "game goods" boxes. And not necessarily specially purchased, you can do it without problems DIY toy box . Containers made of natural or artificial rattan, utility boxes, painted in cheerful colors and decorated with uncomplicated decor: ribbons, beads, fabric frills, flowers and sequins are appropriate in children's rooms decorated in modern styles.


Toy storage baskets
Toy baskets various forms and sizes also perfectly complement and contain a sufficient amount of game "props". Choose baskets different colors that match the interior of the room, place them one on one to save space.
Involve your child in the creation process DIY toy baskets : a shoebox lined with colored paper or a painted wicker garden basket will be inexpensive, but worthy alternative purchase options.


Interested in how sew a toy basket? Take a bright printed fabric and wrap it around a pre-prepared frame made of strong wire or a wooden beam.
DIY toy basket: video
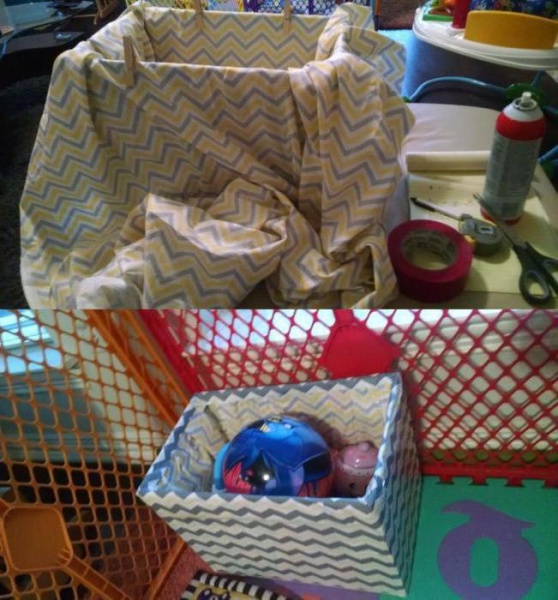
Organizers for children
With minimal sewing skills and a bit of imagination, you can please your child with functional and ergonomic toy organizers – hanging fabric "containers", divided into several sections, or simply small bags of colored felt, sewn together if necessary.
The advantage of this storage method is compactness: organizers are hung on the wall, side wall cabinet or shelf. It is convenient to store not only toys, but also socks or handkerchiefs in them. By the way, we advise you to choose shelves or shelves for toys open type, without doors, with which children do not always get along.


But not only baskets, drawers and organizers are used for toy storage . Chests, hanging bags, colored buckets, ottomans with pockets, wardrobe trunks, stylized suitcases will surely interest a small family member and arouse in him an interest in order. Besides, toy bags or toy nets due to the soft shape, it is easy to “hide” in cabinets, sliding shelves, under the beds, which is convenient in conditions of lack of free space.


- take away everything that the child is not interested in - dose the number of toys by choosing several diverse amusements: give everything that is not old or broken, give it or send it to the scrap. Otherwise, the child will have problems with concentration and perseverance, and children's chest of drawers for toys will be littered with unnecessary "good".
- sign and sort toy storage boxes : separately for dolls, cars, puzzles, educational games, cubes, books. So it will be easier for the child to direct the marafet in the room and find the right thing.
- Decorate containers and toy storage boxes bright ribbons, felt, dried flowers and involve the child in this process - he should like the “tools” that help keep his favorite room clean.


To save space, stack the boxes on top of each other, you can hang up toy basket to a wall or ceiling, hide it in a niche or under. If the expanses of the nursery allow - select a separate toy cabinet , and place trunks or boxes on its shelves, taking into account the height of the shelves and the height of the child - in the nursery everything should obey the needs and desires of the little owner.


If you are usingtoy rack, put the most popular fun on the lower shelves, those that are used less often are higher. Children's toy rack - in general, an irreplaceable thing, on its shelves you can place everything related to the leisure and life of the child: not only toys, but also board games, books, some things and hygiene items.

By the way, the task storage of toys becomes more complicated if more than one baby lives in the room, but a couple at once. In this case, everyone is allocated a personal corner for games and storage of game "props" - his own territory. Sign boxes To avoid confusion and unnecessary quarrels, teach the children to respect each other's personal space and work together to maintain order in the room.


But even the presence of a functional furniture for toys , wardrobe trunks and organizers will not save the nursery from chaos if the child is not accustomed to return everything to its place at the end of the day. The cleaning process should be part of it exciting game well, colorful design and creativity toy box designed to attract the attention of the crumbs and develop in him a sense of thriftiness, with your help, of course.
Well, which parent is able to refuse his child to buy a toy that he likes? Everything is swept off the shelves: from small trinkets to solid sizes of soft animals and entire doll houses. Toys in the house are also relatives with guests. As a result, their assortment grows to such volumes that it becomes impossible to walk around the room without stepping on some kind of typewriter or doll dishes. This means - it's time to think about how to make a toy box with your own hands?
Why not take the path of light resistance and just buy some storage from the store? It's a matter of psychology and education. original box for children's toys, assembled with your own hands - a great way to turn a tedious and little-liked cleaning process into an entertaining action. So, in a playful way, it will be easier for a child to accustom to the idea that there should be order in the room. He himself will gladly collect everything that was scattered, and with his own hands will send the toy box to the place allotted to him.
How difficult is the task? Exactly to the level of your desire to do handmade. After all, you can literally assemble an interesting design from nothing.
Consumables
“You can make a box for children's toys with your own hands from almost everything”
What exactly can you work with to get a really cute craft that attracts the attention of the baby? As the photo says, you can make a box for children's toys with your own hands from almost everything. His role may be played by:
- carton boxes;
- wooden container;
- plastic boxes;
- baskets;
- buckets.
You can make a box for children's toys from almost anything.
In the end, the toy storage can simply be cut out and assembled from the remnants of the fabric. Let's see what can come out of such foundations.
A few ideas on how to make a DIY toy box
Cardboard box transformation
You can make a box for toys from any box, even a shoe box, but considering that the child will use the container several times a day, it is still better to take something stronger and more voluminous. To do this needlework you will need:
- scotch;
- glue;
- a set of colored paper;
- scissors.
Box for toys from a cardboard box
Sequencing
Do-it-yourself work on creating a toy box begins with the removal of unnecessary parts from the workpiece. It is necessary to cut off the upper part, that is, remove the elements that form the lid of the box. Then holes are cut along the side faces for future handles.
Coat the surface of the box with PVA glue
Now we paste over the blank with colored paper, putting it on PVA. To simplify the task, you can use self-adhesive film. It is more practical and dirt can be removed from its surface.
Cover the box with colored paper
When choosing color solution, be guided by the main interior colors used in the decor of the room. Then a do-it-yourself box for children's toys will not look like a ridiculous element of interior decor. You can assemble a whole set of such colored boxes and provide separate storage of balls from cars and designers.
DIY toy box
soft container
An option that meets all the requirements for arranging a nursery. How to make such a toy box with your own hands? You need to start by creating a frame. Traditionally, it is made from hard wire, boiled from thin rods, knocked down from wooden slats.
Textile box pattern
According to the size of the frame, the fabric is cut. There will be two patterns: one for outer skin, the second - for the internal. On the bottom, it is recommended to put a denser material, such as tarpaulin, teak or burlap.
Perform fabric cutting
Do-it-yourself work on the toy box will continue with the arrangement of soft walls. Between the fabric layers, a thick layer of foam rubber should be laid or replaced with synthetic padding pillows, sewn with one's own hand to the available sizes.
Turn out the finished structure
In the first case, for reliable fixation of foam rubber, the sides need to be quilted. You can put into business large beautiful design buttons. Thus, the issue of the decor of the product will also be solved. Ideas for creating beautiful soft boxes for toys with your own hands, see the photo.
Fabric toy box example
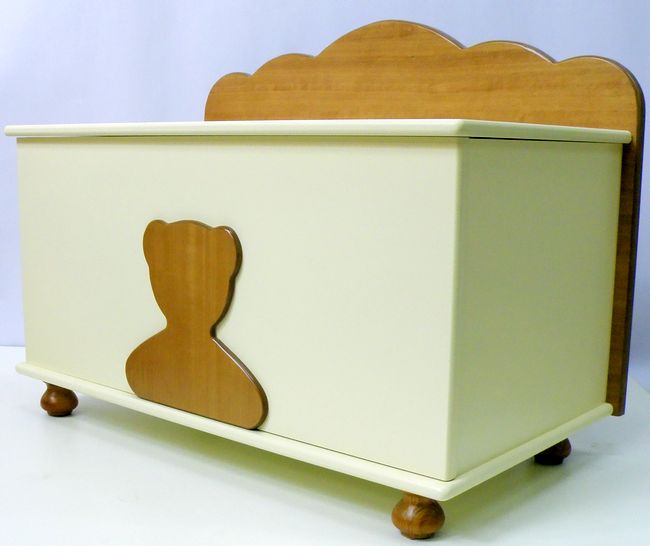
wooden container
The most durable model, toys in which more than one generation can store toys. If inheritance is not included in your plans, then wooden box it will not be difficult to retrain it into a furniture element of a different functionality, for example, convert it into a mini chest of drawers or a comfortable seating pouffe.
What you need and how to make a box for children's toys with your own hands from wood?
As Supplies fit:
- boards;
- elements from already unnecessary furniture;
- durable plywood.
Required Consumables
It is clear that it is better for dads to work with such consumables. It will be easier for them to find perfect option fixing elements in each case and solve the issues of wood processing.
Action algorithm
In order for a do-it-yourself toy box to turn out to be of high quality, do not be lazy to make a sketch of the future design on a piece of paper indicating the dimensional parameters and the method of movement.
Look at the photos of DIY toy boxes. There will definitely be options with lids. This is very practical, as it will allow the piece of furniture to act in several forms at the same time. To assemble them, you need to prepare 6 parts: 4 side walls, a bottom and a lid. All elements, except for the last one, are connected with screws and glue. The cover is fixed on hinges.
Decorate the assembled box
The wood used in the work must be carefully sanded with your own hands so that the toy box does not have roughness and splinters, neither inside nor outside. This is a child safety issue, so take it seriously.
If it was planned to make the structure mobile, it would have to be put on furniture wheels.
How to decorate such a thing? A matter of taste. It is acceptable to keep the natural pattern of the wood and simply open the box with several layers of varnish. You can paint it in the most unpredictable colors or paint it with thematic drawings.
An interesting idea is how to design a toy box with your own hands using the patchwork technique. For this, again, paints will be used.
Attach furniture wheels for mobility
Painting the container with plain paint and decorating it with animal figures, geometric figures, and letters sawn from wood is considered a classic.
You can attach a soft mattress of cheerful colors to the lid of the box, then you can also sit comfortably on it. In a small nursery, such a piece of furniture may well replace a chair.
DIY wooden toy box
DIY creative boxes for children's toys and more
“A worthy alternative to a toy box will be a do-it-yourself hammock”
In principle, you can store toys in anything, so turn on your imagination and go!
rare suitcase
The suitcase dug in the depths of the pantry of grandfathers is a real find! It can be turned into a magnificent element of interior decor and, at the same time, make a box for storing toys out of it. All that is required is to change its design in any convenient way. When thinking about finishing options, keep in mind that appearance products should overlap with the general interior solution. So it will be easier to enter the nursery's atmosphere.
Toy box from an old suitcase
Plastic packaging
How to make a box for children's toys with your own hands from it? You can assemble container containers into a single structure by building something like a chest of drawers. But in this case, you will have to work on creating wooden frame which is not for everyone.
There is such an option as simply placing them around the room. However, it will look boring, even though the elements are bright and colorful.
Rack for toys from boxes
From a completely different perspective, a nursery will appear with boxes for toys randomly stuffed with their own hands on the wall. Such a composition will create a picturesque mess and serve as an excellent repository for children's treasures. And the child will have the opportunity to choose what and where to put. For example, he will collect cars in a red container, and books in a green one. So that the baby does not get confused, each box can be marked with the corresponding pictures.
Separate boxes by color
Car tires
The idea is more suitable for giving. In order to assemble such a box for children's toys with your own hands, it is enough to put two or three tires on top of each other. For greater decorativeness, they can be painted in different colors or decorated in a different original way.
Tire storage box
Wooden packaging
Seemingly unsightly designs can be turned into real masterpiece. There are a lot of design options for wooden boxes. It looks interesting, for example, decor with book spines.
Another creative is a skateboard box. The product is painted and placed on the running platform of the skateboard. Such a toy warehouse will be easy to move to any corner of the house. How else to make a toy box with your own hands, tell the photo.
Functional toy box
Textile storage
Instead of a box, you can make a soft design for storing toys in the form of a bag. Untying the rope and extracting the contents will not be difficult even for the smallest child. Great solution are transparent bags sewn from fabric and vinyl film. Transparent walls allow you to quickly find desired item without spilling the entire contents onto the floor.
Transparent toy bags with drawstrings
A worthy alternative to a toy box will be a do-it-yourself hammock. It is often hung over the head of the bed and stuffed toys are stored there. This is done so that the baby can always get his beloved bunny or dog. Sleeping in the company of fluffies is much calmer.
Hammock for soft toys
Autoparking
Does the boy have a solid collection of small cars? Suggest that he park them in the hive garage. The design is a multi-tiered structure, constructed from the bearing bases of the rolls toilet paper. How you can assemble an alternative to a toy box with your own hands, look at the photo.
Rack for typewriters from bushings
In principle, the process is not labor intensive. Cardboard bobbins are glued side by side. To prevent cars from falling out back wall can be closed with one common piece of cardboard.
Something similar, but in the appropriate decor (with ribbons, bows, rhinestones) can be offered to girls. After all, it is not necessary to design a whole box for children's toys with your own hands, if you plan to store only some little things in it.
Organizer from bushings for storing small things
funny buckets
The mission of the toy storage system can be assigned to plastic and zinc buckets. It is good if the containers are initially multi-colored. Otherwise, you will have to decorate them yourself. On plastic, the application will hold well, but plain zinc buckets will have to be painted. You can work on their design with decorative tape. This material will allow you to realize any fantasies. Look for ideas on how to make a box for children's toys from buckets with your own hands, in the photo.
Bright buckets for storing toys
Conclusion
The issue of storing toys may not be so big problem, if not too lazy to solve it radically. As you can see, it is not at all necessary to run to the store for the containers under them. It is enough to find a suitable idea on how to make a toy box with your own hands on the Internet and implement it in life. The untold wealth of the child will be harmoniously distributed in the modest expanses of the nursery in a matter of hours.
Photo gallery - do-it-yourself toy box
As a rule, we buy a lot of different toys for our children (dolls, cars, soft, educational, and so on). As a result, they are all scattered in different corners of the apartment. To prevent this from happening, we suggest that you find out how and from what you can make a box for At the same time, it will be possible to accustom a child to order.
Using an unused cardboard box
Big shoe boxes household appliances and so on can be reused. Just decorate them - and you will succeed comfortable spot for storing children's dolls and cars.
A master class on how to make a toy box with your own hands is described below.
- You will need a cardboard box big piece fabrics.
- Coat the bottom of the box around the perimeter with glue from a gun.
- Unfold the fabric and line the bottom of the box with the middle, gently spreading the flap and pressing it to the glue.
- Coat all the walls from the inside, stretch the fabric and glue it to the sides.
- Wrap the fabric over the outside of the box and glue it to the bottom of the walls.
- Turn the box over and wrap the fabric at the bottom. The patch should be evenly pressed against the wall. Glue the fabric, and cut off the excess.
- To strengthen the bottom, coat the fabric with glue around the perimeter of the box and glue cardboard on top.
- Flip the box.
- Pin clothespins on top, and put something heavy inside so that the fabric sticks well to the box.
The box is ready!
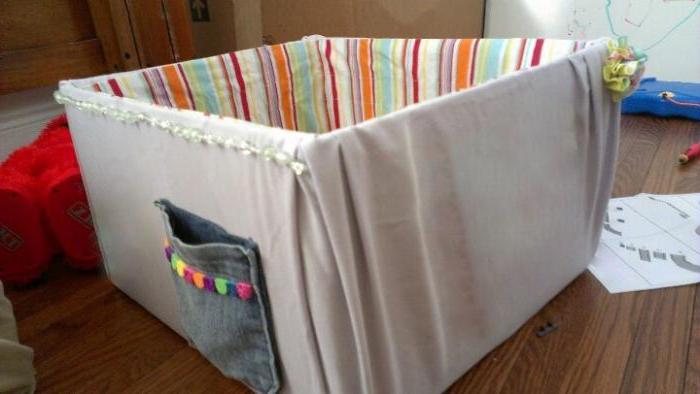
Box with handles
Instructions on how to make a box for children's toys with handles will help you in this matter.

- Take two types of fabric, thick tape or rope, glue, glue gun.
- Cut off a strip of fabric. In width, it should be greater than the height of the box (it is necessary that the flap can close the bottom and wrap a little inside the box). The length of the fabric should completely wrap around the perimeter of the box.
- Glue the cut out rectangle of fabric to the sides of the box.
- Wrap the excess fabric on one side inside the box, and on the other, glue it to the bottom.
- Measure out a piece of fabric in a different color. It should cover the bottom and walls inside the box.
- Lubricate the bottom inside with glue and glue the fabric.
- Coat the walls inside and also glue the fabric. Make folds around the edges.
- Glue the folds at the intersection of the two types of fabric.
- Measure the tape and glue it to the bottom, around the perimeter of the box, using a hot glue gun.
- Measure out two identical pieces of tape. Handles will be made from them.
- Glue two tapes to the walls on the sides of the box.
- On top of the box, glue another tape around the perimeter. It should cover the bottom of the handles.
The toy box is ready!
Pasted box
The easiest way for this purpose is to take self-adhesive wallpaper. Then you do not have to mess with glue and wait until all the walls dry.

But, regardless of whether you will paste over the future toy box with self-adhesive or paper wallpaper, the principle of operation is the same:
- Cut off a piece of wallpaper so that it can wrap around the perimeter of the box.
- If necessary, coat the walls with PVA glue.
- Glue wallpaper around the perimeter of the box.
- Make cuts at the top and bottom of the protruding parts of the wallpaper.
- Wrap the protruding pieces inward and to the bottom.
The box is ready!
Using a tree
Do-it-yourself wooden toy box is quite difficult. But such an item turns out to be very reliable and will last much longer than a cardboard box.

Also, it can not only be used in the interior as decorative element. Such a box can become a functional part of the room.
For example, if you put a box under the wall, put a blanket and cushions on top, you will see extra bed for sitting.
How to make a box?
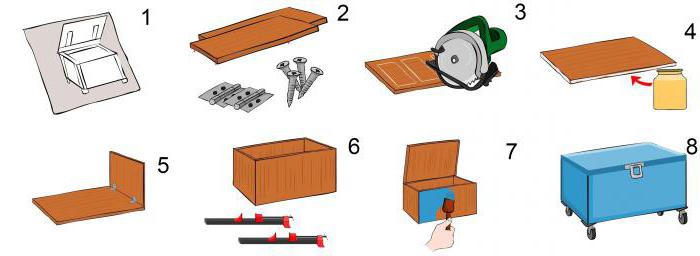
For convenience, here is a guide on how to make a wooden box for storing toys with your own hands.

- Create a sketch of the future box (picture 1). Consider its dimensions, what will be the height, depth and width. Will he be on legs or stand upside down on the floor? Will there be handles and where should they be located?
- Prepare everything necessary materials and tools (picture 2). To get started, you will need plywood or MDF board. They are sold at a hardware store. But if you have old furniture(for example, a table, a chest of drawers, a wardrobe), then you can disassemble it and get the necessary materials. You will also need screws and corners, hinges, PVA glue or carpentry. Of the tools you need a simple saw or a circular saw.
- If you buy materials in a store, you can ask them to cut the boards for you there. the right dimensions. If this is not possible or you are using improvised material, then do everything yourself (picture 3). To do this, draw the board into pieces and saw it. As a result, you should get the following number of parts: four walls (all the same or two different), a bottom and a lid.
- Start assembling the box. For this place of the joints of the walls, coat with glue (picture 4).
- Then connect the two parts with corners (picture 5).
- Attach the lid to the box with hinges (picture 6).
- Wipe off excess glue with a cloth and leave the box to dry.
- Decorate the box. For example, sand it and paint it (picture 7).
- Attach the handle and legs as desired (picture 8).
Storage box is ready!
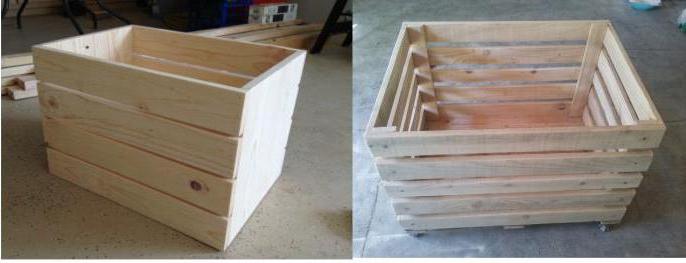
A box of boards
A wooden toy box can be made from planks. There are two ways to collect.

- Take plywood for the bottom and nail four blocks in the corners. Then nail planks to them with thin carnations. You can make gaps between the tree, so ventilation will be better.
- Nail plywood to the bottom of the box on both sides. And nail planks to it. Thus, the sides of the box will be solid, and the sides will be with slots.

Children are the flowers of life! We love them and want them to have the very best. And what is so valuable for young children? That's right, toys. And here we are talking not about quality, but about quantity. The more of them, the better.
However, parents are faced with a frequent problem - all these toys are scattered throughout the house or apartment. So that you do not step on them, and there is order in the rooms, you can make a special box in which the child will store these toys.
The tool is convenient, simple and practical. In this article, you will learn several ways to make a DIY toy box. Then the child will be accustomed to order.
Box from a waste cardboard box
Everyone should have an extra box after shopping. Boxes from shoes, household appliances or products. Everything will fit. In fact, you almost already have a ready-made storage box, it just needs to be decorated and strengthened a little to store toys. Check in advance if the cardboard is soft, as it will not last long.

So below is detailed instructions how to make such a cardboard toy box. All you need for work is a box, a gun with glue and a piece of beautiful fabric. The instruction is as follows:
That's it, the toy box is ready. It remains to turn the box over, pin the clothespins on top and put the books inside so that the fabric sticks tightly to the cardboard. In order for the toys inside the box to be ventilated, do not cover it.
Advice! This is an easy option that anyone can do. You can glue such a box not with a cloth, but with paper and attach handles to it. This is done very simply.
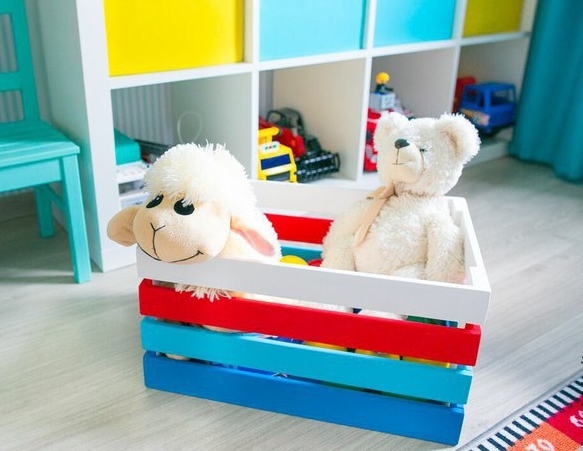
Durable wooden toy box
It is clear that the cardboard box is not entirely reliable and children can simply bend it. To prevent this from happening, it is better to make a product out of wood. It will take a little more effort and skills, but the result is worth it. The box will be strong, durable and reliable.
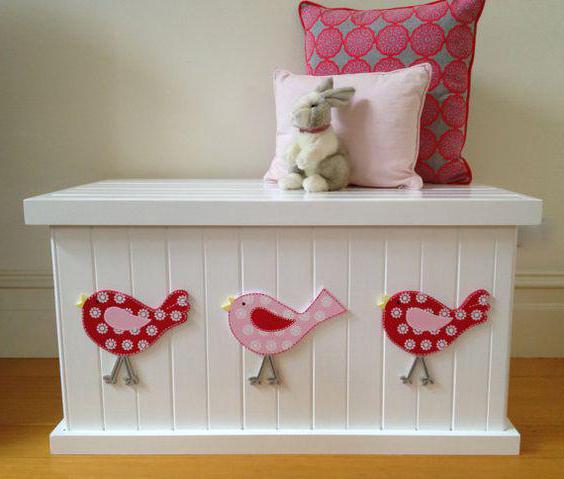
In addition to its practical value, it will play a decorative role, complementing the interior of the room. Yes, and it can be used as a chair if you install it under the wall, cover it with a blanket and put pillows. We will consider two types: a box in the form of a box and from boards.
Making a wooden box
The technology is not easy, so you need to be especially careful and work according to the instructions. The photo shows what you can do.

The instruction is as follows:

At this stage, the box is ready and can be used for its intended purpose. You can decorate it, attach a handle and legs.
Advice! To protect the material, it can be opened with varnish or stain.
Board box
This option is a little more complicated, but it looks pretty nice. Outwardly, it resembles an ordinary food storage box. To work, you will need boards of a certain size, plywood for the bottom, a hammer and nails.
On plywood, you need to fix four equal bars in a vertical position. They must be firmly fixed. Then you need to bottom, moving up, stuff the boards on them. This is done around the perimeter of the frame. You can make gaps between the boards - large or small, as you wish. So, the box will be ventilated.
Advice! You can nail a piece of plywood to the bottom on both sides, and fill the boards with it. So, you can make legs for the structure. Alternatively, use rollers.