There are handmade items that go beyond handmade, coming as close as possible to unique works of decorative and applied art, created with great skill and imagination. A wonderful example of such a small masterpiece - original watch in the style of steampunk and machinery, created by the author of our portal. Each the smallest detail they are worked out so carefully that you can look at them for hours!
Yulianna spoke about her search for inspiration, working with various techniques and materials, the history of the creation of these extraordinary watches, as well as why radio electronics can be useful for a jeweler in an interview with our editors.

Juliana, I would like to learn more about you and your wonderful work. To begin with, tell us a little about yourself, because not every master knows various materials and handmade techniques on such high level. Where did you study? How long have you been doing handmade?
Thank you for your kind words. By first education, I am an aircraft radio electronics engineer. But since I had to work part-time in the field of design since school, this gradually developed into teaching, and later into my professional training. Now I am writing a diploma at the Stroganov Academy, specializing in graphic artist. My sister and I are also graduating from jewelry college this year.
I always had to do manual work: the family drew and drew absolutely everything. Of course not on professional level, but it was believed that intensive practice in drawing partly replaced any schools. I still adhere to this opinion.

What techniques do you prefer and what objects do you usually create?
I really want everything at once!
Often, techniques have to be mastered after an idea has settled in your head. A lot depends on the tools. For example, I like stained glass as such, but I estimate the resources that will need to be obtained immediately and at one time, and decide: I need stained glass for several projects, or it’s just a small interest.

I have no idea at all what the name of the equipment I work with is called. I interact with wood, metals, glass, paints in any of their subtypes, textiles, polymer clay, ceramics, etc. The jewelry college helped me a lot in this matter, although I still don’t like soldering and working with precious metals.

And I create objects, first of all, those that I like. For the soul, definitely with your own little world. And I try to find suitable, loving owners for them.

What was the starting point and source of inspiration for creating the watch?
The spirit of our student laboratories. Actually, it was from there that the first few IN-14 lamps were brought home. In general, the entire territory of the Aviation Institute, especially in autumn, is an interesting sight: endless brick walls, narrow passages littered with abandoned machines, unwashed huge windows of old workshops. And stairs. Wonderful fire escapes floating in the gray sky overhead. True, these were wonderful moments!

Of course, this is not the largest institute, but it was easy to get lost there. There was something mesmerizing in these deserted passages between buildings.
Do you make preliminary sketches and sketches of the future item, or does everything arise spontaneously in the process of work?
I don't like making sketches. When the sketch is done perfectly, it becomes boring to work. But you can only communicate with customers in the language of sketches, so this is part of working with the client. I usually make drawings right away; they are clearer and more familiar to me.


Stages of working on a watch
Was this your first experience creating watches or compositions of this kind, or have you already done something similar?
It is the watch case that is not. There was an opportunity to practice some techniques on the “Chemical Fume Hood” jewelry box. It plays on the image of a Victorian era fume hood: small flasks, flasks, an alcohol lamp, ceramic tiles. Everything is real, there are no plastic imitations. We even had to break the glass to match the spirit of antiquity!


The size, of course, dictates its own characteristics (the box is only 9x9 cm, and 6 cm deep); you can only work with tweezers.
How long did the work take? What turned out to be the most difficult and time-consuming?
Difficult - creating the frame of the body, labor-intensive - internal filling. The clocks were collected in free time, so there was an opportunity to think about everything and count it many times. But in the end this did not save us from constructive dead ends. In general, not counting pre-preparation, I assembled and filled the body for about a year (total work time 2 years). And, of course, there were some moments that had to be redone.
Were there any difficulties in finding specific materials, or any new work methods or techniques that you had to master?
I had to sift through a bunch of photographic material from workshops, factory premises, etc., in order to collect an image of a certain plant. For a long time I was looking for rock crystal druses with small crystals (there is a box with crystals on the second floor).


I had to work a lot with glass, I used a whole pack of expired novocaine to learn how to cut off perfectly straight tops from ampoules. I had to order a duplicate flask for seconds from a glass blower from Ukraine, and ceramic tiles 3x3 mm from Germany. I dug up a root tree in the vastness of Spain. It was some kind of quest: “Collect the treasure yourself”!


How would you characterize the style of your work? Perhaps you relied on some historical samples, photographs, works of other authors?
Oh yeah! I love the game "Machinarium". I consider Jakub Dvorsky and the entire Amanita studio to be a unique fusion of soulful, highly professional and wise. I watch the output of each of their works!

The style of gas-discharge watches is mechanical, in the good sense of the word.

On last stages work, I turned on music from there, and the sounds in the patina merged with the work, it was even somehow easier to assemble it. Well, little things, of course I love small things, so I often work with miniatures.
Are there any professional advice, which you could give to beginning craftsmen who are planning to create such large-scale interior compositions?
Perhaps, be patient and take the work more calmly. She herself will tell you how and when to end yourself. I’m not an interior designer, but for me it’s enough to simply arrange the entire composition in my mind in its entirety. Therefore the most useful advice- imagine yourself inside this object and examine everything there yourself. What would you like to move or add? It's up to the author to decide!

Will the watch stay at your home or will it look for a new owner?
The question has already been raised many, many times! Especially at fairs, when we took the watches out into the light. I will keep this copy. The case uses parts from my great-grandfather’s watch reserves, this piece is special.
Well, we repeat to everyone again and again that if you have time to wait (the production time is now 9 months) and the material resources to pay for 9 months of painstaking assembly, then we can do it again.
Do you plan to create something similar again, and if so, what are your creative plans?
Now I'm already working on a new building. True, there will be a different building, more glass, light, space, and a different geometry in general. The customer will see it in September. Well, the rest of the world too! I won’t reveal any secrets - the layout itself is still at the development stage.
Do you take part in any exhibitions and events?
As an artist, I have to exhibit quite often. These are both student exhibitions and as part of the international art fund. In one of the last exhibitions, in addition to graphics, several of my applied gizmos even took part, including the Gaia microcard index. It happened completely spontaneously, but was a success.


I prefer to participate in various fairs when I can talk with visitors, see their reaction, and exchange warmth.
For you handmade Is this creative self-expression, just a hobby, or is it also your main activity?
IN Lately it takes everything most time. However, I never forget about painting (academic and in graphic format), it’s mine favorite hobby. But bringing miniature joys to people is very pleasant, and given the fact that more and more people come to us for them more people, I want to continue to create in this vein!
In today's project we will make watches that can be useful for theatrical productions. The clock has a diameter of 1.5 meters and works using electronic components to set the time between different acts of a production or performance. The clock gears are driven by a pulley system.

Step 1: Model Concept

I was inspired to create this watch by a 3D animated screen saver from 3PlaneSoft.
It took 2 weeks to make the watch. The clock works as follows: motor direct current A 12-volt power supply is attached to the frame and serves to drive a set of pulleys connected to the gears and hands of the clock. The actual gear ratio between the minute and hour hands is 12:1. For this purpose, a complex gear unit with two gears with gear ratio 3.464:1. The pulley belts are made of 0.6 cm diameter latex tube with both ends connected through a barbed fitting. Latex tubing can stretch up to 125% to create enough tension to engage the pulleys without creating excessive tension that could cause the fitting to pop out. The control unit is designed so that the time can be set remotely and the clock can go forward and backward.
Watch
Step 2: Fabrication - Frame


The watch frame is made from pine boards with a section of 1 x 4. The main structure is a hexagon with reinforcing pads at the corners and forms fastenings that form a round shape. The sides of the hexagon are cut to 0.75 meters at an angle of 60° at both ends. Two vertical 1 x 4 boards are attached to the 4 corners to create mounting points where the cables will be attached to place the clock on the ceiling above the stage. The round fastenings are made of 1.2 cm thick fiberboard. The cylindrical wall around the perimeter is made of Chipboard thickness 0.3 cm.
Step 3: Fabrication – Dial and Gears


The dial components, hands, Roman numerals and other parts are made of 0.64cm thick fiberboard and cut using a machine hacksaw! The gears were made using a regular wheel, for which I used a protractor and 0.64 cm thick wooden fiberboard. The parts prepared for painting took up an entire garage. There were a lot of details! Three gears, Roman numerals, two hands and 12 sparkling parts were coated with red Rustoleum primer. The rest of the parts were coated with Rustoleum black primer.
Step 4: Fabrication - Electrical


This project uses the following components:
- Hossen motor 12V DC / 15 rpm
- Potentiometer 100 kOhm - power 1/2 W
- Rocker switch DPDT 15A 125V
- Black plastic body measuring 8.31 x 5.41 x 3.05 cm
- Round handle Ø 2.4 cm
- Power supply 12V DC/2A
Thanks to the rocker switch, the motor can change the direction of rotation.
Step 5: Final Stage


Gears, Roman numerals, hands and 12 parts are covered on final stage Copper-colored Rustoleum primer. The main dial is painted green with the addition of Brown to give an aged and slightly rusty look to your watch.
Experiment with colors and make the watch to your taste. Good luck!
2. We first pull the clock's winding lever to the adjustment position (when the hands turn), and then pull it out completely. To do this you will have to apply a little more effort. The lever comes out completely, nothing breaks.
3. Now the clock mechanism can be removed from the case. All that remains is to figure out how to thread the lace through it. You can do this in two ways:
Drill (or pierce) a hole in the dial;
Insert the winding lever back into the hole of the clock mechanism and tie the cord on it with a simple knot.
I chose the second, more humane and more original method. And as a result, I got a double-sided pendant in the steampunk style (on one side of the pendant there is a dial, and on the other there is an open clock mechanism).
4. After making a steampunk jewelry in the form of a pendant with our own hands, we were left with a beautiful watch case with a strap. It is the case that is of particular value, and it is its preservation that is especially important for many (after all, there are often dedicatory engravings on the back panel of the watch, and appearance case reminds us of so many things!). We use the case to make our own original bracelet in the steampunk style. It's very easy to do this:
We will need several beads, or any other small objects, a piece of plastic, cardboard or fabric and scissors;
We place small items into the watch case;
Cut out a circle from plastic, foil or any other background material that matches the color of overall design bracelet according to the diameter of the back cover;
Place the cut out circle on top of the beads;
Close back cover hours.
A DIY steampunk bracelet is ready. Instead of beads, you can use a photo of a loved one, or shiny confetti. There are a lot of options, and you can change them every day with a new designer accessory.
If you glue a clock mechanism to a simple jewelry ring with regular moment glue, you will get a steampunk style ring that will go perfectly with your bracelet and pendant.
Today we continue the series of master classes on creating original wall clocks in the steampunk style with your own hands.
Hi all! Today we will make a wall clock.
We take it and clean it thoroughly. 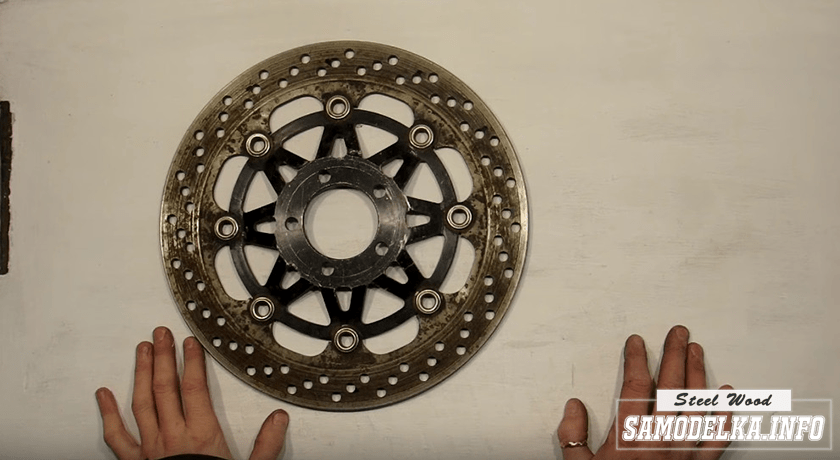 Now we need a regular clock mechanism from chinese watches. It just becomes a disk.
  All that remains is to replace the clock hands. We will make them from transparent plastic 1 mm thick, which is used in advertising agencies. The width of the arrows at the base is 4 mm. After drilling the holes, we attach the hands to the clock mechanism.
  Now all that remains is to secure the mechanism inside the disk using hot glue. But first we’ll paint the disk with black paint and then gild it all over the disk.
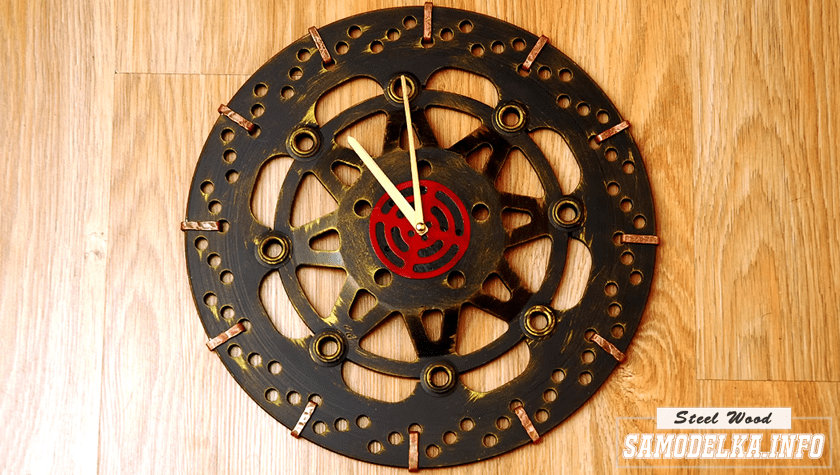
  Next we will make hour markers. To do this, take a thick one copper wire 4 mm in diameter, clean it, rivet it with a hammer.
  And we make 12 U-shaped brackets from it.
  We attach them to the disk.
  To prevent the marks from fading, fill everything with semi-matte varnish.
  We paint the arrows with gold paint. Next, use a knife to remove the plastic side from the clock mechanism. We take a part from a former one, drill a 4 mm hole in the center, paint the part red and glue it to the clock mechanism. We put arrows, . This is how the clock turned out.
 For a detailed watch making process, watch my video.


