Both beginners and experienced beekeepers come to the conclusion that it is better to make a hive with their own hands. You are absolutely confident in the quality of your own product; if development is necessary, you can quickly produce the missing parts. We will talk about how to make hives yourself.
Popular hive designs
Before you build a hive with your own hands, you need to choose its design. Basically, novice beekeepers use two types of hives:
- Dadanovsky for 12 frames. It has a vertical design and grows upward. If necessary, another standard housing or magazine is placed on top (an additional housing half the height of the main one, into which the half-frames are installed).
- Lounger - for 20 frames or more. It differs in size - it has a greater width than depth. The number of frames used by the bee colony is regulated by rearranging the partition.
Both of these designs use standard 470*300 mm frames, which are widely used. These two types are the most common among beginner (and experienced) beekeepers. Sometimes they use Ruta hives, but they have frames of a different format - 470*230 mm and are not so easy to find. Also, it is more difficult to work with Rutas than with Dadanovskys or beds; more experience in beekeeping is required. Therefore, choose from two options - Dadanovsky or lounger. It’s best to find out which one specifically from beekeepers in your area.
Hive drawings
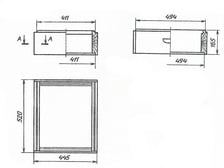
Since the Dadanovsky hive and the lounger use standard frames, they differ only in width: one should fit 12 pieces of frames, the other - 20 or 24 pieces. The rest of the parameters remain the same.

Changeable parameters for hives with different numbers of frames are shown in the table. Substitute them into the drawing and get the option that you need.
| Number of frames in the case, pcs. | Case width B, mm | Width of the internal opening of the housing B1, mm | External installation dimension of the housing rebate B2, mm | Internal installation size of rebate B3, mm |
|---|---|---|---|---|
| 10 | 455 | 375 | 419 | 425 |
| 12 | 520 | 450 | 494 | 400 |
| 14 | 595 | 525 | 569 | 575 |
| 16 | 685 | 615 | 659 | 665 |
| 20 | 880 | 810 | 854 | 860 |
What you need to know before you start making a hive with your own hands
Even before the start self-made hives, you need to know the requirements for materials and technology for constructing bee hives. A lot of them. Let's start with the material requirements.
What are they made of?
The most common material is wood. Can be used as non-resinous wood coniferous species(spruce, fir, deresined pine), and loose hardwoods- poplar, linden, etc. You should not use dense wood - the hive will be heavy and cold.
The requirements for wood are strict. It should be dry - no more than 16% humidity, without falling knots, rot, wormholes, or redness. Blue discoloration is acceptable (it does not affect quality indicators). If there are knots, they can be removed, sealed with plugs of the same type of wood and puttied. Do not use wood with other defects.
Today they make hives from plywood, preferably birch. In this case, the walls are made double with a gasket between layers of insulation - foam plastic. Such hives are warm in winter and cool in summer. Their disadvantage is that the walls are vapor-tight and moisture does not escape through them. Therefore, the hive ventilation system must be given Special attention(make an additional notch at the top and, if necessary, open it for ventilation).
Sometimes hives are assembled from polystyrene foam, polyurethane foam and polystyrene foam. Most good option- expanded polystyrene. You can even install some kind of fasteners in it; neither bees nor other insects can gnaw it. The remaining two materials are collected using glue, and bees also grind them down, and ants and other neighbors undesirable for bees can settle in.
Processing and Assembly Requirements
When assembling a hive with your own hands, you must strictly maintain the internal dimensions of the body and extensions. Then increasing volumes will not cause difficulties. Parts of the hive - bodies, extensions, magazines, roof - must be connected into a lock and the lock parts must also match. This is necessary for a reliable connection without cracks and drafts, which bees really don’t like. In this regard, the maximum processing tolerances are 1-2 mm.
There are also requirements for the quality of processing of materials. Most of of which relates to wood, but they can also be applied to other materials:
- Boards and bars must be smooth, without burrs, burrs or chips.
- It is necessary to cut materials strictly at an angle of 90°, without allowing deviations.
- The hive bodies must be knocked down from solid boards 40-45 mm thick or using a tongue-and-groove joint, glued for reliability.
- To pair the parts of the hive, a quarter is chosen in the parts - for a reliable gapless connection.
- Rebates are made on the front and back walls of the hive for hanging frames. The depth of the fold should be such that there is a distance of at least 8-10 mm from the top edge of the plank to the cover or extension. If the distance is smaller, the frames may stick to the cover, which creates maintenance problems.
- If the walls are made of two layers (if the boards are not thick enough), the outer ones are connected in quarters, making sure that the seams in the layers do not coincide. It is better to connect the internal parts and the bottom into a tongue or groove.
Structural elements and their features
Most often, the hive has a modular structure - it consists of several detachable parts. This is convenient as it allows you to increase the volume as needed. Each of these parts is manufactured separately and the manufacturing precision must be high - all parts must be interchangeable.

Frame
This is the central part of the hive, which usually houses the bees' nest. Depending on the number of bodies, hives can be single-body, double-body or multi-body (3 or more). The corps are mentored as the family grows.

Roof
The roof of the hive can be single-pitched (sloping backwards) or gable. In any case, it should have overhangs - protrude beyond the geometric dimensions of the hive and protect the walls from exposure to bad weather.

The roof consists of a roof liner - a flat body for placing insulation or feeders for feeding bees - and the roof planks themselves, nailed to the roof liner or screwed with self-tapping screws. The height of the underframe depends on the thickness of the insulation, and this value depends on the region. Typically the height of the roof liner is 80-140 mm. Ventilation holes are often also made in the roof liner to remove moist air from the hive.

When making a roof, the boards are laid either in two layers with the seams overlapping, or from thicker boards in one layer, but the seams are necessarily covered with thin planks. On top wooden roof hives can be laid roofing iron, roofing felt or roofing felt.
When making the roof, make sure that it fits tightly, without gaps. To seal the joint around the perimeter of the body, you can stuff a felt strip or nail a plinth to the outside of the body to cover the joint.
Bottom
The bottom of the hive can be nailed to the body (solid) or can be pulled out or pulled out, i.e. be detachable. The removable bottom makes hive maintenance easier - it allows you to clean the bottom without disassembling the entire hive. Structurally, the bottom can be:
- cold - from a single board;
- warm - made of two layers with insulating backfill.
The bottom can also be double-sided - with protrusions of different heights on both sides, which allows you to adjust the internal volume. Knock it down tightly, without gaps, connect the boards into a quarter or into a groove with additional gluing of the joint with moisture-resistant wood glue. The cracks must be carefully sealed (with wood putty), as wax crumbs are poured into them, and then wax moths appear. Therefore, from time to time they prefer to replace the bottom by knocking together a new one.
Video about making hives from different materials
The ancestor of the modern multi-body hive is the frame hive of L. L. Langstroth, invented in the mid-19th century. After A.I. Ruth finalized the design for mass production, the hive today has practically not undergone any major modifications and is used by modern beekeepers with minor changes.
In the Soviet Union, multi-body hives were produced according to two standard designs.
1. Multi-body hive (item 808-5-1), consisting of a detachable bottom, three or four bodies for ten nesting frames measuring 435 x 230 mm, a roof liner and a roof.
2. Double-body hive with magazines (item 3.808-2), consisting of a detachable bottom, two buildings for ten nesting frames measuring 435 x 230 mm and three magazines for ten nesting frames measuring 435 x 145 mm, a roof cover, a feeder and a roof .
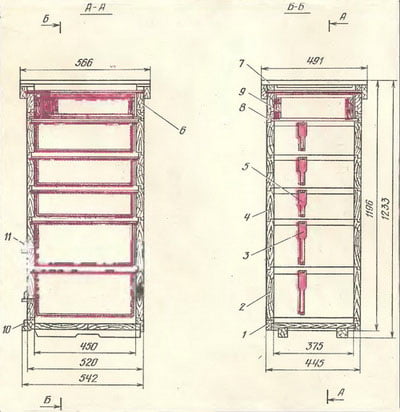
If you look at these drawings from the point of view of a modern beekeeper, you can see a number of shortcomings:
1. Hives should be easier to manufacture, especially the bottom of the hive in project 808-5-1.
2. The thickness of the side walls of the housings can be reduced to 25-30mm to make the housings lighter.
3. It is not advisable to use magazine extensions in multi-body hives, since already low bodies and frames of the same size are the main advantages of multi-body hives.
The cases are made of boards 35 mm thick, connected at the corners in a quarter. The upper and lower edges of the cases have folds. Inner dimensions housing 375x450mm. The front wall has a rectangular upper entrance 10x120mm, and the side walls have hand basins.
When manufacturing hives, it is necessary to take into account that all changes in the design should not affect the interchangeability with the parts of the hives that are made according to these drawings.


12.01.2017 1
There are a wide variety of hives on sale. different designs. However, many beekeepers prefer to make multi-hull hives with their own hands: dimensions, drawings, detailed instructions, compiled by beekeeping experts, will help even a beginner create comfortable housing for his charges.
This significantly reduces the cost of organizing an apiary and provides the beekeeper with the opportunity to install the hives that are needed specifically for his specific farm.
Advantages of a multi-body hive
Multi-body hives, consisting of several working sections, are a vertical structure that the beekeeper can change, supplement and reduce as needed, and this technology for working with honey workers provides:
- family strengthening: judging by observations, the brood increases by 30% compared to keeping bees in recumbent hives;
- good wintering conditions, rapid development in spring;
- swarming prevention;
- ease of operation for the beekeeper due to the low weight of the structure.
These undoubted advantages ultimately lead to increased apiary productivity.
In an ordinary hive, a growing family gradually begins to run out of space. When this happens, the queen bee lays down a queen cell for a new queen. Having hatched, the young “mistress” creates a swarm of young animals, which fly away after her in search of a new “place of residence.” This leads to a weakening of the family, and, as a result, a drop in productivity.
It is especially important to prevent swarming in large apiaries, where large losses of beekeeping products occur due to the division of colonies.
Structure
Depending on the time of year, the owner of the apiary, as if using construction kit parts, assembles the home of his charges, completing it with new sections and swapping them in places.
During wintering it is recommended to use 2 or 3 buildings. the main task during this period - to provide the inhabitants of the home with food. The drawing, drawn up by a professional beekeeper, shows how the bee colony should be placed so that it does not suffer from hunger and retains maximum strength.
- In the cold season, under the roof, insulated with canvas and a pillow, there is a food extension - honeycombs with honey and at least 2 frames with beebread.
- For honey hymenoptera, lack of food is much more dangerous than cold. Wintering will go smoothly if the food supply contains at least 30 kg of honey.
- The lower body under the stern extension is occupied by a bee club, the upper part of which necessarily comes into contact with the food base. The honeycombs on which the club is located, initially empty, begin to fill with larvae by spring.
- During such wintering, insects feel good because these conditions are as close as possible to natural ones.
In the first half of May, when warm weather finally sets in, the first expansion of the structure is carried out. At this time, the lower body is free from brood, and upper body filled with it.
- At this stage, the sections are swapped, with the brood at the bottom and the oviposition cells at the top.
- The queen bee herself goes upstairs, where she is now provided with a huge number of free cells.
- The rest of the family members are actively involved in feeding and warming the “babies,” and swarming is thus prevented.
- In the first days of June, multi-hull hives are expanded a second time, since by this time the two sections become crowded, they are filled with hatched young animals and brood.
- To strengthen the family, a third section containing frames with foundation is inserted between the upper and lower sections.
- Insects try to reduce the distance between the brood as quickly as possible and actively build honeycombs on the foundation. This process may take up to 10 days.
In mid-June, during the period of active flowering, the home of the apiary inhabitants is again expanded, using 4 buildings:
- At the very bottom, above the bottom, they install a construction one - with foundation.
- 2 others with brood are placed above: below - with the open one and the queen, on top - with the printed one. A separating grid is installed between them to prevent the uterus from moving to the upper sections.
- Above the buildings with brood, under the roof, another one is installed - with dry food and honey.
- The uterus produces eggs in the 2 lower “floors”, and honey quickly accumulates in the 2 upper ones.
- Thus, the family actively grows with brood and young animals on the lower “floors” and accumulates beebread and honey on the upper ones.
Types of housing for bees
The size of the hive is determined by the size of the frame. The most common are the so-called Langstroth - Ruta hives, designed for a frame height of 230 mm and a width of 435 mm. One case can accommodate 10 frames, which determines its internal dimensions. The drawing of the case shows that its width in millimeters is 450, height – 240, depth – 375.
- The thickness of the board from which the hive is made is 35 mm.
- The length and width of the ceiling coincides with the external dimensions of the housing. An oval hole is made in its center for ventilation.
- Placed on top flat roof 8 cm high, which is a strapping of boards 2.5 cm thick, onto which a shield covered with galvanized iron is attached. The roof must be completely waterproof and have 4 ventilation holes.
- The bottom consists of a floor made of tongue-and-groove boards and 3 bars inserted into grooves - two side and one rear. It is very important that the outside bottom protrudes 5 cm beyond the body, forming a landing area for insects. The bottom is slightly inclined forward so that moisture does not collect on it, and is equipped with a tap hole.
- The size of the tap hole can be controlled using a block-liner with a square section of 2x2 cm, in which 2 cutouts are made - small and large. In the spring, when it is relatively cool, bees fly through the small entrance, when it gets warmer, through the large one, and during the period of active honey collection, the insert is removed altogether.
- The entire multi-tiered structure is installed on a stand to which an inclined landing board is attached. This device greatly facilitates the work of winged workers loaded with nectar: the flight board allows them to calmly land and get to the “entrance to the house.”


Nowadays, breeding insects in low-wide hives on a frame 145 mm high, first designed by the American beekeeper Farrar, is becoming increasingly popular. The principle of working with them is in many ways similar to working with hives with 10 frames: the component parts are also rearranged, delivered or removed depending on external conditions.
Such designs have a number of advantages recognized by many beekeepers:
- Compact, lightweight, heat resistant.
- Possibility to place more frames.
- more intensive family development, since created Better conditions for hatching queens.
- Fast cell filling.
- It is more convenient for the beekeeper to monitor the condition of the families.
- The result is an increase in the yield of final products. A skilled beekeeper can achieve up to 100 kg of honey per family.
Sections of the hive can be connected to each other using folds or be unrebated. In the first case, the connection is stronger, more rigid, and individual sections do not move during transportation. However, this option has a very significant drawback: when installing various parts of the hive, insects can crawl into the folds and be crushed.
If this happened to the queen, then, according to beekeepers, this threatens a real disaster. As a result, more and more apiary owners are switching to the non-rebated version, which does not have additional gaps, is safe for insects and is very convenient to use, especially when transporting the apiary.
In the conditions of the Central Russian zone, during frosty and, most importantly, long winters, beekeepers use a northern narrow-high hive or, as it is also called, a small multi-body hive. Its length and width are the same: 300 by 300 mm, 6-7 frames are left in the nest for the winter, the walls are insulated with special materials - plywood, polystyrene foam.
In such a dwelling, its inhabitants can maintain the temperature well during the northern winter and practically get rid of ascopherosis - stone brood - moldy, dead larvae thrown by insects from the cells to the bottom.
Video: ten-frame multi-body hive.
Manufacturing
Let's look at how to make a multi-body hive with your own hands. For self-built housing for bees, the owner of the apiary requires:
- First of all, good carpentry skills.
- Special tools: woodworking machine, drill, Sander, clamp, glue.
- Well made, detail drawing with exact indication of all sizes.
All parts of the body are made only from wood and very carefully: the bee is a picky creature, does not like metal and is very selective about the type of wood.
- To make bee houses, you need boards made of non-resinous species, preferably spruce, cedar, fir, and some deciduous trees, dried for at least a year.
- There should be no cracks or knots on the board.
- Each side of the workpiece is cut with an allowance of up to 3 mm, leaving 1 cm at the ends.
- The walls are connected using the “tenon” technology, without nails, just like they are placed “in the paw” wooden log houses houses. Spikes like " dovetail"and the eyelets at the ends of the walls being connected are cut out so that there is no gap between them.
- Recesses are cut out for the frames - folds on the front and back walls. At the same time, you need to know that the frames should be approximately 8 mm from the walls, 1.5-2 cm from the floor, between their centers there should be about 4 cm, and the distance between them on different “floors” should be 1 cm.
- The wall with the lugs is placed on the workbench, the wall with the tenons is placed on top, and the tenons are driven into the lugs with careful blows of a hammer.
- Recesses are cut out on the outside of the side walls for ease of carrying.
- A ventilation hole with a diameter of 2.5 cm is made on the front wall.
- The roof, bottom, and stand are made no less carefully and scrupulously.
The design of the dwelling for the inhabitants of the apiary, at first glance, is simple, however, making it yourself is not at all easy - all the details must be adjusted with pinpoint precision. Careless assembly will lead to the appearance of cracks into which enemies of the Hymenoptera - ants or mice - can crawl. The beekeeper must take every possible care for the safety and convenience of amazing honey producers.
After you have decided to become a beekeeper and have bought a couple of colonies, the time comes for you to need new hives. Families grow and swarm, and they need to be moved to new houses. You can, of course, buy ready-made ones, but buying used ones is dangerous. It is unknown what diseases can be purchased with them, and the new prices are steep. There is only one thing left - to make beehives for bees with your own hands according to the drawings. If you know all the manufacturing rules, then it’s not difficult at all.
In this article we will just talk about making beehives with your own hands, correct sizes and drawings for them. Let's find out what a beehive is and how to make it.
In ancient times, beekeepers extracted honey from hollow trees, then they began to hollow out logs for bees. With the development of beekeeping, they began to make evidence for bees with their own hands of different designs, and the material used for them is different.
Tree
A classic option for making bee hives. In such houses, bees feel in natural conditions, close to natural ones. Best breed The wood for making will be cedar, although linden and aspen can also be used. Such hives breathe better, smell nice and are dry.
Hives made from aspen and linden require additional insulation. And these are expensive materials.
Some beekeepers make their own hives from cheaper materials. This is pine, spruce, fir. But the bees are not comfortable in such evidence. They collect moisture and resins, especially in new ones.. Pine smell. There is only one good thing about them: they are warm and require minimal insulation for the winter.
Plywood
Durable and environmentally friendly material. A house made from it must be painted and insulated from the inside with polystyrene foam, then it will be dry and warm. But plywood is afraid of moisture and requires constant and proper care.
Expanded polystyrene
Modern material used by beekeepers to make hives. It has a low cost and does not require additional insulation in winter time.
The disadvantage of this material is fragility and brittleness. If you choose poor quality, the honey may deteriorate.
Styrofoam
The most economical option. It is possible to use packaging from household appliances. The advantage of this material is its lightness even with filled frames. Excellent thermal insulation. The disadvantage of this material is its fragility and permanent coloring, so that from exposure sun rays didn't crumble.
Polyurethane
Excellent thermal insulation properties. Does not rot, does not decompose. Fungus and bacteria do not develop in it. It does not allow moisture to pass through and it does not accumulate inside. Bees, mice and birds do not like to chew on it.
A small downside is that it is flammable and requires ventilation because it does not allow air to pass through.
After carefully studying the characteristics of the material, you can begin building the hive. Let's consider options for building wooden and foam houses.
Types and designs of hives
Bee houses are divided according to their design:
- collapsible;
- non-separable.
Almost no one uses the latter because they are difficult to care for.. All beekeepers use frame hives, where the number of frames can vary. A DIY beehive with 24 frames is popular. However, there are options for 16 and 20 frames.

In turn, frame hives are divided into:
- horizontal;
- vertical.
The horizontal or “bed” consists of one body. The expansion goes to the sides. It is easy to work with such evidence and change the number of frames, but they have a drawback - they are bulky and heavy.
Vertical ones consist of several buildings. This form is lightweight and mobile.
Both forms use multiple sections. They are separated by partitions, which allows you to change volumes in any direction.
Popular designs
Dadanovsky
Used in almost all apiaries. Made from wood (cedar, spruce, pine, linden, aspen). It is simple and spacious. Consists of 12 frames and can be supplemented with shops or cases as the family grows. In winter, bees are kept in the nesting compartment. As the weather gets warmer and the family grows, they are added to the buildings.

Alpine
Multi-body hive. The creator is French beekeeper Roger Delon. Made according to the hollow principle. That is, the natural living conditions of bees have been created and taken into account.
Compact design is convenient for tight spaces. It has no partitions or ventilation holes. Air naturally enters through the tap hole.

Ruta
This DIY bee house designed for keeping bees in the southern regions, because due to constant rearrangements of the buildings, hypothermia occurs in the house. Consists of 6 cases of 10 frames each.

Cassette
Due to the increase in the incidence of bees, cassette hives have become popular among beekeepers. Such evidence have thin partitions, so bees create a microclimate on their own.
They are made only from wood and impregnated with wax, so the bees in them are less susceptible to diseases.

Ukrainian lounger
This hive design is the largest in size suitable for beginners. They are easy to maintain. Easy to build, which will allow you to master beekeeping skills. Usually such hives have 20 frames. The sides of the house are insulated, so the bees winter well in them.

There are many designs of evidence, but we will dwell in more detail on the classic one, a sunbed with a different number of frames, and a multi-frame unrebated one. In this case, there are beehives with 16, 20 and 24 frames.
How to build a classic hive step by step
Due to the ease of manufacture, classic version considered the Dadanovsky hive.
To make hives, it is better to use natural materials.
The classic design for hive production consists of:
- One or more buildings.
- One or two stores.
- Liner.
- The bottom of the hive.
- Ceiling.
- Roofs.
- Framework.
- Feeders.
- Insert board.

Bee house instructions with drawings
Now let's talk about how to make a beehive with your own hands step by step. The sizes of a bee hive can be very different, but we will focus on one option. To do this you will need:

A 15 mm thick board is required for the lid and liner. Collect and cover with tin to prevent water from entering. Paint it. Make ventilation holes with a diameter of 1.4 cm.

- back and front shield (cm): width 53, height 32, thickness 4.
- side shield (cm): width 48, height 32, thickness 4.
- internal (cm): width 45, height 45, thickness 32.
In order to place the frames in the body, folds need to be made.
Dimensions 1.1 * 2 cm.
If there is a multi-body bee hive, then the dimensions will be different: 1 * 1.4 cm.


The frame located in the nest is 43.5 * 30 cm;
Magazine frame - 43.5 * 14.5 cm;
The distance from the walls of the case to the side strips is 0.07 cm;
The space for the frame is 2.5 cm;
The width of the side of the frame is 3.7 cm.
Hive-bed for 16, 20 and 24 frames: drawings and dimensions
 Hive-bed for 16, 20 and 24 frames
 What tools and materials will be needed?
- Wood, plywood, foam.
- Rulers or tape measures.
- Squares;
- Hacksaws.
- Hammers.
- Drill, drill, self-tapping screws.
- Chisels.
- Glue.
- Carrying handles.
- Galvanized sheet for the roof.
- Frames in the amount of 24 pieces.
Hive dimensions:
- frames 30 * 43.5 cm;
- body (cm): length 87, width 56.5, height 63.5;
- roof length (cm): outside 93.5, inside 81;
- bottom thickness 3.5 cm;
- lower entrance - 1.2 * 14 cm;
- the upper tap hole is 2.5 cm in diameter.
Instructions for making a hive for 24 frames
- Cut out parts from the prepared material according to the drawings.
Observe the dimensions exactly so that the construction of the bee trap with your own hands is even and without large gaps.
 Instructions for making a hive-lounger
 - Assemble the bottom. Connect the two slats and the deck using primer and nails.
- Connect side walls and attach to the bottom. Make a protrusion beyond the bars of 2 cm.
- On the front and rear walls make grooves for the frames. Size 1.8 * 1.1 cm.
- Cut holes from below.
- Attach the valve and the landing board.
- Make a roof. Fasten the boards with nails into tenons.
- Attach opening hinges to the roof.
- Cover the roof with tin.
- On the back side of the roof do vent 20 * 0.03 cm.
- On the front wall drill a hole with a diameter of 2.5 cm.
- Cover them with a net.
- The legs are strong to the bottom.
- Dry and paint.
- Attach handles to make it convenient when carrying.
Should be painted white. Bees remember this color better. White color repels sun rays.
How to make an evidence bed for 20 and 16 frames
It is made according to the same principle with a difference in size.


Multi-body beehive: dimensions and drawings.

Over the years, this hive has not lost its popularity in use. Convenient design allows them to be used everywhere. And it’s easy to make.
In order to properly build a hive, you need to know what the structure consists of:
- Lid.
- Roof liner or ceiling.
- The shops.
- Cases.
- Stand.
- Framework.
- Dividing grid.

The body looks like a box. Its size from the inside (cm): width 37.5; length 45; height 24.
It includes 10 - 12 frames measuring 43.5 * 23 cm.
These sizes are more suitable for regions with warm climates, and for the Russian climate the width is made half a centimeter larger.
Reducing the size leads to inconvenience in working with frames. It is impossible to get them out when they are heavily polished or swollen from moisture. Therefore, some increase the width of the case to 38 cm.
To make cases, you need to take carefully dried boards. They should dry out within a year. When cutting out parts, the boards should have a small margin (3-5 mm). The stock is left for further fitting of parts. For trimming, it is recommended to leave an overlap of 1 cm.
Make folds on the front and back parts of the body to place frames on them. Sizes 1.1 and 1.7 cm. This depth allows you to freely place the upper body.
Handles or small recesses need to be attached to the side walls.
A 25 mm hole is drilled from the end of the hive under the roof to ventilate the house.
Boxes with frames are tightly connected to each other. In this case, folds are not used. This design solution is more convenient to use and simpler to build.
In cases using folds, during transportation or movement, bees most often get stuck in the lower part and hide in the folded recesses, subsequently dying. Most often, the queen dies in them and beekeepers abandoned such hives in favor of a non-rebated design.
To make the roof, a 2 cm thick die is taken. A shield is knocked together from it, which is covered with galvanized sheet.
It is better to make the bottom removable, double-sided.
- three bars 57*6.5*3.5 cm - side;
- one 44.5*6.5*3. cm is installed at the rear.
Make grooves in them. Width 3.5 and depth 1 cm. Assemble a U-shaped structure. The grooves are designed for installing a floor slab.

It is necessary to provide a front projection of 50 mm. It serves as an arrival board.
The roof liner (ceiling) is a solid shield assembled from dies, measuring 52 * 44 cm. Around it is a rim made of slats. They are 3.5 cm wide and 1.5 cm thick. There is a hole in the center. It is needed for ventilation between the buildings or a feeder is placed on it.
The liner is placed on the body with the smooth side without the rim, which allows the bees to move freely. It can also serve as a dividing grid; in this case, a mesh is stuffed over the hole.
Stand. It is made from bars according to the size of the bottom. A wide die is nailed into the front part at an angle of 45°. This will be the arrival board.

A recess measuring 2.5*9 cm is cut into the side bars. They are designed for convenience when you need to lift the hive or secure it when moving.
To increase the service life of the bars, impregnate them with liquid bitumen. Dissolve it with gasoline. This procedure will make the wood waterproof.
Dimensions of the dividing grid. Designed to isolate the temporary isolation of the uterus. To separate the body with brood from the honey ones.
The size of the grille must match the size of the inner housing. It is placed on bars. Made from wire mesh.
Frame sizes. Case and magazine frames can also be made with your own hands. They must correspond to the drawings.

Drawings of multi-body hives.


Frames for the hive: dimensions and description of how to make it yourself
Frames are an important part of hives and the main work is done with them. From constant use they become unusable and need to be added. Therefore, the beekeeper should always have a large supply. To save money, it is better to make them yourself than to constantly purchase them.

To make frames we will use the following tools:
- hammer;
- pliers;
- awl;
- shoe nails;
- a skein of thin wire.


For production, use natural materials. It is better if these are boards that have been dried for a year. To make a frame you need to know what parts it consists of:
Top bar.
Grooved or uniform.
Bottom bar.
Regular, grooved or through-gap.
Side bars.
They have holes for pulling the wire under the foundation.
Frame sizes depend on the design of your hive. Standard sizes are considered:
- the width of the top and side boards is 2.5 cm;
- height of the top block is 2 cm;
- bottom width 1.5 - 2.5 cm;
- height 1 cm;
- external dimensions vary depending on the design of the hive, but usually 43.5 * 30 cm.
After we have chosen the material and decided on the dimensions, we proceed to the actual production of the frame.
- Cut out parts from dry boards according to the dimensions of the drawing.
- Using shoe nails, connect all the parts.
- Drill 4 holes and two double holes on the side strips for attaching the wire. The distances between the holes must be equal.
- Pull the wire. Start from the top hole and snake it through. Make sure that the wire does not intersect anywhere. Fasten it securely so that the heavy honeycomb does not accidentally break off. As a result, you should have 4 lines.
The foundation is fixed onto the frames prepared in this way.
Now you know how to make bee hives yourself with your own hands with drawings. Using the drawings and dimensions, you can easily build it yourself, thereby saving your budget and providing it to the bees comfortable conditions accommodation.
A multi-hull hive is one of the most common ways to develop a bee colony during the season and ensure maximum honey yield. Unlike large, but single-hulled beds, its design is optimal for the development of a bee colony: as experts have established, bees most willingly build a frame by moving vertically rather than horizontally. However, 145 mm magazines are sometimes used in sun loungers.
In apiaries, there are hives consisting of several buildings, both Dadan-Blat (in the jargon of beekeepers, “Dadanovskie” or simply “Dadanov”), and Langsroth-Rut (respectively, “Rutovskie”). Traditionally, in Soviet times, Dadanov hives were used, but this is due not so much to their advantages, but to the fact that mass production and provision of apiaries with them was established. As multi-body hives, Rutov hives are in many ways preferable. Their design was initially designed for the fact that beekeeping work will be carried out not in pieces, but as a whole body. Actually, this is one of the reasons why Rutov hives do not provide a reduced frame for a 145 mm magazine extension - they are designed for one size.
How the enclosures are installed
- A new case or magazine is placed on top of a 145 mm frame. This method of working with a bee colony is typical for dadans during active honey collection.
- The first body rises, and the second one is placed under it. This technology is used on Rutov hives, as well as in cases where bees overwinter in two buildings rather than being squeezed into one. This rearrangement leads to the fact that the lower body, which has already been freed from brood over the winter, is again mastered by the queen and bees, as a result of which the reproduction of bees is accelerated. Then, by the beginning of the honey harvest, the number of bees increases, and they fill each empty frame faster.
What frame size is optimal?
A multi-body hive can be designed to fit any frame. However, now the size of 145 mm in height is becoming more and more popular. This is due to the following reasons:
- Rutov's hives are designed for almost this frame - and they are, not without reason, considered more progressive than old-fashioned dadans. However, 145 mm is not alien to Dadan either - such is the height of its magazines.
- Work with a 145 mm frame is easier. It weighs less (on average 1-1.5 kg less than a full-size 300 mm one.
- It is possible to use carrying boxes and honey extractors without alteration, if they were originally designed for the Dadan frame. In this case, instead of one, two 145 mm in size are installed.
- Cutting the foundation to this size is much more convenient than cutting it to a longer length.
 However, a multi-body hive can be designed for a 300 or 230 mm frame. Here everything depends on the habits of a particular beekeeper, climate (dadans are more suitable for northern apiaries), as well as on what drawings were available when making beekeeping equipment. It is impossible to say unequivocally which size is better - there are too many factors here.
It should be noted that the remaining sizes are usually unified. Typically, the length of the frame is always 435 mm, top – 37 mm, bottom – 25 mm. The length reserve for hangers for mounting in the case is also almost always the same - 35 mm. Therefore, in case of urgent need and lack of suitable parts, you can use the Rutov hive in the Dadan body, and in as a last resort- and set up the store. Usually this is not recommended at all, but if you need to temporarily accommodate a swarm that has flown out, this is possible.
Making your own hive
You can purchase beekeeping equipment, or you can make a multi-hull hive with your own hands. The manufacturing technology is not too complicated for a person who has experience in carpentry and knows how to handle wood. To do this you will need the following:

To make a multi-body hive, in principle, all you need is a workbench, a plane, a hacksaw and fasteners (screwdrivers and self-tapping screws or even a hammer and nails). However, it is best if you have access to woodworking machines - at least the simplest ones. In this case, the precision of manufacturing parts is much higher, and so is the quality. And the better the hive is made, the longer it will last.
Where to get the drawing
Drawings of any parts can be obtained in different ways: 
- Copy from beekeeping literature. It’s labor-intensive and not very reliable, but it’s great for beekeepers from the outback where there is no Internet access.
- Download and print. Nowadays there are many websites for beekeepers. There you can find drawings of products designed for any height: 145, 300, and 230 mm.
- Finally, an experienced beekeeper can make the drawings himself to his liking. Now, if you wish, you can experiment using original materials and sizes. In particular, products designed for 145 mm honeycombs are mostly experimental.