Hello everyone, I want to present to you my version of a smokehouse, assembled from what I had, maybe it will be useful for someone, because it was made without the use of welding, which makes it more accessible. Don’t judge strictly, this is my first creation) So, I was inspired to make myself a smokehouse, I looked on the Internet what people make it out of: gas cylinders, barrels, buckets, and whatever they make it out of! A smokehouse made from a freon cylinder caught my attention; fortunately, when working in the auto industry, getting one is not a problem. In my opinion, the size is also suitable for home smoking and can be taken on a short fishing trip, for three days. This is what happened in the end:
The cylinder itself

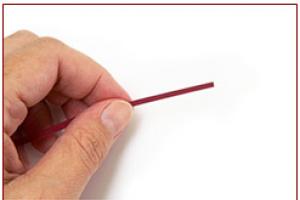
Unscrew the valve from it

Next, you need to cut off the handles with the valve, ALWAYS ventilate it, in order to avoid an accident!!! On the cylinder there is safety valve(in the photo above it’s at the top) it’s better to turn it away from you, I don’t know how it works, but it’s better not to check!!!
The actual tool used

It turned out something like this


That part with the handles was not initially planned to be used, so it was cut off carelessly, but later it will also be useful to us, so cut straighter)


Now we need to evenly cut off the top of our smokehouse, cut it crookedly - smoke will escape, how to mark an even cut, everyone decides for himself, I chose masking tape, glued it along the bend by eye.


Here's what happened

We pass the edges with a grinder attachment, smooth it with a file, and sand it so that there are no burrs.


Then we make a stand on which we will place the smoked meats, the easiest way to do this is to use a metal stand with legs, which comes with the microwave, the height of the legs turns out to be half the smokehouse, but the diameter did not suit me - larger diameter balloon, I had to come up with it myself.


The basis was a pot holder from some kind of primus, found in a barn, it was possible to limit it to one, but due to the large opening, it was decided to throw a mesh over it, or you don’t have to put it on, as you like, maybe over time I’ll weld a mesh from thin rods


Now we are fastening the stand in the smokehouse, for this I took M8 bolts (lying in the foreground) and made studs from them


We mark and drill holes on four sides, place a nut on the stud until it stops and tighten the second one from the outside


I decided to use that upper part, with the handles, about which I spoke above, as a saucer for collecting fat. To do this, we plug the central hole with a bolt, go through the edges from the burrs - the saucer is ready. You can weld the hole if you are too lazy to look for a suitable bolt, but we do it without welding use)

We put everything together, the smokehouse is ready!


I could have ended there, but I was confused by the distance from the stand to the top of the smokehouse, isn’t it too small?! An option is to re-drill the holes lower, but there is another way to change the height - bend the pins in a Z shape, which in turn also makes it easier to remove the saucer with fat; with the first option, it was only possible to get it out from the side, or by removing the pins


This configuration of the studs allows us to change the position of the stand in height: loosened, turned to desired angle, spun it.


Most likely, you won’t have to change the height of the stand very often, but just in case, I decided to install copper nuts to prevent it from sticking; the nuts were left over after repairing the muffler

The only thing that was bought in the store was a glass lid (diameter 24 cm, a common size). The glass lid is very convenient, as soon as the smoke started, we timed it. (40-60 min) the fish is ready! 


If you often go out into nature with friends (for a picnic or fishing), then a folding barbecue grill will definitely come in handy. You can make it yourself from a regular freon cylinder. Thanks to its compact size, this homemade product can easily fit in the trunk of a car.
Main stages of work
The first step is to remove the handles on the cylinder by drilling resistance welding using an electric drill, and cut off the valve with a grinder. Next, you need to cut the metal case into two halves - to do this, use a marker and building level, draw a straight line, then stick masking tape along the contour, make markings and cut the cylinder with a grinder.
We do not cut a little at the ends of the body so that the hinges can be installed. If the workshop is not lathe, then the loop can be made alternative way. To do this you will need a bolt and extended nuts. We tighten the nut until it stops, then cut off the protruding threaded part.

The bolt rod must be cut to the length of the second nut, which must first be drilled out with a drill with a diameter of 8 mm. The result is a simple, but quite nice loop, which is ideal for attaching the lid of a barbecue grill. At the next stage, we weld two loops and cut the remaining part of the freon cylinder with a grinder.

Drilling holes
We make markings on the lower half of the body (on the back side) and drill four holes for skewers at the same distance from each other. On front side four slits need to be made. Then we drill air holes in two rows every 4 cm, departing from the edge by about 5–6 cm.

Barbecue from a gas cylinder It's quite easy to do by following the instructions and it won't take much time. The main thing is to be able to handle a welding machine and have the skills to work with tools.
Owners country houses or dachas know that a mandatory attribute used during recreation is a barbecue. Due to the small size of this element, many people simply find it inconvenient to fry in them. The cost of large models is correspondingly considerable, so not everyone can make such a purchase.
In order to save money, as well as dispose of broken items, you can use such a part as an old one gas cylinder. This item is quite in demand, as it has a ready-made shape and its thick walls do not burn through. After small changes, made carefully, such a design can not only be useful, but also decorate the landscape of the site.
How to make a barbecue from a gas cylinder with your own hands
Before you start making a barbecue from a gas cylinder, you will need to prepare necessary materials that will be needed during work:
Old 50 l cylinder;
Grinder, electric drill, welding machine;
Spanners;
Metal pipe, lid hinges, handles, rivets.
Instructions:
1. Remove remaining gas.
2. Determine the size of the cover and cut it out.
3. Fasten the parts and install the structure on supports.
4. Make a chimney and holes for skewers.
Preparing the gas cylinder
After all the tools are assembled, you should cut the cylinder. You need to do this correctly: remove the residues liquefied gas and condensate. Therefore, you will need to open it carefully with a gas key to bleed off the gas, and turn it upside down to remove condensation. You can control this process by using foam made from soap by lathering the valve hole accordingly.
Then water is poured into the balloon for several days, which will displace the remaining vapor. This is not difficult to do: just remove the tap, connect water hose and fill the bottle with water under low pressure. The liquid should be drained away from buildings to prevent the spread of unpleasant odors.
Then you need to cut off the valve. Do this together with an assistant, which will avoid heating and spark formation. One is sawing, the other is pouring water onto the cut site. After preparing the cylinder, you can sequentially create a barbecue, based on the instructions given below and using the diagram.
Marking
As you can see from the diagram, there will be two parts: the main one and the lid, so the cylinder will need to be marked before cutting. The walls are left higher on the sides so that the wind cannot fan the coals during frying.
Next, draw a cutting line, retreating 2 cm from the weld that connects the bottom and the cylinder itself and mark the lines. We find the longitudinal seam of the cylinder: we retreat 24 cm from it in both directions and mark the places where the lid will be and where to make cross cuts.
Cylinder cutting
A grinder makes a cut in a horizontal plane. This must be done as carefully as possible and try not to damage the side rings, as they will be used to support the lid.
Assembly of the structure
After the above steps, we got two parts that need to be connected together - the bottom and the lid.
Attaching the cover
The lid is attached to the main part using a drill and hinges. To do this, drill holes in the bottom and install hinges. Their number is chosen as desired, the main thing is to place them at the same distance from each other. This can be done using rivets or bolts. It is better to weld the hinges to the lid, which is necessary for the strength of the connection.
So that the lid can be fixed open, a limiter should be welded between the hinges: a steel strip bent to the side.
You also need to consider important nuance– the hinges should be in the same direction, which will allow you to remove this part if necessary. You can come up with an additional accessory - a handle for the lid, securing it with screws on the front. For greater comfort when using such a design, it is worth providing a limiter to prevent the lid from opening.
Creating supports
We create a frame to avoid deformation of the barbecue during use. To do this, you need to weld a metal corner along the entire perimeter of the cylinder base along the cut line.
Shelf dimensions – 30x30 mm. Thanks to this element, the design will:
Have extra strength;
protected from temperature deformations;
attached to legs;
equipped with skewers or a grill that are installed on it.
You need to weld the corner without gaps; to do this you will have to press it to the base with clamps. The legs for support can be made from the same corner or tubes and welded into the corners of the frame. To ensure that their structure stands firmly, it is better to strengthen the legs with additional corners, connecting them together.
How to improve combustion
In order for the frying process in such a grill to proceed correctly, you should take care constant influx air. The required ventilation can be achieved by drilling holes with a diameter of 10-16 mm in any order at the bottom of the base in its rear part. 10 pieces will be enough.
In the place where the cylinder tap was located, you can cut a hole to install a chimney in it.
You can also place cast iron grates on the bottom for additional ventilation. As they burn, they will become hotter and less fuel will be needed.
Brazier from a gas cylinder: nuances during operation
To make this design as effective as possible, you should pay attention to the nuances:
It is worth welding steel pads at the junction of the base and the lid to ensure uniform heat distribution.
At the bottom, a structure is made of reinforcing rods for reliability. In this case, the distance from the coal to the food should be 16 cm.
You can strengthen the thermometer to monitor the temperature.
You should use a container under the food to prevent fat from getting on the coals.
Shelves from an old refrigerator are suitable for the grille; they can be welded to each other.
At the end of the work, you can paint the barbecue so that it fits perfectly into the style of the summer cottage.
I warn you right away: the article has “a lot of letters” and the same number of step-by-step photos.
The reason is simple: I wanted to “chew” everything as much as possible, so that anyone could simply repeat this master class. At the same time, I want to immediately note that I did it at home, on the balcony, you don’t have to worry about any workshop or the presence of special equipment.
So, I needed:
grinder with cutting (I used two) and cleaning discs;
screwdriver or drill;
several drills of different diameters;
obligatory - core and hammer;
masking tape;
tape measure, marker, level;
spanners M8 and M13, as well as a screwdriver;
bench vice: clamp when cutting small parts they are very comfortable.
From materials:
empty freon cylinder;
24 M5 screws, the same number of nuts and a little more washers this size;
4 long M6 (or M8) screws, 8 nuts and the same number of washers for them;
two loops: not wide, maximum 4 cm;
door knob, definitely - with the main wooden part: when cooking, the grill will be very hot;
a metal corner or a piece of steel 2 mm thick: more on this at the very end.
That's all, the preparations are over, let's start creating.
No, I have a large, reusable, “real-life” grill intended for a large company:

But its dimensions, 600 by 300 mm and weight - 46 kilograms, speak about one thing: compactness, convenience, “quickly pack up and go”, you can’t even dream about it. Especially when we go on a picnic only as a family. But if I bought a rocket stove for a cauldron, and even improved it for it, then I need to think about something with a barbecue grill. Well, don’t buy it ready-made at the nearest supermarket or gas station.
The idea was born by itself: a friend was installing an air conditioner for me and I saw a compact cylinder with freon. And since it is, by and large, disposable (in our city, refilling is only slightly cheaper than purchasing a new, full one), it was not difficult to beg for it.

Like many, I used Yandex search. But absolutely all videos on this topic, or articles with step by step photos, had one feature: assembly was carried out by welding. But firstly, I’m not friends with her, and secondly, I don’t have welding machine. If so, I'll do it model assembled, on bolts and nuts.
The first thing you need to do is remove the handles from it. I have a version where they are made in one piece. He cut it, little by little (like a baby tooth when it needs to be pulled out), loosened it and broke it out. First one,

and then the second one. But don’t rush to throw them away: you’ll need them later.

Therefore, modify it right away: trim it, drill out the resulting holes after breaking it out with a 5 mm drill, and also make two more a little lower. That's exactly what I did.

By the way, if I knew exactly where the welding points are that attach it to the cylinder, I would simply drill it out and remove the handles.
Now I unscrewed the valve with the valve. It fits very tightly, is mounted on some kind of thread locking sealant, I even thought that it was reversed. But no, the valve was clamped in a vice and unscrewed. If I had known that it was planted so tightly, I would have simply cut it off with a grinder. By the way, as I later realized, this is the main tool in manufacturing.

However, I cut it off and also leveled the surface as much as possible with a grinding wheel.

Now, the most interesting and important part, the markup. The diameter of the cylinder is 250 mm, I decided to divide it in a ratio of 2/3. It turns out 15 cm from the bottom to the skewers.
In the grill, which I had always used before, the distance from the coals to the meat is 13-15 (how to put the skewer) centimeters. The roasting was always perfect, the meat didn’t burn, but it wasn’t raw either. So I decided to repeat, guided by “good is not sought from good,” to stay at the same sizes.
But how to draw a horizontal line on a cylinder, also with rounded edges and a seam in the middle? In fact, it’s very simple: use the level. Even the part with a bubble for horizontal lines turned out to be in place: the weld of the two halves of the cylinder will not interfere.

Then everything is even simpler: you see all the sizes in the picture: they are the same on one side and on the other. The holes for inflation will be staggered. According to all calculations, they are higher than burning firewood and coals: this way they will not become clogged with ash and will work, supplying oxygen, even if the grill lid is lowered during cooking.
Whereas for the legs we drill holes as close to the edge as possible: this way the grill will be more stable. And to make them, I took a 6.5 mm drill: the same as for blowing.

Holes for the side handles (the ones we cut off from the empty cylinder at the very beginning were just useful),

as well as the central one (I took the most ordinary one, from the nearest hardware store), drilled it in place using a 5 mm drill. Naturally, I filled all future holes before drilling: from the round cylinder of the cylinder, even at low speeds (I worked with a cordless screwdriver), the drill tries to “run away”.

Now the most important thing, cutting the balloon itself. The good news is that if you bevel, you won’t have to adjust anything: anyway, the two resulting parts, the bottom and the lid, are from one cylinder.
We cut the back part. In no case along the entire perimeter, the cylinder should not ahead of schedule fall apart I widened the holes for the hinges. As it turned out later, these were superfluous: they had to be screwed on the other side, and I still had to make a stopper. Now I set the hinges and drilled holes for them.

I also cut through on the other, front side,

and then sawed it in a circle. Ready. Just remove the burrs with a grinding wheel.
Now make vertical cuts for the skewers: you might forget, and then you’ll have to mark them again. Yes, and when you mark the holes for the hinges, they should not overlap them. Therefore, be sure to select narrow loops.

From all the holes drilled in the lower part of the grill, you need to remove burrs: the metal is soft enough and they will certainly be there. The easiest way to do this is with a thick drill, larger than the diameter of the hole.

Likewise in the lid

Let's start assembling. For this I used M5 screws, nuts and washers (I had them on hand). And I only had to buy additional hinges - they had to be shortened by 2 cm from each edge,

and bolts for the legs. M6 with a length of 100 mm fit perfectly: they are not long, and the grill will not stand on the ground.

First of all, we fasten the hinges: first the two bottom screws, and then the top one. This way you won’t even have to bend the loop: the required curvature will be selected by the screw itself.

And if the lid does not fit levelly relative to the bottom, it is easy to fix this by placing thin washers between the hinges and parts of the grill: this is what happened to me

Now we screw on the central handle,

and lateral.

Legs. Two nuts per screw, one outside, the other inside, through washers with a large shelf, screw them on.