Household submersible vibration pumps “Malysh”, “Neptune”, “Rucheek”, “Urozhay”, “Strumok”, “Bosna”, “Dzhereltse”, etc. Do-it-yourself repairs
Submersible vibration pumps have many positive qualities. However, they also have a disadvantage: frequent breakdowns and malfunctions. Among them there are such as valve breakthrough, broken rod, short circuit, etc. But even if all these words do not give you an understanding of the essence of the problem, it is not necessary to immediately run to a technician who will fix everything. You can try to figure this out on your own.
Submersible vibration pumps have many positive qualities. However, they also have a disadvantage: frequent breakdowns and malfunctions. Among them there are such as valve breakthrough, broken rod, short circuit, etc. But even if all these words do not give you an understanding of the essence of the problem, it is not necessary to immediately run to a technician who will fix everything. You can try to figure this out on your own.
Just don’t start repairing headlong. Otherwise, when repairing one breakdown, you may make another or completely damage the pump, so that it will no longer work. To prevent this from happening, you first need to understand how vibration submersible pumps are designed and what the principle of their operation is. Let's start with this.
Operating principle and design of a submersible pump
Principle of operation submersible pumps consists of converting alternating current into mechanical vibrations (vibrations) of the piston and armature. These vibrations promote the movement of water into the pressure pipe from the hydraulic chamber, which is located between the piston and the valve.
So, we now know how the pump works. It remains to figure out how it works and what these or other parts are used for. Consider the submersible device vibration pump We will use the example of the Rucheek brand. This will not prevent you from understanding pumps of other brands, since they are designed according to the same principle.
Complete assembly diagram of the "Rucheek" submersible pump
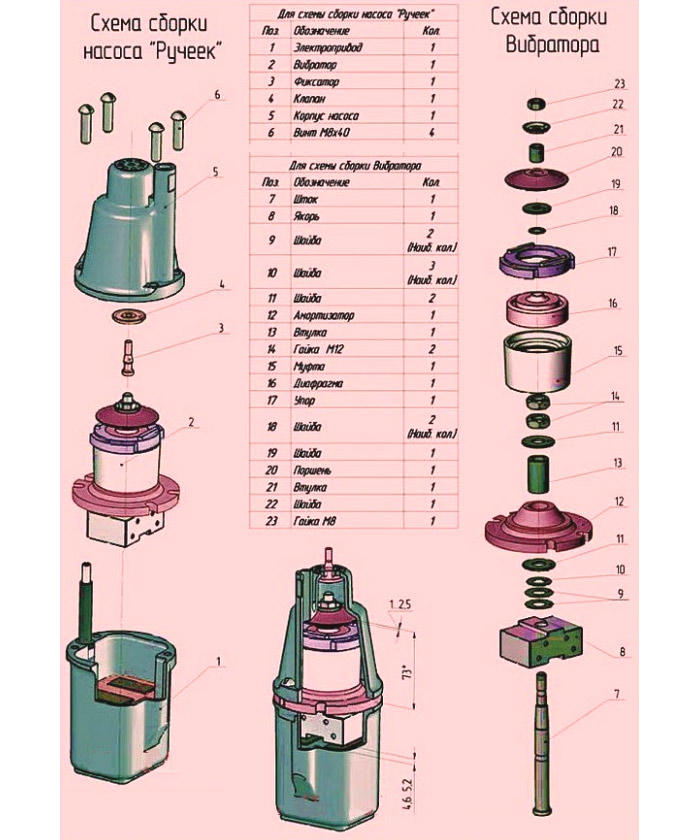
Main parts of the pump:
- frame
- electromagnet
- vibrator
The electromagnet is fixed in the pump housing. The magnetic system itself consists of a core and two coils wound with copper wire. To fix it in the housing, the electromagnet is filled with a compound. By the way, the compound is also an insulating and heat-dissipating material.
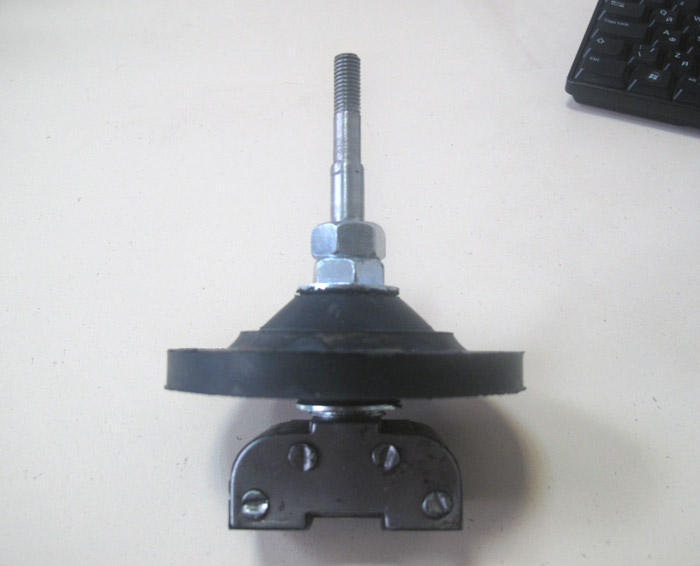
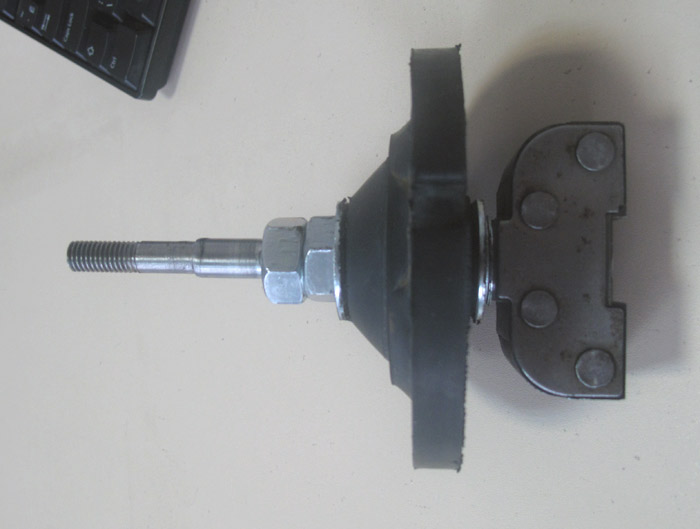
The pump vibrator consists of an armature, a rod, and a shock absorber (rubber membrane). The rod is firmly inserted into the anchor, and the shock absorber is installed on top of the rod. By the way, some important operating parameters of the submersible pump depend on the quality of the shock absorber. The hydraulic and electrical chambers of the device are separated by a rubber diaphragm, which is fixed with a stop. It itself also serves as a support for the rod and determines its direction. There is a rubber piston on the top of the rod.
An important part of the pump is the rubber valve, which is located in the housing. It blocks the holes for water outlet, and in the absence of pressure in the device ensures its free flow.
Now you know the pump’s structure like the back of your hand, which means it’s time to put your knowledge into practice and repair the device yourself, without turning to a specialist! And we will help you with the following instructions, in which we will tell you about the most frequent malfunctions, causes, as well as ways to eliminate them. (We recommend referring to the diagram provided to you above.)

Fault 1: The pump hums, but does not pump water (or pumps weakly)
Reason 1: The nuts located on the rod on top of the shock absorber have become loose.
Troubleshooting method: Disassemble the pump and tighten the nuts until they stop. Lock the top nut (fix) so that the fastening of the nuts does not loosen in the future. When disassembling the pump, you may encounter a problem such as rusty coupling screws (M8x40). In this case, it will be impossible to remove them. However, this does not mean that repairs are impossible. You can use a grinder and just carefully cut them off, and after fixing the problem, replace them with hex head screws.
Reason 2: Wear, valve rupture
Remedy: Replace valve.
Reason 3: Broken rod
In this case, check what happened to the rod. If it is deformed or broken, it cannot be replaced.
Malfunction 2: When connected to the power supply, plugs are knocked out, the cable becomes charred
Reason 1: Burnt armature winding
Remedy: Replace the winding with a new one.
Reason 2: Cable fault
Remedy: Check the cable with a tester. If it is defective, replace it with a new one. However, it is not possible to replace the cable in all models of submersible pumps, since some models, for example “Malysh”, provide for filling the wire in the housing with a compound. If you are faced with just such a model, the cable can only be extended by twisting.
Fault 3: Vibration too strong, pump overheating
Cause: Operation without water, as a result of which the magnetic part of the pump peels off.
Remedy: The breakdown is quite serious and requires a lot of time and effort to fix. Disassemble the pump. Separate the electrical part. To check whether the magnet is attached or has come off, tap the housing. If in front of you this problem, separate the magnet from the body and use a grinder to cut grooves (2 mm) lengthwise and crosswise. Also make grooves on inside housings. Next, you should cover the inside of the case with glue and sealant and insert a magnet inside. When everything is dry, start assembling the pump.
Fault 4: Low pressure, pump pumps weakly
Cause: Insufficient clearance in the vibrator (or weak fastening of the nuts - see point 1)
Remedy: Add washers to the vibrator (11 in the diagram). Determine the number of washers to add experimentally to the required water pressure.
Well, you have learned about all the main features of submersible vibration pump failures. Now you can repair pumps of the brands “Malysh”, “Neptune”, “Rucheek”, “Urozhay”, “Strumok”, “Bosna”, “Dzhereltse” and others yourself. Congratulations and wish you a successful repair and long term service to your unit!
Added: Photo and text from reader Ruslan.
“A month ago I disassembled the Expert. The same garbage... broken rod... I think usually they break off in the place where the piston is installed. At work I pressed out the broken rod, the turner cut internal thread on the main part of the rod, screwed the workpiece tightly, cut the external thread in the place where the piston sits, welded the transition just in case, and carefully trimmed it on the machine! Collected! All things! Works like new! This is all provided that there is no other damage (for example, defects in the rubber piston or diaphragm)."
|
Sergey
2014-08-14 12:57:28
The Neptune-2 pump often triggers the thermal relay, turning off the pump, what should I do? [Answer] [Reply with quote][Cancel reply]
|
Reliable sewerage in a private house ensures maximum comfort for all residents. However, in some cases it can fail, becoming clogged with large particles or failing to process storm drains. In this case, drainage pumps are used, and therefore they must be maintained in good condition and ready.
Drainage self-priming equipment
Intensive work hydraulic devices can cause them to break. Users have to quickly repair clogged channels of devices, change a burnt-out engine, or repair float switch water level with your own hands. It is not always possible to do these operations correctly in a short time, so quality repairs you need to worry about it in advance.
Design features of drainage pumps
Drainage water pump To pump out water, it uses its main element - an impeller, to build up pressure in the system. In addition to this, the design contains the following elements:
- pump unit;
- electric motor operating from a 220 V household network;
- suction unit with filter element;
- float circuit breaker.

Design
Since operating conditions imply the presence of liquid in contact with the housing, the outer part consists of tightly fitted parts of a composite housing. This ensures high-quality sealing, and the material for the housing is:
- stainless steel with sufficient chromium alloying content;
- moisture-resistant plastic.
During operation, it is necessary to protect the housing from mechanical damage so as not to depressurize the installation.
It is necessary to follow the manufacturer's operating recommendations so that the float pump for pumping out water works with liquid that contains contaminant particles of an acceptable fraction. The threshold geometric value is indicated in the device passport. Typically the permitted interval is 3-50 mm in diameter.
Industrial units can also work with large fractions. Improper operation of the pumps can lead to the electric motor humming, but not starting to return, or to other types of breakdowns.
Troubleshooting
In most cases, you can figure it out on your own. To do this you will need a set of wrenches, screwdrivers, pliers, a multimeter and possibly a soldering iron. In some cases, you will have to use the repair kit provided by the manufacturer.
VIDEO: Drainage pump. disassembly and repair
Mechanical breakdowns
In cases where the electric motor hums but does not rotate, the cause most often lies in a mechanical fault.
- It is worth checking the integrity of all blades. A broken piece can block the rotation of the head shaft located in the housing.
- Blocking of rotation, which causes a characteristic hum, is caused by a damaged bearing assembly on the shaft. Under the influence of wear, it worsens the alignment and leads to the shaft stopping.
To check for these reasons you need to:
- turn off the power supply;
- remove the pump from the water and place it on a level surface;
- try to rotate the working impeller by hand, visually checking its integrity.
If there is difficulty, the unit must be replaced or repaired, because if the electric motor does not start pumping, but hums, then the problem is often not with the electrician, but with blocking the rotation.
Reduced water level
Drainage equipment in most models has a submersible design. Due to this, it is possible to effectively pump out liquid. Operation without liquid inside the working cavities of such pumps leads to rapid failure of the units. An important factor protection against operation without water is a special device - a float switch.

This is what the pump looks like long time operating partially immersed in liquid
The part is capable of blocking the operation of the entire pump in time if the liquid level drops below a critical level for the device. The role of a kind of gyroscope is performed by a metal ball that changes its position depending on the location of the unit in the water. It acts on the lever, closing/opening electrical contacts.
Air valve malfunctions
Some drainage models have a special bleed valve. The accumulated air bubbles are passed through it. Many pollutants are dissolved in the problematic liquid media that the pump pumps. They are able to envelop the surface of the ball from the valve and due to this it can fill in its seat.
If the system does not provide constant air venting, then your Karcher will hum, but will not pump water. You can restore functionality after pumping a certain amount clean water. The system will flush itself, and the liquid will remove contaminants from the ball.
Electric motor failure
The pump can become silent during operation and not respond to the supply of electricity. In many cases, this is due not so much to problems with the cable, which can fray or bend, but rather to an interturn short circuit:
- In such a situation, the characteristic smell of burnt wire insulation will be heard from the electric motor.
- The second sign will be significant overheating of the unit, which can be heard by touching the switched off unit with your hand.
The reason for such malfunctions is the lack of protection against idle move. Significant overheating of the motor leads to heating of the turns, and they, melting the insulation, form an electrical short circuit between the turns.
![]()
Cleaning the pump
Operation can only be restored by replacing the block or rewinding the wire in the damaged area. The second option may be a little cheaper, but if performed poorly, it can soon lead to new malfunctions.
Do-it-yourself pump repair
In most cases, doing DIY repairs comes down to eliminating mechanical damage. The most popular types of repairs are replacing the impeller or bearing units.
To completely disassemble the device, a special set of tools is required. The case is opened when completely disconnected from the power supply and on a dry apparatus. In most cases, repairs are entrusted to experienced specialists.
VIDEO: Features of equipment repair
Despite all my positive traits, submersible vibration pumps are not the most reliable and often break down at the most various reasons. The cause of pump malfunction may be problems with the power magnet or winding, broken traction, broken valve, open circuit or short circuit. There are many simple malfunctions, which, it would seem, are not difficult to eliminate. However, after repairing the pump, it may pump very weakly, or even stop pumping altogether. Therefore, it is very important to correctly assemble and adjust the pump. In order to understand how to set up and assemble the pump correctly, you need to know well, as well as some important points about it correct adjustment which we will consider today...
In order to correctly diagnose a pump malfunction and subsequently be able to fix the problem yourself, you should first study the operating principle and internal organization unit. This is especially true for those who are faced with such a problem as a breakdown of a vibration pump for the first time and have no idea how it can be repaired.
Let's look at these questions in detail using a visual diagram.
The operation of a submersible pump is based on the conversion of alternating current into mechanical vibrations of the armature and piston, which contribute to the movement of water. The vibration of the piston forces water from the hydraulic chamber (the space between the piston and the valve) into the discharge pipe. The main components of the pump are: housing, electromagnet and vibrator.
An electromagnet consists of a core and two coils wound with copper wire. Placed in the pump housing, it is filled with a compound, which serves not only to fix the magnetic system in the housing, but also as an insulating and heat-dissipating material.
The vibrator consists of: an armature, a rod, a shock absorber. The rod is pressed into the armature, the shock absorber is installed on the rod and is a rubber membrane, the quality of which determines some parameters of the pump's operation.
A rubber diaphragm, fixed with a stop, separates the hydraulic and electrical chambers of the pump and also serves as a support for the rod, determining its direction. At the top of the rod there is a rubber piston.
There is a rubber valve in the pump body that closes the water outlets, but in the absence of pressure in the pump ensures its free flow.
Do-it-yourself pump repair is real!
The most common pump malfunctions and how to fix them
1. It hums, but does not pump (or pumps very weakly)
To understand the reason, let's look at the design of the pump (see diagram): on the rod 7 on top of the shock absorber 12 screw on two nuts 14 . If their fastening weakens, the shock absorber also moves, and the pump begins to work “in vain”.
To return the pump to normal operation, you need to disassemble it and tighten the nuts until they stop, locking the top one. The pump disassembly sequence can be seen in the diagram above. Difficulties may arise with the tightening screws (M8x40) on the cover if they are rusty and cannot be removed in the usual way. Alternatively, you can cut them off with a grinder and replace them with hex head screws during assembly.
Another reason could be valve damage due to excessive wear. Sand entering the pump speeds up this process, so the integrity of the rubber parts is worth checking. If severe wear or rupture occurs, the valve must be replaced.
Broken rod is also one of the possible reasons, so it’s worth checking its integrity. Replacing a rod if it is faulty or deformed is almost impossible.
2. When the pump is turned on, the plugs are knocked out, the cable is charred
The cause of this phenomenon may be a burnt-out armature winding or a cable malfunction. In the first case, repair is impractical: the process of rewinding the armature requires certain knowledge, and the time and effort required are not worth the result, since the probability of a re-circuit is high. It is theoretically possible to make a winding for 36V by rewinding the coils in compliance with all parameters: thickness and grade of wire; the number of turns calculated for a given voltage so that the power remains the same, etc. But it’s easier to just replace the winding with a new one.
We check the cable using a tester. Replacing the cable in the event of a malfunction is possible in some cases, since in the “Malysh”, for example, the wire in the housing is filled with a compound; only if it is necessary to increase the length, it can be increased by twisting.
3. Strong vibration and overheating of the pump
Even short-term operation of the pump without water causes overheating, which can lead to the pump burning out. Due to overheating, the housing expands, the compound filling surrounding the magnet peels off from its surface, and vibration occurs. Working without water for a longer period of time will result in complete detachment of the magnet. The gap between the magnet and the piston disappears, and movement of the piston becomes impossible.
You can bring the pump to its normal state and reduce the possibility of such a phenomenon in the future using the method described below (the method is quite complex and not entirely accurate when using some materials and tools).
The pump should be disassembled, separating the electrical part. By tapping on the body we determine that the magnet is not secured inside. We release it from the body, after which we use a grinder to cut grooves on it with a depth of almost 2 mm, in the longitudinal and transverse directions. On the inside of the body, such grooves can be cut in a chaotic manner. After this, cover the case with sealant or glue and press the magnet inside. Once the sealant has hardened, you can assemble the pump.
However, there are pump models with suction holes located on top (“Rucheek”, produced by Livgidromash OJSC, and “Malysh M” from the Elektrodvigatel plant). This design allows not only to eliminate the intake of impurities from the bottom of the well, but also to improve the cooling of the pump, making it possible safe work pump “dry” up to 7 hours. Equipping the pump with a thermal relay (model “Baby K”) increases its cost, but ensures its shutdown in case of voltage surges or overheating.
4. Low pressure, pump does not pump well
This happens when the gap in the vibrator is insufficient.
If the valve is in order, the nuts on the stem are not loose and there is no break in the rod, you can correct the situation by adding washers 11 (1mm each) per vibrator 2 . By increasing the gap in this way, you can increase the pressure and increase the pump stroke. It is worth remembering that during this procedure you need to configure and check the pump, that is, determine the number of washers experimentally until the desired result is achieved.
IN this material We have reviewed the most common breakdowns in which you can repair the pump yourself. By the way, about how to repair it yourself pumping station, we told.
Important points when assembling and setting up the pump
The repair has been completed, the pump needs to be assembled, adjusted and tested. These actions require special attention and accuracy.
So, when assembling, you should first pay attention to the gap between the piston and the magnetic system of the pump; it should be approximately 4-5mm. Then we check the integrity of the valve, blow it out from the water inlet side - the valve should allow air to pass through. The piston must also be tested for integrity, elasticity and absence of deformation. The next step is to determine the gap between the body and the valve adjacent to the suction openings. The optimal value is 0.6-0.8 mm; the gap is needed for the free flow of water in the absence of pressure in the pump. When assembling the housing, we compare the symmetrical parts, aligning the hole for water flow in the rubber gasket with the hole in the upper part of the housing.