Egor is a snow scraper? maybe a shovel?
Vasily A shovel is made of metal, and a scraper is made of plastic or rubber, if you do not want to remove paint or other coatings with snow.
Tags: How to, make, a scraper, for, cleaning, snow, with your own hands
Scraper, do-it-yourself snow plow.
6 Feb 2011 - 38 sec - Uploaded by fedormaevConvenient "Drag Scraper" is designed for quick... DIY snow scraper - Duration: 18:41.
11 Nov 2015 - 4 min - Uploaded by Want to do something good? Do it yourself!!! In this video I tried to make a very budget snow scraper. Kitai nnada ... Scraper, do-it-yourself snow plow.


Please advise how and from what to make a scraper for cleaning snow on the street? | Topic author: Nikita
Vyacheslav I bought from the janitors and everything for a bubble
Ivan The janitors seem to have a sheet of tin attached to a stick with staples. Often rectangular in shape.
The main thing is that the device is light, but durable.
Vladimir) My dad has a rectangular flat piece of wood, about like 2 A4 sheets folded together, nailed to the handle of a simple shovel - it’s been fucking clearing snow for five years now, well, sometimes the nails get loose, and he clogs them again :-) It’s easier to buy a ready-made shovel, in my opinion they are not scarce!
Sergei Where are you from? that shovels have not been seen?

How to choose a scraper for snow removal in the country? - Landscape...
January 30, 2014 ... Description of the types of scrapers for removing snow in the garden and in the country, ... How to make a wood splitter with your own hands to save time and ...
How to make a do-it-yourself snow scraper | Build...
10 Mar 2014 ... All kinds of snow scrapers, how to make a snow scraper with your own hands, metal and plastic scrapers.
Ecology of knowledge. Homestead: Let's talk about how to make a regular shovel or scraper for cleaning adjoining territory after another snowfall.
Let's talk about how to make an ordinary shovel or scraper for cleaning the local area after the next snowfall. They will definitely come in handy if you live in a private house, because you have to clear the area from snow on your own, without relying on utilities.
Of course, it is very convenient to have your own snow blower. The snow melting and anti-icing systems also cope with the problem perfectly. However, such devices are far from affordable for every homeowner; many are forced to continue to work with their hands.
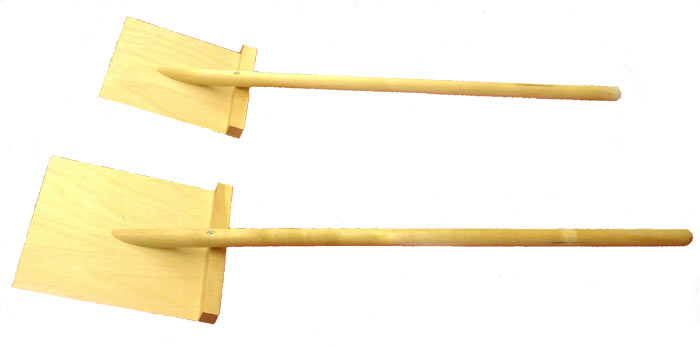
How to make your own shovel
Let's start with the simplest and available option- plywood snow shovels. All you need:
- A piece of ordinary plywood "four" about 50 by 50 cm in size. With a shovel bigger size it will be difficult to work even for an adult and physically strong person;
- A piece of board with a length of a piece of plywood, that is, 50 cm for rear wall, the end of the working part of the shovel;
- Finished cutting from the old garden tool, a wooden lath of suitable length and strength, an aluminum pipe - everything that can serve as a convenient handle for a shovel;
- A strip of galvanized metal, with which we will protect the edge of the plywood and significantly extend the life of our shovel;
- Nails. The most common. You can also use wood screws or wood screws. And for fastening the handle, it is better to take a furniture bolt;
- From the tool you will need a jigsaw or a wood saw, a hammer or a screwdriver (depending on what type of fasteners you use), a measuring tape, pliers to bend a metal strip, a grinder to cut it out, sandpaper.
First of all, mark the middle on the cut out square of plywood - the handle will be attached to this place. In the middle of the board, cut a hole for the shovel handle. The edges of the plywood and the wooden lath-handle are cleaned sandpaper. At the edge of the holder, a wedge is sawn off obliquely so that it fits snugly against the plywood. If your handle is an aluminum pipe, flatten its end. The galvanized strip must be bent along the edge of the plywood. In principle, everything - you can assemble a shovel using self-tapping screws or nails. For fidelity, the handle can be additionally fixed with a galvanized strip, which is also attached to plywood.
If desired, the shovel can be painted. As for the purchase options, the simplest snow shovel will cost 250 rubles. And there is no guarantee that it will last long.
Using the same technology, a snow shovel is made from aluminum sheet. In this case, the back of the sheet should be bent so that a rim with a height of about five centimeters is obtained. They also make side skirts. Since aluminum is a fairly soft metal, a zinc-plated strip along the front edge working surface is also necessary, as in the case of plywood.
A purchased version of an aluminum snow shovel can cost 400-500 rubles.
A scraper, an engine, a snow scraper can be the simplest plate from the same lightweight plywood, only in this case, experts advise taking the "six". Leaf dimensions are approximately 1–1.2 m long and 50–60 cm wide. The handle will be not just a handle, but a structure that is attached to the edges of the scraper sheet, so that it is convenient to work with two hands, removing snow.
Along the edges, plywood must be reinforced with metal strips, otherwise the scraper will not last very long. The handle can be welded from metal, as well as fastened from three wooden slats. Craftsmen advise taking a handle from an old folding bed as a handle for a scraper - it is round, comfortable, durable, and will perfectly attach to plywood.
A purchased simple version of a scraper, a snow removal engine will cost from 500 to 1200 rubles, depending on the material used and the manufacturer.
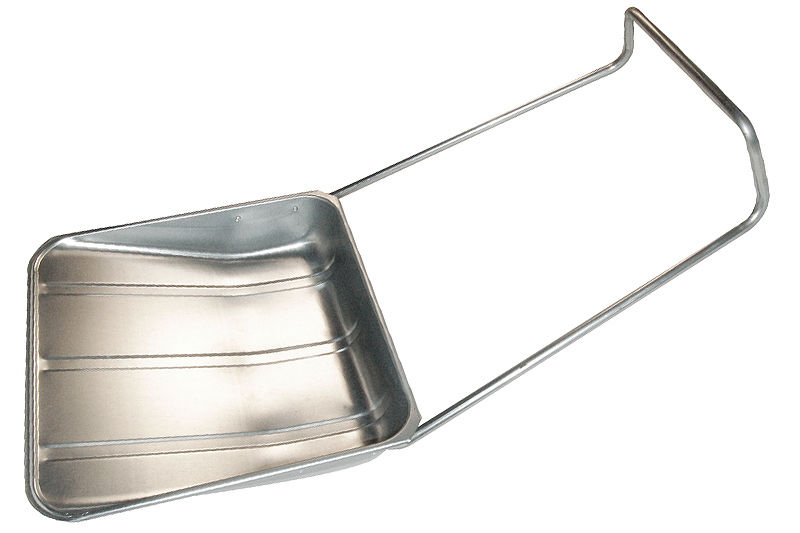
The disadvantage of an ordinary scraper is that it allows you to clear snow from the paths and the yard, push it, but it will not help to throw it away, take it out, take it out of the territory. In this regard, bucket-shaped scrapers are much more convenient, where you can load snow and move it outside the site.
It is already more difficult to make such scrapers with your own hands, you will need a stainless steel sheet, which will have to be bent, if necessary, welded to give it the shape of a bucket. It is not for nothing that such scrapers, scrapers are often called drags - they allow you to quickly drag snow out of the yard, they operate on the principle of a bulldozer.
Scrapers on wheels or skids are even more convenient. Bucket can be made from half metal pipe or barrels, and take the wheels, for example, from an old baby carriage. The skids will have to be welded on their own, but on the snow they ride very easily. published
If you have any questions on this topic, ask them to specialists and readers of our project.
For some, the first snow, as well as any snowfall that has occurred within six months, is an occasion to rejoice, play snowballs and make a snowman. But for some it's enough. hard labour, which regularly takes up a lot of time. Yes, do-it-yourself snow removal is not an easy task.
In some regions of our country, snow falls quite rarely and melts almost immediately. In others, in a week, and more than once, it may well pile up half a meter of snow. And in order to clear your area near the house or at least the paths from snow, you will have to stock up on the appropriate tools. Then snow removal in the country will take less time, and will turn from hard work into a good workout. Also, do not forget about the need for periodic
Otherwise, a lot of it can accumulate there, which threatens backfire both for you and for your cottage.
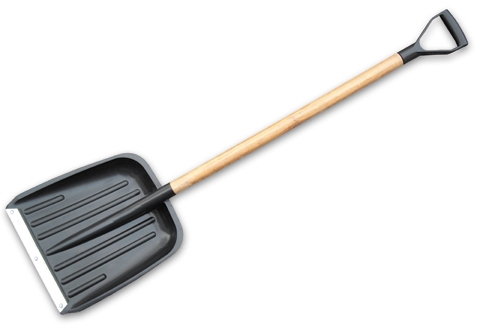
Of course, the most common tool is a snow shovel. It can be easily purchased at any hardware or home improvement store. Big choice modern models allows you to choose the right shovel for every person, regardless of his strength, height and skills. Shovels can be made of aluminum, plastic or dense plywood. Depending on this, they vary significantly in cost, convenience and durability.
For example, a wooden shovel is not only the lightest, but also the cheapest. Alas, the tree does not tolerate high humidity. Therefore, it is enough to make minor errors during storage so that the shovel simply rots.
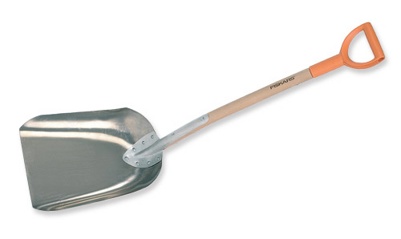
An aluminum shovel costs the most and will be the heaviest. But when working with it, you will be sure that you can easily remove the snow around the house and clean everything with your own hands without much difficulty. The most severe frosts will not be able to harm a metal shovel. Accidental falls, hits on stones hiding under the snow, will also not cause the slightest harm to the instrument.
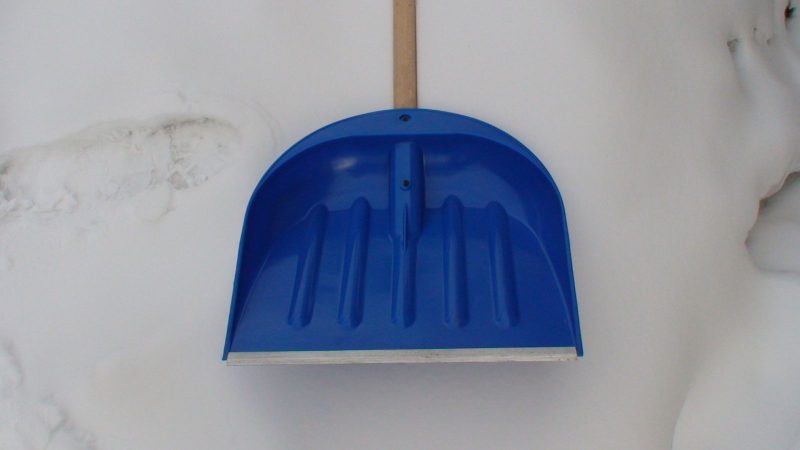
And finally plastic shovel. In terms of price and weight, it is the golden mean of choice. It is quite convenient to work, but when the temperature drops below -25 degrees, some types of plastic become brittle. As a result, ordinary cleaning in the yard can result in a broken shovel. In addition, plastic, in general, does not withstand impact well. So no one can say how long a shovel made of it will last you.
Other popular hand tool- a snow scraper or, as it is more commonly called, just a scraper. If you only need to shovel snow into a pile, for example, on the side of the road, on or flower beds, then this is a great solution. To cope with such a tool may not be too strong man, as well as the one who is seriously tormented by back pain: the load on the body during work is minimal.
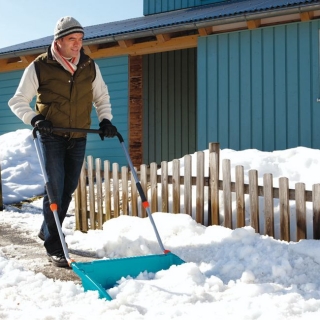
A serious plus is the ability to eliminate ice, into which water turns from melted snow on a warm day. But for this it is better to take a metal scraper, not a plastic one. It allows you to easily break the ice off the path, and due to the greater weight, it is easier to enter deep snowdrifts. Yes, the cost of a metal scraper is higher than a plastic one. But it will last you longer, and the ease of use fully pays for the additional costs.
Scrapers can vary considerably in width. There are very narrow ones, the main purpose of which is to chip ice and remove it. And there is a wide inventory: this is better suited for cleaning soft, fluffy and not yet packed snow. One person with a similar tool can easily clean it in an hour.
Read also
Work in the country after winter

How to make a snow shovel with your own hands
A snow shovel today is relatively inexpensive. But still, many people are interested in whether it is possible to make a snow shovel yourself.
Of course, almost anyone who has suitable materials, tools and at least a minimum of skills to work with them. But in this case, you can only make a wooden shovel. For the manufacture of plastic or metal - you will need not only materials, but also special stamping equipment. So, to make a shovel with your own hands you will need:

You will also need a jigsaw or hacksaw, a planer, a hammer, pliers, a set of self-tapping screws, sandpaper and a meter.
As already clear, a large sheet of plywood will serve as the basis for the shovel. It does not undergo any additional processing. But with the bar you have to work. Arm yourself with a jigsaw and planer to give it desired shape: exactly matched the length of the plywood, one of the sides should be completely flat, and the other slightly rounded. In order to look better, you can process the bar with sandpaper.
 the picture shows necessary materials to create a shovel
 Now you can proceed to the processing of the cutting. Its length should be from 150 to 180 centimeters. A new shovel should be comfortable for you to work with, so proceed from your height and habits. The handle should also be treated with sandpaper so that there are no protrusions and splinters, which are easy to get hurt during work. Make sure that there are no knots on the handle, otherwise it will fail much earlier than desired.
Connect the block with plywood so that it adjoins to it with a rounded part. Lay a long and thin strip of tin on top. Using self-tapping screws, connect all three parts into a single product. It is better to use at least 6-8 self-tapping screws, then the load on each of them will be minimal.
 we connect the bar, plywood and the handle
 Using a jigsaw, cut a small semicircle on the bar, corresponding in size to the handle, it should sink in half. Align the block with the handle so that the tip of the handle rests on the plywood approximately in the middle of the sheet. Remove the handle and saw off a piece of it at such an angle that it fits as closely as possible to the plywood. Align them again and make sure the handle fits perfectly on the plywood. If not, repeat the procedure, increasing the angle.
The video shows the entire process of making a snow shovel with your own hands.
When you have achieved the desired result, install a small piece of tin (3 x 2 cm) on the opposite side of the plywood. Connect the tin, plywood and shank with two self-tapping screws.
Turn the shovel over and place a 65 x 2 cm tin strip on the block. Secure with 4-6 screws. Carefully bend the hanging edges and tighten them on the sides of the bar.

It remains only to strengthen the front of the plywood with tin, then the shovel will not crack when it hits the ice. Put the tin on the plywood, wrap it on both sides so that it covers the shovel by about 3-4 cm on each side. Gently pinch the tin with pliers so that it fits snugly against the wood.
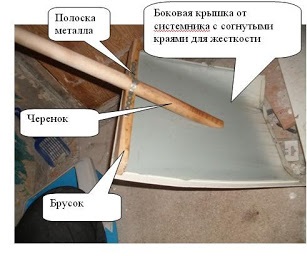 you can take the side cover from the old system unit as a piece of tin
 That's all! The shovel is ready and you can start working with it.
Achievements of progress - to the masses
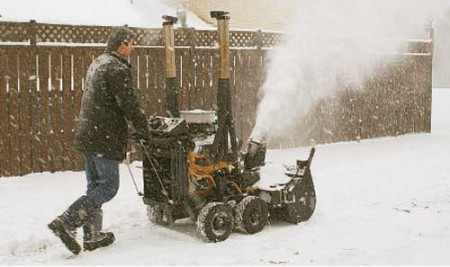
A few decades ago, a shovel with a motor was met only in jokes. But today the most amazing and strange things have firmly entered our lives. Therefore, every person should know about such a cunning tool as an electric shovel.

Of course, this device is not too similar to a shovel. Rather, it has something in common with a conventional lawn mower. You need to hold the shovel by the handle, pressing lightly from above so that the screw rakes in as much snow as possible. The captured snow is thrown far to the side, where it will not cause unnecessary trouble.

Before buying, you should seriously consider whether you really need this tool. After all, its cost usually starts from 5 thousand rubles and can be much higher, depending on the manufacturer and power. Therefore, it is worth making such a purchase in cases where it is necessary to regularly clear an area of tens of snow from snow. square meters. Then the electric shovel will help you save a lot of time and effort. A major advantage is minimum cost energy: you just walk around the site, slightly pressing on the shovel, and it does all the work for you.
Light weight - from 6 kilograms - makes it easy to work with an electroshovel for men, women, adults and adolescents. Of course, when working, you should be careful not to get hurt on the powerful screw of the device.
Winter has come, a lot of snow has fallen, it needs to be cleaned. Therefore, Anton Weber came up with an idea for the craftsmen. It offers a snow scraper based on iron barrel volume of 200 liters. I took half the container as a dump. It is better to use a barrel from paintwork materials, her head and bottom are rolled. It is simply cut in half by a grinder and you get a blade. If you want to reduce the weight of the device, then you can cut it into three parts, use pine handles. More about this in the second part of the story and video story about the invention.
Design features of the snow scraper
Shown in the video is a barrel of some kind of grease with a removable lid. Therefore, the side where the lid is located had to be screwed to the barrel itself with self-tapping screws. On the side I adapted the bars. On one side there are stiffening ribs, on the other - a support platform under the guide. The last of the birch cuttings, the same thing - the handle. The top and bottom, where the handle is attached, are tied with a suspension.
I took the path of least resistance, did not invent complex mechanisms. Made it easier. It turned out to be a good working tool. This scraper does its job well. He is not easy. But at the same time, not too heavy. A grown man can handle it. If you can't move it with the snow, then since the handle is wide, two people can stand up and push it.
The slope can be improved. The sector can be reduced from 180 degrees to 120-130. It is not being used. Therefore, in order to facilitate the structure, it can be cut off, and the ribs can also be replaced with a smaller section.


Cheap and cheerful! The best outdoor crossfit is to clean the snow.
Regarding the price of the barrel. Used one costs 200 rubles. Since only one half is needed, two snowplows can be made from one purchased container. Cuttings for 20-30 rubles. Plus Consumables. The cost of such a scraper is a maximum of 100 - 200 rubles. The master assembled it in 1.5 hours. If everything is available, the maximum hour of work.
The most important detail- bottom blade The edge during snow removal will cling to all sorts of pebbles and other irregularities. I tried it without a rib at first, I was tormented, because it clings to everything in its path, plus a lot of edge wear. It will wrinkle and then begin to disperse at the seams. And with such a rib is normal. You can circle sheet metal to improve glide.
The model is working. You can clean snow with this scraper.
Scraper finishing
Cut off a slice of 60 degrees. It turned out that the blade sector is about 120 degrees. That is, from one barrel you can already make 3 scrapers. I left the side edge exactly as a sector, did not cut it along the chord, because such a high and wide side, snow does not fall out of it. 
It is advisable to take the barrels Russian production which are currently being released. They have thin metal. The old Soviet ones are too thick, the snowplow will turn out to be heavy, respectively. Birch cuttings. They are mainly used on shoulder blades because they work on bending and strength is higher than that of pine. On the scraper, they are not needed. Birch is about 1.5 times heavier than pine, so if hands reach, the master will change both the guides and the handle to pine ones. Then the scraper will be generally airy.
Although a huge amount of snow falls in the Altai Territory, it is only the 4th snow region. And somewhere there are 5, 6, where such precipitation falls 1.5 times more. So stock up on shovels, scrapers and meet the winter fully armed.
Clearing the road from snow in winter is an important undertaking, and it is also good for health if you resort to manual labor. But labor intensive! And the greater the distance, the more you have to spend time and effort to bring the road in order. And if a tractor is a rare guest in your area, then a snow removal device that greatly simplifies and speeds up the harvesting process becomes vital.
So it is in this case. There is a section of the road about 250m, which is not cleared by the city administration, because. lane belongs to the dacha cooperative. Those. technology does not come here. Calling a tractor all the time is expensive. There are times when clearing the road of snow is required several times a week. Accordingly, cleaning driveways with a shovel with your own hands is, at a minimum, laborious and time-consuming. Hence the desire to makeshift fixture to clear snow from the road.
The photo below shows last year's version.
This homemade snow removal device is attached to the towbar of the car with a towing cable and rolled along the road. This “grader” (as we called it), of course, made life much easier last year. After all, it took only 20 minutes to clear the road instead of 1.5-2 hours of intense physical work. But unfortunately, this option has its drawbacks.
So, about what does not suit this “grader” model. Weight and shape are the two parameters that together reduce its performance parameters. He shovels snow - that's a fact. But due to its small mass and its design, when a certain amount of snow is collected, it begins to rise, as a result of which the snow is partially collected and partially rolled. As a result, the level of the road is rising, which in the spring with warming can become a certain problem. Such clearing of the road from snow is not the most the best option! To eliminate such a problem, someone weighty has to stand on it (I usually acted in this role with a child, and my wife was driving the car) and, when a certain amount of snow is accumulated, constantly stop and throw back the collected pile with a shovel.
This year it was decided to improve the device for snow removal. Those. try to make sure that snow removal from the road is carried out without unnecessary stops and without additional involvement of manual labor in the form of discarding the collected piles. And for this, based on a little thought, our snow clearing device must satisfy several requirements:
- Snow should be thrown to the side, not piled up. To achieve this effect, the "grader version 2.0" must be made in the form of a wedge.
- The weight of the "grader version 2.0" must be sufficient so that when moving it does not lift it above the snow. To do this, again, you can provide a place for a weighty person.
- Try to save money and spend as little money on production as possible.
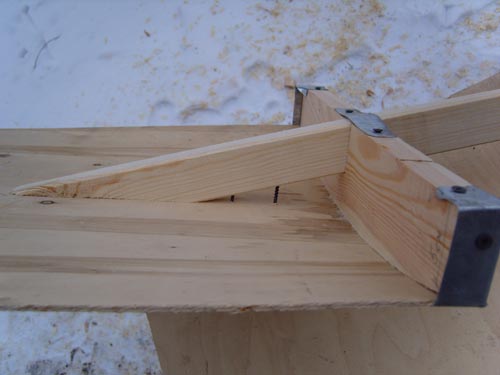
Let's start with the choice of materials. originally planned to buy wooden blocks 50x50, from which to make a frame. Next, sheathe this frame with plywood and begin operation. But one day, looking at my site, I saw that there were several euro pallets from building blocks and a bunch of pieces of wood from a dismantled barn. And the thought came to me that wooden pallet- This is a frame ready for sheathing. In addition, renting them out at 50 rubles apiece is not profitable, because. for gasoline to take them to the reception point, it will take more. In the case of a purchase, you will have to spend only 100 rubles apiece on them. We need only 4 pieces. Those. 400 rubles. This is the same money that will be needed to buy the bars, only a frame will still need to be made from them. Summarizing all of the above, I note that I did not have to buy anything. Those. the savings are enormous.
 Now directly about the manufacture of a device with which the removal of snow from the road should be as simple and fast as possible. First of all, we sew euro pallets in pairs.

 Pallets have the following dimensions 1.2m by 1m and 1.2m by 0.8m. I have a pair of each type. The height of the side of the future grader is 0.8 m and 1 m - this is a bit too much, and the mass of the entire structure will be too large. So I shortened them a bit.
 Next, we prepare a bar or board with a length equal to the width of the road clearing. Those. snow removal from the road will be carried out for a certain width of the carriageway. For me it is 2.1m. It was this length that the board was chosen for. After that, we install shields from pallets in the form of a wedge, trying to combine in front of the future grader. So that they do not disperse, they can be grabbed to each other with a self-tapping screw or a nail. Now we take the prepared board and fix it to both shields at the back of the grader.
 Next, we mount a few more connecting bars in the middle. This is where euro pallet trimmings come in handy. They can be sewn together to strengthen the position of the shields relative to each other and at the same time get a good seat for the weighting agent.
 So we got a rigid structure that can withstand good loads. Now we need to stitch it up. Plywood or stainless steel sheets are suitable for this. But, again, in order to save money, you can look around in search of suitable, but already waste materials. I have those turned out to be scrap metal. They sheathed the frame

 The last step remains - this is to make "ears" to which the cable will cling. For this, I used Soviet-made pens from some old door. By the way, they were on the previous version of the grader. As for the level of installation of "ears". They should be mounted at the same height as the towbar of your car. If they are lower, then when driving, the front will ride up. If it is higher, then the back of the grader will lift up. In any of these two cases, high-quality clearing of the road from snow will not work.
 Here, in fact, the snow removal device is ready. It certainly doesn't look the best, but it does its job well. You can hitch the grader to the car and get to work. Clearing snow off the road with a grader like this is an economical, quick and easy solution.

 Below is a video in which you can look at the process of cleaning the road from snow with such a device and the result of the work done.


