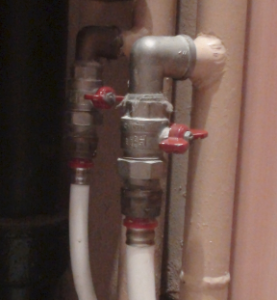
A situation where you need to carry out repairs yourself at home ball valve- occurs quite often. It differs in design from conventional similar devices. However, repairing it is not difficult for any man who has minimal skills. To do this you need to know:
- how does a ball valve work?
- what parts does it consist of?
- how the water is supplied.
Many people are accustomed to the fact that in a regular faucet you need to replace the rubber or silicone gasket, and the device can be used. A ball design can have similar problems, but there are other reasons for its poor performance.
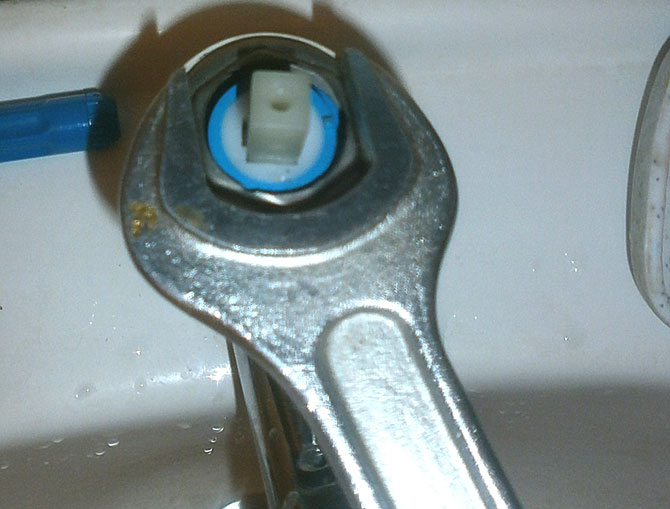
O-rings and bushings can wear out over time, so replacement is necessary when leaks occur. Try this easy fix if the leak is on the handle: 1 - To repair some types of wash water valves, first turn off the valve with the valve. Use a crescent wrench and tighten the nut at the base of the stem, holding the handle in place.
If the leak stops, you have fixed the leak by simply tightening the nut. If the valve is still leaking, the O-ring or bushing on the union nut will need to be replaced. Replace and check. If there are no leaks, you have successfully fixed the leak. How to replace the common washer connection head.
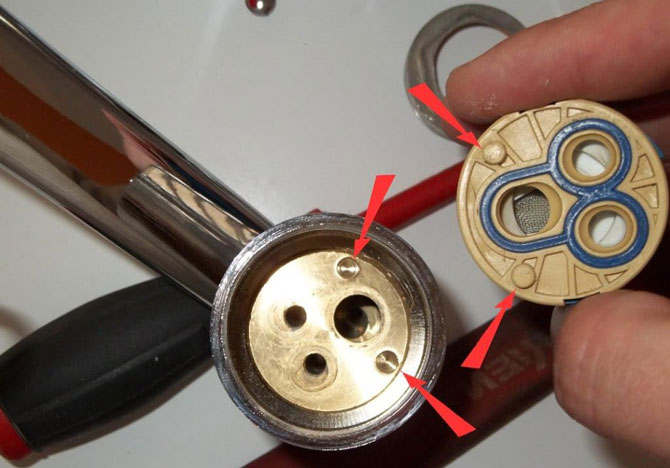
A ball valve consists of the following main parts: A shut-off device in the form of a metal ball with holes for the passage of water is mounted inside the mixer or tap. By turning this ball, the water pressure increases or decreases or the device is completely closed. The faucet has two holes for cold and hot water. And at the outlet there is one hole for discharging water at the desired temperature.
To fully restore your flush water valve, use this method below: 1 - Turn off the water supply to your complete home. Remove the rubber O-ring or PTFE fiber sleeve inside the valve by sliding it off the stem.
How to disassemble a single-lever ball mixer with your own hands? (video)
You may need a flat head screwdriver to remove the bushing if it is compressed. Place the nut on the rod and tighten it using a crescent wrench. Another type of water shut-off valve washer - notice the hot and cold are separate and color-coded.

Therefore, if difficulties arise, the repair of ball valves should be entrusted to a plumber who will do everything quickly and efficiently. But you can save money and fix all the problems yourself.
|
|
Problems when operating a ball valve
If there is obvious damage in the form of cracks on the body, then the faucet can no longer be repaired and must be replaced. This defect is often found in cheap devices that are made of low-quality materials. If the water pressure has decreased, then there is no need to immediately disassemble the faucet and look for problems inside. First you need to determine whether the pressure has become less due to a decrease in water pressure in the system. To do this, you should look at the pressure of other taps in the house. Another reason may be that the aerator (mesh) on the outlet channel is clogged and simply clean it.
Another type of washer water shut-off valve - note the hot and cold old handles. A leak washing machine. You have The best way repair stop valve with a sealed washer? Read more DIY Tips, Tricks, Ideas, Repairs.
Reasons for rigidity
Thank you very much for posting this information. Diagrams are extremely useful. Replacing a heavy tap or drain tap not always necessary. Sometimes it can be repaired without special tools. If the lever single lever mixer can only be moved with difficulty, this is almost always due to scale deposits. This also applies to conventional slewing taps. If the faucet drips or requires great strength to close, the seal is damaged. If this problem is present, your single lever mixer will require a new cartridge.
If rusty water flows from a tap, then most often the cause of the problem lies in the water supply system, and not in the tap.
The following malfunctions most often occur in a ball mixer:
- water is leaking from the faucet;
- the water pressure from the tap is weakened;
- The water temperature is not adjusted correctly.
Water leakage is often caused by the fact that the space between the rotating element (ball) and the rubber gaskets in the cartridge is clogged. A small grain of sand is enough, and the tightness of the structure will be broken, resulting in a leak.
Causes of faucet leakage
When water taps it is enough to change the so-called upper part. Repairs require a tubular wrench, a hex wrench, vinegar and a faucet. Open wrenches are more suitable than pipe tongs because they don't scratch faucets as much as tongs.
Also, a flathead screwdriver works well. During renovation water tap loses its locking function. Therefore, the water must be parked in advance. If there is an angle valve under repair to the pool, it is enough to stop the water. If water is parked above the main house of a house, all occupants must be informed in a timely manner.
Therefore, in this situation, it is necessary to disassemble the mixer and clean this area, otherwise, the leakage will increase due to the fact that a grain of sand will deform the rubber gasket over time and it will have to be replaced.
The reason for the decrease in water pressure may be a partially clogged valve. To avoid the occurrence of this situation in the future, you should install a filter in front of the mixer or at the entrance to the house. Changes in water temperature may cause one of the holes to become clogged with sand particles or pieces of rubber gasket.
Disassemble one lever mixer
Each manufacturer builds these faucets according to a different system; there is no fixed rule about disassembling single lever faucets. Typically, you can remove the cap that contains the magnesium screw. A hex wrench solves this.
You may need to remove additional caps before the cartridge is visible. This can be done using pliers or wrench. Single lever faucets can be misleading, as inexpensive products cannot be disassembled and are only interchangeable.
If the causes of the malfunction cannot be found, then the tap on the water riser needs to be replaced. The reason for this is that some people buy the cheapest faucets and taps. And such devices are made of cheap material - silumin
, which has low strength and often simply crumbles even with slight mechanical impact.
Water taps can be disassembled
For simple taps, the handles are removed to unscrew the chrome caps. The top of the wing is now visible and can be removed from the crane. The bends are standard, the principle is the same for all.
Installing new or cleaned parts
If lime is the cause, it is enough to soak the removed parts in vinegar for a few hours and then rinse well. Parts need a thin layer of lubricant before installation, whether new parts or decalcified parts. The grease must be acid-free and approved for drinking water pipelines.It is better to buy a normal device once than to change or repair cheap faucets often.
How to repair a ball valve
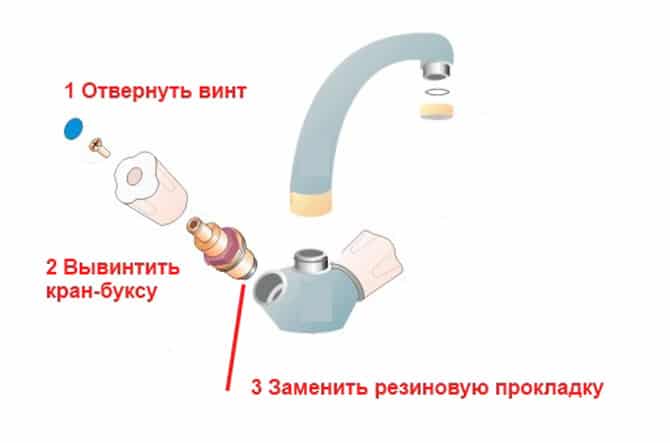
Ball valve disassembly sequence:
- first of all, you should turn off the hot and cold water in front of the tap;
- The screw that holds the faucet's swing arm must be unscrewed. Then you should remove the lever, applying some force and shaking it slightly from side to side;
- After removing the lever, the threaded part of the device opens. Use a screwdriver to unscrew it, turning it slightly clockwise.
At the same time, we must not forget about water hoses– when turning the tap they can be damaged.
Other crane problems
This also applies to taps or single-lever mixers on bathtubs, showers or bathroom vanities. Reassemble in the reverse order of removal. Ball valves are used to flow or shut off the flow of pressurized media. The ball valve and sealing materials are selected by the ball valve manufacturer according to customer specifications, such as medium, pressure and temperature, and other customer specifications.
Other faucet breakdowns and fault prevention
Using media other than those specified on the order will result in reduced service life or failure of the ball valve. Pressure and temperature limits must be observed. When designing and engineering ball valves, the customer must therefore take into account the possible operating pressure. The pressure values in the catalog refer to static loads. Appropriate pressure reductions must be included for swelling or alternating loads.
- Using pliers, you need to remove the mixer dome and remove the plastic element;
- If there is a leak, you should carefully inspect the seal, which may be worn out or clogged with sand particles or lime deposits. Cleaning work must be done very carefully so as not to damage the seal;
- Next, you need to remove the ball from the mount, and if it is damaged, replace it;
- the next step is to dismantle the seals that secure the rotating element. Seals and springs can be easily removed with a flat-blade screwdriver.
- If the gaskets are damaged or deformed, they should be replaced with new products.
- It is necessary to carefully inspect the springs; if they have become less elastic, they also need to be replaced.
This is how you can repair a faucet in a kitchen or bathroom. Assembly is carried out in reverse order. At the same time, all gaskets, old or new, should be coated with a thin layer of lubricant that is suitable for the specific type of mixer or tap.
Ball valves are intended exclusively for installation in pipeline systems with connections of the same pressure stage and the corresponding connection or between flanges of the same pressure stage and the same flange connection. Ball valves open and close 90° each time the control shaft is rotated. The cutout on the end of the shift shaft indicates the shift position of the ball valve. Ball valves can be operated manually or using an actuator. This must be specified when ordering ball valves.
The composition of the lubricant may vary from manufacturer to manufacturer. Therefore, you need to carefully look at what the mixer is lubricated with. Otherwise it will cause the faucet to break.
Repair ball mixer must be done very carefully, carefully examining all elements and parts of the structure.
Particular attention should be paid to the presence of foreign particles in the rotating element and on the seals.
Actuators and position switches, the current instructions of the respective manufacturers apply. Before installation, ensure that the ball valve design is as required and suitable for the intended application. Installation of ball valves should only be performed by qualified personnel and when discarding the ball valve and piping system. The pipes must be connected to the fitting for tension-free installation! Before installation, ball valves should be inspected for damage during transportation.
After assembly, you should check the tightness of all connections and elements and carry out tests with water connected. If the mixer or faucet works normally, there are no leaks, the water pressure is normal and the temperature is regulated, then the repair has been done completely correctly.
Damaged ball valves must not be installed. Before installing ball valves, all pipes must be cleaned. Residues in piping damage the sealing elements of ball valves and lead to leaks and failures. When tightening threaded connections It is absolutely necessary to use the correct tool.
Ball valve connections should not be screwed further into the body or become damaged, otherwise torque may increase or cause leakage. Once the ball valve has been installed, the circuit must be implemented as a functional train. No parts of the ball valve, cap, connector, disconnected or screwed. In the case of hazardous, flammable and explosive media, ensure that the piping system and ball valve are completely drained!
In the kitchen, the faucet is used much more actively than in the bathroom, so it breaks down much more often. In rare cases, the only solution to the problem that has arisen is to buy a new device and invite a plumber; in other cases, you can handle it yourself. By deciding to repair a kitchen faucet yourself, you will save on the services of a specialist and gain important experience. You just need to arm yourself with theory and tools.
Ball valves with flanged connections must be centered with the mating flange screws before all flange connection bolts are tightened transversely. If necessary, the fitting must be installed between the pipeline using a lift. A seal must be used between flanges. The studs or connecting bolts must be selected according to the size of the flanges, taking into account the size and strength class. For blind threads it is important to ensure that the maximum screw depth is not exceeded.
In the case of ball valves with welded ends, it is important to ensure that no welding particles enter the inner hinge area during installation. Weld residues must be removed. It is also important to ensure that the ball valve chamber does not heat up beyond acceptable limits. temperature limits. Exceeding this temperature may cause damage sealing elements.
- Leakage from under the nut at the water outlet, from under the handle (lever) or mixer valves in working condition.
- The correct movement of the lever or valves is disrupted (they stick, turn, do not lock in the desired position, etc.).
- At normal water pressure in the system, the jet is not powerful enough.
- Water drips from a closed tap.
Please note: the detected problem must be resolved as quickly as possible! This will extend the service life of the mixer and protect yourself and your neighbors from flooding, saving cash, time and nerves.
The switching position of the ball valve must be observed in accordance with the piping plan. The pressure stage, connection and overall length of the piping system must match the ball valve. The operating instructions of the respective manufacturers must be observed.
Before commissioning and re-check all operating conditions and assembly work, all operating instructions must be read and observed. Commissioning of the system may only be carried out by qualified personnel. When the ball valve is held for a long time or for a longer stop time in the switching position, the torque during the first switching process is significantly higher than the actual torque.
The problem that raises the most questions is a leaking faucet. And here you need to know the “enemy” not only by sight, but also from the inside. We are talking about the design of mixers.
Features of the device of the main types of kitchen faucets
Such delights as thermostatic and touchless faucets are good for bathrooms. In the kitchen, more practical models - traditional two-valve and single-lever - are fighting for a place in the sun. The common elements for them are: body, spout (spout), aerator, sealing gaskets. Otherwise they differ significantly.
Video: disassembling a mixer with a ball valve mechanism
The piping system must be run through before commissioning. Air bubbles in a piping system can cause explosions if the pressure builds up suddenly. Therefore, step by step, build up the working pressure. If ball valves are installed as end fittings in a piping system, unused ball valve connections must be properly closed in accordance with the danger of life due to rupture.
When emptying the pipeline system, for example in the event of frost or cleaning, the ball valves must also be emptied through the switch position 45°. Ball valves cannot be dismantled. Emergency seals of any kind are prohibited. Ball valves should be checked regularly for leaks, function and damage. In case of extreme stress, the test shall be carried out at shorter intervals.
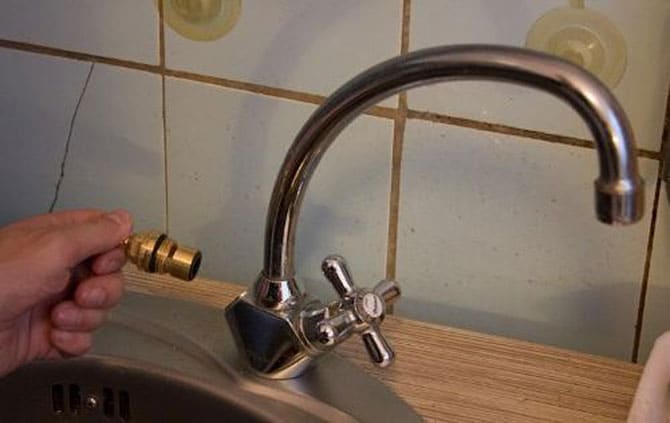
The device of two-valve cranes
Faucets with two valves that are familiar to the eye are designed quite simply. Under the flywheel, which you turn when operating the structure, there is a crane-axlebox - its locking element. Below is the design of such a kitchen faucet in pictures.
To maintain proper function, the ball valve must be switched at least once every six months. If during work on maintenance or inspections of faulty ball valves, for example, leaking, improperly switched, corroded ball valves, they must be replaced immediately.
Removal of ball valves should only be performed by qualified personnel when disposing of the ball valve and piping system. Relieve pressure in the piping system before removal. Turn on the ball valve by switching to the half-open position so that the pressure in the body cavity is also relieved.
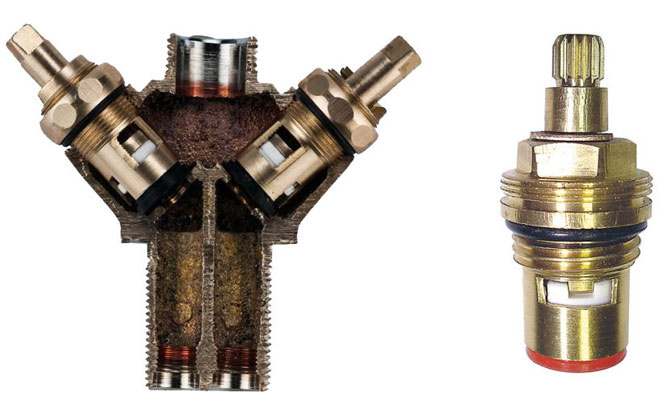
Axleboxes in a two-valve mixer (sectional view)
In products where several revolutions of the flywheel are required to supply or shut off water, worm axle boxes are installed. Their work is based on rotational-translational movements. The more you unscrew the valve, the further the axle box gasket will move away from the so-called “saddle”. The consequence of this is the flow of water into the internal cavity of the mixer, and then into its spout (spout).
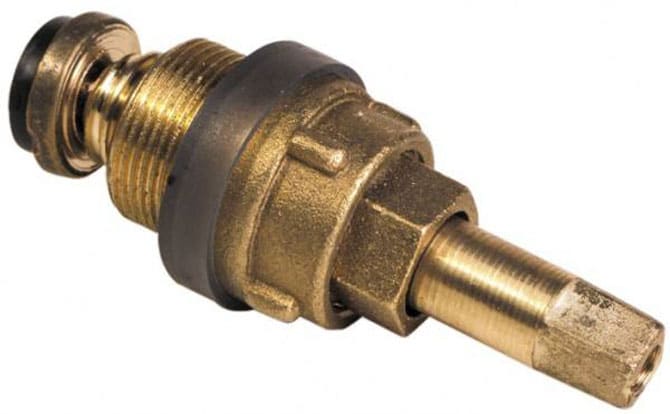
Worm worm valve axle box for mixer
In models where it is enough to make only half a revolution to supply water, axle boxes with ceramic plates are installed. When you open the tap, the holes in them coincide and water flows into the spout.
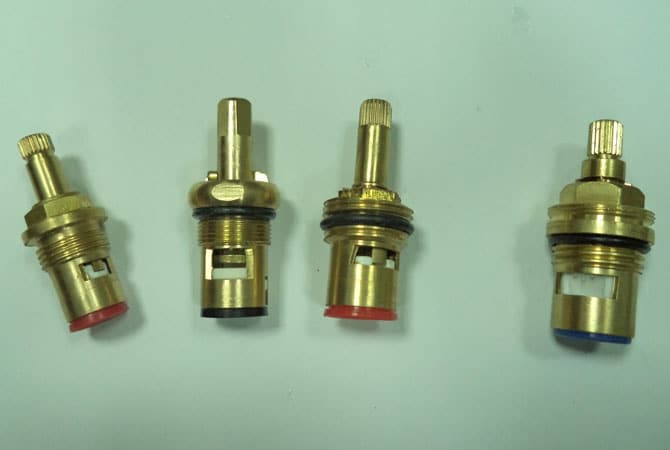
Crane axle boxes with ceramic plates
The cost of faucets is low, they are always available in plumbing stores, and their replacement is extremely simple.
Design and types of single-lever mixers
More modern and practical are faucet models with one handle (lever) that regulates pressure and temperature. Mixing of water in them is carried out in a hollow ball with three holes or in a special cartridge.
The mixing element in ball models has three holes, two of which are inlets - designed to allow hot and cold water to enter this miniature container. cold water, and one output is for supplying water at a given temperature to the sink.
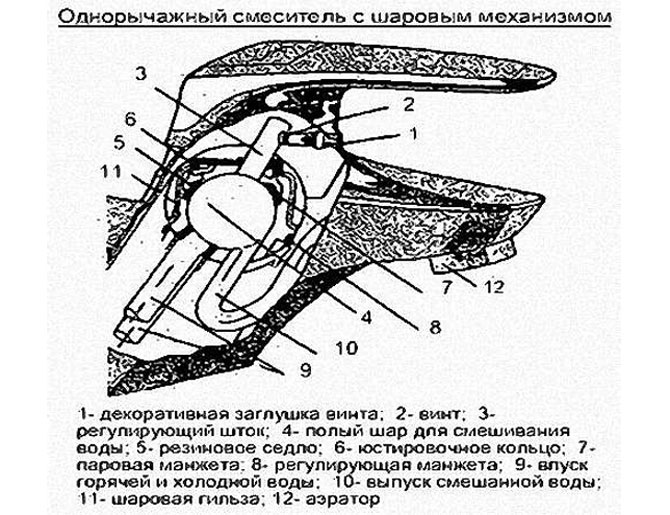
Ball mixer device
The ball itself is located on two rubber “saddles”. Its displacement relative to them, carried out when the lever moves, and allows you to adjust the pressure, the temperature of the poured water. The ball is secured at the top with a sealing collar and a lock nut.
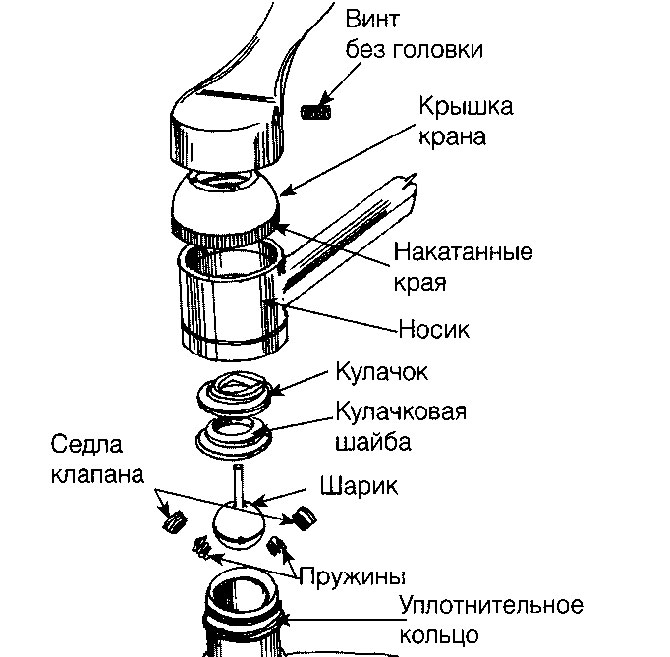
Schematic structure of a ball model of a kitchen faucet
The operating principle of a mixer with a cartridge that replaces a ball is similar. Wherein internal structure they are fundamentally different. All the same three functional holes are available, but inside the cartridge there is not a cavity, but special discs made of cermet. Due to their displacement relative to each other and the degree of overlap of the supply holes, when the lever is turned, the water supply is adjusted.
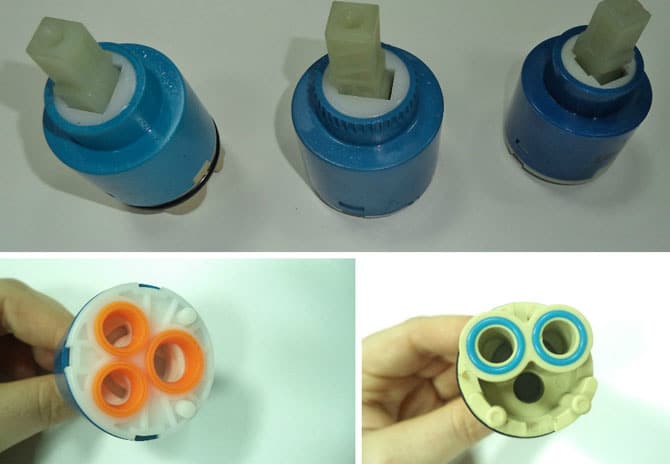
Replaceable ceramic cartridges
The kitchen faucet is leaking - how to fix it yourself
To repair a kitchen faucet you will need:
- knife with a sharp end;
- hex and adjustable wrench;
- screwdrivers;
- a new cartridge, valve axle, rubber gasket, etc. - depends on which part you will change;
- WD40 is a technical aerosol that is useful if parts are “stuck” to each other. However, you can get by with the traditional tapping of a hammer on a screwdriver, but there is a high risk of damaging the mixer.
Regardless of which faucet you have installed, before starting repairs, you must turn off the water supply to the system and drain its remaining water into a sink or a separate container. To do this, just open the tap. Then you can begin to repair it, taking into account design features.
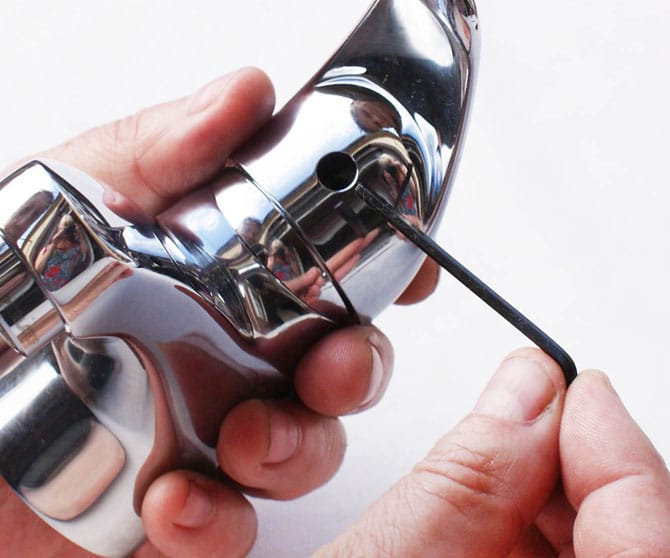
To repair a single-lever faucet, you will need a hex wrench.
Single lever kitchen faucet repair
The main principles of repair are sequence of actions and accuracy.
- Using a thin screwdriver or knife, pry and remove the decorative plug on the faucet body.
- In the resulting hole you will see a screw connecting the lever and the adjusting rod. Unscrew it using a hex wrench.
- Remove the lever from the body and unscrew the decorative casing. This can even be done by hand if the parts are not stuck to each other.
Removing the decorative casing
- There will be a locking (clamping) nut underneath it. Carefully unscrew it with an adjustable wrench or by tapping a screwdriver with a hammer.
- If you disassemble the ball mixer, you will see a sealing cuff under the nut. Inspect it for dirt, deformation and tears. Pull out the ball. Inspect its surface - it should be smooth and clean. It is necessary to remove the seals and support springs - their poor condition can cause the tap to leak.
- If you are disassembling a faucet with a cartridge, remove it and thoroughly inspect it.
- Replace the failed part.
- Reassemble the faucet in reverse order.
It is important! Do not tighten the nuts too tightly, as this may lead to deformation of the rubber seals and disruption of the normal operation of the mixer.
Installing a new cartridge
To prolong the service life of the product and ensure the smooth running of its rubbing parts, you can use a special silicone grease.
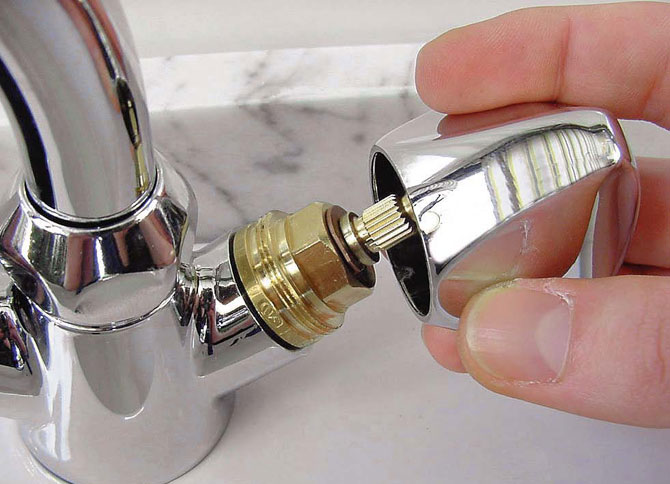
Removing the mixer handwheel
Repair of a two-valve mixer
What to do if your two-valve faucet is dripping in your kitchen? Almost everything is the same.
- On the valve flywheel, pry up and remove the decorative plug.
- Using a screwdriver, unscrew the screw that secures the flywheel.
- Remove the flywheel. There will be a crane box in front of you.
- Unscrew it counterclockwise and inspect it.
Removing the crane axle box
- If it is a worm-type axlebox and its gasket is damaged, replace it separately - buy it in a store (costs pennies) or cut it yourself from rubber of a suitable thickness. The axle box with ceramic discs is replaced entirely.
- Reassemble the faucet in reverse order.
General scheme of mixer repair work
Everything is as simple as possible and slightly reminiscent of a construction set. But a leaking faucet is not the only problem you may encounter while using it in the kitchen.
Other faucet breakdowns and fault prevention
The quality of water in many cities leaves much to be desired, so over time the aerator in the tap can become dirty. WITH inside solid deposits “grow” on it. When there are too many of them, the pressure and quality of the water deteriorate significantly. The solution to the problem is to replace the aerator. Ideally, it can be easily unscrewed with an adjustable wrench, but for stuck parts you will need WD40 or tapping with a hammer.
It is important! Carry out all work carefully, otherwise the mixer will have to be replaced completely.
The faucet is leaking, and during the inspection you found a crack in it? Then it's time to go for a new product. Can become an assistant for a short time silicone sealant.
You can extend the life of the faucet if you install a water filter and use the device carefully, without tightening the valves too tightly or moving the lever suddenly and all the way.
Video: repair of a single-lever faucet with a ceramic cartridge
Now you know what to do if your kitchen faucet is dripping. In most cases, the repair schemes discussed are also suitable for eliminating breakdowns of faucets in bathrooms. This is a good saving for the family budget. But if you are not confident in your abilities or you simply don’t have time, a competent plumber will complete all the work in a matter of minutes.


