How to quickly and inexpensively update your interior? Right! You need to make bright accessories with your own hands. And what could be easier than updating? This is especially true in the cold season, when you want to bring color and warmth to the space around us. Therefore, we invite you to find out how to make a pillowcase with your own hands. You can sew the options below quite quickly, spending a maximum of one hour.
How to make pillowcases?
Pillowcases are made quite simply and in most cases the same way. First, you need to decide which pillows you will decorate. Secondly, measurements are taken from sofa accessories. To do this, use a centimeter.
Thirdly, materials and tools are prepared. No matter what type of pillowcase you want to make, you will still need fabric. Better to use soft material(such as cotton, fleece and so on). You will definitely need scissors, a pencil and a ruler, thread and a needle. Depending on the chosen design, a glue gun and various decorative elements(ribbon, rhinestones, sequins, etc.).
Create volume using felt

Felt is an excellent material for creating various crafts. It will also come in handy when you want to sew a pillowcase for a sofa cushion with your own hands. So you will need big piece plain fabric, bright felt, scissors, a lid, a pencil, a snake, or a needle and thread.
To begin, cut out fabric material two squares from which to make a pillowcase. Their size should be a couple of centimeters larger on each side than the size of the pillow itself. Now place the felt in front of you. Place the lid on the material and trace it with a pencil. You have a circle. Draw a large number of such shapes, and then carefully cut them out.
Fold each circle in half so that it takes on a three-dimensional shape. Now start decorating the prepared part of the pillowcase. The circles are sewn only along the fold line. Instead of thread, you can use a glue gun. The circles must be attached to the fabric and to each other. Do it randomly or in a line. It all depends on your imagination and preferences. You can decorate one side of the pillowcase or two.
When the circles are glued, you need to sew the two parts of the pillowcase together. To do this, fold the parts with the decorated side inward and go along three sides with a needle and thread or a glue gun. On the fourth side, sew or glue a snake.
The pillowcase is ready! All that remains is to turn it inside out and put it on the pillow.
Airy lace

A pillowcase for a pillow will turn out to be very delicate and airy (any housewife can make such a beauty with her own hands) if you decorate it with lace. For the craft you will need: several meters of different things for a pillowcase, sewing pins, a snake, a needle and thread, scissors.
First, make a pillowcase blank. To do this, simply cut a piece of fabric the right size with a small margin. Then cut several strips of lace. Their length should be equal to the width of the pillowcase, and the number depends on your preferences.
Place the first strip on the bottom edge of the piece and pin the ends in place. Carefully sew on the lace. Then take the next strip and place it on top. It should slightly cover the bottom row. Sew on the lace. Sew on the remaining strips in this manner. Alternate different stripes in a chaotic order, then the resulting pattern will be very interesting and beautiful.
When you're done, sew the pillowcase pieces together. Don't forget about the snake.
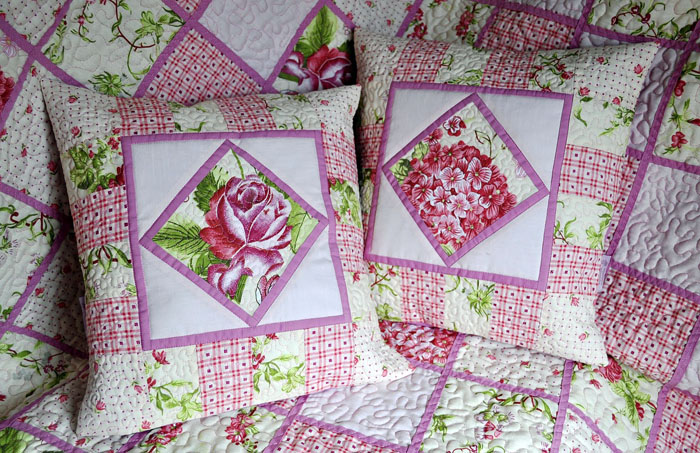
Delicate roses

Making very beautiful pillowcases with your own hands is quite simple. For example, those decorated with voluminous roses turn out to be very original. To create such an accessory you will need: fabric, fleece, scissors, needle and thread or glue gun, pencil, compass or lid, snake.
Prepare the piece for the pillowcase. Do not forget that you need to cut the fabric with a margin. Then make a large number of fleece circles. To do this, use a compass or attach a lid to the material and trace it with a pencil. It’s better to make the circles large enough, about 10 cm in diameter.
Cut the circle in a spiral and then make waves along the line (see picture above). Now roll the piece into a roll. You need to roll from the very edge. Attach the end with thread or glue gun. Make several of these rosettes.
Now the flowers need to be sewn or glued to the front of the pillowcase. It will look very beautiful if the roses are arranged in a row. When the decor is ready, sew the pillowcase and attach a zipper.
DIY patchwork pillowcase

Master class on sewing pillowcases in patchwork style:
- Stock up on scraps of different colors and with different patterns. The main thing is that they are all made of the same material.
- On a piece of paper, draw a diagram of a pillow - a square. Scale 1 to 1.
- Mark on the diagram how the patches will be placed and what size they need to be made. You need to push off either from the central piece or from the side.
- When the pattern is ready, prepare the scraps. The size of the pieces should be slightly larger on each side than you previously calculated.
- Start sewing the scraps together as indicated in your diagram. Make the front part of the pillowcase first, then the back.
- Then connect the two parts of the pillowcase together and insert the zipper.
Pillowcase with applique

Instructions on how to make a pillowcase with your own hands with applique:
- Take a large piece of fabric and prepare the pieces for the pillowcase. The color of the material depends on what kind of applique you have in mind: if it is just a silhouette, then choose a bright fabric, maybe even with a pattern, but if it is a picture of several pieces, the material needs neutral shades.
- Draw your future applique on paper. For example, the silhouette of a rabbit from the back.
- Cut out the paper diagram.
- Attach the pattern to another piece of fabric and cut out the piece.
- Attach the resulting piece to the front side of the pillowcase. Sew it with a decorative stitch.
- Decorate your silhouette. In our case, we need to sew on a tail.
- Sew the pillowcase pieces and attach a zipper
Pillowcase with a pattern

One of the most simple options creations for pillows. To do this you will need fabric, paper, pencil, utility knife, fabric paint, needle and thread, zipper.
Prepare the pieces for the pillowcase. Now draw on paper a simple one, it could be an animal, an object, a plant, and so on. Now cut out the silhouette to make a template.
Using pins, pin the paper to the pillowcase piece. Prepare the paint and paint over the template. Let the parts dry. When everything is dry, sew the pillowcase and attach a snake.
Warm pillowcases

How do you like the knitted pillowcase? It is quite possible for those who know the basics of this type of needlework to build such a beauty with their own hands, as in the photo above. Select a pattern, buy yarn of the color you need, knitting needles - and go ahead to accomplish your plans! Although... You can just use old sweaters or jackets for this. Simply apply the pillow to the material and cut out the parts. Then they should be sewn together. By the way, it is better to cover the seam with fabric so that the thread can properly connect the knitted material. The finished pillowcase can be decorated with decorative buttons or a zipper.
Home is a place where you need to return with pleasure. To do this, we arrange it according to our taste, create our own small world. Decor is an integral part of a comfortable home, and decorations created by with my own hands. Today we will look at...
We are talking about a simple square-shaped sofa cushion. In addition to the pillow itself stuffed with holofiber, we will show in detail how sew a pillowcase on the pillow.
For the inside of the pillow we will need:
- rectangle of fabric 45x70 cm;
- Holofiber padding – 0.5 kg.
For the pillowcase we will prepare:
- leatherette - 47x47 cm;
- upholstery fabric for sofas, red - 47x47 cm;
- plastic snake, more than 50 cm long.

To be honest, this pillow was assembled from materials that were in the “what’s left” basket. Those. I didn’t collect fabric on purpose, but sewed from what I already had and what I wanted to turn into something, so in the process of sewing I encountered some difficulties that I had to solve on the fly.
How to sew a pillow
So, inner part pillows. We take a rectangle of fabric 45x70 cm and fold it in half, thereby allowing ourselves not to sew one side. From one edge, sew the two halves together, departing 1/3 of the length from the fold. We sew to this very fold. Then, stepping back from the fold 2/3, we sew the entire pillow along the contour. This way we leave ourselves a hole for stuffing. I like it when my fist fits freely into the opening of the bag with the expectation that the filler will be clamped in it. Pushing stuffing through a small hole is a dubious pleasure.

As for the stuffing - I tried it different variants. The most common one, which, unfortunately, is used by the majority, is padding with padding polyester. I don't like it for two reasons:
— synthetic winterizer floats (although this is not critical for a sofa cushion);
- he's watching. Those. After some time, the pillow will lose its elastic appearance and become more like a bedding. Even “pyramid” stuffing (folding layers of padding polyester) doesn’t help different sizes on top of each other from largest to smallest to the center and from smallest to largest to the top)
Therefore, I prefer holofiber. It consists of pellets of approximately the same size and does not crumble even if thrown, which shows good connection between internal fibers. At the same time, each pellet is easy to separate from its neighbor, which allows you to regulate the amount of stuffing. You can buy anything by weight from us. required amount or order on a specialized website.
The fabric for the inner pillow was frankly bad; it frayed a lot around the edges. I had to sew it together in three stages:
- straight stitch along the contour;

- zigzag over straight stitch;

- overlock the edge.

There were attempts to overlock the edges of the fabric separately, but they fell off along with the overlock threads. Everything held up perfectly on two layers of fabric. Therefore, it turns out that the edges of the fabric at the hole are not overlocked. Work with them more carefully.

After we have the bag in our hands, we turn it inside out and start stuffing it, first straightening the corners from the inside.
Once you have reached required density in the stuffing – sew up the hole by hand.
The inner pillow is ready.

How to sew a pillowcase for a pillow
We will sew a pillowcase from two squares and a snake. The red fabric is overlocked at the edges, the leatherette square is not.

The snake can be any length, the main thing is longer than the side of the square. I had one meter long snake with two dogs, which I divided into two.

Sew the snake to one square, placing them face to face. We sew the snake using a single-sided foot. Take care of your fingers!

Then, in the same way, we sew the second square, we get a snake between the two edges of the pillowcase.

We begin to sew up the contours of the pillowcase. I started from one corner and walked towards the snake. Having separated the two sides of the snake as in the photo, we wrap it as if inward. If you don’t open the snake, the dog will end up on the outside and you’ll have to rip it apart; there are no other options.

Sew slowly and carefully. Wear construction or other safety glasses, especially if your snake is made of metal. A piece of needle flying into your face is a dangerous thing.
We repeat the same on the other side. We also fold the snake.
Sew up the bottom of the pillowcase.

We turn it inside out and measure the finished and stuffed pillow. She shouldn't walk around in a pillowcase. Cushion usually rigid, there is no room for unfilled corners. If the pillowcase is larger, turn it inside out, measure how much it needs to be sewn in, and mark it with chalk. Remove the pillowcase from the pillow and sew it up, evenly on each side.
We measure again after straightening the corners. To better draw out the corners, it is best to use a large, stiff needle.
Our pillow is ready.
Search the Internet for ideas for decorating sofa cushions. They don't all have to be identical, even on the same sofa.
This is what our pillow looks like from the leatherette side:

Sewing and photographs: Workshop M.Y. CODe. Groups in
We will send the material to you by e-mail
Sometimes it happens that the interior seems familiar, monotonous, and you want to update it with something. Or, conversely, the new room design seems imperfect and something is missing. Do-it-yourself decorative pillows can be called a wonderful original addition to decorate a room, and at the same time your own comfort. We have prepared tips on how to create a beautiful pillow yourself in different styles and for various purposes.
If the product includes different types fabrics, you will need needles of different thicknesses and suitable types of thread
At first glance, it may seem scary to a beginner in sewing to take and sew a decorative pillow. But in fact, the pillow manufacturing technology is not so complicated thing. How simpler form products, the easier it will be to work.
What tools are used for work
Whatever pillow you want to sew, the process of creating a miracle will require needles, threads in the color of the fabric, scissors, chalk (or a simple pencil), and paper for creating a pattern. In the case where the product has a special design, you need to have on hand all the components for the design of the product.

What forms can a decorative pillow on a sofa take?
In many photos of hand-sewn sofa pillows, there is a standard square shape. In addition to the usual square or rectangle, many people opt for a round shape.


Non-standard shapes make the interior especially original. The shape of the product can be in the form of not only any geometric figure, but also in the form of letters or animals.


Advice! Take a photo of your room, print it out and try placing cut out different geometric shapes on the sofa. This method will help you decide on the best shape for your interior. In the same way, you can select a color in a graphics editor.
Methods for decorating pillows
Patchwork is considered a favorite style that creates an atmosphere of comfort in the house. Not the easiest option for a beginner, but the result will be worth all the effort and perseverance.


The colors of the products can match the tone of the furniture or create a contrast. It all depends on whether you need to make an accent in the room, or whether it is worth emphasizing the unity of style.


Another common way to decorate a pillow is to sew a cover on it from an unwanted sweater or knit or crochet it. Such covers create a warm, homely atmosphere, and winter time you look at such a thing and warm up.


It turned out that tired jeans look great as pillows. In addition, they can be used without any problems for their intended purpose without the risk of damaging the decorative finish.


How do you feel about buffs? Just imagine in your hands a sliding satin, a thin needle... and several hours of painstaking work. But as a result, exquisite beauty will settle on the sofa. What are buffs? These are waves of fabric, fixed according to a certain pattern.


You can list all possible types of decor until the morning, but it’s worth spending time on other aspects of creating pillow beauty.
How to choose fabric for a cover, accessories and stuffing for a pillow
Finding an idea for decor is only half the battle. You also need to select fabric, padding and accessories, if required. Typically, buttons, rivets or a zipper are used for such products. It is better to sew the latter in the most inconspicuous way, so that neither the geometry of the product nor its appearance. Fabrics that are respected in the pillow business: satin, burlap, cotton, linen, upholstery fabrics, fur, denim.
How to stuff your pillow with your own hands? Of course, not with cotton wool or a feather. We settle on synthetic padding in any form or fibertech. These are hypoallergenic and non-caking materials even after washing.
How to make a pillow with your own hands - step-by-step instructions
How to sew a pillow for a sofa with your own hands? We get an idea or take our own, select tools, fabric, padding and get down to business!
How to sew an original fancy-shaped pillow with your own hands
If the form is not simple, then it will take more time to create a good thing.


Why not? We bring to your attention a detailed master class.
| Illustration | Description of action |
|---|---|
 | For work you need such patterns. |
 | We prepare a set of patterns using patterns. There should be 6 circles of each diameter. |
 | The core will require these parts. The edges of the strips are rounded. |
 | We make a petal from two fabrics, trim the edge with bias tape, but leave a hole at the end for stuffing. |
 | We put padding polyester inside, sew the edge with a hidden seam and form a petal with thread and needle. |
 | We sew all the petals one by one onto the base. |
 | Lastly, we sew a long petal twisted around itself into the middle. |
How to create a decorative pillow with applique
Let's remember our childhood, when we created masterpieces from the remains of colored paper. It’s the same with appliqué on a pillow: we take scraps of any fabrics suitable for the design, tape for appliqués on fabrics, fabric for a pillowcase and tailor’s tools.

The instructions for use are simple:
- First, the composition is placed and, when the design takes on its final form, the flaps are glued to the base using a hot iron.
- Then the blanks of the required shape are cut out with scissors. Let's try to cut out the leaves and trunk of the tree.
- Delete paper base tape and place the blanks on one side of the future pillowcase.
- The application is fixed using a heated iron. Now all the elements need to be stitched with a sewing machine, retreating 2-3 mm from the edge, using any seam.
We sew the pillowcase from the back and front sides, and then put the product on the pillow.
How to make a decorative pillow in shabby chic style
The shabby chic style (literally “shabby chic”) is associated with romantic feelings and retro memories. To fully immerse yourself in the image, linen, cotton, and silk are used.

As a print, you should take flowers, pastoral, angels, birds, butterflies. The pillow is decorated in shabby chic style with lace, frills, voluminous fabric flowers, ribbons, and embroidery.


To work you will need filler, fabric and a tailor's kit. The shape of the future cushion is cut out of the fabric according to the pattern and separately strips with a processed edge for the flounce. First, the flounce is sewn to the front side, and then the back and front sides are sewn from the wrong side. Once the filler is inside, the edges of the product are sewn together.
How to knit a decorative pillow
If you really want to work with knitting needles, then here’s an idea for you.

Here's a diagram for you.

This product serves more as a cover than as a base for a pillow.
How to sew a pillow in the shape of a bolster
The cushion under the head is very comfortable. How to sew a bolster pillow with your own hands? Patterns will help!

We sew the rectangle into a ring, not forgetting about the drawstring around the edge if the pillow is in the shape of a candy. Then insert the cord into the drawstring.


Advice! Such pillows can be decorated with lace.
How to sew a decorative baby pillow
A children's room will look more fun if it contains toy pillows. These non-standard shaped products, sewn by caring hands, will become simply faithful friends to the child.
Handmade children's pillow in the form of a toy
To inspire you to create a miracle for your child, we suggest viewing a small gallery of toy pillows.


Fur, an old sweater, felt, flannel, plush can be used.

You can draw your own sketch as a pattern, or take a ready-made one from the master class. Suitable fabrics include fleece and felt for the face:
- Templates of all parts are transferred to the fabric and cut out taking into account the seam allowance. The body consists of a rectangle, and the front and back parts are made of circles.
- The parts are sewn from the wrong side, starting with the cat's ears.
- The ears are sewn in and all the seams are machine sewn. Leave a hole at the bottom for stuffing.
- The muzzle can be drawn with acrylic paint, waterproof felt-tip pens, or sewn on felt parts.
Important! For any decor, especially related to small details, the work must be securely and firmly sewn. All parts must be sewn, not glued.
Article
Types of pillows by shape and size
As a legacy from the Soviet era, we inherited large down pillows measuring 70*70 cm. Every home had a set of such large pillows, and standard bedding sets were (often still are) oriented towards these sizes. The market era, which declares a wealth of choice always and in everything, has not bypassed the sphere of bedding. Firstly, down and feather are now competing with a lot of innovative fillers. Secondly, pillows now come in a variety of shapes and sizes. Along with square ones, rectangular pillows have become popular, and equilateral pillows have become smaller in size in accordance with European standards. About non-standard orthopedic pillows, having a memory effect and repeating anatomical forms, we don’t even talk about them.
Rectangular pillows have harmonious proportions with a side difference of 20 cm. Standard rectangular pillows, which have earned worldwide recognition, have dimensions of 70*50 cm and 60*40 cm (children's version).
Square pillows can have dimensions of 60*60 cm, 50*50 cm, 40*40 cm. Small pillows are most often not intended for sleeping and are decorative in nature.
The principle of sewing square and rectangular pillowcases is the same. The main difference is revealed when creating a pattern and lies in the fabric consumption.
Photo gallery of pillowcases that you can sew yourself
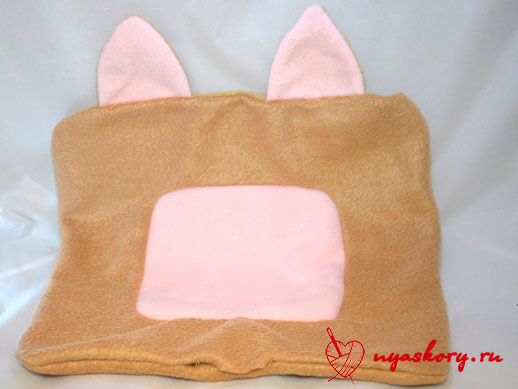
Pillowcases with “ears”  Rectangular pillowcases
  Square pillowcases with zipper
Necessary materials
To make any pillowcase we will need:
- Textile.
- Sewing machine.
- Threads, preferably reinforced, matching the color of the fabric.
- Tape measure.
- Chalk or fabric marker.
- Scissors.
- Safety pins.
If you decide to sew a pillowcase with a zipper, then add to this list also a zipper that matches the fabric; its length should be equal to the width of the pillowcase.
How to choose fabric and calculate its consumption
Particular attention should be paid to the choice of fabric. Natural cotton materials are chosen for the sleeping pillowcase: chintz, calico, satin. Fabrics vary in density and weave of threads. Choose high-quality fabric, given that bedding is subject to intense wear and tear. The cheapest fabric looks bad and won't last long.
The pillowcase is cut using both a transverse and a longitudinal thread, so when choosing the width of the fabric, be guided by the dimensions of your pillow. Try to choose the width so that a minimum of fabric is used for scraps. The stores offer calico and chintz in widths of 80 cm, 120 cm, 150 cm, 220 cm.
Calculate in advance how much fabric you will need for one pillowcase, take into account the possible shrinkage of cotton after washing, multiply by the number of pillowcases and only then go shopping.
So, to make one pillowcase 70*70 cm with a wrap of 20 cm, you will need a piece of fabric measuring 170*75 cm, and for a rectangular pillowcase 50*70 cm, a cut with dimensions of 170*55 cm. Do not forget to calculate seam allowances, fabric supply, which will be required for “ears” or sewing in a zipper, if the selected model requires it.

Approximate pattern of a pillowcase with a flap for a pillow 70*70 cm
For example, with a fabric width of 220 cm, you will need a cut 175 cm long to sew three pillowcases 70*70 cm or four pillowcases 50*70 cm.
When choosing fabric, pay attention to fabric with a small pattern - it will not need to be adjusted when cutting. If your choice falls on a large pattern, you may have to take it into account when cutting. So, large flowers or animals should not be cut: they should fit entirely on at least one side of the pillowcase.
Before you start sewing, wash the fabric temperature conditions, in which you usually wash your bed linen. Cotton fabrics shrink noticeably when washed, so it is better to carry out the shrinkage process in advance and then work with fabric that will no longer deform. The washed and ironed fabric is ready for use.
Scented pillowcase
A pillowcase with a smell (flap) is the easiest to sew. These are the pillowcases that are included in the vast majority of ready-made bedding sets. They are sewn from a single piece of fabric without additional parts.
We will show you how to sew a regular pillowcase measuring 70*70 cm. Keep in mind that rectangular pillowcases are sewn in exactly the same way and will only require recalculation of the fabric consumption depending on the size of the pillow.
A square pillowcase of any size is cut according to the following pattern:

Square wrap pillowcase pattern
The smaller the size of the pillowcase, the smaller the width of the scent.

Our pillowcase is ready. All that remains is to turn it out and put it on the pillow.
 Turn the pillowcase inside out and place it on the pillow
  Turn the pillowcase inside out and stitch it from the inside out, leaving 1 cm from the edge.
  Turn over the edge 70 cm wide, stitch from the front side 0.5 cm from the edge
  We turn the edge 30 cm wide
  Fold and stitch the seams from the wrong side
  We cut out a piece of 174*72 cm
Video tutorial
Pillow with “ears”
The principle of sewing pillowcases in the Oxford style (as pillowcases with “ears” are officially called) is a little more complicated than ordinary ones, but they will require more fabric. But such a pillowcase will look original, so it’s worth a try.
We will sew a standard rectangular pillowcase with “ears” measuring 50*70 cm.
The calculation of fabric for a pillow with “ears” is determined as follows.
Cut length: two pillow lengths (2*70 = 140 cm) + 4 widths of “ears” (for “ears” 5 cm wide you need to add 5*4 = 20 cm) + wrap (25 cm) + allowances for hemming sections from two sides (2*2, 5 = 5 cm).
Cut width: pillow width (50 cm) + “ears” (5*2 = 10 cm) + seam allowances (2*1.5 = 3 cm).
So, we will need a piece of fabric measuring 63*190 cm.
- We process short sections (63 cm each) using a hem seam with a closed cut, as in the previous master class.
- Lay out the fabric front side up and bend the fabric 70 cm long from the edge up with the wrong side.
- We measure 5.5 cm from the edge of the folded fabric - this will be the fold line of the smell.
- We turn the opposite edge (smell) inside out, retreating 5.5 cm. Thus, the valve is located on top.
- We sew the cuts on both sides, retreating 0.5 cm from the edges.
- Turn the pillowcase inside out, smooth out the seams and iron.
- Along the perimeter of the pillowcase, measure 5 cm from the edge, using a ruler to draw a 50*70 cm rectangle. Use chalk, soap or a washable marker, since the line is drawn on the front side.
- We lay the final line along the line.
Video tutorial on sewing a pillowcase with “ears”
Pillowcase with zipper
A zipper is a convenient way to firmly “pack” a pillow.
To sew a square pillow 50*50 cm with a zipper, you will need a piece of fabric measuring 52*102 cm and a hidden zipper 50 cm long.
- Fold the piece in half with the right sides facing in and sew the side seams, leaving the armhole unstitched. Finish the edges with an overlocker or zigzag stitch.
- Unzip. Turn the top side out so the cloves are facing up on the right side. Iron. The bottom part should be parallel to the top.
- Using safety pins, pin the zipper on the front side, leaving 1 cm from the edge of the fabric.
- Using a special zipper foot, stitch it to the pillow. Don't forget to make a 2.5 cm indent from the side cuts, as shown in the picture.
- On the wrong side, sew a 2.5 cm long stitch from the side seams to the zipper, the stitch should run 3 mm above the zipper.
- Turn the pillowcase inside out and insert the ends of the zipper into the resulting holes. Trim excess if necessary.
Step-by-step process (photo gallery)
 The pillow is ready!
  The result is a pillowcase with a zipper
  Turn it inside out
  Place a seam from the wrong side on both sides (2.5 cm from the edge) just above the zipper
  Leave 2.5 cm from the side cuts
  Using a special foot, sew the zipper
  Leave 1 cm from the edge
  Attach the zipper with safety pins
  Both sides must be parallel
  Open the zipper
  Unzipping
  Leave the zipper opening unstitched
  We make a seam, retreating 1 cm from the edge
  Stitch and overcast the side seams
Video tutorial
Beautiful pillow made of small patches (patchwork)
Patchwork allows you to use a lot of small scraps left over from previous works to update your interior with your own hands and create your own unique atmosphere of comfort. Cushion small size perfect for learning the basics of this fancy technique.
Important! For patchwork sewing, fabrics are selected that are uniform in density and texture. Pre-washing for shrinkage is also necessary.
Patchwork lovers have a solid selection available beautiful schemes, along which the flaps in the product should be located. Sometimes these schemes are complex and intricate. We bring to your attention a simple pillowcase made from triangular scraps, which even the most experienced needlewoman can sew. For such a pillow, two types of different fabrics are enough, but you can use four.
As a first experience, we suggest sewing a pillowcase on a pillow measuring 25*25 cm.
- To begin, draw an isosceles right triangle on paper with side lengths of 12.5, 12.5 and 18 cm. Cut it out.
- Attach the triangle to the fabric, trace, draw 1 cm seam allowances and cut along the outline of the allowances. You should get a triangle measuring 13.5*13.5*19 cm.
- Thus, cut out 8 identical triangles from different types fabrics.
- Cut out a 27*27 cm square from a single piece of fabric. This will be the back part of our pillowcase.
- Lay out the triangles on the table surface and select the optimal composition.
- Fold the triangles forming squares 13.5*13.5 cm in pairs and sew them along the hypotenuse line (the longest side), retreating 1 cm from the edge. You should end up with four multi-colored squares that are the same size.
- Press the seams from the inside out as shown in the picture.
- Now sew the squares together in pairs. You will get two rectangles measuring 12.5*25 cm. Sew them together along the long side.
- The front side of the pillowcase is ready. Trim off excess fabric at the corners from the wrong side.
- Place both sides of the pillowcase face to face, stitch them along three sides, leaving 1 cm from the edge. Finish the edges with an overlocker or zigzag stitch.
- Sew a 25 cm long zipper into the armhole following the example of the previous master class.
The shredded pillow is ready!
Step-by-step process (photo gallery)

Step-by-step patchwork process

Patchwork pillowcase: finishing the process
Video tutorial
Decorative pillowcases for sofa cushions
Decorative pillows, as the name suggests, are designed to decorate the interior. Such pillows are not used for sleeping, and this is the reason for the peculiarities of their manufacture. .
Firstly, they are made from dense fabrics, including furniture fabrics, which would be a bit rough for an ordinary sleeping pillow. Secondly, you can use a huge variety of decoration options for a sofa pillow: applique, embroidery, buttons, beads, rhinestones, ribbons, braid... All these elements will interfere with a regular sleeping pillowcase healthy sleep, so when making it you have to adhere to minimalism and light natural materials. Give free rein to your imagination when sewing a pillowcase for a sofa cushion: here your inner creator will definitely have room to roam!
- Variety of materials. A sofa cushion can be made from almost any fabric. Depending on the style of a particular interior, you can use linen or brocade, cotton or wool, denim or knitwear. Moreover, the combination of various seemingly polar textures often brings unexpectedly bold, interesting and stylish solutions.
- Variety of forms. If sleeping pillows are most often square or rectangular, then decorative pillows boldly emerge from these narrow shores. A sofa cushion can be like classic shape, and round, oval, triangular, in the form of a roller, in the shape of a heart or, say, a kitten. And if we haven’t mentioned some form here, perhaps you will become its inventor.
- Variety of decorative elements. A sofa cushion can be decorated using any technique. You can resort to your favorite type of needlework or master a completely new one for this occasion. We offer you a selection of pillowcases decorated with various decorative elements. Here you can get ideas for your own project.
Photo gallery of decorative pillows
 Decor made of beads and mother of pearl
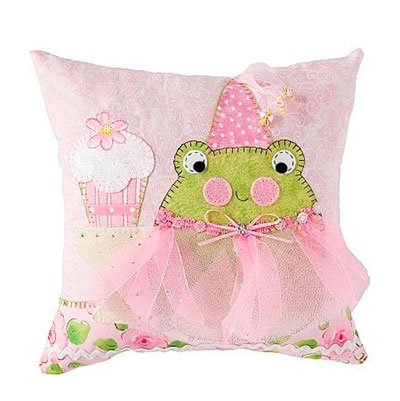
  Fleece pillow with applique
  Pillow toys
  Knitted pillow for a cozy living room
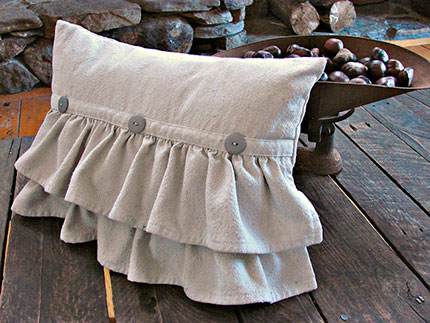
  Pillow with puffs
  Button decor for a non-standard interior
  Volumetric applique of ribbons and buttons
  Patchwork decor
  A gentle solution for a discreet interior
  Owl pillow
  Volume applique
  Ribbon and braid applique
A decorative pillowcase is sewn according to the same principle as a regular one. Most often, such a pillow closes with a secret zipper.
Even those who are taking their first timid steps in the sewing field can sew pillowcases. You don't need to master any cutting secrets or intricate seams to sew a regular wrap pillowcase. Models with “ears” and zippers require a little more diligence and skill, but also do not pose any particular difficulties. If you have a creative impulse, it’s time to start making decorative pillows to decorate your interior. The presented master classes will help you with this.
A universal selection of gift ideas for any occasion and occasion. Surprise your friends and loved ones! ;)
Step-by-step master - classes and patterns or how to sew a pillow with your own hands
A lot of master classes are waiting for you now. Let's start with children's pillows.
Pillows - toys for adults and children
Soft plush friends are always appreciated by children. What if we made them a little more practical, but no less original? In this section you will see a lot of children's pillows in the form of toys and simply unusual and bright designs for a great rest for your baby.
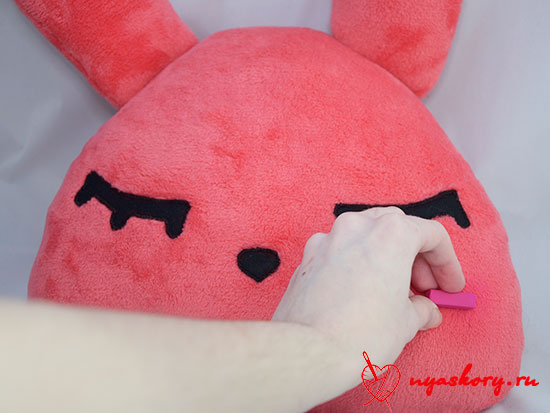
Children's pillow - toy “Rosalina”
With this shy beauty, children's sleep will always be a joy. To sew a soft blanket for your child, you will need:
- velsoft (for the base of Rosalina, you can take faux fur and fleece);
- thin felt (for decorating the muzzle);
- threads in the color of the fabric + black;
- lace of 2 colors (for decoration);
- small rose (for the central part of the bow);
- padding polyester (for stuffing);
- dry pastel (to give a delicate blush);
- cotton pad (optional);
- chalk or pencil (for transferring patterns onto fabric);
- needle;
- pins (for chopping parts);
- scissors.
Here are the patterns for Rosalina (click to enlarge):


Cut them out carefully, velsoft is a capricious fabric. We start with the ears. Sew them like below. Turn the ears out and stuff them with padding polyester.


Place the ears inside the head. Pin along the edge, baste and sew, leaving an opening at the bottom.


Turn your head inside out along with your ears. I got it like this:

Stuff Rosalina with padding polyester and sew up the bottom hole with a hidden seam.

Now we have to make Rosaline's face. To do this, take all the details of the face, pin them to the head (so as not to move), and then sew them with a small hidden seam.
To apply blush, just take a pastel chalk and rub the bunny’s cheeks, rub it with your finger. If the pile on the fabric is not very long, you can do this using a cotton pad, after first applying pastel to it.


Rosalina definitely needs to make a cute headband! To do this, cut the lace so long that it is slightly longer than the distance between the ears.
Sew the ends of this piece to the ears, as if stretching it.

Now let's make a bow! To do this, take another piece of lace, fold it in half and sew the ends together.

Now simply sew a line of running stitches down the center of the bow. And pull it off.


Quadrocat
Necessary materials
What will we need for a pillow - a Quadrocat toy?

Here is the list:
- fleece in 2 colors (for the muzzle and head);
- felt (for the eyes and nose);
- threads in the color of the fabric;
- padding polyester or padding polyester (for stuffing);
- white acrylic paint for the pupil (or rhinestones)
- a glass of water (if you use paint);
- second glue (if you chose rhinestones);
- pencil or chalk for transferring patterns onto fabric;
- stitching needle;
- paper for transferring patterns onto fabric;
- scissors.
Before you start sewing, you will need the patterns that I have prepared for you (click):

First of all, I want to say: this is only a quarter of the pattern (for the head and muzzle), for the nose it is half. For felt parts, allowances are not needed. For everyone else, half a centimeter should be enough.
First of all, cut out and sew the ears together. Trim off excess seam allowances. Turn out the ears.


You can put the ears aside for now, take the muzzle and head. Sew the muzzle into the head as shown below.
To avoid confusion, you can make small notes in the same places on the muzzle and border.

This is what the cat's face looks like:


Now place the ears inside the Quadrocat where you like and sew them in. Also sew around the edge of the cat, leaving a small hole at the bottom.

Turn the pillow inside out. So far Quadrocat looks like this:
And now you need to stuff the pillow with padding polyester as tightly as possible, since fleece is very sensitive to stretching and can simply turn out “orange peel” if the stuffing is not dense enough

Sew the bottom hole with a hidden seam. Below you can see the hole that is already completely sewn up.

Our cat is still without a face! Let's fix this. Take the eyes and nose and place them where you would like to see the muzzle.

We will sew on the eyes and nose. To do this, bring the thread out as below and sew with a buttonhole stitch, but VERY fine. That is, there should be no distance between the stitches at all.

This process is quite painstaking, but it’s worth it! Final photo:

DIY letter pillows
A very common type of sofa cushion now. They are sewn quite simply, the main thing is to have the alphabet with in the right language. And enlarge the letters to the desired size, of course.
The most important thing is not to forget to cut off the required amount of strip for the side jumper.

I found two such alphabets, but on the Internet there are also a very large number of different fonts, each of which is applicable for letter creativity. 

Photos of baby pillows


There will also be a lot of inspiring photos at the end of the article, so don't miss it
DIY decorative pillows: photos and creation schemes
There will be cushions, flower pillows, and simply unusual, practical and easy to implement ideas.
Soft heart for dear
Now we’ll talk about how to give a gift to your loved one with your own hands. Otherwise, Valentine's Day is about to come, and somehow I rarely prepare you for it)
What gift am I talking about? We will sew a beautiful pink heart-shaped pillow with voile frills.
Necessary materials

- faux fur for the heart itself (the pillow is quite large, so the dimensions of the material are decent: 110 x 40 cm);
- veil, chiffon or organza for frills and flowers (dimensions: 300 x 30 cm);
- synthetic padding or padding polyester for stuffing;
- threads in the color of the fabric;
- satin ribbon for bow;
- rhinestones;
- paper for patterns;
- pencil for transferring patterns;
- scissors;
- needle;
- pins for pinning patterns and frills.
You will need patterns (click to enlarge):


As you can see, this is only half of our heart. Therefore, when you cut it out, transfer first one half, then the other. And so on for both parts.
Cut out two parts so that the direction of the pile on them is the same. Cut a strip of the following dimensions from the veil: 300 x 18 cm. Such a long length is needed so that when further gathering this strip you can insert it into the edges of the pillow.

Now fold the strip in half lengthwise. Sew on sewing machine two lines at a distance from the edge and from each other by about 5 - 7 mm. But do not fasten the ends of the thread! And leave more thread on all sides.

We haven't secured our stitching, so now we can tighten it. Just pull both threads and slowly gather our frill to the desired state (the length of the finished frill should be equal to the length of the edge of the pillow itself).

Once the threads are tight, tie all the threads into knots at the ends and trim off the excess threads.


Now you need to put the frill inside the pillow, as shown below, and pin it.
 And then baste and sew without sewing to the end. Leave a small hole. After everything is sewn, turn the future pillow inside out and fill it with synthetic down.
Now sew the ends of the frill together, as in the bottom photo.

If you have a small reserve of frill left, you can slightly hide the seam by making a small fold. All that remains is to sew up the left hole.

Our pillow, of course, is good, but there are not enough decorative elements on it, so we will make roses with you. To make roses, you will need 3 strips of veil with the following dimensions: 9 x 50 cm, 5 x 30 cm and 4 x 17 cm. Process them as well as a frill for a pillow.

It's time to wrap our rose! To do this, start rolling the rosette as below. But when wrapping the flower, bend the edges of the rose so that it looks more natural. Using this principle, make all 3 roses.


The roses turned out great, didn't they? I hope everything worked out for you too. By the way, about the creation similar roses I wrote in one of the previous posts.
All that remains is to sew or glue the rose to the pillow. It turns out very nice:

Other sofa cushions
I think a few more detailed master classes will not hurt you)
Butterflies

Lamb

Bear and dog


Frill

Roses 
Roller “Princess Hotdog”(don't worry about the name, this is a character from one stoned cartoon)
I don’t have a detailed photo description, but I can say one thing: for the body you will need six elongated wedges and two parts (almost semicircles) for the muzzle.

Other fabric fantasies


It's nice to know that blog readers are inspired by my posts. The wonderful needlewoman Marina Grudzinskaya sewed pillows based on the works presented in this article. Come visit her (profile in In contact with And Instagram) and evaluate the products yourself:


I want to show you where to buy excellent materials to create super-soft and delicate pillows that are indistinguishable from store-bought ones. I bought this myself wonderful fleece- I couldn’t be happier, he’s so nice. The most important thing is - color palette on high.
With this, dear friends, I bid you farewell. This time the article turned out to be very full of ideas (personally, I counted about 50 ideas). I hope that we found exactly the option you wanted. See you soon!
Sincerely, Anastasia Skoracheva