A temporary structure made from available materials is called a hut. Such a shelter is used for several situations: for children's games, as a temporary shelter from negative weather conditions, or for overnight stays while traveling.
To make a hut you do not need any special skills.
The article talks about how and from what materials you can make a simple hut for children.
Given step-by-step instruction on setting up a hut in the forest while traveling. Options for constructing tourist shelters are discussed.
Making a hut for children with your own hands step by step
You can build a hut for children's games on your private plot. By appearance and for the intellectual development of children, it is advisable to build such a structure as similar in appearance to.
Materials
Important! Children must be involved in the process of building a hut.
The process will arouse their interest and acquisition of certain skills and abilities in handling tools and materials. It is necessary to give full opportunity to realize children's ideas.
Assembly
It is not necessary to insert frames and door leaf, these materials can be replaced with fabric curtains. It will be even more comfortable this way. It is advisable to cover the floor to prevent the penetration of dust and moisture from the ground.
It must be made from solid material to protect the interior from rain. There is no need for a ceiling. The shape of the roof in the form of a house will perfectly serve as a ceiling.
Attention! All materials for children's hut Only natural quality, with a smooth surface, are taken.
Cannot be used metal sheets, in order to avoid causing injuries during construction and during further operation.
Nails and self-tapping screws should not protrude beyond the boundaries of the materials, the heads should be recessed into the pattai, and the sharp ends should be cut off.
It is better to build a hut on the ground; on a tree there is a danger due to the height. In such places, safety comes first!
Painting
The finished hut house must be painted in bright colors. Water-based facade paints are used for this.
They are the most harmless, are not washed off by precipitation, are not expensive, and have a wide color scheme in standard kits, you can mix coloring additives to obtain new options. Limitless spaces open up for children to be creative.
Arrangement
All that remains is to provide the hut with furniture and toys.
You can also delight children with the construction of a hut. At the dacha, work is constantly underway to improve and clear the area of trees, shrubs and grass. All this can be used in construction.
The shape will already be more similar to a classic forest hut. It is advisable to choose the most secluded place. The structure can be assembled from thick branches on a frame. Place thinner branches on the veins to attach the covering material. The joints of the parts are secured by rewinding the rope.
At classic form object, walls are and . You can cover them with cuttings of branches with leaves or grass. Laying starts from the bottom rows to the top. The material is overlapped so that precipitation flows towards the ground and does not fall inside. It is better to lay the floor with dry grass and cover it with fiberboard or linoleum.
Hut in the forest
When traveling as a tourist, there is a need to stop for the night to rest along the route.
To preserve health and even, in some cases, life, they build a hut from scrap materials. If you are in the forest, there are no problems with the choice of material.
Set of tools
Minimum tools required:
- Sapper shovel,
- large knife, machete type,
- tourist axe,
- rope.
Most often, this composition of the tool is purchased in a universal set.
Materials
For the execution material the following are taken:
- trunks small trees, poles, for ,
- tree branches with foliage or spruce branches, moss. As an option, turf is cut out to provide protection from precipitation and night cold.
Options for huts by location and with detailed instructions
There are several ways to set up a shelter.
Ground method of constructing a hut in the form of a shield
Use several trees growing close to each other as the main support. This distance must be at least 2 meters.
Using an ax, we harvest tree trunks with a diameter of no more than 8-10 centimeters and a length of 2-2.5 meters. Quantity: no less than 26 pieces.
It is necessary to secure the pole horizontally between the tree trunks with a rope at a height of 1.8 meters. Then, at an angle of 45 0 from the ground, we apply 20 pieces one by one to the installed part. pole.
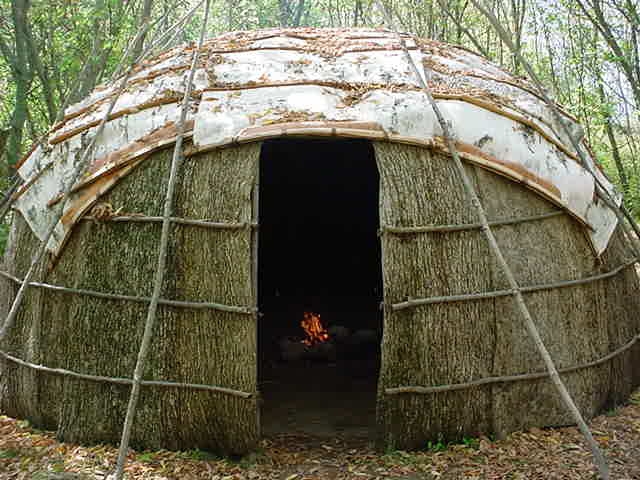
The surface of such a shield is covered with branches, moss or turf. Under the base, inside, from the remaining trunks we arrange a sunbed, above ground level. This sleeping area You can cover it with spruce branches or dry moss and lay a cloth on top. For heating, a fire is built in the recess in front of the bed.
In such a shelter there is no fear of rain, wind and it is warm to sleep. Construction time takes no more than 1 hour.
Such an object, the next day, can be easily dismantled and all traces of overnight accommodation can be hidden, the fire pit can be buried and the turf can be returned to its place.
Free standing full frame shelter
A similar version of a ground hut can be used to build a free-standing shelter with a full frame. A more complex and reliable structure. The frame is also assembled from poles in the form of a cone or triangular prism, all parts are secured with ropes.
The outside surface on all sides except the entrance is covered with branches or moss laid overlapping from bottom to top.
The floor is a layer of spruce branches or grass on the ground. On the walls you can use thinner poles and with large gaps between them, which are then tightly laid with freshly cut branches.
The hut will be warm even without a fire. Body heat is enough to warm the room. But building it will require more time and effort.
Rope shelter
The fastest version of a ground hut is a shelter assembled from ropes stretched between trees and branches of spruce branches or grass laid on them. To heat such a shelter, a fire is needed.
Hut on the fork of large branches
In areas with high humidity or the presence of dangerous reptiles, it is advisable to make a hut on the fork of large tree branches or between several small tree trunks.
To do this, you need to carefully choose the location. Secure the poles horizontally to the trunks using rope. Reliable fastening will be facilitated by the presence of branches of the trunk into which the poles rest.
Two parallel parts fixed at a distance of 1-1.5 meters are enough. Cuttings of trunks 1.5 meters long are tightly laid on them perpendicular to the main veins. It is not enough to fasten every part.
The ceiling is made of branches laid tightly on stretched ropes. The lounger is covered with spruce branches or grass.
The height from the ground is sufficient at 1.8 meters. The distance from the sunbed to the ceiling is 1 meter. These dimensions are designed for a simple and safe sleeping place.
Conclusion
There is no single form for building a hut. It should provide maximum comfort and protection from insects, animals and weather conditions during minimum costs time and effort. The only important elements are the location of the device and the material used.
9 best construction and furniture stores!
- Parket-sale.ru - A huge range of laminate, parquet, linoleum, carpet and related materials! - The furniture presented on the site is manufactured in our own factory in Moscow, as well as by trusted manufacturers from China, Indonesia, Malaysia and Taiwan."
- Mebelion.ru is the largest online store selling furniture, lamps, interior decor and other goods for a beautiful and cozy home.
Any person involved in construction knows that sometimes you want to build something “for the soul.” Although not entirely practical, it is pleasing to the eye. This desire is especially strong if the site is located in a picturesque place, in a forest or on a hill that offers a wonderful view of the surrounding area.
It is for such cases when it seems that standard house simply won’t fit into the landscape, the so-called solution may be A-frame house, or, what is more familiar to us, a hut house.
In this article we will cover:
- How to build a hut house yourself.
- Is it possible to improve the design of the hut house?
DIY hut house
The design of houses in the shape of the letter “A” is known in many countries. In the vast expanses of the USSR, triangular country houses were called huts or tents.
IN North America they are known as A-frame houses. Such houses in the form of a hut were built when it was necessary to quickly and inexpensively build a house from what was “underfoot.”

A-houses are experiencing a real renaissance, and thanks to the use of modern building materials, projects of the most unusual design appear.

The house shown above is difficult to replicate on your own, therefore, when talking about how to build a hut house, we will talk about more budget ones, but no less interesting options that you can build with your own hands. Good example why a developer chooses a hut house - the history of the construction of a portal user with a nickname eglis.

eglis FORUMHOUSE Member
I have a plot of 5 acres near the city. The site offers a wonderful view of the Taganrog Bay. The place is very beautiful, you can breathe easily, you can smell the sea. An old brick house was sold along with the plot. It has no foundation, so cracks have formed in the walls. At first I wanted to finish this house: expand it, insulate it, etc., but after calculating everything, I came to the conclusion that building a new one would be cheaper. Because I will be building alone, without helpers, I needed feasible and inexpensive technology. Therefore, the choice fell on a frame hut house.


Before we talk about the stages of this construction, we will list the main pros and cons of A-houses.
Pros and cons of A-houses
The main advantage of a hut house is the saving of building materials, time and effort. In fact, the “legs” of this wigwam are both wall posts and roof rafters.

Accordingly, there is no need to build a classic “box”, on which the rafter system is then mounted.

We also note the light weight of the frame of this beautiful hut, which leads to a reduction in the material consumption of the foundation and a simplification of its design. There is no need to build a serious foundation for the building; you can get by.
Among the main disadvantages of a hut house: smaller usable area, with an equal building footprint, with a house built using classical technology. Therefore, the second floor of the “triangle” is most often used to accommodate bedrooms or an “attic” where various things can be stored.

When building a staircase in a hut house, you will have to rack your brains about how to position it and how to make it comfortable. But all the shortcomings fade into the background if you approach the matter with invention and imagination. If you make a hut house not as it goes, but by adhering to a clearly developed project, you get a truly unusual and beautiful structure that fits organically into nature.

This is what you should end up with eglis.


Work on the construction of a hut house began with the construction of a cellar.

eglis
I live in an apartment, so the urgent question is where to store pickles and jam. I decided to build a cellar right under the house.
To do this, the user himself, with a shovel, dug a hole measuring 1800x3500 mm and 2800 mm deep.

Having dug a pit, eglis I leveled the base with concrete, which simplified the laying of blocks.


The ceiling of the cellar is made of asbestos-cement pipes with a diameter of 11 cm.

The “50” corner was used for the manhole, which in the middle rests on the “beam” of the ceiling, made from the “12th” channel.

The user also provided ventilation for the cellar by installing “gray” sewer pipes.

The ceiling was covered with clay on top, spilled with water and the 80 cm thick “screed” was allowed to dry under the hot southern sun.

Now it's time to build the A-frame. First of all, the user erected a columnar foundation. The technology is classic - a hole is dug, then it is filled with crushed stone and sand. All this is spilled with water and thoroughly compacted. Then it is placed on the prepared base concrete block, sand-cement, etc.
To prevent crushed stone and sand from becoming mixed with the soil and sinking into it over time, the base must be separated from the soil with geotextiles, which are placed in advance at the bottom of the hole.
Columnar foundation eglis consists of twelve concrete blocks measuring 30x30x30 cm. Waterproofing is laid on the blocks, on which the frame frame is laid - a beam with a cross-section of 15x10 cm.

Since, according to the user, the height of the blocks was not enough to raise the frame higher above the ground, spacers were placed between the timber and the blocks - cuttings from larch.

eglis
Having finished the foundation, I moved on to building the frame. The dimensions of the triangles of the hut house are as follows: base 5400 mm, side – 6130 mm. The distance between the triangles is 59 cm, taking into account the laying of insulation against each other, the width of which is 60 cm. A board with a section of 15x5 cm was used for the “legs”. I raised the triangle myself, using temporary stops for this - three boards. I’ll say right away that it’s physically difficult to do this alone, and considering that several times the triangles were torn off the support boards during lifting, it’s dangerous. But everything worked out, and I raised the frame.

To strengthen the frame, the triangles were additionally reinforced with construction brackets.
1. Installation of a moisture-and-windproof membrane and sheathing under the final roofing covering - corrugated slate.

The peculiarity of the membrane is that the film releases water vapor coming from the room to the outside, but does not allow wind and atmospheric moisture to enter the insulation.

2. Laying insulation - stone wool 5 cm thick, in two layers. Because The “legs” are made of 15x5 cm boards, and the total thickness of the thermal insulation layer is 10 cm, resulting in a double ventilation gap. Those. the distance between the insulation and the membrane is 5 cm, and due to the bars a second ventilation duct, between slate and film.

3. The floor insulation was carried out according to a similar scheme, with the only difference being that a galvanized mesh with a mesh size of 5x5 cm is additionally fixed between the joists.


4. The wave slate sheet was divided into 3 parts. According to the user, this makes the roof look more original. It is easier to climb the lathing with a piece weighing 7 kg than to try to fix a whole sheet.


The sheets are pre-cut to reduce the joint “hump”. The sheets were fastened with slate nails. There are a few holes in the slate larger diameter, than the “body” of the nail, were drilled in advance with a screwdriver.
5. Installation of pediments from OSB sheets. Installation of temporary stairs and doors.

6. Installation of windows.

To bend a ridge element from a galvanized sheet, the user made a sheet bender from several boards and hinges. The design of the device, available for independent repetition, is clearly demonstrated by the following photographs.


In the future, it is planned to improve the sheet bending machine and install metal guides and clamps.
7. A 2.8 cm thick tongue and groove board was used for the flooring.
Before laying, the boards were treated with fire protection. The boards were fastened into the groove with a 5 cm long self-tapping screw, which was screwed in at an angle.

The floor of the second floor is OSB 18 mm thick.

eglis
In the future I want to cover the floor with waterproof varnish. The pipe coming from the cellar will go up and sideways through a frame extension that I will build on the site of the old brick house after it is dismantled. In the extension (I will not insulate it) I will place a shower room and a shed for storing garden tools.
The user's hut-house is still under construction, but it is already clear that the result is a cozy “dacha” structure that fits well into the site.
In the future, the outside walls will be covered with siding, and the base will be covered with basement siding or corrugated sheeting.
How to improve the design A-frame house and build a beautiful one hut house
If the house eglis still being completed, then A-frame housesergiolakky has already been completed: a beautiful and cozy turnkey hut house is waiting for guests to take a virtual tour.


sergiolakky User FORUMHOUSE
My plot of 18 acres is located on the banks of the Volga. It offers a magnificent view of the river and the area. I decided to build a “dacha”, but with all the amenities. We supplied electricity, gas, and drilled a well for water. The question arose of what to build. I didn’t want to put an ordinary box in such a place or build something complicated: it’s both expensive and doesn’t fit into the landscape. Stopped at A-house. Although there is not much space on the second floor with this design, I actually don’t need it. Everything you need is located on the first floor.
Now let’s show a photo that inspired the user to build his own “hut”.

It is worth noting that the house shown above is the same as the cottage sergiolakky, not classic A-frame houses. Pay attention to the right side of the picture. Part of the “legs” of the supports are cut off, and the rafters rest on the extension.

Such asymmetry, on the one hand, gives the house a “zest”, and on the other, significantly expands its functionality by adding additional space.


Thanks to the fracture of the roof, it was possible to place a vestibule, a toilet, and build a dressing room underneath. The house also has a bedroom, a bathhouse with a relaxation room and a veranda.
(No ratings yet)
 Summer has come - the time when adults and children go to nature to take a break from the bustle of the city and enjoy clean air. Those who want to experience nature more deeply do not take tents with them, but prefer to build a hut on the spot. However, not all people have this skill - everything happens for the first time, and if the company does not have people who have already built a hut before, then the process without additional information can drag on and ruin the whole mood.
Depending on the means available to build a hut, the methods vary. In this article we will look at options for building the most commonly used shelters in nature, namely, a halabuda, a hut in the forest, a house made of branches, a house for children and an Indian hut.
Halabuda
Halabuda on a tree is a real dream of many adults and children. Depending on the goals, time spent and execution, halabuda can be either temporary or strong construction, which will last longer than one season and is ideal for a mini-headquarters for children. If you are planning to make a halabuda for yourself, then you will get a wonderful corner for close communication with nature.
 If you decide to build a tree house for your children, then it is very important to choose the right materials. They have to be as light as possible, which means the use of iron and cement is excluded. The following materials can be used for basic construction:
- Various weavings (from vines, reeds, young shoots);
- Strong ropes;
- Plywood;
- Boards.
The selected tree on which the house will be placed must be stable, strong, fairly tall and spreading with strong horizontal branches. Before building a house, the tree needs to be tested. To do this on planned level of halabuda Several people must climb in, the total weight of which will be approximately the total weight of the children or people who will use the hut. Next, you should jump on the tree and shake it, simulating a storm.
 Pay attention to the stability of the tree. It should not wobble or crack. If the conditions are met, then proceed directly to the construction itself. If you need the house for one season, then you can build only the floor and roof. In such a building The floor can be a strong net, and the roof can be polyethylene. If you are planning to make something like a house, then the halabuda should be carefully planned and, ideally, made as a model before construction. After this, the main parts of the halabuda can be constructed either directly on the tree from the very beginning, or on the ground and raised onto the tree later.
Gallery: DIY hut (25 photos)


Hut
Now let's look at how to make a hut in the forest. Trees, branches, and leaves are used to build the house. The easiest option would be to use a tree felled at an angle, which can be used as a support for the building. Before erecting a hut, you should make sure that the tree securely fixed and it will not fall on you under the weight of the branches. The construction of a hut involves weaving additional branches into the branches of a tree to protect it from the wind. If there is no fallen tree, then you can cut down a small tree and tie it to a branch by the base big tree, and then close the gaps with other branches.
 In the warm season, if you have a sleeping bag, the structure can be single-pitched - only one part of the structure is closed, which is a canopy at an angle of 45-60 degrees. For the construction, you can use a pole consisting of a strong long branch placed between the branches of two adjacent trees. Further, just like in the case of a fallen tree, large branches lean on one side at an angle. The top of the canopy can be sprinkled with leaves. Such a hut reflects heat from the fire well and protects from the wind on one side. If necessary, it can easily be expanded into a full-fledged house from additional branches.
House made of branches
 Such a hut can be built both in the country and in the forest. There are several options for constructing such a shelter, but, in any case, you will need a lot of long branches and strong rope. In the first case main strong branches They are stuck into the ground in a cone shape and are firmly attached to each other at the top with a rope. After this, others are added to the supporting branches, but only if necessary. If the building is located in the forest, then it is advisable to tie its top to a tree to give it stability.
The second option for building a house from branches differs in that the branches will be located around the tree trunk, which will serve as its support. Otherwise, the construction method is similar to the first, with the exception of the absence of the need to tie the top of the hut, since the support is already there.
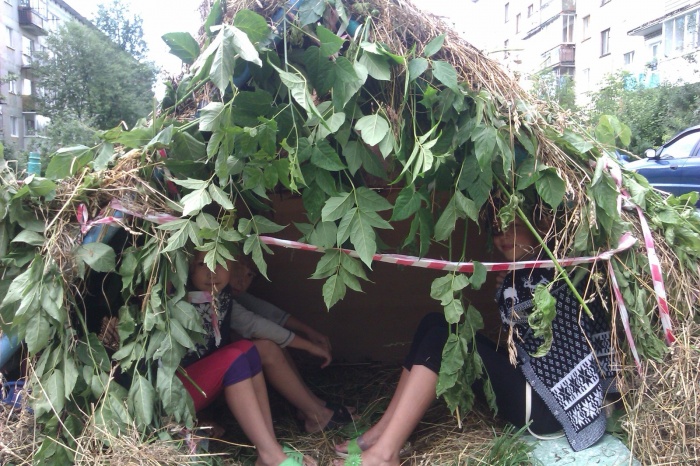
Children's hut
On vacation, adults want the children to have fun and, at the same time, so that they do not run away and are nearby, in sight. For this purpose, you can build a house with your children, which will then become the main playground.
 All of the above methods are suitable for a children's hut. In particular, you can build a halabuda on the ground, and not on a tree. Such a halabuda can be constructed from any available means. If you you are at the dacha and if you don't want to go overboard, you can simply take out 2-6 chairs (depending on the number of children so that everyone can fit inside) and cover them with a blanket or several, interlocked with clothespins. Alternatively, you can stretch the fabric for the halabuda, using branches of a low-growing tree to secure it.
The other options listed above can also be simplified, since for children the very fact of having a shelter is more important than often its design or functionality. However don't forget that children are restless and often awkward, which means that the structure itself must be perfectly fixed so that children do not inadvertently knock it over while playing.
Indian hut
The main difference between a Tipi, or Indian hut, is that in the center of the structure there is a hole for the smoke from the fire to escape. You can spend several weeks or even more in such a hut, if during installation waterproof fabric was used. In the case of the construction of an Indian hut, it is more like a short-term decorative element Rather than a full-fledged place to live, ordinary fabric will do. For construction you will need the following materials:
- Beams are large strong branches without leaves or branches;
- Rope for fastening;
- Textile;
- Paints for painting a hut.
 Building such a house is quite simple: a regular hut is built using beams without additional branches. Next, the beams need to be covered with a single piece of fabric, leaving the top of the hut uncovered. After that hut fabric can be painted imitating traditional painting. In real Tipis, the lower part symbolizes the earth, and the upper part symbolizes the air. The drawing can be chosen based on this. If you are vacationing with children, you can entrust them with painting the hut. This will help children feel involved in the process and will captivate them for more than one hour if the structure is quite large.
Outdoor recreation is always a great time, especially when you know that you will definitely not be left homeless under any circumstances. WITH hut building skills nothing will hurt you to rest while camping lightly, without a heavy, bulky tent over your shoulders. At the dacha, such a skill will help to captivate children and give parents a break, which will allow everyone to spend their free time with pleasure.
If you decide to build own house or a cottage, then in addition to traditional houses and standard layouts you should consider alternative options. For example, a hut house can be used as country house or housing for permanent residence. If you know some of the nuances of these buildings and strictly follow the construction technology, then you will get not only a beautiful and unusual house, but also a comfortable, cozy home.
Features of the structure
Externally, this building resembles a triangular prism laid on one of the side faces. That is, the two facades of the hut house are triangles, and the functions of the side walls are performed by the roof slopes. In fact, the building consists of a frame, which is made of several frames of a triangular configuration. home distinctive feature structures are the absence of side walls. From the photo you can see that gable roof construction begins directly from the foundation or low base.
Such houses began to be built in the 70s of the last century. Since then, the house in the form of a hut has won many fans and has become very popular. Especially often, structures of this form are erected as country houses, houses for recreation centers and campsites.
Advantages and disadvantages

Hut houses have many advantages, for which they are so popular. Among the advantages of such buildings, it is worth noting their following qualities:
- Easy to install. During the process of building a house, you will not need the help of specialists, because it is quite possible to do all the work yourself.
- Since such a house has no walls, the construction time for the structure is the shortest, because you do not need to carry out masonry work or pour concrete to form the walls.
- A gable roof reaching to the very foundation or plinth is the most suitable option for regions with a humid climate, prolonged rain or a lot of snow in winter. The thing is that such a roof reliably protects the base and other structures of the house from getting wet in conditions high humidity and abundance of precipitation.
- You just need to look at the photos of such houses to understand how harmoniously they fit into any suburban landscape. Such buildings are appropriate in mountainous areas, among tall pine or deciduous forests, in ordinary rural areas, among country houses or in an open landscape with low-growing plants.
- The price of houses of this type is relatively low, since there are no costs for masonry work or the purchase of mortar, and the foundation for such a light construction can be made lightweight, which will also significantly save money and time.
- A triangular building is the best way to save free space in a small space. summer cottage. Moreover, this configuration of the structure provides a minimum of shadow, so light-loving plants will feel great on your site.
- If you want to spend a minimum of effort and money on construction country house or buildings for year-round living, then a house in the form of a hut is exactly what you need.
Important: this type of structure was very popular during the Soviet Union, therefore finished projects and you should look for photos of such buildings in publications of that era. When building such a house, do not be afraid to seem old-fashioned, because retro style always in fashion.

However, the construction of hut houses also has its disadvantages, which are also worth mentioning so that you can form your own opinion about the need to build such a house. So, among the disadvantages of these houses it is worth listing the following points:
- Since the main enclosing structure is the roof, the structure's protection from the cold is not very high. To make such a house comfortable in winter, the roof must be carefully insulated.
- Due to the fact that the roof slopes form the side walls of the house and taper towards the top, there is a significant loss of usable space inside the house.
- A gable roof gets very hot in the summer, because its surface is large. This heat is transferred to the rooms inside the house, so in the heat of such a house it is impossible to do without an air conditioner.
- A roof that is too high and steep makes it difficult to install roofing material very difficult.
- The rafter structure, due to the large sloping roof, requires the use of elongated non-standard rafters. Such products will have to be made to order from high-quality wood.
- The same goes for panoramic glazing(if one will be used at the ends of the house). Not only does it need to be ordered, but in addition to this, it is worth using energy-efficient double-glazed windows. It's not cheap.
- When creating the interior of a room, due to the sloping walls, you will have to use non-standard approaches and individual furniture.
- The seemingly cheapness of a house at first glance can result in high costs for the installation of a high-quality, well-insulated roof.
Self-construction

If you decide to build a hut house with your own hands, then one beautiful photo you are not enough. A carefully developed project is also needed, because considerable attention must be paid to calculating the load-bearing capacity of the rafters.
First of all, you need to prepare the construction site by clearing it of unnecessary green spaces and various debris. It is worth preparing a storage area for building materials, providing entrances and a temporary structure for storing tools.
Foundation

The optimal basis for such a construction would be strip foundation, which can be made from rubble concrete blocks. If you are planning to do open veranda, then you can lay columnar supports under it.
We carry out foundation work in the following order:
- After leveling the site for building a house, we lay out the axes of the future structure on the ground. To do this we use cords and pegs.
- Next, we dig trenches under all external and internal load-bearing walls.
- At the bottom of the trench we make a layer of gravel and sand, which we carefully compact.
- After this, we proceed to installing the formwork. We connect the top of the formwork structure with boards so that its width is 30 cm.
- Masonry of rubble concrete blocks is done with bandaging of seams using horizontal rows.
- The first row of stones is laid dry, compacted and filled with grade 100 concrete.
- All subsequent rows must be laid, slightly recessed into the solution that covers the previous row. In this way, we lay the stones until the base rises 23 cm above the ground surface.
- When laying the last row, it is necessary to lay the embedded parts for installing the purlins. In this area it is advisable to use a finer foundation aggregate.
- After this, the foundation is kept in the formwork for 3 days with regular wetting with water.
- After dismantling the formwork, all voids are filled with sand, and a blind area is performed.
Attention: at the stage of installing the foundation, it is worthwhile to provide vents in the basement to ventilate the space under the house.
Frame

We install the roof frame on the constructed foundation. To do this, horizontal waterproofing is performed on the foundation from two layers of roofing material on bitumen mastic. The embedded parts are passed into the slots made in the waterproofing and filled with bitumen. Load-bearing purlins are attached to them.
We install the frame in the following sequence:
- Couples first rafter legs laid out on the ground and connected with ridge caps. The connections are lightly secured with bolts with a diameter of 10 mm.
- After this, accurately measure the gap between the free ends, finally fix the beam and tighten the bolts tightly.
- We assemble other pairs of rafter legs in the same way.
- Next, first of all, we install the outer pairs of rafter legs on the load-bearing purlins, those that form the pediments of the front and rear facades.
- We check the verticality of the elements using a plumb line and fix them with supports. We connect the lower corners with metal plates and bolts with a diameter of 12 mm.
- We mount the ridge board to the frame using nails.
- We place all other rafter pairs under the ridge and install them with equal spacing between the outer pairs.
- Temporary supports can be removed after wind bracing has been secured in the upper part of the rafter structure. In this way we connect three frames on both edges.
Roof

In numerous photos on the Internet you can see that the quality roofing For such a house you can use any material: soft tiles, slate, metal tiles, corrugated sheets, etc. In our case, we will use slate sheets.
We install the roofing as follows:
- First we make the sheathing. To do this, we attach 30x40 mm beams across the rafters in increments of 40-50 cm.
- We extend these beams beyond the boundaries of the outer frames by half a meter. This will give us a roof overhang.
- We spread roofing felt over the sheathing, and fasten the slate on top of it using nails with rubber gaskets. We begin work from the bottom of the roof, moving towards the ridge. This way the roofing sheets will overlap each other.
- We cover the ridge part with a strip of roofing material.
- From the inside between the rafters we lay thermal insulation material(mineral or basalt wool).
- We cover the entire structure with a vapor barrier membrane, which we fix with a stapler to the rafters.
- We line the bottom of the roof with wood sheet material, plasterboard or clapboard.
Floor

We carry out floor manufacturing work in the following sequence:
- We lay the logs on the purlins of the rafter frames in increments of 0.5 m. We fasten them with nails.
- At the bottom, we attach cranial bars to the side surface of the lag.
- We lay roughing boards on these bars.
- We cover the entire structure with a waterproofing film on top so that it goes around the joists. We fasten the film with a stapler to the beams.
- We place heat-insulating material in the gaps between the beams so that it is flush with the surface of the joists.
- We cover the top of the floor with a vapor barrier membrane and fasten it to the joists with a stapler. We overlap the edges of the film and additionally fix the junction with tape.
- Now you can lay subfloor boards, moisture-resistant plywood or OSB.
After installation of window and door blocks, gaskets engineering communications You can begin interior finishing work.
We all love to relax in nature. And it doesn’t matter where exactly we want to relax, in a flat forest, or in the rocky mountains. Naturally, when planning your vacation, you know in advance where you will spend the night, in your car, in a tent or sleeping bag. However, there is another option for overnight stay.
This option is convenient because in it you will not only feel protected, but will also be able to breathe fresh air in a pleasant atmosphere. This option is to build a hut. In this article you will learn how to build a treehouse.
Definition
A hut is a universal shelter that is built for a short time. First of all, it is built for overnight accommodation, as well as for protection from snow, heavy rain, temperature changes, strong winds, and the scorching summer sun.
There are these types of huts:

How to make a hut in the forest with your own hands
First you need to find appropriate place for the construction of a hut. This place should be safe for your life. We do not advise you to build a hut on the banks of a river, in narrow gorges, or at the bottom of a canyon. Because in case of flooding or heavy rain, this place may become unsafe. Also, do not build a hut under sagging rocks or near steep mountains.
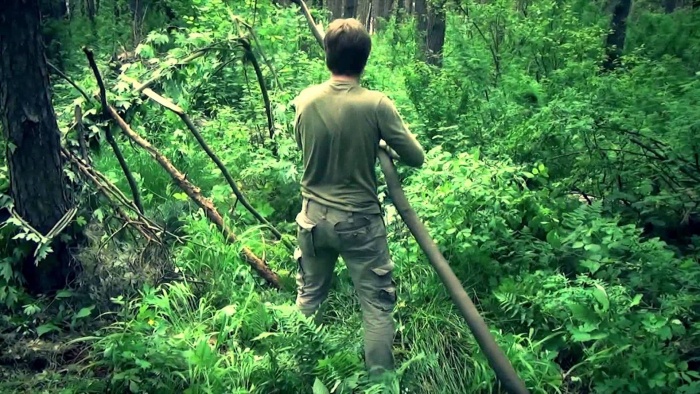
You can build a hut without any tools. However, you will need a standard set to work:
- Axe.
- Rope (scotch tape).
The great thing is that you will most likely always have these tools with you. They will significantly reduce the robot’s time, and the process itself will be more enjoyable.
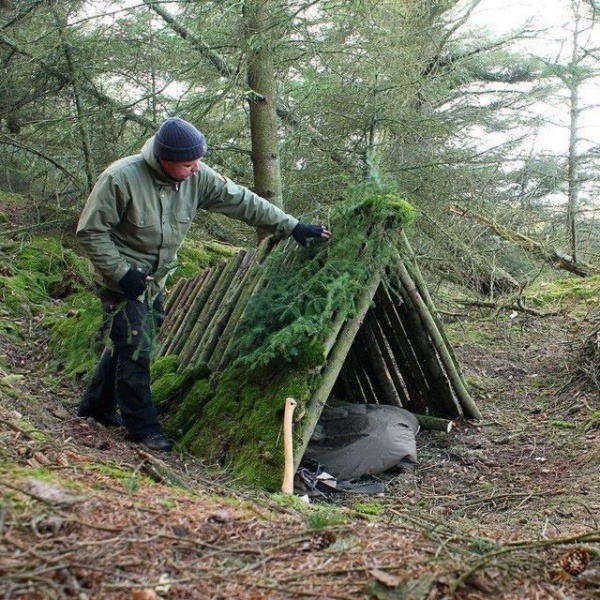
As you can see in the photo, most huts can be built using a simple technique of weaving from branches. In order to make a high-quality roof and walls that will be reliable in all weather conditions, you only need to use those materials that are found in the forest at almost every step, these are branches, bark, moss, leaves, grass. By collecting all these materials you can make a good hut with your own hands.
Huts come in different shapes and sizes, it all depends on how many people it should accommodate, as well as what its purpose is - it will be a shelter from the sun or protection from the cold and wind. But with all this, you need to take into account the type of terrain, weather conditions and time of year.
Making a lean-to hut
A lean-to hut consists of only one wall, made directly by you. This wall should rest on something, it could be a fallen tree or a large stone or two trees growing nearby. You can make this wall or canopy from branches and cover it with leaves. This type of hut will serve as protection for you from light rain, scorching sun or other circumstances. However, you will not be able to completely protect yourself from strong wind, snow or rain. Also, this building is not so practical. Since you can have a good rest in it, however, you will not be able to comfortably spend the night there.
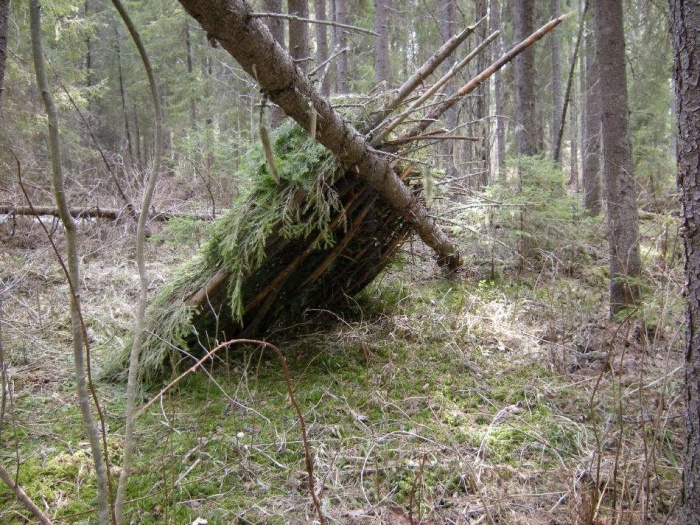
In order to build a building you will need two strong logs with branches at the top, 2-2.5 meters long. Drive these logs into the ground at an angle to the base and secure the crossbar at the top. At a distance of 30 cm, you should place branches (poles) with one end pressed into the ground and the other resting on the crossbar.
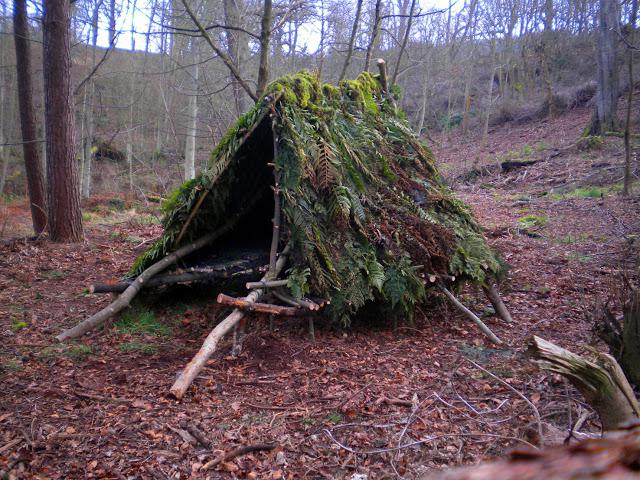
Making a gable hut
This type of hut is more convenient and practical. A gable hut is made according to the same principle as a lean-to hut. But the difference is that the poles that are installed from the crossbar to the base of the ground must be installed on both sides. This can be seen in the photo.
One side should be completely covered with small branches or leaves, and the other will be used as an exit. If you have film or tarpaulin with you, then use it as additional protection from rain and wind.
Once you are done with the exterior work, start with the interior work. What is meant? You need to take care of the floor covering. Especially if you don’t have sleeping bags or other warm clothes with you. If you have to spend the night in cold and wet weather, make sure you don't sleep on the ground. Build something like a stretcher with your own hands and cover it with dry leaves and grass that you can find, or unnecessary things that may be in your backpack.

Advice! If you are making a tent in rainy weather, then do not forget that water can get inside the tent. To prevent this from happening, dig a moat around the tent.
Important Note: In order for the shelter not to allow heavy rain to pass through, its thickness should be 20-25 degrees, and the angle of inclination should be at least 45 degrees to the base of the ground.
Remember, if there is a question about preserving your health or even life, you should not look for the most convenient types of materials. Use what you have on hand. The main thing is that the material you choose is dry and reliable. But, probably, few of us may need to build a hut in the forest due to various extreme situations. Therefore, in the next part of this article we will talk about how to help our children build their own hut.
Wigwam hut
We build the frame: draw a circle on a flat surface. Around the circle you need to dig a row of sticks. The upper ends of the sticks must be connected using rope, tape or wire. However, everything must be very reliable so that your children are safe. At this stage, we can say that the frame is ready.

After making the frame, you only need to cover the wigwam with colorful fabric or film, as you see in the photo.
If you have a summer house or your own garden, then do not lose this opportunity to make an original and very beautiful wigwam from sunflowers for children. To do this, you just need to plant a few sunflowers in a circle. And when they grow up, tie them together. You can only imagine how happy your child will be playing in such a hut that you built.
Let's sum it up
There are also other types of children's huts. For example, if you have a lot of trees, consider making a treehouse or building a large treehouse for playing with friends. You can even make a small hut in a children's room using improvised materials. Remember: joint work always unites the family. Before you build a hut in the forest with your own hands, it is important to think everything over, stock up on tools and start working.