There is nothing easier than sewing cat pillows with your own hands. Pillows in the house perform several functions: they make the house cozier, decorate it and serve as armrests and headrests. Now you won’t surprise anyone with store-bought ones, but cat pillows sewn with your own hands are quite likely. Sew or knit as you wish interesting pillows and stencils, it is quite within your power.

It is very pleasant to lie on the couch, relax, soak up with your pet. And when he is not around (someone must hunt), then a beautiful pillow with cat symbols will be a pleasant reminder. Probably the easiest way is to draw a cat on the fabric.
Although, there are other ways to make a bright pillow, for example, deliberately choose a colorful fabric and cut out details from it.

Or choose a material and take it to a workshop that specializes in thermal transfer printing - they will “draw” what you want, and you will also cut out details from this canvas and make something unusual, creative.

Still, it's nice to do something on your own. Stencils are perfect for this type of pillow. The drawing can be done with acrylic paints or special ones for textiles.


Stencils can also be made independently from scratch, or a complex drawing with some details on thick paper, or take a finished drawing. For cutting, it is worth using a clerical knife, carry out the process itself by placing a sheet with a pattern on a wooden cutting board or, specially designated for this, a sheet of plywood.


To get the desired drawing, you can do without printing it. Just transfer it to paper or tracing paper directly from the monitor.


Fleece

We will need: a small piece of fleece of the desired color, a piece of light beige or milky felt, sewing threads to match the main fabric, holofiber, brown iris (or floss) threads, a fabric marker, needles, pins, scissors, lace, ribbons, buttons, beads to decorate your cat or kitty. Pattern with centimeter scale: 
We sew two cats at once, so we have more details in the photo. We fold the fleece in half, transfer the pattern to the fabric, it is very convenient to do this with a disappearing fabric marker.

We sew our details on a sewing machine along the contour, cut out with an allowance of 0.5 cm.

We make an incision on one layer in the area and turn the body inside out. We also cut one layer of the tail in the upper part and turn it inside out.

We stuff the body and tail with holofiber.

We sew up the holes through which the cat and tail were stuffed with matching threads.


We mark it with a disappearing marker, embroider the muzzle with iris or floss threads.

We try on our muzzle on the cat's body, closing the sewn incision, fix it with pins. With a seam over the edge, we sew the muzzle with threads to match the felt.

We try on and sew a tail with a hidden seam so that the cat can lean on it and stand on its own.

That's it, the cat is ready.

It remains to decorate it according to your desire - with bows, braid, flowers, skirts, buttons - with everything your imagination tells you! See how different cats can be:

sleeping cat

A cat in the house can most often be found on a sofa or in an armchair. She loves to sleep. Let's try to sew a decorative pillow with a sleeping cat's face. It looks so much like her.
For work we need:
- A piece of fabric (color optional).
- Threads, scissors.
- Pattern.
- Disappearing marker for fabric.
- Interlining.

We select fabric for the future pillow, the choice of which is unlimited. It all depends on what exactly you have on this moment at hand. For living rooms, any kind of fabric is suitable; for a children's room, a pillow can be made from old children's things with a funny pattern.
We transfer the pattern of the main part to the fabric using a disappearing marker.
We cut out the part, while leaving about one centimeter for allowances. Now we transfer the pattern of the main part to the interlining, trace and cut along the contour. We do the same with the second part of the part, we make it from fleece. We make a pattern of legs, tail and ears and cut them out. It is also necessary to duplicate the details.

Using an iron, we glue one part of the main part with interlining. Now we take everything small parts: paws, tail and ears, fold them in pairs with the front side. After that, we grind each part on a typewriter along the edge, leaving a small hole for stuffing. We process all the edges of each part with zigzag scissors or we do it with ordinary scissors. After that, turn out to front side and stuff with any filler, and sew the holes with a zigzag stitch.
All the details are ready, which means we need to sew them to the main part. To do this, use pins and fix each detail in the right place. With the help of a disappearing marker, draw a muzzle on the pillow. We turn over and put a fleece piece on top, sew it together, leaving room for filling. Turn right side out, smooth out all seams. The pillow can now be stuffed to the desired density with any stuffing, we sew up the hole. Now we sew the paws, for this we use buttons. We embroider the muzzle with floss threads dark color. The cat pillow is ready, you can decorate it with a bow, heart and other appliqué if you wish. On such things, the drawing made by acrylic paint.

Give your kitty a gift - a sleeping cat pillow. It looks on the sofa - just great, but guests like this one, so it can be a great hand-made gift.

You can decorate the neck with a bow or hang a medallion on it - there will be a cat with decoration. The pillow will look great on your sofa!


Description of the work process:


knitted

Cute do-it-yourself sofa cushions can be knitted on knitting needles. All over the world, things made by hands are valued. Things keep the warmth of the hands of the person who made them.
These are original sofa cushions in the form of knitting needles.
For work we need:
- Needles of medium thickness.
- Any threads, the remains of threads (you can take threads of two colors and connect).
- White thread for paws.
- Synthetic winterizer for stuffing pillows, hands and feet.
- Two buttons for the eyes, a piece of fabric for the nose.
We knit either two squares, or a rectangle, which, when we fold it, will turn into a square. The size of the pillow can be any, the smallest is 35/35 centimeters, you can make more. Paws about 28 centimeters. How many loops to cast on: knit a little on the needles and look at the number of loops in 1 cm. Multiply by 35 cm.

Knitting pattern
Option 1: front surface.
- 1 row - one facial,
- 2 row - one purl.
Option 2: confusion.
- 1 row - front - purl - front - purl, etc.
- 2nd row - purl - front - purl - front, so that all the time above the purl was the front, and vice versa.


The front and back legs and tail are knit in stockinette stitch. We knit desired length, first we make reductions (we knit two loops together and tighten the rest with a thread).
On the other hand, we knit the paws: with white threads we knit three from each loop to get a white foot. You can not fill the length, but we fill the brush and foot with synthetic winterizer, embroider fingers. We decorate the muzzle with an application. We sew the pillow, leaving a slot for the padding polyester. We sew the ears, stuff with padding polyester. The cat is ready.


Children's

With such a toy, you can even sleep, which is so loved by children. The cat pillow is sewn very easily. The pattern is elementary. You can do this craft with your child.
Necessary materials:
- Fabric in two colors (you can use more if you want to make the cat pillow even more original).
- Threads.
- Needles.
- Sintepon, cotton wool or granules for stuffing.
- Patchwork for eyes, nose and mustache.
Pattern

Those elements that are cut in duplicate are made by folding the fabric in half, face to face. Cut out, making seam allowances. We sew the parts, leaving small holes for stuffing. First of all, we sew the body, head, then we sew paws, tail, ears to it. With the help of colored patches, we make eyes, a nose and a mustache using the applique method.
In the video you will learn how to pillow-cat.
cat muzzle

From the materials we need:
- Fabric in different colors, choose them by looking at our photos, but you can also improvise.
- Threads.
- Scissors.
- Filler.
Eyes and nose can be embroidered, or you can make an applique.

- We cut out two parts of the head, hearts for a smile, eyelids, an eye, and one part each - the lower part of the muzzle and nose.
- Let's make a smile.
- We stretch it.
- Sew the top of the muzzle to the bottom.
- We sew in the form of an application the nose, eyes, cheeks, eyelids - we make out the face.
- You can do it in the form of embroidery.
- Draw with white paint or corrector pupils.
- We do the same with the nose.
- Sew the two parts of the head, leaving a hole for the filler.
- We fill the cat with synthetic winterizer or other filler.
- Our unusual handmade gift is ready! We think it will bring a lot of joy!
It is difficult to imagine modern life without such a wonderful thing as a pillow. It is no secret that a properly selected pillow will give good and bright dreams.
In stores you can find a huge number of a wide variety of pillows, including pillow toys. Let's figure out together what it is and how you can make them yourself.
What is a pillow toy
Based on the name, a toy pillow is a pillow made in the form of a soft toy (most often some kind of animal). You can play with such a pillow, take it with you to bed, you can sit on it or lie on the floor. Such a pillow can be an excellent decoration for an interior made in a certain style.

Pillow - boat.
The advantage of do-it-yourself pillows-toys is that you can use the remains of shreds or the remains of wool for their manufacture. In this case, the pillow will also perform a developing function: the child will develop sensitivity, and a variety of colors will help to learn the names of colors.
For example, a pillow made in the shape of a typewriter or a house with windows will help not only to learn the names of colors, but also the names of geometric shapes.


Knitting pattern for a pillow-machine
Sewing a pillow-toy with your own hands is not at all difficult. You will need a pattern (which you can draw yourself or use our ideas), fabric, thread with a needle, if available - sewing machine, knitting threads (if you want to make a knitted toy) and filler.

Pillow-toy "Cat" made of fabric

Pattern of a pillow-toy in the form of a cat

Pillow "Pigvin", crocheted

Knitted horse pillows
When choosing materials for a toy, do not forget that they should not cause allergies, and should not shed.
Choosing an idea for a pillow
The shape of the pillow will depend on the purpose of the pillow.
Roller pillow
Do you want to make a tight roller under your back? The ideas of a dachshund dog, a snake or a train are suitable for you.


Pattern pillow-toy in the form of a dog
Want to make a pillow for the road? Choose semicircular shapes: such a pillow can be placed under the child’s neck:


Pattern pillow-toy "Giraffe"
How to make a pillow in the form of a sweet donut, see the video master class:
sleeping pillow
If the pillow is intended for sleeping, then you should not make hard, noticeably protruding eyes and nose. It is difficult to press your face against such a pillow and fall asleep. It's better to prioritize soft tissues: fleece or flannel.


Pattern pillow-toy in the form of a lamb
Pillow


seat cushion
Want to be able to sit on your pillow? Try to make it flatter.


Floor pillow

And a long pillow can be put on the window or on the floor - from drafts.


Patterns of pillows in the form of a cat and a dog
Pillow filler
There are a few important things to keep in mind when choosing filler for a toy pillow.
Firstly, the toy should be fairly light so that the child can carry it from place to place.
Secondly, such a pillow will often have to be washed. So, the filler should be well wrung out and dry quickly. It is best to use sintepuh or holofiber for stuffing.
Another interesting option filler - a special ball filler polystyrene (the same one that is used in pillows - mnushkas).
And remember that do-it-yourself pillows-toys are a unique product that will make your home cozy and your child will undoubtedly like it!


original decorative pillow able to revive the most strict and restrained interior. Especially when it comes to pillows made in the form pet, for example, a cat. After all, cats are like guardians home comfort, are a kind of mascot for households. A do-it-yourself cat pillow will not only decorate any room, but also serve as a wonderful gift for a loved one.
There are many options for how to make a decorative cat pillow with your own hands. You just have to choose what this fashionable piece of furniture should be and start manufacturing.
First you need to prepare the following materials:
- Pattern. The pattern can be printed, or simply transferred to graph paper.
- Textile. The choice of fabric for similar product truly unlimited - it can be fleece, velor, cotton of any color.
- Threads, needles, pins, chalk and scissors.
- Pillow stuffing - synthetic winterizer, holofiber. Also use natural materials- buckwheat husks, sawdust.
- Finishing materials - buttons, colored shreds, floss, beads, glue.
Important. If the pillow is planned to be purely decorative, for decoration (cat's eyes), you can use buttons and other plastic parts. And if the pillow will be used for its intended purpose, then it is better to use fabric and colored embroidery.
Classic variant
A do-it-yourself cat pillow made of fabric will look great on a sofa, armchair or bed. When choosing material by color, you can focus on the shade of furniture upholstery, then the pillow will fit especially harmoniously into the interior.
The first step in the manufacturing process is choosing a pattern. The proposed pattern can be downloaded by increasing it to right size and print on paper.

Then the pattern should be transferred to the fabric folded in half, attached with pins.
The fabric is cut along the contour, as a result of which we get two parts of the pillow.
Important! When cutting, be sure to leave 1 cm for a seam allowance.
Before you start sewing together the details of the pillow, you should shape the cat's face - eyes, whiskers and mouth.
To do this, we cut out two circles from white fabric (you can use felt) and sew them on the front side of the pillow, in the center we make embroidery in the form of pupils or sew on small black buttons.
We embroider the whiskers and mouth of the cat with floss threads, black and red.

The two received parts are sewn together. In the lower part of the future, we leave a hole for turning the product out and stuffing it with filler.
Having turned the product on the front side, we proceed to stuffing the pillow with synthetic winterizer or holofiber through the hole left. The amount of stuffing is adjustable independently, depending on the desired degree of softness of the product.
The hole is closed with a hidden seam.

Pillow in the form of a roller
This is one of the most simple ways make a cat pillow with your own hands from fabric.
As a filler, you can use foam rubber, holofiber, synthetic winterizer.
Important! Foam rubber with prolonged use may lose its shape, and holofiber or synthetic winterizer are more durable. Also, a great solution would be to use buckwheat husks, which will give the pillow orthopedic properties.
Having decided on the filler, you can proceed directly to the manufacture of a cat pillow with your own hands.
The algorithm of actions will be as follows:
- the fabric is cut in the form of a rectangle, the length of which will be equal to the length of the pillow;
- the sides that form the width of the rectangle must be processed and tucked up to make a drawstring;
- the rectangle is sewn from the inside out and turned outward;
- the resulting cylinder is stuffed with filler;
- pull the cord into the drawstring and pull it off at both ends, securing it with a knot;
- for the head, a ball should be sewn from the fabric (cut out and assembled on a thread), and ears - triangles should be sewn to it and the muzzle should be embroidered with floss threads;
- for the tail, the canvas is sewn in the form of a narrow rectangle and stuffed with filler;
- the head, body and tail of the cat come together.

The simplest cat pillow
This method does not require any special patterns and is suitable for those who do not like curvilinear stitches and complex lines.
However, a simplified version of a cat pillow will look and serve no less original. worthy decoration any interior.
For manufacturing, a piece of any rectangular-shaped fabric is suitable, from which an ordinary pillowcase is sewn. It is better to combine the fabric of two shades, this will give the product an elegant and cheerful look.
- Circles of white felt are sewn onto the front part - these are the eyes of a cat. For the pupils and nose, use black felt or another dense fabric, which will not crumble around the edges.
- The mustache is embroidered with floss threads.
- Two triangles are sewn into the upper seam of the resulting product - the ears of the future cat.
- Through the hole left in the bottom of the pillowcase, the pillow is stuffed with filler.
- The hole is sutured. If desired, you can sew in a hidden zipper.

Thus, you can decorate and diversify your interior without much effort and financial investment. It is enough just to show imagination and not spare a few hours of time. And the presented patterns, diagrams and photos will help you make an original accessory with your own hands.
How to sew a sofa cushion cat: video
Decor elements made by hand always bring coziness, warmth to the interior and reveal the soul of the hostess of the house. Sewing a sofa cushion is easy, but many people want to make it unusual. Very interesting topic for needlework - do-it-yourself cat pillow. Patterns and the algorithm for sewing such a product are quite a popular topic among hand-made lovers. The simplest and, at the same time, original ideas you will find in this article.
Why cats?
The theme of cats is always relevant. Most people are indifferent to them. A cat, especially a sleeping one, personifies calmness, tranquility, they not only touch, but also relieve stress. Therefore, the idea of making a pillow cat seems to be very successful.
It can be implemented in different ways:
- You can make a pillow in the shape of a cat;
- You can sew an application in the form of a cat on a regular pillowcase;
- You can sew a pillow-roller, to which you can sew a cat's head and tail with paws.
Important! The cat can be embodied not only in sofa cushion, but also in a pillow-sachet with fragrant soothing herbs.
We will not be able to cover all the variations on the theme of cat pillows, so we propose to consider the most interesting ones, in our opinion. Let's start simple.
Application
If you just want to decorate a pillow with an image of a cat, then you can get by with an applique.
Action algorithm:
- If you have the makings of an artist, draw a cat yourself. If you do not want to bother, print the finished picture of the cat you like.
- Then transfer the pattern from paper to fabric.
- Cut out the eyes and nose from scraps of fabric of the appropriate color or embroider.
Important! If the pillow is purely decorative, then the eyes and nose can be sewn on plastic. For this, buttons or ready-made eyes designed for soft toys are suitable.
- Then glue the blank with hot glue or sew it to the pillowcase.

Ideas for interiors:
- For a children's room, you can use it for cartoon cats applique.
- For a hall or bedroom it will be interesting to look at the silhouette of a black cat on any light background.
- You can sew an appliqué pillowcase for any ready-made sofa cushion.
- You can make a pillow out of old jeans, sew a pocket from them in the center, and a cunning cat's face looks like it looks out of the pocket. It looks funny.
- A set of two identical pillows will also look original, where the application in the form of a silhouette of a walking cat smoothly transitions from one pillow to another. That is, the picture is divided into two parts. It looks like one piece when both pillows are placed side by side.
Do-it-yourself cat pillow is simple and fun!
Embroidery
If you love to embroider, then you can finished pillow make a pillowcase decorated with embroidery.
Action algorithm:
- The back of the pillowcase can be sewn from any suitable fabric, and for the front, take a special embroidery canvas - canvas. She comes in different colors.
- The sites of needlewomen have a large number of schemes for embroidery on the theme of love for cats. Choose the right one, print and embroider.
- After the picture is ready, sew the pillowcase.
Knitting
Do-it-yourself knitted pillow cats will look especially unusual and beautiful.
Action algorithm:
- Select thread and desired number spokes.
- Think over the parameters of the pillow, knit a small square and count how many loops are in 1 cm.
- According to the calculations, cast on the required number of loops and simply knit the fabric of the desired size. It can be 2 squares or a rectangle that you fold in half.
Important! Knitting should be tight.
- When the pillowcase is tied, fill it with filler (synthetic winterizer, holofiber or any other).
- Now make the ears. To do this, lay the seam obliquely under the two upper corners. These resulting triangles will be the ears.
- Make a muzzle. Embroider eyes, mustache, nose with threads of a contrasting color. The nose can be made slightly convex.
On this, you can complete the work, or you can also tie the paws, which will give your pillow more originality.
Do-it-yourself cat pillow in the form of a roller
The sofa cushion is a very handy thing. It can be placed under the head, under the back, can be used as an armrest. If it is made slightly flattened and wrapped in the shape of the letter C, then such a pillow can even be used to feed a baby. Interesting design such a product will make it not only useful, but also beautiful.
Method number 1:
- The sofa cushion is sewn quickly, but first you should consider the filler.
Important! Rolled foam rubber holds its shape well at first, but its big drawback is that over time it absorbs unpleasant odors and starts to crumble. The best option there will be the use of more modern fillers, for example, holofiber. It is durable and practical, mites and fungus do not like it. If you want your roller to be also orthopedic, you can fill it with buckwheat or buckwheat husk. In this case, the fabric for the roller should be sufficiently dense.
- From the fabric you need to cut a rectangle, the length of which will be equal to the length of the future roller, and the width - its thickness.
Important! For a roller in the form of a cat, it would be interesting to take a striped fabric that is pleasant to the body.
- On the sides that will be pulled together, you need to process the edges with a zigzag and tuck in 1-2 cm, sew so that the drawstring comes out. You need to thread a braid into it, with the help of which the sides of the roller will later be pulled together.
- The prepared rectangle must be sewn from the inside out to make a cylinder.
- Then turn it right side out and fill it with stuffing.
- After that, you need to pull the ribbons on the sides and secure them with a knot.
- After all the manipulations done, you have a roller. It remains to turn him into a cat. To do this, you need to sew a cat's head on one end, and a tail on the other:
- For the head, make a ball out of fabric and filler, to which sew triangles-ears, and also embroider a muzzle with a mustache.
- For the tail, make a “sausage” out of fabric and filler.
- All this must be sewn on both ends of the roller. If you want, you can work a little more and make paws.
There is another interesting option, how to sew a cat pillow with your own hands, where the head will not hang out separately.

Method number 2:
- Similarly, cut a rectangle of the desired size from the fabric, sew it on the wrong side so that the cylinder comes out.
- On one side, sew the end in a semicircle, and on the other side, leave it open for now and turn the workpiece inside out.
- Now prepare the rest of the details. For each ear, take two triangles of fabric and one of the padding polyester of the same size.
- Fold the fabric triangles face to face, and attach the sintepon part on top.
- Sew along the perimeter 0.7 cm from the edge, leaving a hole of a couple of centimeters to turn the product inside out.
- Make the tail of any shape (straight, curved). Sew it from two halves, you can stuff it a little with holofiber.
- For the paws, first draw a template, for example, in the form of a straight part, which goes into three plump fingers at the bottom. For four paws, you need 8 identical blanks.
- Fold the pieces of fabric for the legs in half and circle the template from the inside. First you have to lay the seam, and then just cut (0.5 cm from the seam).
Important! In the bends, this indent must be cut almost to the seam, so that after turning it out, nothing will pull anywhere.
- When the paws are turned out on the face, fill only the lower part with holofiber (where the fingers are) and sew across so that the filler remains in place.
- After all the elements are ready, sew them to the body: paws - on the sides, ears - on the rounded part of the roller.
- Now fill the roller with filler, bend the edge and manually walk along the edge with a strong thread. Pull tight. After that, you can sew on the tail.
Important! Similarly, you can sew a curved pillow-roller (like a horseshoe, a banana or the letter C). Everything is done in the same way as in the previous case, only from the fabric you cut out not a rectangle, but two parts of the desired curved shape. Then proceed in the same way. Such pillows are very fond of pregnant and lactating mothers.
How to sew a cat pillow with your own hands?
A do-it-yourself pillow made in the form of a cat can be designed for different purposes:
- Small figurines of cats can be stuffed with fragrant herbs, juniper shavings and serve as a sachet.
- Larger figurines can be used as pillows or just as decoration.
All of them are sewn according to a similar pattern, differ only in size and filler.
Sewing a cat. Procedure:
- To begin with, you must choose a suitable pattern and print it out, or draw it by hand. The cat can be sitting, lying, standing.
- Pick up the fabric and transfer the pattern to it. Get two mirror parts.
- Sew them inside out, leaving ten centimeters for turning and stuffing.
Important! If you will embroider the muzzle on a typewriter or make it in the form of an applique, then it is better to do this before stitching the details. If manually, it is possible and after.
- Next, fill the cat figurine with filler and sew up the left hole.
Important! The torso can be sewn from a fabric close to the natural color of the cat, or you can, on the contrary, take a cheerful fabric in small flower or colored stripe.
By the way, it is not necessary to sew a whole cat. You can make a pillow in the form of a cat's head.

Option number 2. Procedure:
- To sew such a product, create a template in the form of an outline of a cat's head with ears and transfer it to the fabric.
- Now cut out two identical blanks.
- The back part can not be touched, but on the front you need to draw a muzzle. “Facial features” can be applied with embroidery, appliqué, or even painted with acrylic fabric paint.
- Sew both pieces inside out, leaving an opening of a few centimeters.
- Turn the workpiece inside out, stuff it with filler and finally sew it up.
Important! If you fill the pillow with buckwheat, buckwheat husk or juniper shavings, then such beauty will also be an excellent “anti-stress”.
Do-it-yourself cat pillows original:
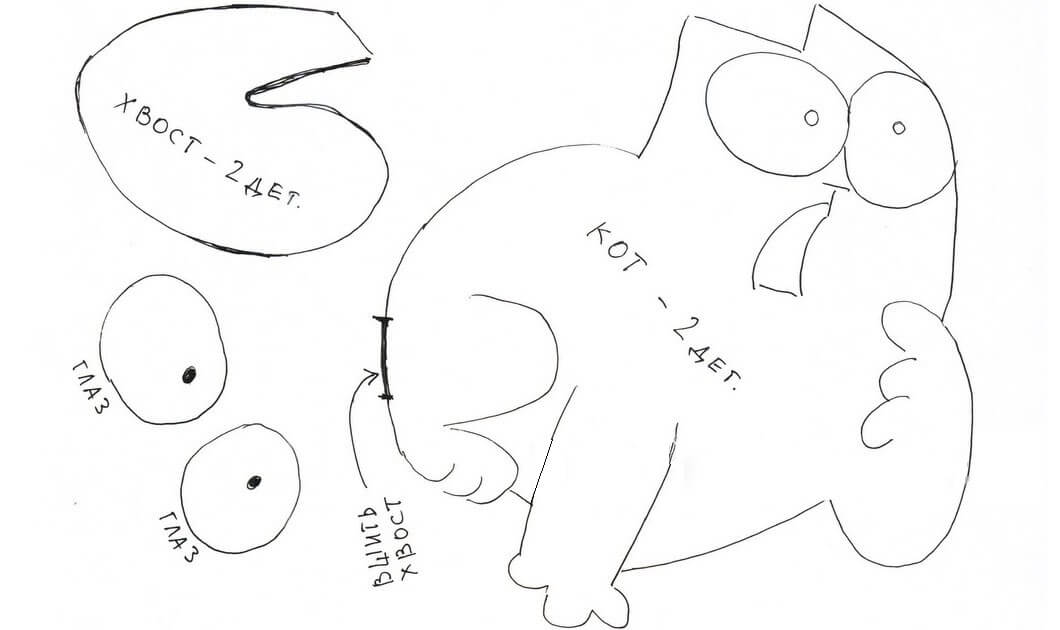
- A pillow in the form of Simon's cat, a grumpy cat popular on the Internet or an anime-style cat looks very funny.
How to make simple do-it-yourself cat pillows is described in detail in this article. The proposed ideas will be easy to translate into reality even for those people who are not quite friends with a needle and thread. Using the recommendations, you can create an unusual little thing. Such a product will not only decorate the interior of the room and help to place accents in the design, but will also be a comfortable and practical pillow that can cheer you up.
Unusual, original, unique pillows-toys in the form of animals or dolls become favorite things for both children and adults. Do-it-yourself cat pillow will not be an exception. It can be sewn according to ready-made patterns or according to sketches drawn by yourself.
If the baby does not fall asleep well, and he needs company, offer him such a pillow-toy. With it, the child will calm down faster. Adults will also need a small pillow-dumka, with which it is easier to relax the cervical vertebrae, you can lie down comfortably, fall asleep faster and more soundly. Of course, you can buy a model of any size and shape in stores, but sewn or knitted on your own, these products become an indispensable element of decor, created only for the closest people.
How to cut out
Do-it-yourself cat pillow is a gift for yourself and your child, decoration and addition to stylish design rooms. In order for such an accessory to be truly one and only, you will have to independently make a pattern for the future cat. It would seem, what could be easier? But no. After all, cats and cats are so different, and everyone wants his pet to be the cutest.
They cannot be similar to each other, and therefore you will need to find a special drawing or make a sketch yourself. When preparing to work on creating a pattern, it is important to consider the purpose of the future product. If this is just a decoration for a new sofa, then it is important to make sure that the color and shape of the cat are in harmony with the surrounding furniture.
But most often it is a real pillow, with which it is comfortable to fall asleep. In this case, you need to carefully consider:
- its size;
- the quality of the fabric that an adult or child will touch with his face;
- Availability decorative elements safe for babies;
- quality and quantity of filler.
Of course, it is very important to choose the character who will surely become everyone's favorite, and the pillow should be an exact copy of him. Such a hero has long been the well-known cat Simon.
This funny soft toy was loved by children many years ago. different countries, and to make it with your own hands, it is enough to find a detailed image and prepare the components. White, fluffy, with huge bulging eyes and upright ears, the cat will take root in any home. He can really decorate the interior and become a friend to the baby.
Preparation
When starting to make a pattern for a soft pillow toy, you should think in advance what size the cat will be and who will use it. Usually such a handsome man is sewn from faux white fur, and if desired, it can be replaced with plush, terry or flannel. For work you will need:
- material for the body, folded in half;
- floss threads to highlight the mustache and the desired shape;
- pins to secure the pattern to the material;
- colored crayons;
- threads, the color of which differs from the main one;
- scissors;
- filler;
- sewing needles.
You can make an accurate pattern by watching a video or photo, where real masters of their craft give a master class in cutting and sewing.
You will need several sheets of A4 format, but it is better if you prepare graph paper, which makes it easier and more convenient to recreate the exact image of every detail of the component of the future pillow, and you can get to work:
- Having decided on the size, it is important to decide whether the pillow toy will be one-piece or some parts will need to be sewn on. The image drawing must contain all parts in the exact size. Smaller details are drawn on the same sheet.
- After cutting out each component, lay out the parts on the material so that there is a distance of at least 1.5-2 cm between them. This will be a seam allowance.
- Secure all parts of the pattern with pins and circle with chalk, marking the places of the future connection.
- Carefully cut out each detail, not forgetting the allowances.
- So that all the components match in size, along the line drawn in chalk, make a running seam with air loops, push the edges of the fabric and carefully cut the threads between the layers of matter. All the necessary lines and outlines have been transferred to the second part.

Assembly of parts
Having laid out and swept away all the constituent parts, you can begin to assemble the toy itself.
- On one of the resulting components, fix all the required small parts. These are pads on the paws, eyes and tongue. Embroider the mustache and outlines of the mouth with floss.
- Having folded the received parts with the right side of the matter inward, fasten with pins or sweep and carefully sew on a typewriter, leaving a hole for filling.
- Overcast all edges carefully so that the fabric does not crumble.
- If the cat has a tail, then it needs to be stitched and stuffed with filler. Then insert between the two halves of the body so that the body can be sewn together, leaving a hole for filling next to the tail.
- Unscrew the resulting cover through the hole left, paying attention to all available corners.
- Fill the toy pillow with filler and carefully sew the edges of the remaining hole by hand or sew on a typewriter.
When filling the pillow, it is important to remember that it should be soft, but keep its shape. You can not use too much filler, otherwise the pillow will be very uncomfortable.
Design details

The design of the toy is also quite a crucial moment. Getting started, it is important to consider the future use and age of the pillow owner. Do not use glued toy eyes or small buttons if such a cat becomes a pillow for a baby. A child can tear them off and inadvertently hurt themselves.
To get bright, beautiful eyes, the pads on the paws were visible, a bright tongue stood out, it is enough to use pieces of matter, sewing them in the appropriate places. Individual details can simply be embroidered using floss.
Features of pillow toy
If you decide for the first time in your life to make a pillow in the form of a soft toy with your own hands, let it be a cat. It is easier to sew such a pillow, it does not require special knowledge, experience and skills. All you need is imagination and a desire to achieve results, bringing pleasure to your family and friends.


