A toilet tank is a storage tank into which water is collected in order to flush feces from the bowl of the vessel into the sewer at the right time. The tank itself has simple design. When people are interested in how to disassemble a toilet cistern, their interest often concerns disassembling the mechanism that is inside, or dismantling the cistern, like individual element the entire structure.
There is a water supply and level control system in each toilet tank. Modern toilets are equipped with sufficient mechanisms complex design.
Apartment owners use (and dismantle, if necessary, repairs) both outdated models and technically advanced ones. The disassembly process can be carried out directly on site - without removing the tank or after dismantling the latter. Which option will be used depends on various factors.
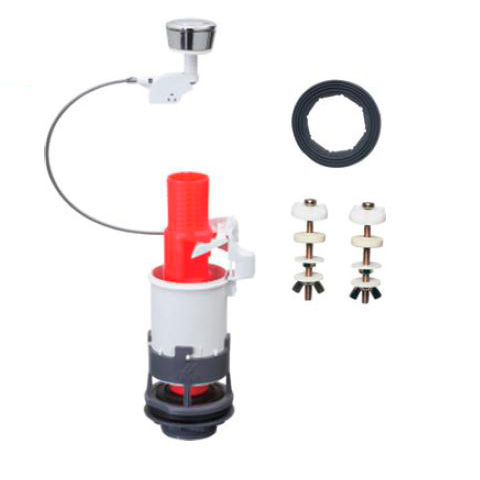
Toilet cistern modern design. Such products are equipped with more advanced mechanisms for collecting and draining water. Non-ferrous metals and plastic are used here as materials for technical fittings. Uses a push-button control system
Typically, dismantling is carried out with the aim of completely replacing the tank along with the mechanism with a more advanced model. The storage tank must also be removed in case of water leakage at the connection points with the toilet. For example, due to wear of sealing gaskets, breakage of fastening bolts, and the appearance of microcracks in the housing. Let's look at how the toilet tank is removed in any of these situations.
Removing the water reservoir on the toilet
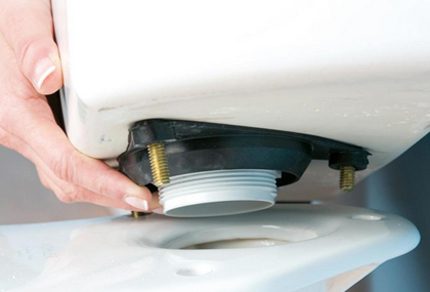
The classic design involves fastening the toilet cistern with just two studs or bolts (d = 5-7 mm). Typically, metal (bronze, brass, steel) studs with double-sided threads for nuts are used as fasteners. Steel fasteners were used on older models. The service life of steel fasteners is relatively short. Sometimes such pins “burn out” from rust after a year of using the device.

Typically, flush tanks are fixed to the toilet body in the rear area. There is a specially protruding shelf for installing the tank. There are two holes on the surface of the shelf, which exactly coincide along the axes with the holes in the bottom of the tank. Most designs support two-point fastening
Fastening to the base of the toilet is usually done through two holes (or through 3) made in the bottom of the tank. The same two holes, in the same axes, are on the rear extension shelf of the device.
Fastening pins are passed through the aligned holes, gaskets are put on them on both sides and tightened with nuts. The cavities of the tank and toilet bowl are united by a common pipe, insulated at the junction with a rubber sealing ring.
Option for mounting the drive according to a three-point scheme. This solution is considered more reliable, as it provides better stability of the container. In addition, fastening the tank at three points contributes to a better fit of the sealing gasket. The risk of leakage in this place is reduced, which means you will have to disassemble the tank less often
The problem of how to remove the tank from the attached toilet shelf is solved as follows:
- Close the centralized water supply valve.
- Disconnect the water supply hose.
- Empty the storage tank by pressing the drain button.
- Unscrew the drain button head and remove the top cap of the tank.
- Collect the remaining moisture inside the tank with a sponge.
- Unscrew the nuts on the mounting studs (on the bolts) under the attached shelf.
Now all that remains is to carefully lift the tank, separating it from the installation site (possibly with some effort, because sometimes the gasket sticks) and then move it to the place where you plan to perform further work.
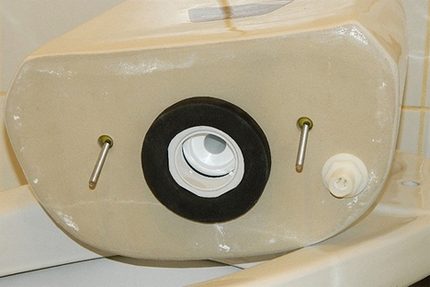
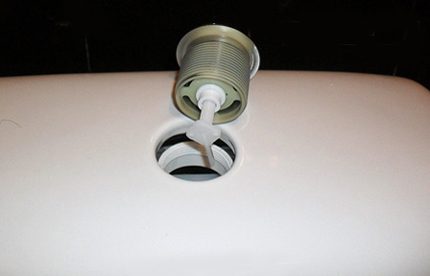
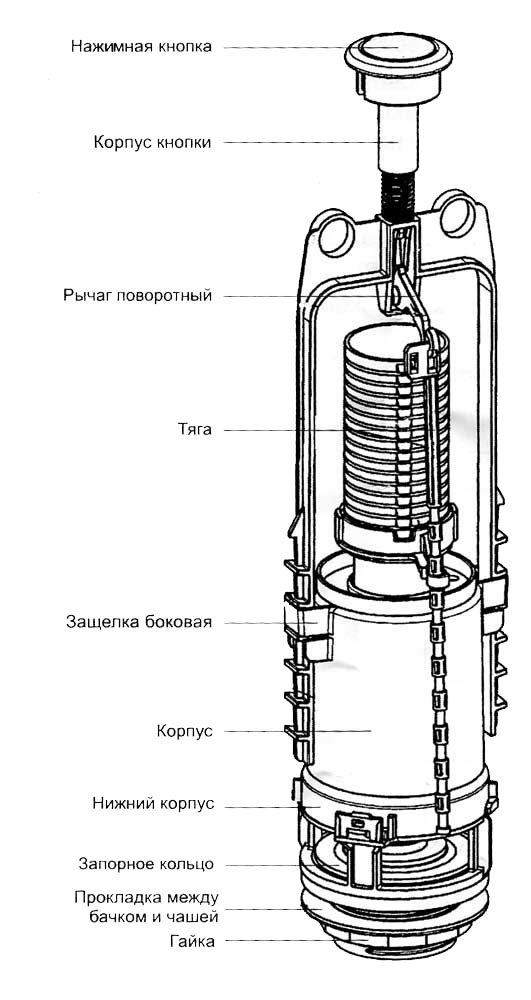
Bottom view of the toilet cistern after removing it from the attached shelf. In the center you can see a rubber sealing gasket covering the plastic nut securing the drain mechanism. On the sides there are two studs for fastening the drive. A little lower on the right you can see the threaded part for the hose of the water supply module and a plastic fastening nut
Disassembling the drain mechanism
Modern models in the mid-price segment usually use a push-button mechanism for double water flush (3/6 liters). One press of any button switches on the operating mode of the drain and fill modules. You can stumble upon the most different variants execution of such mechanisms. However, the assembly configuration for them is the same:
- head with buttons and threaded part for the valve mechanism;
- valve mechanism with lower threaded part;
- sealing gasket;
- valve mechanism fastening nut.
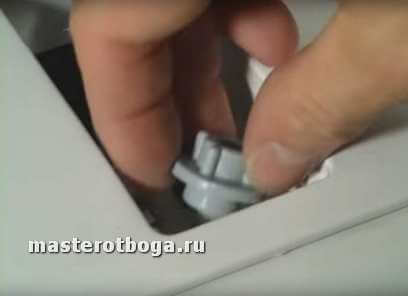
When the top cover is removed, the head with the buttons will already be twisted. All that remains is to remove the sealing gasket from the fastening nut. The gasket (rubber ring) has a pentagon-shaped or circular inner area.
The fastening nut has the same shape along the outer border (not always). When assembled, the sealing rubber ring is placed on the nut. It is removed and the nut is unscrewed. The released mechanism can be easily removed. The filling system is attached using the same method.
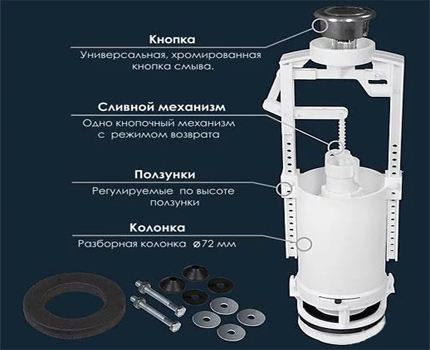
Diagram of most drain mechanisms of foreign and domestic production. One-button control design, which can be found on almost all budget toilets.
The material used for making the fittings is plastic. If repairs are necessary, the mechanism is disassembled, but it is easier to buy a new one to replace it.
How to remove the tank cap
Again, returning to toilet models modern style, it should be noted that users are often faced with the problem of how to remove the covers on such models?
Indeed, these designs are somewhat different from outdated toilets in that they are made more technically, including the fastening of the lid. But in general, the principle remains the same - the cover is pressed with a nut included in the valve mechanism kit.
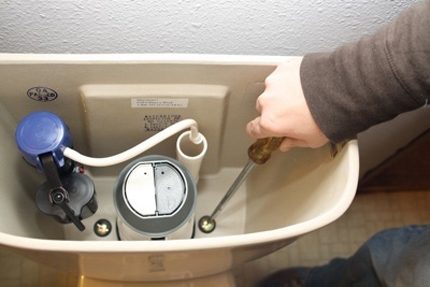
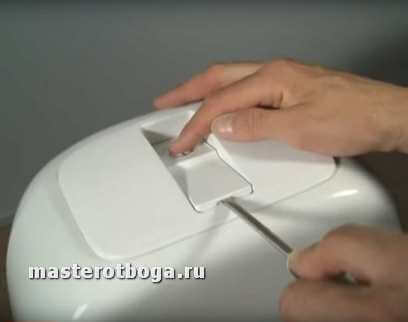
Technology showing how to disassemble a modern toilet cistern, starting with removing the lid. the main task– carefully unscrew and separate the button head. After this operation, the lid is removed and steps are taken to repair (replace) the drain mechanism
On new models, heads with buttons, bottom-button and double-button, act as a clamping nut. To remove the one-button fastener and remove the cover, follow these steps:
- The button is pressed as if draining water and held in this position.
- Carefully turn the head with the button counterclockwise.
- Finally, turn the head with the button out of the valve mechanism bushing.
On different models threaded connection may vary. There is a wide-field external bushing thread, as in the picture below, and there is also an internal bushing thread for a small diameter rod.
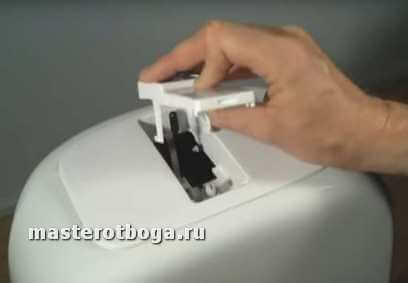
This is what the dismantled head of a single control button looks like. This is just one of the possible configurations. In practice there are different designs push-button heads. This point must be taken into account when starting to disassemble the toilet cistern.
Along with single control buttons, the head of which simply unscrews, there are designs that are more difficult to disassemble, made with latches. Often this solution has two-button mechanisms.
How to disassemble a tank with two buttons
On toilet cisterns, where a flush mechanism with two buttons is installed, there are different methods fastenings With this configuration, it is sometimes impossible to simply unscrew the head with the buttons. In such situations, the disassembly technology is as follows:
- You only need to press one of the buttons (small) into the head body.
- On the opened inner wall, a small groove will open in the lower part.
- Using a screwdriver, carefully press the retainer through this groove.
- Remove one button (large) from the case and then the other in the same way.
- Unscrew the fixing screw located under the buttons.
After these operations, the tank lid with two buttons can be removed without any difficulty.
The process of dismantling the head with two control buttons begins by pressing the small button. This opens access to the mounting opening on the side of the head housing. Through this opening, lightly pressing a screwdriver removes the lock, after which the buttons can be removed and accessed to the fastening screw.
There are also tank designs where, first of all, you need to unscrew the decorative nickel-plated washer, then turn the lid 90 degrees - that is, install it across the container. In this position, press out the fixing brackets located inside the button head bowl. After these manipulations, the cover is completely freed from the fasteners.
Removing an old toilet cistern
A number of outdated toilet models are still in use. It is necessary to repair battered products more often due to significant wear of their components. But the owners of such structures do not have to think much about how to repair or remove the toilet cistern, due to the extremely simplified design.
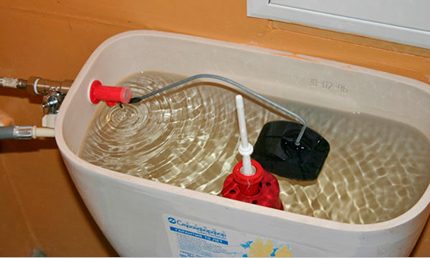
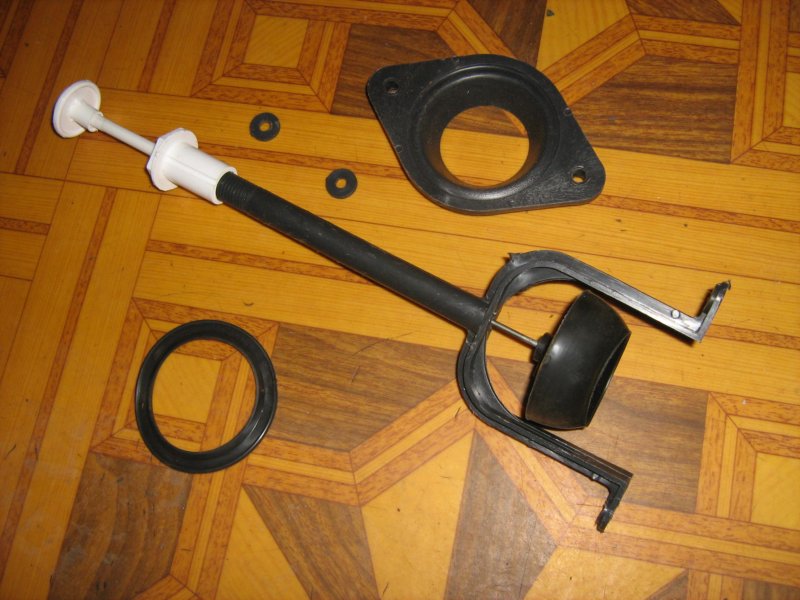
View of the mechanism inside cistern outdated toilet model. Float control system and traction control for drainage. The tank is also attached from below with two bolts. Top cover can be removed easier and faster than on new models
So, to dismantle the same cover, it is enough to twist the handle on the drain mechanism rod and unscrew the plastic (or metal) washer nut. Under the lid inside the tank there is a float mechanism for collecting water and a lever-valve drain mechanism. The valve system of such a mechanism is usually attached to the tank through two additional holes in the bottom.
The tank itself of the old design is removed in the same way as is done with new models. It is necessary to unscrew the two bolted connections in the area of the bottom of the tank. The passage area for water from the storage tank to the bowl on old toilets is isolated with an ellipsoidal sealing ring. Often in older systems there are overflow tubes secured at the bottom of the tank with a plastic nut.
Some models of flush tanks are equipped with mounting screws with screwdriver heads. But it is recommended to traditionally disconnect such fasteners by unscrewing the nuts from below. This prevents the gaskets from becoming deformed. The screwdriver is used only to lock the screw from turning.
To dismantle the lever-valve drain mechanism, you will need to unscrew two more bolted connections that secure the drain mechanism's rocker arm. The water supply module is dismantled by unscrewing just one nut from the outside of the tank body.
First, you need to disconnect the water supply hose from the storage valve. It should be noted: there are models of tanks with water release levers embedded in side wall. On such devices, the toilet lid is not secured at all - it simply lies, resting on the walls of the body.
Malfunctions that force you to disassemble the tank
Typical malfunctions that force disassembly are often:
- leakage during flushing in the area of the gasket at the connection between the tank and the toilet bowl;
- leakage in the places where the storage tank is attached to the toilet shelf;
- dysfunction of the drain mechanism;
- dysfunction of the water collection mechanism.
Leakage problems are often eliminated by simply tightening the fastening nuts. The functionality of the drain and set mechanisms may be impaired due to insufficient water pressure in centralized system. Therefore, before you start disassembling, you should make sure that there are no other possibilities for eliminating defects.
Defects in functional fittings
If there is an involuntary flow of water from the reservoir into the toilet bowl, most likely the lock ring is defective. It needs to be replaced. The same effect can be observed when the closing mode of the mechanism does not work. Possible reason– control button jamming.
Insufficient filling of the container with water indicates some defects in the dial module. Often the cause is the displacement of the float on the limit bar or its contact with other parts of the mechanism (the wall of the tank). A complete lack of drainage is possible due to a non-working dial module or drainage mechanism.
Plumbing care
When disassembling plumbing fixtures, each user should remember the principles of ceramic care. This has a direct bearing on repair work.
Ceramic products impact resistant chemical substances, but are easily damaged by cleaning with metal mesh, abrasives and other similar substances. Cleaning household plumbing after repairs should be done with soft substances and materials.
Video: how to replace the drain mechanism
Some practical advice will help you cope with self-adjustment fittings.
Briefing before performing repair work household appliances with your own hands is a voluntary matter. However, extra information never hurts in any endeavor. The more information there is about a specific object, the simpler and easier it is to perform all actions. Disassembling modern toilets, despite the simplicity of the steps, also does not exclude reference to the instructions.
Modern plumbing is very fault-tolerant, but sometimes its maintainability leaves much to be desired. Even experienced plumbers sometimes stop at a loss, not understanding how to remove the lid from the toilet tank or adjust the fill valve.
We will look at the main points of repairing the now common kits in this article.
Removing the cover
Option 1
Let's start with the simplest scenario.
How to open the toilet cistern lid, if we are talking about a domestic set of fittings with a lifting plastic handle stock?
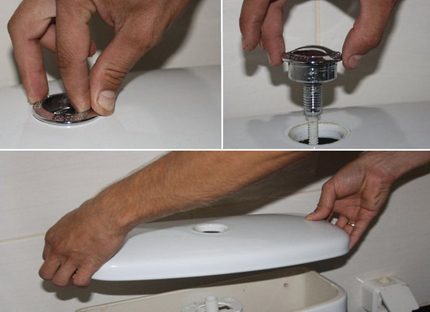
- Unscrew the plastic handle while holding the rod.
- We unscrew the brass or plastic hollow screw screwed into the guide rod tube.
- Remove the plastic washer under the screw. The cover is free.
Option 2
In most imported kits, the lid is held in place by a drain button. More precisely, its headband.
The procedure is as follows:
- With dry fingers, grab the rim and turn it counterclockwise.
Please note: in order to remove the nut, quite a lot of force is sometimes required.
To prevent your fingers from slipping, you can use rubber gloves. But you should use a gas wrench only in as a last resort: appearance the rim will be irreparably damaged.
- Having removed the nut, unscrew it completely.
- Pull the drain button up, pull it out and remove the lid.
Option 3
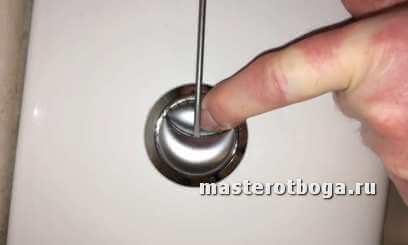
How to remove the toilet tank lid if the rim does not turn when applying significant force?
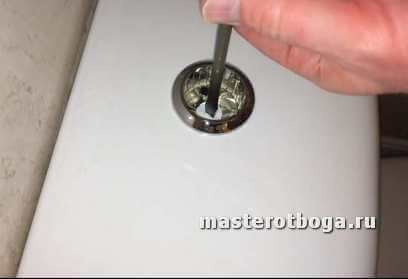
- Armed with a thin screwdriver, we grab the edge of the pressure part of the drain button and carefully remove it.
- Underneath there is a nut that can be turned with your fingers, tweezers or pliers. We unscrew it counterclockwise, then remove the drain button. The cover is free.
Option 4
In some tank designs, the drain button is screwed to the lid with a nut located on the back side. The button is a lever mechanism that, when pressed, pulls the chain and raises the flush bulb. Feature design: when you try to remove the lid, water begins to flow into the toilet.
The cistern lid for a toilet of this type is removed as follows:
- Turn off the water to the tank.
- Lift the lid just enough to fit your fingers under it and unhook the lever hook from the chain.
- Remove the cover.
Please note: it will be quite inconvenient to hook the button again. Long tweezers will make the task a little easier. When removing the lid, remember which chain link was on the hook: this will save you time that you would otherwise have to spend adjusting the drain mechanism.

Replacing the drain mechanism
Option 1
If you have a new tank with imported fittings, replacing the drain mechanism is indecently simple. It is a one-piece structure that does not require dismantling the tank for replacement.
The exhaust, seat and cuff between the reservoir and the shelf will remain the same: kits of this type are compatible with each other.

- Turn off the water to the tank.
- Remove the drain button and cover.
- Turn drain mechanism clockwise a few degrees and pull it up.
- Clean the outlet and the seat against which the gasket is pressed of any deposits or small debris.
- Install the new drain mechanism and turn it counterclockwise to secure it.
- Turn on the water supply and make sure that the mechanism completely shuts off the drain when closed.
By the way, a situation where a complete replacement of a unit is necessary is rare. In most cases, a water leak problem can be resolved by cleaning the seat or replacing the O-ring. The operation takes no more than a minute and does not require any special skills.
Option 2
For domestic kits with a separate shelf, replacing the drain mechanism is much more difficult.
No, all operations are intuitive; but the amount of work to completely replace the unit will take much longer.
- Turn off the water to the tank.
- The lid for the toilet tank is removed after the nut under the flush handle is unscrewed.
- Then disconnect the flexible line from the fill valve.
- We unscrew the bolts holding the shelf and, often, the seat with the lid. Polyethylene bolts and nuts can be easily removed by hand; If brass or galvanized bolts were used when installing the kit, you will have to arm yourself with pliers and an adjustable wrench. Steel bolts without anti-corrosion protection will have to be cut with a hacksaw blade.
- Having pushed the tank back, we pull out the outlet of the shelf from the conical cuff. Be prepared to replace this cuff: the rubber loses its elasticity over time, and the connection may leak after assembly.
- We place the structure on flat surface and sequentially unscrew all the bolts. Of course, avoiding distortions, strictly in pairs. Steel bolts, if some kind soul blessed the toilet owner with them during assembly, will have to be cut down.
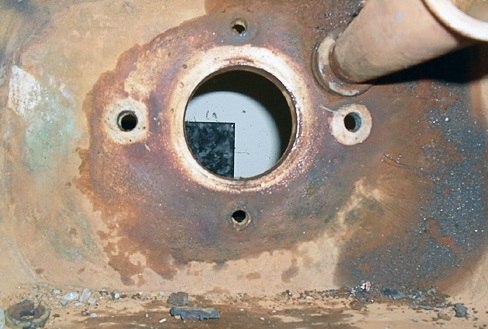
- Having separated the shelf and removed the drain mechanism, carefully remove all debris and deposits around the holes.
- We install the new mechanism, not forgetting to install a gasket under the brass seat. Regarding the bolts, the rules already known to us apply: they are tightened strictly in pairs, one at a time - two turns at a time and without excessive effort.
- We attach the shelf. It is better to replace the oval gasket under it: it has probably ceased to be elastic. In extreme cases, applying it to both sides will help out.
- We check the structure for leaks: plug the shelf outlet with a rag and fill the tank with water while the bulb is raised.
- If not, check the tightness of the drain: fill the tank with the bulb lowered.
- If everything is in order, you can install the tank in place. The conical cuff is pulled over the outlet of the shelf and rolled up to it with a wide socket. After the shelf fastening bolts are tightened, roll out the cuff onto the toilet bowl socket.
- We connect the flexible hose and turn on the water.
- After all equipment has passed the performance test, the toilet tank lid is installed and secured with a nut.
Replacing and adjusting the fill valve
Replacement involves unscrewing the nut securing the old valve and tightening a similar nut on the new valve. Of course, there must be a rubber gasket on the inside of the tank to ensure a tight seal.
However, there are a couple of nuances associated with installing the fill valve.
- Fittings with bottom connection are often equipped with plastic filter fine filter, which should be placed between the fill valve and the hose. Throw it away immediately: it will constantly become clogged with fine sand, which is safe for the operation of the valve. A coarse filter at the entrance to the apartment is much more effective.
- Flexible eyeliner connects without tension and bends with a small radius. The load on the fitting will significantly reduce the already short service life of the hose.
Attention: when tightening the union nut, do not use too much force. Not only are they unnecessary for soft padding; Excessive force can also cut off the threads on the valve.
How to adjust the valve actuation level in modern kits?
There are two options.
- The float can move with some effort along a plastic rail with projections. To raise or lower it, just move the rack to the wider part of the hole in the float slot.

- Screw adjustment is no less common. The float is adjusted by turning (using a screwdriver or manually) a long plastic screw.
Conclusion
Unfortunately, the abundance of various design solutions does not allow us to describe in detail all reinforcement designs. As always, the video in this article will provide more visual information.
A toilet malfunction is a rather unpleasant situation, and in order to eliminate the breakdown, you must first disassemble the structure. It is not always possible to call a plumber, and you have to deal with the problem on our own. Each of us knows that for the normal functioning of a toilet connected to a centralized or autonomous sewerage, you need to ensure uninterrupted operation of the drain tank.
The most common malfunction of the toilet is precisely the breakdown of the flush valve of the tank. Fixing this problem is not a difficult task, but to do this it is necessary to correctly disassemble the tank structure. IN this material will be served step-by-step instruction and some important recommendations on how to disassemble a toilet cistern with a button. First, look at the photos of the mechanisms used in modern toilets. The picture shows where the flush button is located and how it is attached to the device:
 |
 |
How to properly disassemble a toilet cistern with a button? And what will you need for this?
In most cases everything modern toilets have a similar design, but there are some modifications that differ from the standard options. With the old models it was much simpler; there were no difficulties with how to disassemble the drain tank.
Let's look at several options for the location of buttons on the toilet cistern:
Modern designs are designed in such a way that it can be difficult to simply lift the tank lid. But, nevertheless, it is quite possible for anyone to do this work; for this you will need: a flat-head screwdriver and any metal object with a flat end.
Step-by-step instructions for a standard tank design with a button from manufacturers such as IDO, IFO, etc.
- We take a screwdriver and slowly turn the ring around the button counterclockwise. Having moved the ring using these steps, we then unscrew it by hand.
- Unscrew and take out the ring.
- Now lift the lid a little and turn it 90º, it should be located across the tank. This way you can remove the double-sided clothespin that secures the button. To do this, you need to rotate one end to the left and the other to the right, so the clothespin will spin in the center.
- After this, you can easily remove the drain tank lid.
- Having eliminated all malfunctions of the trigger mechanism, it is necessary to check the operation of the toilet in the open position.
- After making sure that the device is working properly, we assemble the structure in the reverse order.
How to disassemble a toilet cistern with a double button?
- By lightly pressing one of the halves of the double button, we find inside the other half has a slot, catching on which you need to remove the second half of the button. To do this we use a flat screwdriver.
- In the hole where the button was, you can see a slotted screw that needs to be unscrewed.
- Then you can lift the tank lid a little. Lifting it, rotate it 90º and place it across the tank. You can already remove the clothespin that holds the button.
- Remove the lid of the drain tank.
- We carry out renovation work, and check the operation of the toilet when open.
- We assemble the structure in reverse order.
When carrying out any plumbing work, you must follow safety rules. To be more confident, you can clearly read the instructions by watching how to disassemble a toilet cistern with a video button. And one more thing, if you do not understand the toilet system at all, it is safest to use the services of a professional plumber. Unknowingly, you can not only damage the integrity of the device, but also lead to flooding of your neighbors.
It is very important that the devices work properly and perform their function stably. This also applies to the toilet. How often do we use such a simple, but very important device? Every day and more than once. Therefore, if something in its mechanism fails, it will inevitably lead to problems. As a rule, something breaks in the tank, and in order to fix it, you need to go into its depths. In this article, we will figure out how to remove the toilet tank lid.
Why do you have to remove the cover?
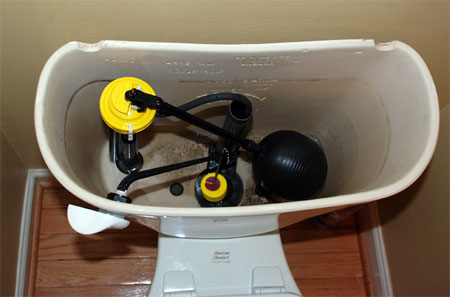
The parts inside the toilet cistern can be divided into two components: the water drainage mechanism and the water intake mechanism. Water is drawn to a certain level, after which the shut-off device (valve) is activated. When we press a button or pull up the release lever, another locking device (elastic band, bulb) rises and water is poured into the toilet.
Everything is simple in principle. These mechanisms are adjustable depending on the dimensions of the tank. They are usually made of plastic, some rubber parts, and can deteriorate over time. Therefore, if you notice problems, you need to go inside and either adjust the devices or change them. If you decide to look inside the tank, then you have one of these problems:
Water constantly pours into the toilet.
There is no water drainage.
Insufficient amount of water when draining.
Water runs from under the tank.
Some general rules.
These rules apply to the assembly and disassembly of any mechanism; they should also be observed when disassembling the toilet cistern.
1) When you disassemble any device (part, assembly, mechanism), remember the order of your actions so that there are no problems during reassembly.
2) Do everything carefully: fold fragile parts so that they do not break (this also applies to the ceramic tank lid), put all fasteners in one place and so that they do not fall under your feet during work.
3) If something does not unscrew (does not come off, does not turn), then most likely you are doing something wrong. When disassembling a mechanism that is unfamiliar to you, apply your efforts gradually. Grandfather's method of hitting it harder with a hammer to make it work won't work.
So, let's start from the simplest. How to remove the toilet tank lid without a button. All old-style toilets and some new models have such a device. The lid is not fixed to the tank in any way and in order to remove it, you just need to unscrew the cap on the release lever.
![]()
How to remove a toilet cistern lid with a button.
Majority modern models Toilet cisterns have exactly this structure. The button has a thread on the end and simply turns counterclockwise. For convenience, it is better to press the button (to drain the water). Then calmly unscrew it with your thumb and forefinger.
How to remove a toilet cistern lid with two buttons.
In this case, the button should not be unscrewed, but simply removed from the glass (base). To do this, one of the buttons should be recessed, then the second one should be pryed off with a sharp object, for example a flat-head screwdriver.
There will definitely be fasteners under the buttons; these can be nuts, hooks or screws, depending on the model of the toilet cistern; by unscrewing them, you can remove the button and remove the toilet cistern lid.
How to remove the toilet cistern lid from foreign manufacturers.
Ifo.
Remove the button using a flathead screwdriver. Under the button we find a 12 nut and unscrew it with a socket wrench. Then he removes the glass, which is held in place with the help of special pushers. They should be pressed simultaneously and at the same time pull the glass up. Then remove the cover. A short video will help you deal with the toilet of this brand.
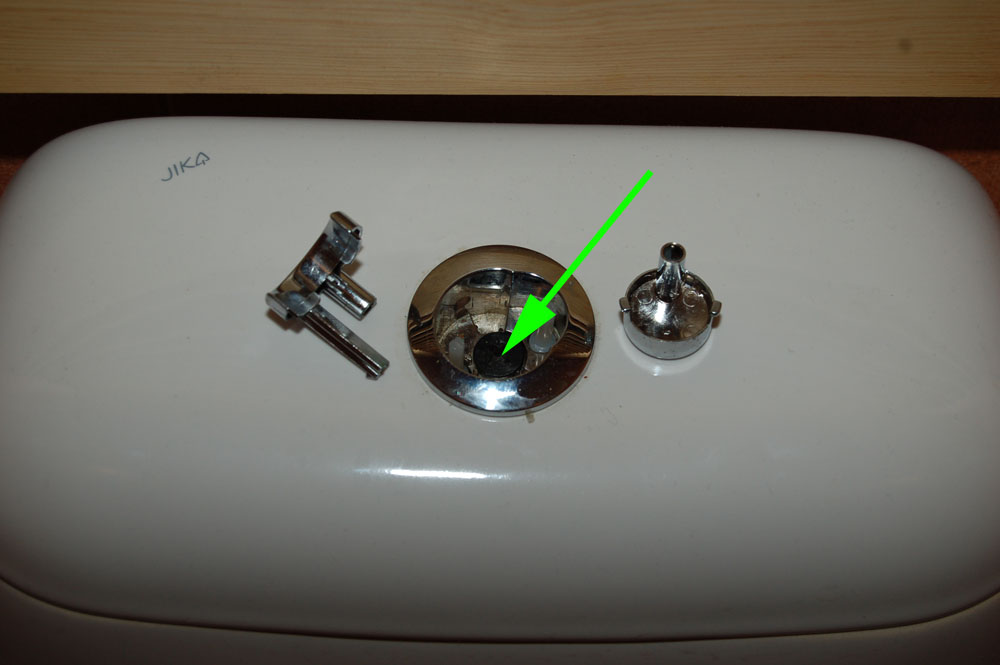
Jika.
How to remove the toilet cistern lid on this model? Carefully remove both buttons. Under them we find a screw that can be unscrewed using a Phillips screwdriver, then we take out the glass. Ready!
Gustavberg.
We press the button and find a slot at its end. This slot is made so that the button can be pulled out by inserting a flathead screwdriver into it.
Then we pull out the button.
Under it we find a plastic nut, which can be unscrewed with a special key or using pliers. You should unscrew it carefully, the plastic elements are quite fragile.
That's all science, now you can imagine how to remove the toilet tank lid similar device. As you can see, the parsing scheme is almost standard. You just need to remove the buttons and see what kind of fasteners are installed under them, and then disassemble that too. Usually the manufacturer takes into account that people will look into the tank from time to time, and therefore tries to make everything as simple and clear as possible.
Finally.
Let’s summarize briefly to finally understand how to remove the toilet tank lid. If the device has a simple lever, unscrew the cap. If there is one round button, unscrew it counterclockwise. If there are two or one buttons, but it has a non-standard shape (square, triangular, oval), take out the button and look at what’s under it.
Dear visitors site , I hope this article is useful to you and will help you when repairing a toilet of any type and manufacturer.


