To begin with, we must somewhere find the layout that we want to end up with or draw it ourselves in a graphic editor, Photoshop is very convenient for me, if you use another program, then this is your personal convenience.
So, if you have found a ready-made template or have already drawn it in Photoshop, then you need to transfer the drawing to paper, I printed out various pieces of the layout on my personal printer at home, and then glued them together, if you don’t have such an opportunity, then contact the print service and you can print your entire template on whatman paper if it is large.
Making layouts, stencils, templates for inscriptions, letters and beautiful frames for sawing out of wood to order!
The cost of a template with an inscription is 50 rubles, a template for a beautiful frame or a composition of words from 100 rubles, the price depends on the complexity and size of the stencil.
The completed template will be provided to you in 2 formats, in Photoshop format and as a regular picture. .
Models of my work:


To make various inscriptions from wood with your own hands, you will need different fonts, you can choose them on a very good site - www.fonts-online.ru, on which you can write the text you want and see how it will look in different fonts.
From my practice, the most popular and beautiful fonts are:
- Nautilus Pompilius
- Lobster
- Arctika Script
- teddy bear
- Mon Amour
So, we got a drawn layout on paper and now we need to transfer it to plywood, for this we take carbon paper, put it on plywood, put our template on top and fix it with clerical studs (buttons), you can also simple small carnations. And of course, we outline all the contours of our layout with a pen or pencil, be very careful not to miss anything.
As in any other work, there are always mistakes and failures, having gained bitter experience, I want to warn you against my mistakes and give you some advice:
- When sawing out the curly parts of the product, it is necessary to use a special nail file for curly carving, the nail file is marked T101AO- this nail file allows you to make a very clean cut and at the same time it is very convenient for her to turn even in the most difficult places;
- To make holes in the closed contours of the product, use a special drill for wood, buy drills of various diameters, as sometimes closed areas come in unpredictable shapes and sizes;
- I advise you to cut the product from closed contours, as in a single piece of plywood there is less load on the entire contour of your workpiece, and you will not break it.
- After sanding the wooden inscription, you need to open it with varnish or paint it, and here I advise you to use varnish and paint in spray cans (you can use automotive paint, but there are universal ones), I don’t advise painting with ordinary enamel with a brush or sponge, because the look of the product becomes, to put it mildly, not beautiful, and you are unlikely to be able to paint over the workpiece in all places!
If you are not confident in your abilities or you do not have necessary tool to perform such work, you can order any product you like. Just place an order on our official website.
An experienced person, of course, can quickly determine where front side plywood, for beginners I will explain. Often on the draft side there is a large number of there are significantly more knots than on the front side. On the front side, the wood structure is finer than on the rough side. You can also determine by the notches on the side of the plywood, at the rough surface on the side of the plywood you will see small notches, and the front side will be clean and even.

What you need to make an inscription or word from wood at home:
Plywood, Electric jigsaw, Sander and sandpaper with coarse and fine grains (you can also use your hands), Pen or pencil, Product layout, Copy paper, Push pins (carnations), Drill with a drill for wood, Natfil for removing burrs in hard-to-reach places, Paint in cans.
So, you have all the tools and the translated blank on plywood. Now you need to make holes in closed contours, after which they need to be cut. And then start cutting out the entire outline of the inscription or frame. After painstaking and not easy work, you have received a finished wood inscription, which now needs to be processed grinder and natfil. According to your desire or the desire of the customer, you can open the word from wood with varnish or paint, preferably in several layers!
That's all you need to know in order to make your own beautiful inscriptions from wood, if you don’t understand something, you can write to me at
Today you can find everything in the store. But sometimes you often want to invent something with your own hands. In our case, these will be woodcarving-style plates. The topic of today's article is: "How to carve letters from wood with your own hands." Consider a few master classes on their manufacture.
First lesson
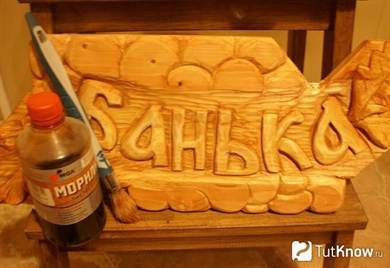
We will make a plate for the bath, you can do it yourself, without spending a lot of money and without overpaying someone for work.
So for work you will need the following tools and materials:
- Wood;
- Ruler in the form of a triangle;
- Simple black pencil;
- Saw;
- Lacquer for furniture coating;
- stain;
- Sandpaper;
- Brush for application.
Step by step manufacturing process.
We cut out a plate from a rectangular board, as shown in the photo.
We find a sketch of the word on the Internet, redraw it on a plate.
If you are afraid to draw on your own, you can print a sketch on a printer and transfer it to the material through a carbon paper.

To make the words look more interesting, we suggest you draw leaves or, for example, brooms for them. Once the plate is made for the bath.

Let's move on to wood carving. The carving technique is simple, so even a beginner can handle it. To work, you need only three types of cutters - a jamb, a cutter, a chisel. With the first type of cutter, it is necessary to make an incision along the entire contour of the word, with the second type we select the drawing, then the letters are voluminous.

You can also make steam as a decor, as shown in the figure. We sand the finished plate with sandpaper.

We cover the finished plate with stain. You can apply it in two layers, again we go through the letters with sandpaper.
We varnish the finished product. We clean in a dark place until completely dry. After that, you can safely use it for its intended purpose.

We create inscriptions
To work, you will need the following:
- Sketch with an inscription;
- Plywood;
- Carbon paper;
- Sandpaper;
- Drill;
- Jigsaw;
- Colorless varnish;
- Simple black pencil.
Step-by-step process of creating an inscription.
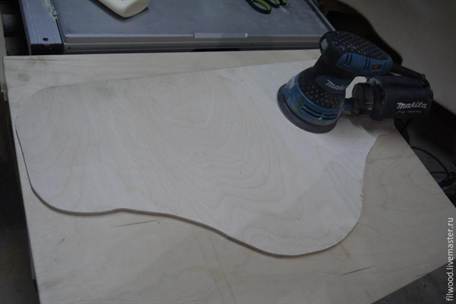
We lay the plywood on the desktop and sand it to level the surface. We transfer the finished sketch to the prepared surface.

It will not hurt if the inscription is re-applied. First of all, it is necessary for your own convenience.


Using a drill, we drill out places near the letters, which have a closed contour.

When working with a drill, you do not need to put pressure on it, otherwise the plywood will begin to crack, and the inscription will not work.

Now the work requires increased attention. Indeed, with the help of a jigsaw machine, we produce the most complex cuts.

When working with electric jigsaw safety precautions must be observed, the most important thing is not to rush when cutting.


The finished inscription must be sanded. This process must begin with the front and reverse side. After we sand the side parts of the inscription.


The inscription is completely ready, it remains only to color it. But it's up to you. A prerequisite is to finish with a colorless varnish. Leave until completely dry.
Here's what happens as a result of the work:

That's all, and the master class has come to an end. As you can see, such an inscription can be made by yourself. The main thing is to have the necessary tools with you.
Master class number 3
To work, you will need the following tools and materials:
- The shield is pine, the thickness of which is 18 mm;
- Plywood sheet 6 mm and 8 mm thick;
- stain;
- Lacquer for painting;
- Electric jigsaw;
- Jigsaw machine;
- Drill;
- Frazier;
- grinding machine;
- Pipe strings.
Today we will make a sign for the house. So let's get started.
In the program "Photoshop" we make an inscription for our house. We print on the printer, here's how it should turn out.

The resulting sketch must be attached to the pine material.

Numbers and letters must be glued separately, as shown in the photo.

So, let's move on to cutting the frame. It should come in two parts. Here's what happens:

The sawn parts must be glued together. We wait until the glue is completely dry.

In the meantime, we begin to cut out letters and numbers. In closed letters, it is necessary to drill the middle.

After we begin to cut out from the inside, and only then proceed to the outer sawing.

That's all, all components are ready.

We grind the blanks, thereby removing the paper.

Here's what happens:

By then, the frame should be completely dry. Let's start sanding.

From plywood 8 mm thick we cut out the background of the plate, we begin grinding.
We cover with stain from the front side.

Sandpaper to sand the letters and numbers.

The background part and the frame must be glued together.

From the background it is necessary to cut off excess material.
Here's what should happen:

The frame with the background is completely ready. Now we move on to gluing the inscription itself. Here's what happens:

We cover the finished sign with a colorless varnish, it is advisable to do this in several layers. Remove until completely dry.

On this, our plate is completely ready. It remains only to make places for attaching the plate itself. Feel free to take it and hang it.

We also suggest that you familiarize yourself with video tutorials that will help novice masters understand this craft.
Video on the topic of the article
Words or letters made of wood can always decorate any photo, as well as decorate your home. This is a great element of decor, because such a thing always catches the eye of guests, and pleases us. Making a word out of wood is not an easy task, it will require a lot of attention, patience and time. Men will be more capable of such work, because in creating such beauty one cannot do without a rough tool and skills in working with wood.
And so, let's start our work. In order to make a word or letters from wood, we need a piece of wood, for example plywood is very good for a gift. And tools are also needed, such as a jigsaw, a pencil, a piece of paper, a drill and a grinder.
Let's get started!
1 . First of all, you need to decide what inscription or letters we want to cut out of wood. It could be anything. In our case, we will make the word "Happiness". To make a layout of this word, we use a computer and print it on A4 sheets. Depending on the size, the number of sheets will be different, we needed 2.
2. After the layout has been printed out, it needs to be transferred to plywood. We use carbon paper for this. We fix the inscription and copy paper well to the plywood and begin to redraw the contours of the word. Here's what we get:

3. Now we need to cut out the word along the path. There are several options for how this can be done, their difference is only in the tool, namely in different types jigsaws. Best to use stationary jigsaw, but it is not very popular, so not everyone has one. Next in ease of use is ordinary electric jigsaw, it is to them that we will cut our word. If there are no electric jigsaws, we can use manual ones, but then a lot of time will go into the cutting process.

4. The internal holes in the letter "A" and "E" can be made with a manual jigsaw. To do this, first we make small holes with a drill, and then we put a jigsaw saw into the hole and begin to cut out the forms.

5 . The inscription is cut out - now you need to clean it up so that it is beautiful, not sharp and pleasant to the touch. To polish a word, we can use different ways, from automatic to manual. For grinding, we use all the means available to us, it can be a grinding machine, or simple sandpaper. Our inscription should be very smooth.

6. And the last step is painting our plate. To change the color we use acrylic paint. We cover the plate in four layers so that it has a beautiful appearance.

Here's what we get as a result!
VIDEO. How to make letters from wood?
Wood words. PHOTO.


All photos from the article
If you are interested in interior design, you could not help but notice that many specialists very often use such a decor option as individual letters or even entire inscriptions from plywood sheets. This material has a whole lot of advantages and is great for decorating rooms. In addition, these products have very great advantage- they are made by hand and each inscription is unique and unrepeatable.

The main advantages of such products
To begin with, we will tell you what advantages this type of product has as letters and inscriptions:
| Uniqueness | You can choose any type of font and make it in any style you like, this allows you to emphasize the features of the environment and make it more comfortable and original. In addition, you can paint the elements in any color that suits your conditions best. |
| Democratic value | The cost of products is low, you will not spend a lot of money, since even the waste left after finishing can be used for work. And if you buy material, you will not incur large costs, since the price of plywood is low. For work, options with low moisture resistance are also suitable. |
| Availability of plywood | You can buy the raw materials necessary for work in almost any store. building materials, it is important to determine in advance optimum thickness to get the best result |
| Ease of processing | Most often, in order to carry out the work, you also need sandpaper for grinding the surface and ends. Even those who have never performed such work can make letters or entire inscriptions. Below we will look at the whole process, and you will see for yourself that there is nothing complicated in it. |
Important!
Remember, the more complex the inscription, the more time it will take to work, so for the first time it is better to choose options with a simple font with a minimum of bends and various decorative elements.

How to carry out work
Now let's figure out how to make words out of plywood with your own hands. The process is quite simple, but if you have never done such work, then familiarize yourself with them. correct sequence it is necessary without fail so as not to spoil the material.
Preparation
The production of words from plywood consists of two stages, and the first of them is preparatory, the final result directly depends on it.
Need to be done whole line works:
- First of all, you need to decide on the size finished product, and for this you need to know in advance where the inscription will be located and how much space it should take. It is very important to determine all the parameters in advance in order to understand exactly what the final result will be in the future;
- Next, you need to find the font itself, which is suitable for your project. You can consider the options that are in office applications. There are also many various types inscriptions on the Internet, you can download the desired package and install it, the easiest way is to work using Photoshop.


