Portable quick-assembly cellular table FRIENDLY-K - inspiration from fellow countryman Reuben Boyko.
Designed for sawing/cutting sheet/roll materials, carpentry and installation work.
- Saves your strength and health
- Promotes material savings (reduces unproductive waste)
- Convenience and safety of work anywhere
- Sawing directly on the table surface
- Possibility of installing machine tools
- Construction site (horses) for work by 2 people
- Fast easy assembly
- Compact transport dimensions
- Strength with reserve
- Durable, waterproof material that's easy to keep clean
On a cellular table, high-quality cutting of plywood, MDF, gypsum board, timber, boards with longitudinal and transverse cuts can be performed using hand-held power tools without damaging the table structure.
Depending on the thickness of the material, they can be used saw blades with a diameter of no more than 290 mm.
The table can withstand a load of at least 350 kg and is used as an assembly table or trestle for work at heights.
The table is produced in basic length sizes: 2000 and 1400 mm. A model with a length of 1000 mm is made to order. The basic transverse width of the table is 1000 mm.
The table's quick-assembly design allows it to be deployed from its transport position in 4 minutes. The table is assembled on precisely fitted counter grooves without tools or fittings. The counter elements are fixed with little effort. To assemble/disassemble the table, it will be convenient to use a mallet with a rubberized striking part.
For easy carrying, the table has a shoulder strap, leaving your hands free for other tools. For transportation, the table is assembled into a transport beam with all elements secured with wing bolts through slats and legs arranged in a certain order. Assembling the table into transport position requires some attention, but ensures that no parts are lost.
It is just as much more convenient to carry out usual work on a portable cellular table, as it is more comfortable to work in the light than in the dark. Craftsmanship and skill allow you to do a lot by weight, on your knees, use a transforming stepladder as a support, or quickly make a sawhorse from scrap materials - all this is not the same! None of the above will allow you to take a comfortable position, place a 3-meter long sheet on the tabletop and carry out a straight continuous cut along the entire length of the material, without interrupting to preserve the supporting elements. And on the cellular table from FRIENDLY-K you can do this with ease. You can also easily assemble it at the installation site electrical wiring and lighting, painting and any other work under the ceiling. The Model 2000's desk comfortably and safely accommodates two large men with equipment and consumables. Can be used as a tabletop Construction Materials on site or portable intercellular worktop FRIENDLY-K.
The FRIENDLY-K honeycomb table is made of laminated moisture-resistant plywood; intercellular tabletop - FSF plywood. Round holes in the slats and tabletop are made to facilitate the design, taking into account the resistance of the material, for installing clamps and hose wiring construction vacuum cleaner And power cables(for long-term use for stationary electrical equipment).
Sawing of table parts is carried out using high-precision equipment with tolerances accurate to tenths of a millimeter. To facilitate assembly and safe operation, the table parts have rounded counter parts and ends facing the person. The width of the table slats and the depth of the joining cuts ensure a rigid and safe position of the legs, eliminating the risk of breaking under sheer loads. However, if two hippos are spinning hula hoops on the table, then when they enter resonance, the legs of the table will break.
Optionally, the FRIENFLY-K table is equipped with:
- a set of slats for modifying tables to a transverse width of 600 mm for carrying into interior doors and work in narrow spaces;
- set of intercellular table tops for installation, finishing works, installation of desktop equipment and use as a sawhorse.
In the electronic order in the store, you can order options for models 2000 and 1500. If you need options for the 1000 table, you can indicate this in the comments to the order.
Typically, when purchasing a honeycomb table, FRIENDLY-K is made to order. The order execution time is 8 days. Check to see if the model you need is in stock for prompt shipment!
This is a wonderful product aimed at DIYers and professionals. Both yesterday's insurance agent, who has finally become a man with hands, and a category 5 electrician need a high-quality portable table, which, after use, can be wiped off and loaded into the interior or trunk of a clean passenger car, along with the precious makita and favorite overalls).
This table is also convenient for trimming sakura branches in your garden. And on the FRIENDLY-K table covered with a tablecloth, a dish from a barbecue master looks great.
Welcome to our page " Multifunctional workshop table - idea Festool table MFT 3 (Festul MFT)"!
In this overview photo and video gallery, Arsenal Masters specialists have made a selection ofoto and video on the topic of variations of the multifunctional table Festool MFT 3: modifications, improvements, adaptations and homemade options.
* This photo review was created for informational purposes and is not a product. You can print this page yourself and for free.
You have interesting photos, ideas, suggestions? You can send for inclusion in this review (with an explanation and your data as the author) via or email: . You can write your comments in the reviews on this page.
It is not for nothing that the Festool MFT /3 table has gained popularity all over the world among Craftsmen working both in workshops and on the road. MFT - Multi Function Table is a combination of a mobile desktop and a workbench.

Its main advantage: versatility and ease of use.
Its popularity is due to the fact that the manufacturer combined the convenience of joinery solutions (with fastening stops and clamps on the tabletop in mounting holes) with a solution? came from the machine tool industry, where aluminum profiles Almost any equipment can be installed with a T-slot.
You can see the idea and possibilities of use in the video from Festool on the MFT/3 table:
View all purchase options in the catalog with prices
We have divided this collection into topics:
1. Improvements to the Festool MFT3 table and expansion of its capabilities
If the Master lacks the standard capabilities of a product or something seems unfinished, then he begins to improve it at his own discretion. And the main thing here is not to overdo it. But if you approach the matter with all passion, you get a successful solution. Some of these good decisions we'll show you.
MFT3 table is initially mobile. Accordingly, its legs are not stable enough for stationary serious work, even with a diagonal crossbeam. But I would like to use its capabilities to the fullest. So the first thing we came up with was to install the MFT table on another more stable desktop. And MFT with legs folded or removed allows this. There are many options, but the essence is the same:


The same one with “adult” wheels:

Base on aluminum profiles:

And compounds:


Video:
The process of making such a table can be seen in the video:
An extended version of the MFT/3 table, assembled using original components. Side extended profiles 2 meters long are custom items that you can order from us.


Additional "body kit":


2. Homemade table options

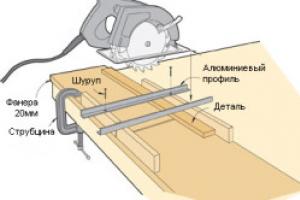
An interesting implementation of the idea of the MFT 3 table from Nizhny Novgorod master Maxim G. Here, instead of standard round holes Rectangular windows are cut out in the top panel of the tabletop. Clamping the workpiece using these windows is much faster than using holes. A standard machine profile with a T-slot is installed in the side trim board of the table top. It ensures work with the same clamps.

The idea of a table with a framed cellular underbench is interesting. Simple and functional. The table can be made using the Kreg miter jig: 


By table with frame cellular underbench:
Another interesting option cellular workbench from mirock's woodshop:


Video: how to make a cellular workbench from mirock's woodshop
Semi-stationary multifunctional table Masters from their native Fatherland. Simple design, available materials- an excellent budget solution:

And a video review of it:
One of the most popular tables in the image and likeness of MFT 3 is the Multifunction workbench mobile table project (abbreviated MFTC) from Timothy Wilmots.


Video of homemade multifunctional table MFTC
Stationary options:
Stationary MFT table options require a good, stable base. Craftsmen use a variety of solutions.
The simplest ones are, of course, the most budget-friendly:


The simplest can also be in the form of a cabinet:


For example, when using even inexpensive materials(plywood, MDF, pine bars and simple), you can achieve excellent results. You just need to be careful, fit all the parts well with the help, sand them well and coat them. And here it is, the embodiment of a craftsman’s budget but decent-looking dream of his own multifunctional workbench. 


The following option takes advantage of only the benefits of working with . 
MFT stationary desk made with German thoroughness (below detailed video presentation on it) further revealed the idea of versatility and capabilities of the Festool MFT table:


A few more solutions from European and American craftsmen, which take advantage of all three options for clamping on a workbench: using rail profiles, using a regular vice and using stops installed in holes in the tabletop:


Version on standard machine-made aluminum profiles: it is quickly assembled and, due to standard profiles, has greater versatility in the implementation of your ideas. For greater stability, it is better to install corner inserts.

Another interesting project stationary workbench on casters from Peter Parfitt from England (below is a video on it):


Video:
And the most thorough, in our opinion, development of the idea of the MFT table is the workbench table from Holzwerken.
A thorough and thoughtful solution with interesting ideas:


Video review of this workbench:
3. Homemade devices for the MTF table
Drawers and shelves:

Such a table can be very useful if there is a shortage of storage space and if you do not work with wood every day, but on occasion.


Step 1: Dimensions and Part Identifications


Many parts have only one dimension. This is because the second one is either unimportant, stated elsewhere, or, depending on the thickness of the plywood. I found out this method was: 18mm, 23/32, 3/4 may be close, but small errors add up.
You will need:
4x8 sheet of plywood. I used bc. e. and it was designated 18mm.
4 pipes about 32″ long. This is a flexible part. I used 1.25" aluminum plugs from onlinemetals.com. They are a bit pricey to ship but were needed as I drilled holes that were too big for my 1″ electrical pipe. I plan to experiment with what you have available and what drills you have access to. A tight fit will give better results.
8pcs x 2 3/8″ bolt
Wing nut 3/8 8pcs
Washer 3/8 16pcs
Adhesive & Double Stick Tape Carpet
cookies and or drywall screws
3/4 oak dowel 36″ long
Notes:
The blue pieces and one short yellow piece support the pipe. These are shown here, but installed under the table to keep the pipes parallel to the top.
Not all photos are 100% accurate. The first table was a glitch and some adjustments were made to the final drawings.
Bolts are overkill, but bigger size easier to use.
Step 2: Cut the Sequences


The idea here is to have similar parts without moving the saw. Tabletop a circular saw can be used, but it was done with the circular saw and rip fence that came with it.
First cut: Rip 24″ off short end of 4x8 plywood. This is for the top of the table and will be the basis for many other aspects. Using some of the cut is important. Track seen, straight edge, etc.
Second cut: From the other end, use your 24″ piece and subtract 4 thicknesses of plywood. It should be around 21. The reason this is important is because the feet are placed on inside top of the table and outside the shelf.
Cutting them off either side gives greater precision.
Set these two aside and continue cutting.
The pieces have color coding, and if they have a color or a color point they are one common dimension. Remember, save on the right side of your line.
Leg Note: The legs should be 3″ x 3″ when finished. This sheet cut has the short side measuring long for the rabbit. If you want glue and screw or glue and cookies the short side would be 2-1/4, or 3″ minus the thickness of the plywood!
Once all the strips are cut go back to the first 24″ wide piece you made and cut that 37″ long. We cut carefully, with a guide or straight to some edge. Save the cut for later when the short skirt ends and comes out of it.
The next section of the shelf from above is the length. This was done using the second piece. Use the top one you just made as a template and subtract four thicknesses of plywood. Should be about 34″. Save cut off like a short skirt, the ends will be made from this.
Step 3: Drilling Holes, Long Boards


1. Take two long 3-3/4. To get the length, lay them out on top and subtract two thicknesses of plywood. Draw a line. Clamp them together and cut at the same time if you can with a circular saw or Miter saw. Set aside.
2. Cut two short 4-1/2s and the remaining 3-3/4s. This aspect should be 32-3/8″ +/- so that they will fit into the shelf when everything is assembled. Clamp and cut all three at once.
3. Next, drill holes of the required diameter depending on which pipes you have chosen. Pay attention to the location of the link from the bottom. Mark all “bottoms” for later installation. Drill the holes as evenly as possible. For this I used double tape and drilling machine. All the pieces were put on flat surface with the marked link side down. In short, they were in the center and everything fit.
If you don't have a drill press, drill three 3-3/4 wide ones in one group, remember the center is shorter and make your marks longer. They should be ordered long, short, long. Then, using the shorter ones as a template, drill two 4-1/2 wide holes. I would still recommend using double-sided adhesive tape.
Please also note. If your plywood has a good side/and a bad side that is important to you, flip the boards appropriately. If the holes are not perfect the pipes may not allow you to do this later.
Step 4: Drilling Holes, Short Boards


1. The board is supportive. Cut the remaining 4-1/2 boards to approximately 24″. I did this by cutting the 4-1/2 x 48 in half. Then add the remaining 4-1/2 and cut all three at once on the miter saw to the maximum length possible.
2. The pipe supports. Cut long 3-3/4 into two pieces 22-3/8 +/-. They fit under the table so that their actual size is 24″ minus the thickness of the plywood*2.
Similar to long boards, these should be laid and stuck together. Ideally 4-1/2, 4-1/2, 3-3/4, 3-3/4, 4-1/2 with 3-3/4 in the center. Remember the bottom marks. If you need to break that I would do 3-3/4 and 4-1/2 and mark them as A. do everything else and mark them as B. You don't want to have to bend the pipe to get things to fit.
Pay attention to the holes:
My first holes were for 1″ emt conductor. This material was cheap, but my hole was too sloppy. Thus expensive aluminum. However, 1.25 aluminum through a 1-1/4 hole drilled with a fostner bit was too tight. Ended up using a feather drill and some sanding.
Step 5: Optional Rigor


In my table I have mortised the leg room. I don't think this is absolutely necessary, but it does add to the stability. It's a fair amount of work. Take it or leave it, the worse thing is to add a few more bolts!
If you choose this should be done to the bottom of the top of the table. Ideally, the front of the skirt is added before making holes and making a show of it.
Step 6: Assemble the top


This should go pretty quickly. I used a biscuit jointer. If you do this, be sure to tag the boards and links to correct angles. Glue and clamp or glue and nails/screws work as well.
All your pieces had a stamp on the bottom. Make sure it is visible when you collect these pieces.
Step 7: Drill at the top


Two ways to do this.
1. Draw a 2-1/2 line all the way around the top. From this line the centers of the holes are 4-3/4 apart in the short direction and 5-5/16 apart in the long direction. Drill away. The numbers are a little off, 1/8 is possible. With some fancy geometry you could cut the lines if you really wanted to. 3/4″ fostner bit for best results
2. I built a jig. 9-3/4 x 37 plywood scraps. Draw line 2-1/2 all the way around. Mark your centers 5-5/16. Install the 2-1/2 link on the drill press. Drill one line of the hole and just opposite the two corners.
Place the template on your top with a line of holes along the bottom edge, clamp securely. Drill. Then turn it over and line up the two corner holes with the template from the two detailed ones. Insert a 3/4-inch dowel into each of the two corner holes. Clamp and drills on line again. Next, I wound the fishing rods, move the template of one line, placing it in the corners.
It worked quite well. The holes looked good, but were not 90 degrees. It probably needs another jig!
Step 8: Legs


A couple of ways to make legs.
Cut all legs to 32″. It's not critical. If you have other machines you can use in combination with this table I think that the changes that. Cut as many as you can safely at once for greater accuracy. Make sure you don't use more than 3″ wide boards. The ones on the shelf.
We use 3″ strips and either 2-1/4″ or 2-1/2″. According to these plans 2-1/2 since there was a rabbit and a dado. If you want to use other methods, then use 2-1/4″. Or technically 3″ minus the thickness of the plywood. In my case 18mm.
Step 9: Assemble the Shelves
We've cut before. It should be about 34″ (37″ minus 4 plywood thicknesses).
We take the remaining 3 long” wide boards. Lay them out on the shelf on top and place two pieces of plywood at the end to shorten the overall length. Scribe and overhang. Cut them both at the same time. Should be about 32-1/2″.
Assembling the shelf is simple, just like you did the top one. There is no need for additional holes or spikes.
Additionally:
Tape the long boards together and drill two more holes for the pipes. I'm in the center of the shaft at 3″ of the board and about 4″ from the end. I did this much however it would be of more use if several holes are drilled into the legs to raise and lower the shelf. I only have one shelf high.
Step 10: Leg Hole Cutting Guide and Leg Holes


This guide drills holes in the top and in the shelf exactly. This is not necessary, but if you have all holes turned off, then your legs will be detected specifically. This helps make the legs interchangeable.
Directory
The scrap is approximately 3x10. Cut 3″ for the top. Cut the remaining piece in half a short way with a 45 degree cut.
Two lines up at the 45 degree end and tape them together as shown in the picture. Cut off the 90 degree end so they are the same. Drill a 3/8″ hole 1-7/8 from the 45 degree end and 2-1/4 down from the top (measured before sticking the actual jig on the top).
Use a square to make sure everything is 90 degrees. Glue and brad or clamp together.
Use a jig to drill 2 holes in each of the four corners of the top and shelf.
DRILL HOLE LEGS
With the table upside down, position the legs using a temporary clamp. If you decide to go rigor, you don't need clamps. I counted the legs and angles to be safe.
On the outside, use holes drilled in the top to drill through the legs. Run the bolt and washers down to the washer and nut at each corner.
Mark the height on the shelf measuring from the top along the foot. Mark each leg. Remember that you are working upside down and turning the shelf upside down and using it as a tray will effectively lift things up. The plywood surface is about 12″ from the ground to my finished table. Install shelves inside the legs. This should stay with friction, but clamp to make sure the corners stay on line. Through the holes drilled before you drill from the inside shelf through the legs. Add bolts as above. If you wanted the height-adjustable shelf to move and mark the shelf, drill, repeat.
There are additional holes. If you want to bolt them you will need another set of bolts and adjust the hole placement. Wing nuts can conflict with each other.
Step 11: Shutters