When the sun shines mercilessly outside the window, a breath of fresh wind seems like the highest pleasure. If it were colored, then not a single stream of it would go unnoticed: I saw a colorful air wave, stood in its path, raised my hands and... here it is - the bliss of “swimming” in the refreshing surf.
Yes, it is not easy to see the wind, but it is easy to detect its presence. How? Let's do this.
Preparatory stage
The pinwheel is a wonderful wind catcher. Children especially like this toy. How to make a pinwheel? From paper, of course. For beginners and children, colored paper is an ideal material that is easy to work with.

Check if you have everything you need at hand:
Square sheet of paper;
Scissors;
A small nail and two beads (or a pin, a button on a round stem, etc.);
A skewer (or pencil, cocktail straw, wooden stick and so on.).
Stage 1
Now let’s take a closer look at the question of how to make a pinwheel out of paper.
Place the beautiful piece of paper you have chosen on the table directly in front of you. Bend it exactly diagonally in half. Unbend. Fold again on the other side. Flatten the square. The sheet should form two lines intersecting in the center, obtained by folding.
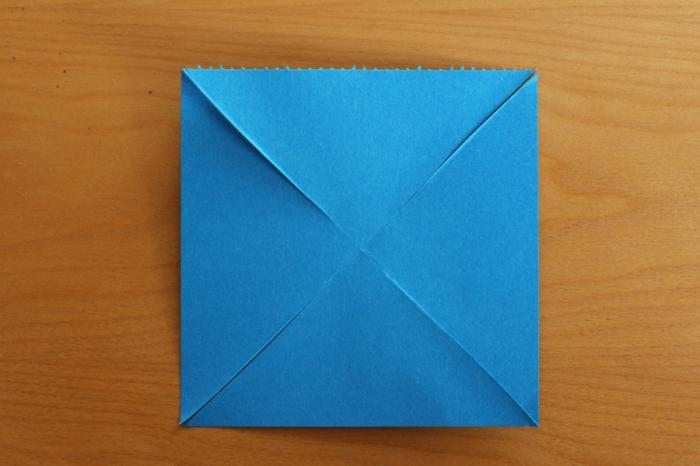
Make four cuts along the fold from each corner to the center. But do not cut to the intersection, leave one and a half centimeters to the “meeting point” of the two lines.
Stage 2
Use a nail to make preliminary punctures: in the center (just where the lines intersect) and one hole in each left corner of the triangle. This is what you should get:

Stage 3
Place the bead on the stud.

Stage 4
Let's proceed to the final stage of the process called "How to make a pinwheel out of paper." Connect all four ends to the holes in the center and thread a nail through each of them, as well as through the middle. On back side, where the point now sticks out, put a second bead on it.

Level 5
Attach the pinwheel “inflorescence” to a wooden stick.

The toy is ready! Now even your child can explain from paper. Stick a stick into a flower pot, and it will not only “bloom,” but also act as a stand as a reliable assistant guarding the breath of a fresh breeze.

By the way, this simple thing can become stylish element room design. An elegant pinwheel will decorate the office.
greetings to all brain friends! And I share with you brain guidance about the creation crafts-windmill, clearly showing the conversion of mechanical energy into electrical energy.

Having collected this simple homemade and having understood the principle of operation, you can later make a larger and actually operating wind generator. And a simple windmill will delight you by lighting up your yard!
Step 1: Materials
- marker
- motor
- LED (mine is red)
- plastic or wooden plate
- PVC tee 3/4 - 1/2 - 1/2
- connector 1/2
- glue gun
- drill with bit for drilling
- blades
- flange 1/2
- pvc pipe scissors
- punch or awl
- sealing ring
- roulette
- 30cm PVC pipes 1/2
- and of course, the wind :)

In count necessary materials It may seem that the craft is complicated, but it is not. The motor can be taken from an old VCR or DVD, the blades can be easily made from spoons and a bottle cap. PVC pipes can be cut perfectly with a regular hacksaw, and not just with special pipe scissors.
Step 2: Cutting the Pipe


Mark on brain tube segments of 2.5 and 12.5 cm, and then cut them off with scissors. This will result in three segments of 5, 12.5 and 15 cm.
Step 3: Marking the Hole


On front side motor, put on the O-ring, apply it to the tee and mark the hole for the LED, it will be located near the back of the motor.
Step 4: Drilling the Hole


Shilom or brainkerner We mark the center of the hole, so the drill will not slip, and drill a hole of such a diameter that you can easily install an LED in it.
Step 5: LED Mounting


We take the LED and determine the polarity of its contacts: the long leg of the LED is the positive contact, and then we connect the LED to the motor. The positive contact is to the “plus” of the motor, the negative contact, respectively, to the “minus”. We secure the LED legs by bending the motor contacts.
Step 6: Check functionality

We install the blades on the axis of the motor and blow on under the tree, strong enough for the LED to light up.
Step 7: Installing the Motor


Carefully bend the LED and insert it brain motor into the hole of the tee until it fits tightly, then insert the LED into the intended hole and straighten it.
Step 8: Fixing the Motor


By using glue gun fix the motor in the tee.
Step 9: Refinement of the connector


We put the tee with the motor aside and take the connector. Unscrew the connector and remove the O-ring that is located inside, this will allow the windmill to homemade rotate freely.
Step 10: Bushing Assembly


We insert the previously cut piece of 2.5cm tube into the connector, thereby obtaining something like a sleeve.
Step 11: Installing the Tee


We mount a tee with a motor on the bushing.
Step 12: Shank


As a “shank”, we tightly insert a piece into the tee braintubes 15cm, and insert a 12.5cm segment as a “stand”.
Step 13: Finishing the Shank


Using hot glue, attach the plate to the shank.
Step 14: The homemade product is ready!


We tighten or loosen the connector parts depending on your needs, mount the flange on the stand and glue all the fixed parts together. If desired, we paint the windmill and that’s it, brain trick ready!
Thank you for your attention, I hope this homemade worthy of being a visual aid!
The Master's Secret offers you original craft- windmill - wind generator. Yes, this windmill generates electricity for four super-bright LEDs. The windmill is assembled with your own hands from ready-made parts. The wind generator is experimental and will be modernized in the future.
How to make a wind generator with your own hands
The following parts were used for the construction of the windmill:
1. Generator. A G-205 synchronous motor is used as a generator. There is a thread on the motor axis, which simplifies the installation of the propeller. The motor is high-voltage, which is very convenient when using it as a generator. The propeller blades will not be able to accelerate the motor several thousand revolutions without a gearbox, but at low rotation speeds the motor will generate 3-15 Volts under load. The motor has two identical field windings.
2. Propeller. I bought the largest propeller from an aircraft model store. The thread of the fixing nut coincides with the thread of the generator shaft.
3. Body. Drain pipe 500 mm long. Purchased from hardware store. The diameter of the generator fits tightly into the connecting pipe and is firmly fixed with a rubber seal.
4. Tail. The tail blade is made by hand from a piece of cellular polycarbonate.
5. Payload. Four super bright LEDs. The basis is a ready-made lantern for the visor of a baseball cap.
6. Rotation axis of the housing. Self-tapping screw 100 mm and several washers.
7. Mast. A suitable pole. The original is 5 meters.
Before describing the assembly, let's look at electrical diagram. The generator is a rotating double-terminal magnet that induces a voltage of variable polarity in the windings. The phases of voltage change in the windings do not coincide. This does not allow voltage summation when connected in series or parallel. At the same time, a low rotation speed will not immediately allow the generated energy to be effectively used when trying to straighten and add voltages. Experimenting with removing energy from the generator at the first stage led to connecting two LEDs to each winding. LEDs are installed back-to-back. Due to the low current, a load resistor is not installed. This invention turned out to be the most successful in converting the generated energy into light. The LEDs alternately turn on brightly when the appropriate voltage appears. All light sources on the illuminated surface are summed up.
Assembly of an operating wind generator
Step 1. The flashlight is disassembled. Excess power supply paths are cut. The switching circuit is being assembled. The power conductors to the generator windings are extended. Look at the photo.
Step 2. Use a hacksaw to make a cut in the end of the pipe (see photo). The tail of the windmill is cut out of polycarbonate with a stationery knife.
Step 3. The tail is glued to the body with hot glue. It is useful to seal the honeycombs from dirt and moisture.
In the process of creating this wonderful windmill, you will see that it is made so simply and easily that it’s even hard to believe! You might even want to make 10 of these windmills. Give it a try.
Wind turbines are relevant at any time of the year. The main thing is that it is windy outside. Such toys can be used for playing, or they can be placed on the balcony as decoration.
So, what will you need:

- bright paper (preferably with patterns or polka dots)
- pencils with an eraser at the end
- stationery knife
- ruler
- hairpins with multi-colored ends
- strong glue (hot glue is better)
Let's start doing
To begin, take colored paper and make an even square out of it. You can adjust the size yourself.

Now mark the center of the sheet with a cross (do everything under the ruler with a simple pencil). Leaving a small square around the cross, draw lines as in the photo below. We will cut along these lines and it is important that small area around the cross remained untouched. Be sure to put dots near the lines (as in the photo below).

Now we make cuts along the marked lines (don’t forget about the center of the sheet, we don’t cut it).

Now we wrap the corners of the square towards the center (as in the photo below).

Now, perhaps, will be the most difficult part of the work. It is necessary to place this sheet on a pencil, pin off the curved ends with a pin and then place the same pin on the eraser of the pencil.


Now apply a bead of hot glue (or silicone glue) to secure the pin. This will also serve as protection for children so that they do not prick their fingers.

OK it's all over Now! The windmill is ready. Enjoy!

So we're going to make a small wind generator. It can be made at home. 90% of the parts are made of plastic pipes and fittings, so it can be easily disassembled for transportation and reassembled. Let's start.
Manufacturing of blades


For this you will need a plastic pipe with a diameter of 8 cm and a length of 25 cm.
Cut it lengthwise into three equal parts. We cut each part lengthwise at an angle and cut out a blade from the resulting parts, as in the figure.
For the base of the screw, take any round plate with a diameter of 6 cm.
We make three equally spaced holes in it and, using small bolts and nuts, attach the blades to the plate.
Making the base

On the base and mast of the wind generator, a propeller, generator, tail and swivel mechanism. The base is very easy to make. To do this you will need several short pieces of plastic pipe and some fittings.
We connect 4 bends and 3 tees, as in the figure.
Making a tail

For normal operation of a wind generator, a tail is needed. What is its purpose? The tail is needed to automatically rotate the propeller axis when the wind direction changes.
To make it, you need to cut a galvanized steel plate, make a slot in plastic pipe, insert the plate into it and secure everything with a bolt.
Housing with generator


To make a housing with a generator you will need:
- electrical wire,
- plastic handle body,
- plastic tee,
- two bearings,
- motor (generator) direct current at 3 V.

Insert the generator into the tee.
Secure the bearings to a common axis.
You can use a section of the handle body as an axis.
One bearing must be attached to the tee.
Mini wind generator is ready

Place the wind generator opposite the fan.
Connect the probes to the output wires. Yes, the device will show what is being produced electricity. With an efficient generator, you can charge a 3-volt battery. In addition, in a similar way you can make a larger wind generator that can be used to charge a mobile phone.