An electric jigsaw is used by home craftsmen to create beautiful products made of plywood and wood. Such crafts are used for a variety of purposes. They can be decorative or serve as household items. Every home craftsman who is interested in this activity should know the features of working with the tool.
You should learn more about how to use the “miracle jigsaw” and what can be cut with it.

Subtleties of working with a jigsaw
A jigsaw is a universal device that is used for cutting shaped products from various materials. All you need is to choose the right canvas. It is important to understand how to cut out shapes of complex shapes. Many novice craftsmen need to figure out how bevels on boards and various components of crafts are made. Electric jigsaws work best when cutting wood coniferous species. However, the thickness of the elements from which cutting is performed should not exceed 3.8 cm.

Blades that will be inserted into a jigsaw quite often bend and leave beveled edges. A straight cut is usually achieved with a well-sharpened blade. However, you should not put too much pressure on the tool while working.

You should first start the saw at the highest speed, and then select the blade angle. This will result in fewer chips. In materials that are highly brittle, it is necessary to drill holes. This will allow you to saw off the workpiece without unnecessary risk. As a result, there is no chipping of the part.
To ensure fast cutting, coarse blades should be used. However, it should be taken into account that when choosing such consumables, it will be more difficult to sand them later. Blades for electric jigsaws are made in such a way that the cut is made when the blade moves upward.
Choosing the Right Blade
Choosing a blade for an electric jigsaw is a major consideration when cutting wood and plywood. Often a jigsaw lies idle in a home craftsman's household. However, when you need to make a complex pattern, this tool is more necessary than ever.
Quite often, an electric jigsaw is used as a tool for cutting a hole in a tabletop or during installation. kitchen sink. This tool is also used for cutting metal. When using other saws, it is often impossible to complete the assigned tasks. A jigsaw is a universal device. Both beginners and experienced people can work with it House master. As a result, you can get excellent results using different materials- plastic, wood, plywood.

How to use the tool
A jigsaw is used for a variety of tasks. Its main function is to cut curved shapes into wooden products. Getting smooth curves using this tool is quite easy. The base of the tool should be kept level on the workpiece. When the preparation is completed, you can begin the main work. Then the engine is turned on and the device is slowly moved along a pre-marked line, at a distance of 2 mm from it. Fine sanding is done later.

The saw should be moved at such a pace that the blade cuts the material easily without any deflection. A jigsaw works great when cutting boards crosswise. A stop must be used if a perfect cut is required. Bevel cuts are fairly easy to make using a jigsaw. Before work, it is necessary to firmly secure the workpiece.
If an oblique or vertical cut is performed, the distance between the blade and the fence is set to the same as on circular table. If you need to make a precise and long cut, it is difficult to work with a jigsaw. In this case, first use circular saw. The final cutting of the element is performed with a jigsaw. It must be pressed firmly against the inside of the marked line.

Where to start
First is well organized workplace. Fulfilling this condition is especially important for high-quality cutting. If the space is arranged correctly, work will be convenient and comfortable. This condition is necessary to create a quality product.
The thrust structure is a special machine. People call it “swallowtail”. This table is made from rectangular boards. It has a wedge-shaped incision that goes into work area. Dovetail attached to the edge of the table.

Job electric jigsaw carried out standing or sitting. The workpiece should be located at a distance of 40 cm from the eyes. It is necessary that the lighting lamp be installed in front of the master. It is placed at an angle to the surface.
Tool preparation
The saw blade in a jigsaw must be fixed in a strictly vertical position. The teeth should point down. Before work, you need to stretch the fabric well. The degree of tension must be adjusted by compressing the frame. The device must be rested against the edge of the table. Then you should tighten the lambs with pliers. When straightening the frame, the canvas will stretch.

To cut out parts with a jigsaw small size, or shapes with sharp contours, you need to choose small files. This requires using fabrics with a large number of patterns per inch. When using them, the jigsaw does not jam when making turns. The cut is created neat and thin. If large-sized plywood products are made, it is necessary to use blades with large teeth.

How to cut with a jigsaw
To obtain an accurate cut, a number of conditions must be met:
- The hand holding the jigsaw should only move vertically.
- All movements must be made as smoothly as possible, without jerking. In addition, they must be performed with maximum amplitude. This is necessary to use the entire canvas.
- With the second hand, the workpiece turns smoothly during operation.
- Do not put too much pressure on the workpiece with the saw. No lateral pressure on the blade is allowed.
- Artistic sawing is carried out only when the file moves from top to bottom. For this reason, the reverse movement must be performed without pressure.

When working with a hand jigsaw, it must not be guided along the marked line. The canvas should be drawn along the inside of the contour. This is due to the presence of a kerf after sawing. After completing the work, one of the clamps should be loosened. The frame of the device should not lose its elasticity.
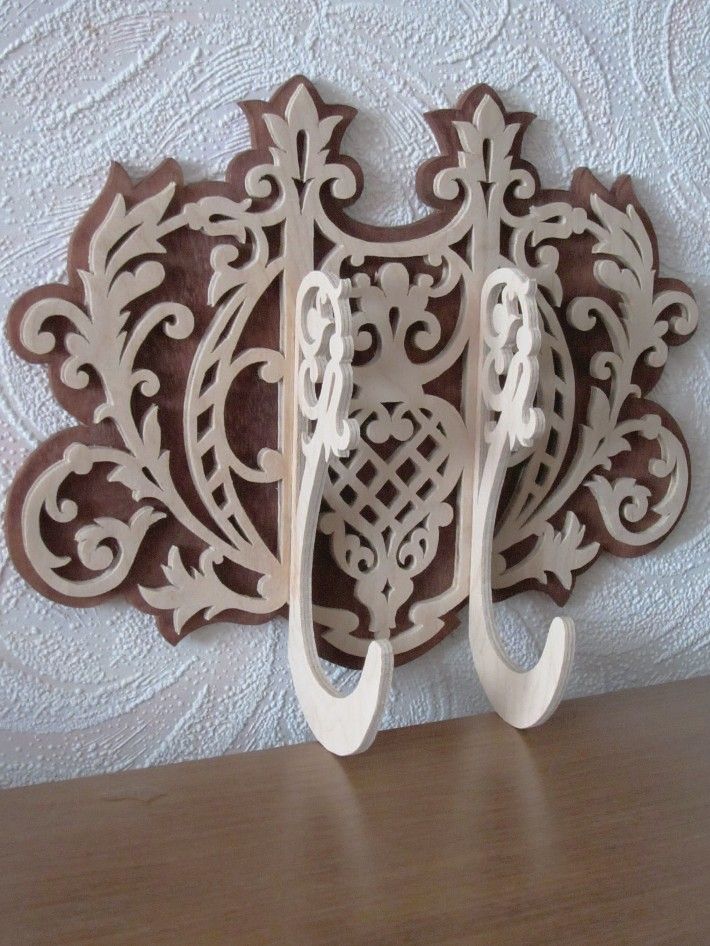
Jewelry box
You can make a beautiful and spacious jewelry box for Valentine's Day or International Women's Day. To complete this craft, you will need to use exact drawing. The work is divided into several stages.

Preparing the work area
Before you start cutting out the parts of the box, you should prepare your workspace. A special table is installed for this purpose. The craft will be created on it. In this case, the following rules are observed:
- There should be no unnecessary items at the table while working.
- The cutting device should always be at hand. A specific place is reserved for it.
- Crafting table. It is placed in a ventilated area. The room should be light and spacious.

However, it is not always possible to install a table for cutting with a jigsaw in the right place. For an ordinary apartment, the workbench is usually placed on the balcony if it is insulated. At the same time, you can work on crafts in any weather.
Plywood selection
For the box you need to use plywood sheet. When choosing a workpiece, you should pay attention to defects that often appear - cracks or knots. The workpiece is selected with a thickness indicated in the diagram. To transfer the drawing to the material, you should:
- Sand the workpiece with sandpaper. You should start with coarse-grained material. This treatment ends with fine-grain sandpaper.
- The surface must be level. To do this, you need to fix the sandpaper in the sanding device. If you don't have one, you can take a small block and wrap it in sandpaper.
- Grinding is carried out along the layers of wood.
- The workpiece is ground until its surface becomes as smooth as possible.

After such preparation, you should transfer the craft template onto it.
Transferring the template to a plywood sheet
Before starting sawing, you should transfer the prepared drawing to a plywood blank. First you will have to print the drawing on paper. To transfer, you must have tracing paper and a pen. First, the template is attached to the workpiece with tape. Having a blank in front of you, you should think about how to cut out the different elements of the box, saving the available material as much as possible.

Sawing out the box
When cutting, you need to adhere to some rules:
- The jigsaw should be positioned perpendicular to the product.
- It is necessary to ensure that all movements are performed as smoothly as possible. You should not rush while cutting - this way you can make a mistake and ruin a piece of material.
- It is necessary to use a sawing table.
- First you need to cut out the internal elements. Only after this they begin cutting the contour.

When leaving the cutting line, it is necessary to correct the line with a needle file while assembling the product.
Advice! During work, your hands will get tired. In this case, productivity drops significantly. Fingers and eyes get seriously tired. All this can lead to hand injuries. This is why it is necessary to take breaks from work.
Assembling the box
Before assembly, you must familiarize yourself with the product drawing. Combining the parts of a jewelry box does not require fine workmanship. Before gluing different elements you need to make sure that they can be put together without problems. After several assemblies of the product without any difficulties, you should begin gluing the parts. Typically, a PVA composition is used for this purpose. During operation, it is necessary to eliminate any glue leaks.

Assembling a steam locomotive model
When the material is prepared and the drawing is printed, you should begin the process of transferring the diagram to the workpiece. In this case, it is necessary to take into account some operating rules. Many home craftsmen tend to transfer a drawing onto plywood using only a copy and a pencil. However, you can also use the “Black Ribbon”. When choosing this tool, the drawing is glued to the workpiece. Then the diagram is washed off the plywood with water, leaving only the marking lines.
Then you can make holes in the parts of the future locomotive. The parts of the locomotive contain parts of grooves cut out from the inside. To make such elements, holes should be made in them hand drill or an awl. The holes must be at least 1 mm in diameter. To avoid damaging the table surface when creating holes, you should place a board under the workpiece.

Now you can cut out the parts. You should not rush when cutting. The basic rule is to hold the jigsaw at right angles to the workpiece. All elements must be performed smoothly, avoiding unevenness.
Plywood. Friends, do you know what is hidden under this word? So I'll tell you. This is a wooden laminated board. And it turns out as a result of gluing an odd amount of veneer. To make the material different, glue it so that the fibers are perpendicular to the previous layer.
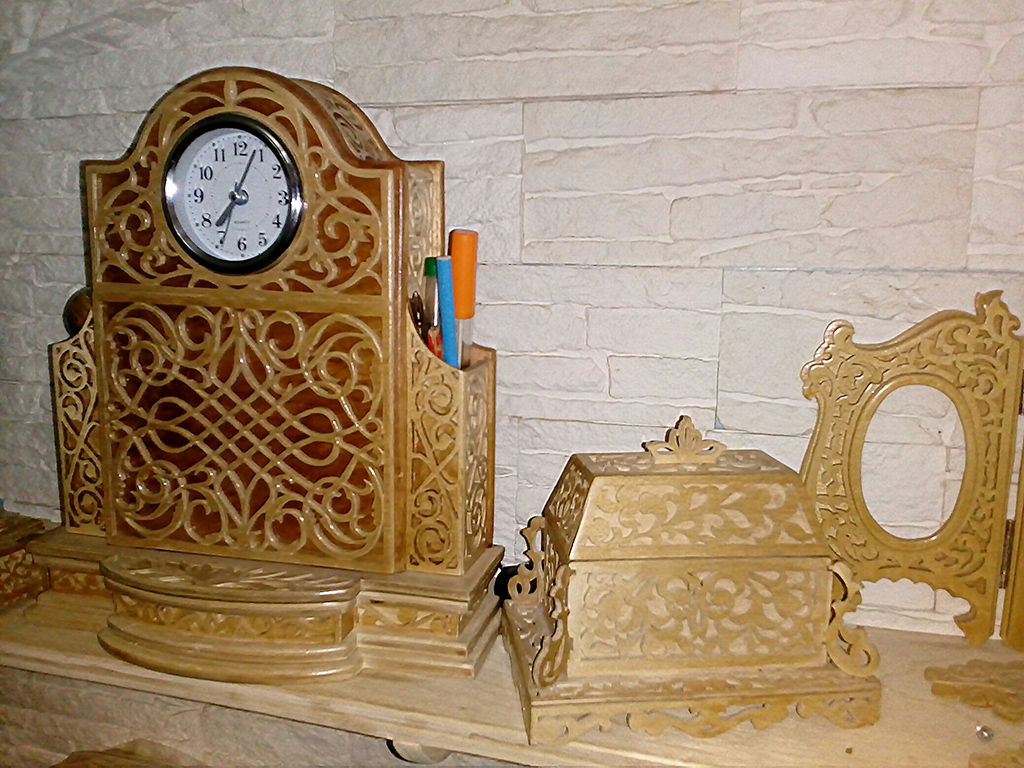
What can be made from plywood?
Beginning craftsmen with “golden hands” are recommended to start their work from this material. This versatile material is famous for its versatility and ease of processing. Photos of plywood crafts for clarity. With the help of this material we have New furniture, children's environmentally friendly toys. After all, what do people value? That's right - health! With such material there is no need to think about the harm to the human body.

How wonderful it is to walk in the fresh air while in country house. But every owner dreams that the home is much more comfortable and looks more promising than the neighbor’s!

All this is real, don’t be lazy, take the design of the site into your own hands. A little creativity, imagination, patience and your home or cottage will become the center of the universe!


You may already have some ideas beautiful crafts made of plywood that you once read in your favorite magazine. And you are ready now to bring them to life. For such work you don’t need to be a famous master, the main thing is to have your own opinion, different views on some things, and a little imagination.

We decided to make the job easier; in this article we have collected for you the easiest plywood crafts for beginners. At the beginning, I would like to note that once you have decided on the type of work you want to do, you should pay attention to the quality of the purchased material.

So, for a workpiece that will later be painted, varnished or other type of processing, you can take a cheaper variety. After all, all the “jambs” will be hidden under makeup. And if you really want to leave the product its original appearance, you will have to spend a little of your savings.


Having studied in detail this material, you can also find drawings of plywood crafts for making the desired item.

Curly shelf for small items
We are creating an image, and we will then work on it in detail. The next step is to apply this data onto a piece of wood. with a simple pencil. If the diagram is very complex, use a carbon copy. Mark the area that we will later delete. We make a hole for the jigsaw to start working.

Shelf manufacturing process
- After inserting the file into the hole, we clamp it with screws for precision work.
- Using light movements, move the sheet to cut the required shapes
- Move away from italics - nothing, just move the jigsaw back a little and start moving from the problem area

How to cut correctly with a jigsaw
Important! To make it easier to work with the tool, it is recommended to choose a surface that is waist-high.

garden snail
This figure is perfect for working together in a family circle. Even a child can do simple elements of the work.

- First you need a sketch of a snail on paper.
- We transfer the drawing to plywood. Or you can immediately draw what you want on the tree.
- We cut out the figure.
- Next, we give them to the children to decorate in different colors. They will be happy to complete the task.
- To brighten the colors, you can varnish the top or apply a second coat of paint.

This is what they look like step by step instructions how to make a craft with your own hands.

Make only children's figures of the highest category, so that the child does not get hurt or get a splinter on his arm. The finished item must be carefully processed with two different types sandpaper.

Tree 4 seasons
The work is aimed at the development of children. By collecting everything according to the instructions, you can easily help your heir understand the quirks of our world, understand what time of year it is now, and what will happen tomorrow.

- Draw a tree template for the product in the amount of 2 pieces
- Cutting out a circle for the stand
- We carefully polish the parts
- Make a cut on one template from above, on the other from below
- Connect the parts crosswise and secure them to a round stand using self-tapping screws.

Each side symbolizes the time of year, you need small details creatively design our tree. The first side is summer, we glue butterflies, green leaves, sun, apples. The second is autumn, orange and red leaves, pumpkins, birds. Third winter - white snowflakes, cotton wool snow, snow woman. Fourth spring – we attach flowers, bugs, birds.


Make all the details with felt, paper, and decorative figures. It is better to attach it with double-sided tape. The output is very interesting designs your garden plot.

- Interesting curly images
- Flower beds
- Newspaper collections
- House for tits
- A variety of fun fences

I like to update my garden with different figures made from practical wood. I take the moisture-resistant option and go!

The product must be treated with special paint or a moisture-repellent agent, otherwise you won’t be able to admire its beauty for a long time. Impact environment doing their job...

Here is a simple master class on crafts made from plywood.

Such unusual look For some reason, they undeservedly began to forget about the decorations of their garden. YOU will become the unique owner of a fairy-tale courtyard, for example, by decorating a small fantastic corner using this method.

Photos of plywood crafts


A finishing material that can be successfully used in construction and furniture making is. These sheets containing wood waste have one unique feature. The point is that with their help you can quickly and inexpensively build a house or create a wall of furniture, as well as make luxury products or use them in expensive construction. Tightly joined sheets of pressed veneer can withstand heavy loads, can withstand moisture, and their appearance can be close to natural wood.
What can be made from plywood
The advantages and disadvantages of plywood walls are presented in the table:
However, plywood walls can receive a rating of 5 if they are used strictly for their intended purpose. In other words, where they are needed, the likelihood of water getting in is reduced to zero and nothing heavy will hang on them. Decorative material is often used for wall cladding.
Decorative plywood
DF is made from at least 3 sheets of peeled veneer of grades A, B and AB. The finished plywood is lined with a film, which consists of paper impregnated with resin. Even numbers in the marking of plywood (DF-2, DF-4) indicate what was used here opaque coating. But the odd ones (DF-1, DF-3) have a transparent coating.
The tensile strength of decorative plywood is in the range of 1.0 – 1.2. This material can be used in car construction and aircraft construction. Decorative plywood costs quite a lot, but it specifications justify the high cost.
Plywood and wallpaper
When not decorative plywood, but ordinary plywood was used for wall cladding, the process of decorating it awaits. You can glue wallpaper onto plywood, but it is worth considering that such walls are quite hygroscopic and very textured. Therefore, ordinary thin paper wallpaper won't fit here.
Before gluing wallpaper onto plywood, you need:
- “Sink” all fastener elements.
- Treat the surface with wood primer.
- Fill deep uneven areas.
- Sand the prepared surface.
It is better to choose plywood that has a high density.
Plywood paneling for vans
The interior lining of car vans will be needed if there is a need to update the old body. Or when a new car model in the basic configuration is purchased. In this case, plywood will not only perform a protective function, but will also increase the level of heat and sound insulation.
Most often sheathed with plywood:
- floor. Moreover, you can even do this yourself;
- doors and half of the side walls. Such work is carried out as temporary work or in machines that are obviously not loaded to the brim;
- walls, roof and doors completely.
The installation technology is the same in all cases. The only difference can be in the thickness of the building material. Isothermal treatment of bodies is insulation, thermal insulation and noise reduction.
Good specialists are able to perform the work in such a way as to maintain the maximum volume of the body and ensure the absence of seams. After such lining, the cargo compartment will have to function for at least 10-12 years.
Laminated moisture-resistant, so-called FSF automotive plywood is used for cladding. Its thickness can be 6.9 and 12 millimeters. When carefully applied, plywood can significantly transform any car van and make it as functional as possible.
How to line the cargo compartment of a van yourself:
Formwork
Proper production of formwork involves the use of plywood of a moisture-resistant brand, but a special one. This is an expensive building material. Therefore, it is used only by large construction companies, whose professionalism does not allow them to “exchange” for low quality.
Such plywood has a thickness of 10-21 millimeters, with sheet sizes, for example, 2,440/1,220. The choice of sheet sizes should depend on the pouring height. The plywood itself can be marked as follows: FC, FBA, FB. Whether one or both sides are sanded is not so important.
This building material, which has been used in our country for only a few decades, belongs to the category of professional ones and deserves the highest rating. Its high cost is offset by the fact that each sheet of bakelite plywood can be used at least 100 times.
Plywood doors
Most doors in the mid-price segment are made of plywood. You can even make them yourself. Door leaf you need to cut it to size from a finished sheet of FK plywood, install awnings, handles and, if necessary, a lock.
You can decorate the doors with different overlays. After that ready product needs to be painted. There are special paints that will help imitate the color natural wood different varieties.
Doors made of plywood in factory conditions can be:
- whole;
- with glass;
- with inserts from other materials.
At the same time, when plywood is initially made for doors, a wide variety of parts can be made. And later then connect them into the desired design. In any case, a plywood product is an excellent alternative to doors made of natural wood. At the same time, they cost much less, are light in weight, and look stylish.
Photos of finished doors
Plywood doors Plywood doors
Application for roofing
Softwood plywood is used as a base for bitumen roofing along with OSB. Brand of this building material FSF or FOF (this material is laminated and therefore more expensive). The thickness of such plywood should range from 9-11 millimeters.
The main characteristics of FSF plywood, which can be used as a roofing material:
- Rot resistant.
- High bending strength.
- Good moisture resistance.
- High density.
- Resistance to aggressive external influences.
No other material that could be used for a roof base has such physical and mechanical characteristics.
What else is made from plywood?
Plywood is quite pliable and at the same time strong material, from which you can not only build almost anything, but also make many furniture elements with your own hands. It is possible to simplify this process significantly if you order elements for future products by size from the manufacturer. This way you can get pieces of furniture of any shape.
Making furniture entirely with your own hands from plywood sheets is somewhat more difficult, but darker ones are also possible. You need to stock up on professional tools that will help you make the elements.
Thus, you can make from plywood with your own hands:
- furniture and furniture walls, including living rooms and kitchens;
- chairs. Plywood here can act as part of the product, for example, the back of an adult chair. You can also make an entire product from it, for example, a children's high chair;
- closet. This product is the easiest to make. All parts of the cabinet are canvases that need to be connected to each other;
- hives. For a very long time, most bee houses have been made of plywood. Ordinary plywood can be used for them, but it is better to opt for moisture-resistant one;
- toys. You can make planes, trains, horses and even dolls from plywood. Such toys can be either flat (dolls) or three-dimensional (locomotive, airplane).
To make these products you need desire, blanks (drawings) and good tools. The environmental friendliness of plywood makes any product safe to use.
The video will tell you how to make a table out of plywood with your own hands:
In general, plywood, having a number of significant advantages, can be used in many stages of construction, as well as in the creation of furniture. This is a unique material that takes all the best from wood, while weighing much less. Environmental friendliness, ease of installation and low cost make plywood a leader among similar materials.
Wood and sheets (plates) based on it are one of the cheapest and most pliable materials. For those who like to work with a jigsaw, plywood is primarily of interest.
It is her home craftsmen who most often choose to make various crafts. If you organize your work correctly, you can create real masterpieces.
Crafts made from this material are made for various purposes, but basically they can be divided into two groups - for decorating premises or areas (for example, fences with inside, garden plot and so on).
Type of plywood
If you focus on the optimal combination of indicators such as quality and price, then FSF or FC products are selected. It is characterized by resistance to dampness and temperature changes. This alone is enough to ensure the durability of a handmade craft. But there is a fundamental difference between these types of plywood - component composition glue that holds the veneer layers together.
In the first case, it is toxic, so FSF sheets are used only for outdoor work. But for crafts intended to be placed in the house, FC plywood is quite suitable. Its analogues are much more expensive, and therefore are not considered as a material for simple, easy-to-make crafts.

Type of sheet sanding
It’s not difficult to figure it out: Ш1 and Ш2 – respectively, one- and two-sided; NSh – rough-processed plywood. That is, the craft will still have to be “brought to mind” and polished. The choice of this parameter depends on how it is planned to be designed and placed in the future. A sample mounted on the wall and, for example, a figurine (stand, vase, toy, or other) that is visible from all sides are different things.

Plywood texture
A lot depends on personal preference here. If planned during application protective coating If you want to preserve the natural look of wood, then it is better to purchase birch veneer plywood for varnish. But for subsequent painting it is advisable to choose pine.
For various crafts made from plywood, it is advisable to focus on oil or acrylic based ones. The explanation is simple - they are less susceptible to fading in the sun, and therefore do not have to frequently renew the outer coating; it will not change its original appearance for several years.
Plywood grade
When choosing a sheet for crafts, you must first inspect it for knots and inclusions. Significant defects will not only complicate the cutting of the material, but also initiate the appearance of cracks or “holes” (as a result of the same knots falling out). Next is an inspection of the end surfaces. During the cutting process, plywood is subjected to dynamic loads (vibrations). If at least signs of veneer peeling are noticeable on the side parts, you should not purchase such material, even if its price is too tempting.

In the future, in the process of making crafts, many problems will arise. As a result, plywood is rejected and its consumption increases. In total terms, the money will be approximately the same compared to purchasing high-grade material, but in terms of time spent and quality of work, it will be a big minus.
Sheet thickness
If crafts are cut out with an electric tool, then it is limited to 30 mm. For a hand jigsaw, it is advisable to use relatively thin plywood; maximum three layers. That is, no more than 9 mm thick.
What you need for work
Jigsaw
This is a priori, since we are talking about making crafts using such a tool. The question is different - which one is better to work with. Electric models are much more expensive than their manual counterparts, but have many advantages. About in .

For example, high speed and cutting accuracy, clean edges, the ability to change cutting parameters and a number of others. If crafting from plywood is not a one-time, short-term hobby, then it’s worth spending money on an electric jigsaw. It is universal and will come in handy on the farm more than once, since depending on the type of file it can “work” not only with wood, but also with non-ferrous metals, plastics, and plexiglass.
It is somewhat more difficult with a hand jigsaw. Its design is quite simple - a frame with screw clamps and a handle + a file.

The nuance is that cutting blades break quite easily (from excessive pressure, changes in position hand tools), and therefore it is advisable to purchase them with a reserve; Fortunately, they are cheap.
Hacksaw
It is needed only at one stage - when cutting a dimensional sheet into individual fragments. Doing this with a hand jigsaw is an unpromising and unprofitable activity; A lot of time and files will be wasted.
Stand
No one will cut plywood by weight; It's clear. Cutting out parts by laying the sheet on the tabletop risks damaging it. It is precisely in order to ensure the “safety” of the latter that the stand is needed. You can make it yourself from scrap boards. What such a device looks like (one of the options) can be seen in the figure.

The stand is fixed to the base using clamps (on a non-working table) or self-tapping screws (if there are carpentry workbench). Although these are not the only mounting options. It is not difficult to understand what to do, depending on local conditions.

Skin
The ideal tool for fine woodworking is the . But for crafts made from plywood that do not have large areas, it is not suitable. Therefore only sandpaper; medium-fraction - for primary grinding of workpieces and with fine grain - for finishing.
Additionally
- Files and needle files.
- Awl.
- A simple pencil and carbon paper.
- Glue, if the craft is created as a composite or multi-level one, that is, with the fixation of two or more shaped fragments in separate areas.
- Varnishes, paints, stains.
Examples of drawings and sketches of plywood crafts


Copying “one to one” in this case is hardly advisable. Any work done with your own hands is a process with a creative component. That is why the dimensions should be determined independently, depending on where you intend to place (or how to use) the craft. For example, will it “look” in a particular place, will it fit organically into the interior of the room.
Even if you liked the drawing, it is not difficult to change the geometry of the figure by applying the scaling rules. Especially when it comes to drawing a contour on plywood with a simple pencil; It’s quite easy to correct any mistake, or to correct anything in certain areas. It is not much more difficult to modify any sketch, introducing something of your own, original into the sample.


There is another solution - you can download any picture you like from the Internet. Printing it to the required scale is not a problem. All that remains is to transfer it onto the plywood using carbon paper and shade the areas that need to be cut out. This is if we are talking about figurative crafts. It's even easier with a contour pattern; cut exactly along the line - and that's it, ready. All that remains is to work on the artistic design of the product.


Basic rules for cutting with a jigsaw
- Laying under a sheet of rigid backing. It is to ensure the hardness of the surface under the plywood that a stand is used. A sheet, even a small one, bends quite easily (under pressure), so without this device a high-quality cut, strictly along the line, will not work.
- The working body of the jigsaw (file) must be strictly perpendicular to the end of the sheet. And constantly, throughout the entire process of cutting the material.
- The tool is fed along the line in a forward motion, but without effort. Otherwise, the file will break immediately. The same goes for when it deviates from the “vertical”.
- Sawing out “blind” holes, that is, somewhere along a sheet of plywood, indented from its edge, is done as follows. A “hole” is drilled at any point on the outlined contour with a slight offset towards the center of the fragment. The diameter is chosen so that the file can easily fit into it. After attaching it to the tool frame, you can cut in any convenient direction.
- A figured cut in plywood involves sharp turns, smooth bends, and so on. First, at the point of change of direction with a jigsaw, without changing its position, you need to make a small hole in the material. To do this, you need to continue cutting with a file, strictly maintaining the orientation of the tool, and at the same time rotate the piece of plywood. As soon as the plane of the cutting part coincides with the required direction for further cutting, it can be carried out along the intended line.
Having mastered production sufficiently simple crafts made of plywood, you can take on more complex options. As an example - self-assembly furniture (racks, bookcases, original hanging shelves). With a skillful approach to business, plywood makes excellent countertops, cutting boards, window frames and so on. It’s easy to make a folding chair from this material, in various modifications. Who is interested in this?
Plywood also makes excellent frames for paintings and photographs. Those who have a plot of land will be able to engage in artistic design of outbuildings; the same gazebo, a house over a well or something else. There are many options. The main thing is to want to learn.
In the process of preparing for cutting with a jigsaw, you should not forget that all drawings and drawings are nothing more than the basis for developing your project. A little imagination, time, effort, and you can make a truly real masterpiece from plywood.


