2. The mixer was placed on a ball. Well, as luck would have it... in my mother-in-law's house, the housing office was doing major renovations. I don’t know how major repairs are done now, but in the past this meant that after overhaul all plumbing fixtures, including toilet and geyser, needs to be changed. Where contractors get the most obsolete, cheapest and low-quality equipment is a mystery to me. But the fact remains a fact. Moreover, the faucet-axle mixer in the kitchen had to be changed to a cartridge one during the overhaul, since the mother-in-law, not accustomed to the delicate handling of Chinese faucets, out of habit, tightened the valve as if it were Soviet-made and the gasket in the faucet-axle was worn out for another 20 years back. Accordingly, the star on the silumin handle of the cold water valve of the Chinese mixer was licked off in 2 weeks.
3. The faucet in the bathroom turned out to be more reliable, but initially the shower switch did not work well. The water switch was slow and not completely. And when such a mixer comes with a wonderful automatic gas water heater that lights up 5-6 times and goes out at any time, even without changes in water pressure, it’s a little annoying. Quite soon, the wife demanded that a new “normal” faucet be installed, after which the old faucet moved to the dacha. And the dacha is such a cunning place where everything that would be a pity to throw away will do: old furniture, dishes, clothes, toys and much more.
4. At the dacha hot water so far only in the project, because with cold water big problems. For this reason, no one uses the shower except me, which means the shower switch is not particularly needed.
However, the shower switch did break and had to be repaired.
Treatment
1. Turn off the supply of cold and hot water. Why do we close the corresponding valves?
2. Remove the mixer - unscrew the mixer from the water socket. To do this, you can use an adjustable wrench or wrench at 30.
3. Remove the mixer carefully so that the rubber gaskets installed between the water socket and the mixer are not lost. As a rule, the gaskets remain in the nuts after unscrewing the mixer. It is better to take them out and put them in a safe place.
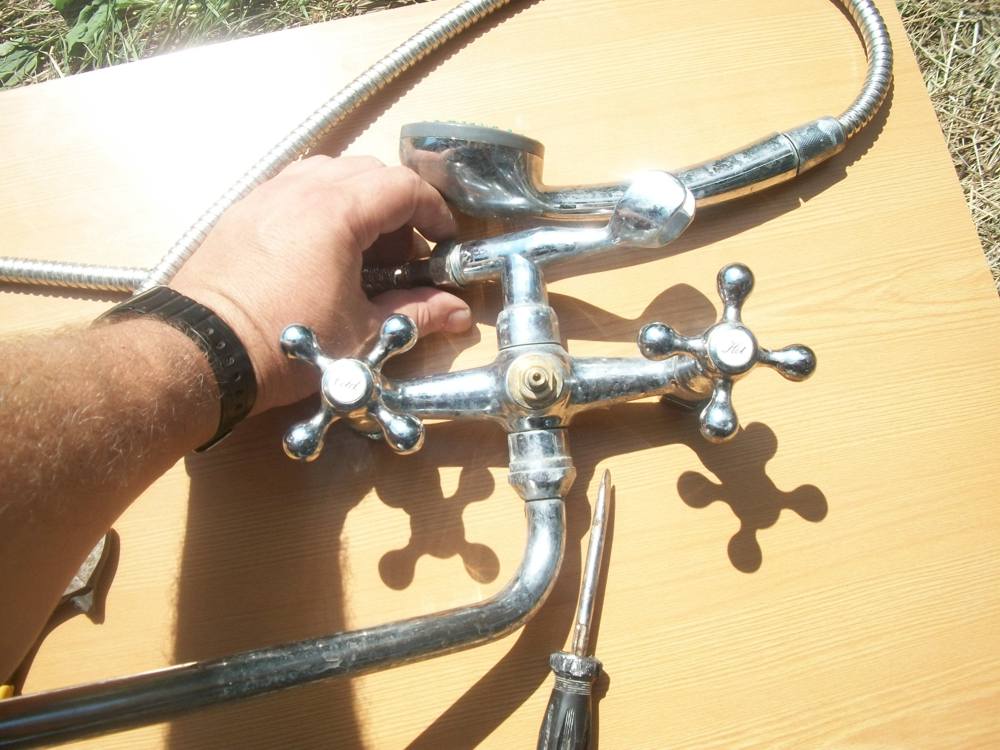
4. Place the mixer on the operating table:
In this case, an old camp table was used as an operating table, which ended up at the dacha for the same reasons listed above.
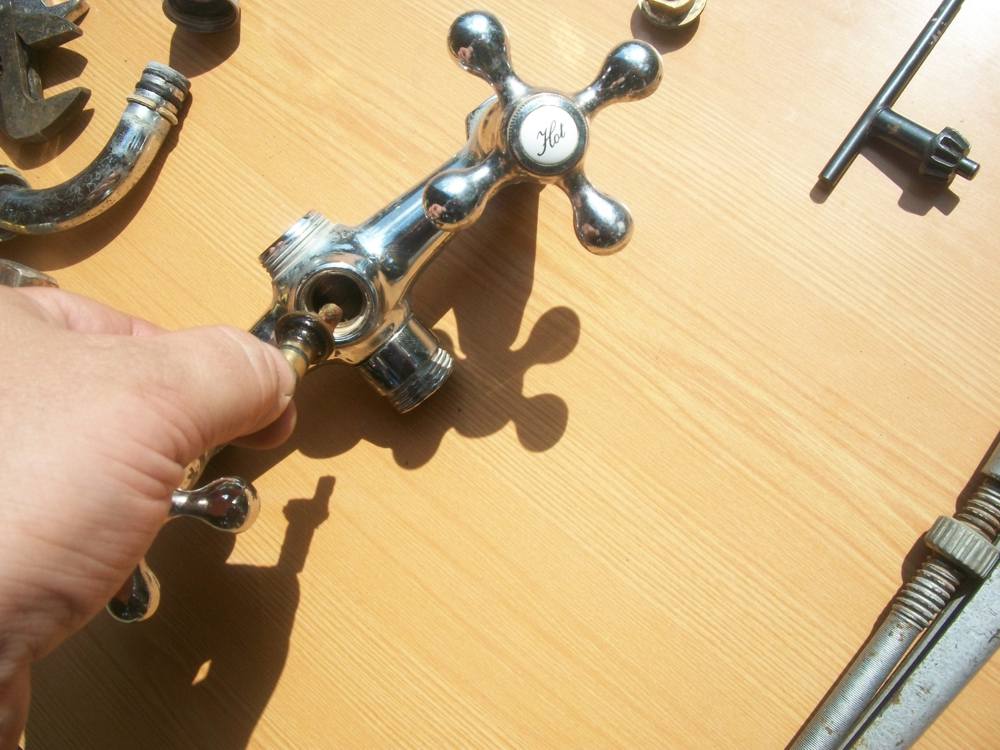
5. Unscrew the plug on the shower switch handle:

As a rule, this can be done by hand, but if the plug is screwed tightly, you will have to use pliers.
6. Unscrew the screw securing the shower switch handle. To do this you will need a Phillips screwdriver.

7. On at this stage the mixer will look like this:

8. Unscrew the shower hose. As a rule, this can also be done by hand. But you can use an adjustable wrench. The gasket should also be removed and placed in a safe place.
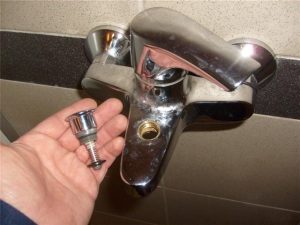
9. Unscrew the nut securing the spool.

10. Unscrew the top nut securing the shower switch (water supply to the shower)
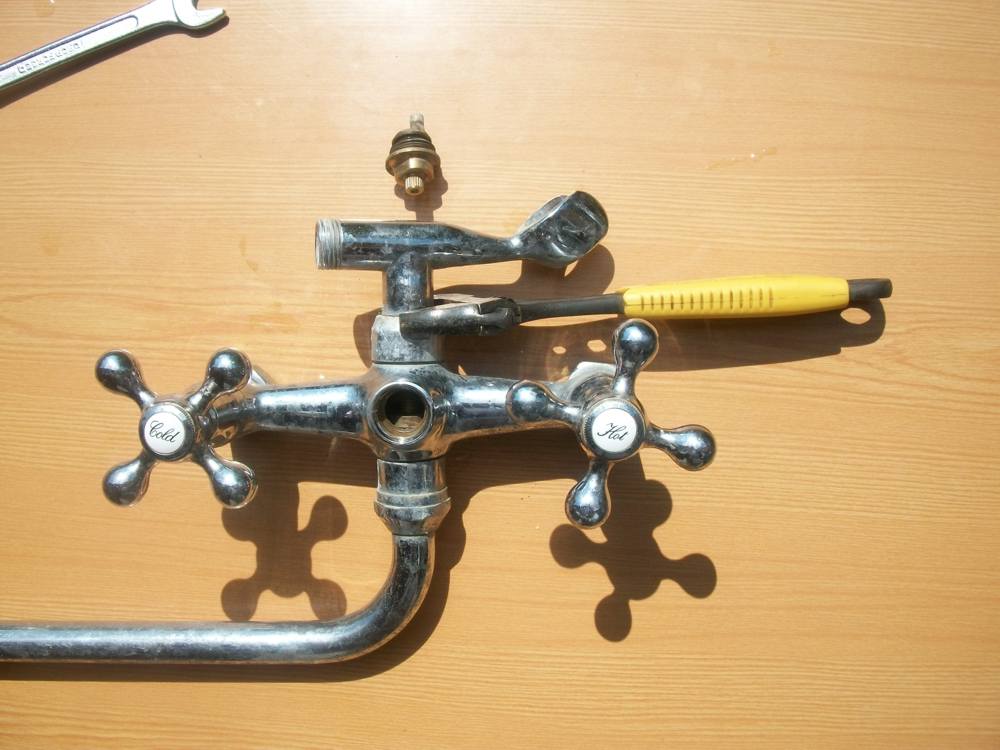
11. Unscrew the spout

12. Unscrew the lower nut securing the shower switch. Actually, the nut has notches for a wrench or wrench. But if the nut has not been unscrewed for a long time, then only a gas wrench will help.
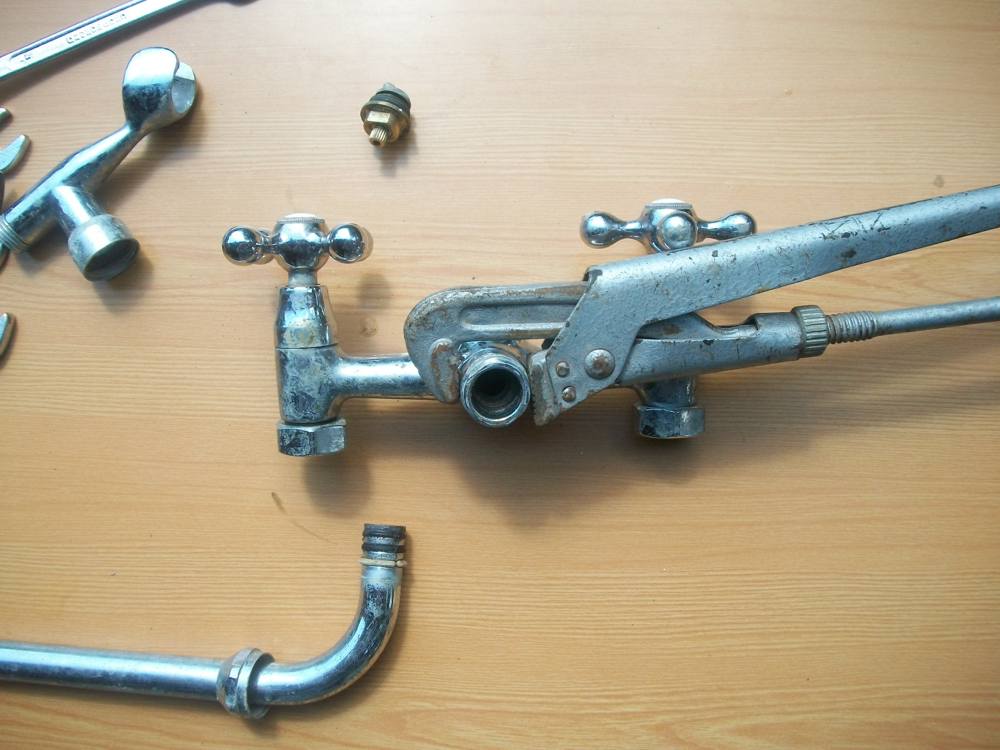
13. Now we get to the shower switch

As it turned out, the shower switch was stuck tightly to the nut, we had to knock it out, which is why the water did not switch.
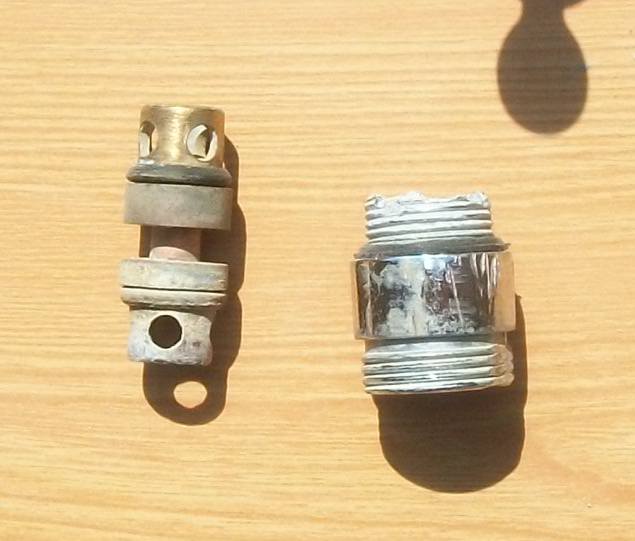
In addition, the thread on the nut was partially destroyed. Apparently the material of the nut turned out to be the same silumin, at least obviously not brass, not bronze or any other alloy of non-ferrous metals known to me. Before assembly, the outer surfaces of the switch and the inner surface of the nut were cleaned with sandpaper and a file, and the end of the nut was also processed to ensure a tighter fit of the switch gasket.
After everything was adjusted, the switch was lubricated with waterproof grease (solid oil) and screwed into place. In principle, assembling the mixer is done in the reverse order and is not particularly difficult, you just need to insert the spool correctly
That's basically it. After the repair, the shower switch works like new, but I don’t know how long it will last. In any case, the problems with the mixer have been eliminated for this season.
It is probably very difficult to imagine a modern bathroom without plumbing fixtures. It is the functionality and a large number of models of devices provides high comfort of sanitary and hygienic procedures, without which a person can no longer imagine his life.
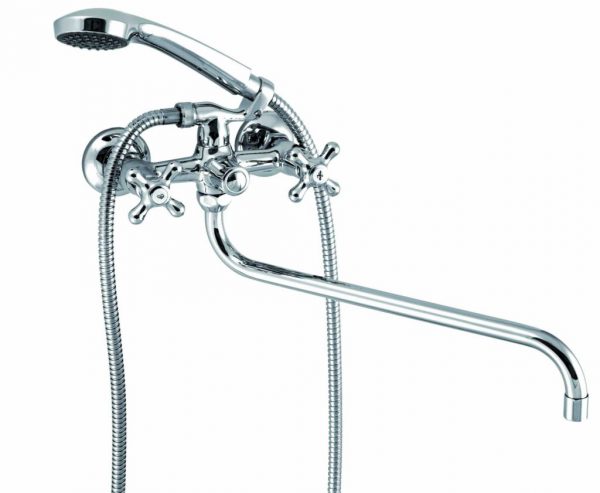
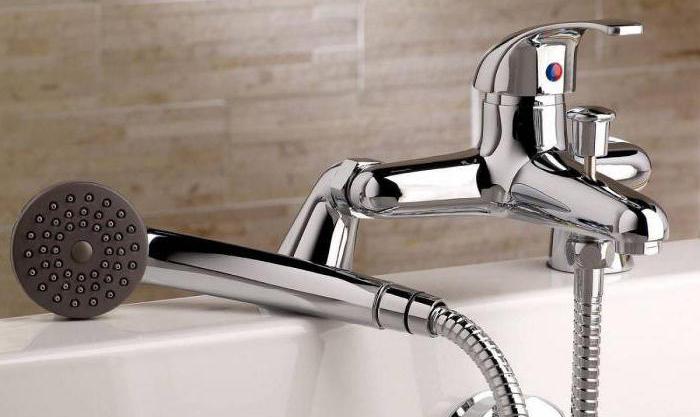
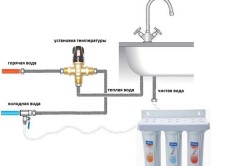
In particular, a mixer makes life much easier - a device where hot and cold water are mixed, resulting in a stream optimal temperature. Exist different models mixers that differ in design and functions. For bathtubs, models equipped with a special switch for the shower head are often used. In this article we will talk about the design of a bathroom mixer with a shower.
What is a mixer and what functions does it perform?
System central water supply in our country is organized in such a way that hot and cold water are supplied to the apartment through separate pipes. In order to get a bath at the desired temperature with this design, you must first fill it with hot water and then dilute it with cold water, which is not very convenient and economical. The task of mixers is to combine cold and hot water in their internal chamber in the required proportions to obtain a stream of a comfortable temperature. They perform the following functions:

It is interesting that in some countries, for example, England, the hot water taps in the sink do not have mixers and, moreover, are located on different sides of the bowl. Imagine how inconvenient it is to use such a design. Therefore, the only way for the British to immediately get water at the desired temperature is to use a mixer with a shower.
Device
Many homeowners are interested in how a bathroom faucet with shower works, how it differs from ordinary ones, and what allows it to redirect the flow of water from the faucet to the shower head or vice versa. In fact, the design of these multifunctional models is not much different from sink appliances. However, a number of their characteristic features can be identified:

Note! When choosing a bath faucet with the ability to switch to a shower and understanding the characteristics of various models, many people wonder what a bottom valve is. This term hides special device, which is installed on the drain hole of a sink or bathtub.
The bottom valve closes the drain if water is mixed not in the mixer, but directly in the washing container. This installation scheme is popular in European countries where hot and cold water are supplied separately; it allows reducing the volume of waste water.
Types of shower faucets
A bathtub is undoubtedly a comfortable plumbing fixture that provides maximum relaxation when washing, however, the modern pace of life requires faster solutions. A shower cabin or shower has become a real alternative, which is used if the bathroom has small size. Despite the large number of common features of shower faucets, their design can differ significantly depending on the type. The following models of shower mixers are distinguished by the type of switching mechanisms:
Note! Adjusting the jet temperature in single-lever mixers is much faster and easier, which reduces water consumption, but they are very sensitive to quality tap water, so they often break. Two-valve models are recommended to be installed on a faucet connected to a gas water heater or water heater.
Operational problems
Like any plumbing fixture, a mixer with the ability to switch to a shower head has its own service life. A common problem that homeowners face during operation is dripping faucets. Knowing what the mixer consists of, you can fix the leak yourself and extend the life of the equipment. The most common causes of leakage are:

Remember that the key to the longevity of any plumbing fixture is compliance with installation technology, as well as timely preventive maintenance. In order for the faucet to last as long as possible, you need to periodically clean it, replace the gaskets, and also improve the quality of the water using a filter.
Video instruction
In a plumbing system, one of the weakest elements is the faucets. This is because even the highest quality of them with high reliability indicators will someday begin to leak. And, naturally, it will need repairs. You can make it on our own. Bathroom Shower Faucet Repair and Diverter Repair is not too difficult. An ordinary person can handle it; they just need to know how to repair a bathroom faucet with a shower. First of all, you need to understand the structure of the faucet, and also understand the reason why the leak occurred.
A mixer of this design can be lever type or valve type. Their work follows slightly different principles and it is important to understand this before starting work.
The valve mixer consists of several valves. They rotate so that the owner can get the water pressure at the required temperature. The design also includes a stainless steel housing containing a crane axle box. It is with its help that water with different temperatures is mixed.
The lever mixer is the most popular. It's all about his beauty appearance and ease of use. To regulate the required temperature, as well as pressure, one lever should first be switched to the side and then up. Such a mixer consists of a body, nuts, a rubber ring, a replaceable cartridge, a lid and a fixing bolt. However, such a mixer has a rather serious drawback. It cannot be repaired because the body cannot be disassembled.
![]()
Repairing a bathroom faucet switch to a shower
It is quite easy to understand that the switch needs repair. As a rule, it begins to leak immediately. The tap switches water from bath to shower different ways. It all depends on the type of specific switch. They are:
IMPORTANT! "Yuri Nikolaev: How I got rid of alcohol addiction in 7 days...
- Push-button;
- Spool valves;
- Cartridge;
- Cork.
And the most common among them are cartridge ones. Most often, their breakdown consists of wear of the rubber ring, which is located between the housing and the switch lever. As a result, a leak forms. It is easy to fix; you just need to replace the gasket. Follow these steps:
- Turn off the water completely;
- The housing lever should be disconnected from the tap;
- The screw must be removed from the switch;
- Then remove the switch itself;
- Replace the old unusable ring with a new, high-quality one;
- At the place where the lever is attached, several layers of FUM tape are wound onto the thread;
- Return the lever to its place and secure it with the screw.
If you have a spool switch, then most often the nut that secures this switch breaks. Such a defect can also be repaired. It is recommended to do the following:
- Remove the faucet and completely disassemble it. It is necessary to unscrew all its parts;
- Pay attention to the thread of the nut; if it is worn out, it is recommended to replace it with a new one. It is better if it is bronze;
- Take sandpaper and use it to clean the inside of the nut, as well as all surfaces that come into contact with it;
- Lubricate all parts with grease;
- Reassemble the faucet.
The repair kit for a bathroom faucet with shower is quite easy to assemble. Prepare in advance everything you might need, including new parts. All tools should be at your fingertips while working. Remember also that when performing any work with the mixer, you should turn off the water to avoid an even greater influx of water in case something fails.
What to remember when carrying out repair work
Quite often, a leak in the place where the water switches from the bath to the shower appears for quite a variety of reasons. Among them:
- Broken button;
- Water immediately enters both the tap and the shower hose at the same time;
- The mechanism with which you can control the water has worn out.
If the whole point is a broken button, then this happens, as a rule, due to wear of the gasket. The problem can be solved quite easily - replace the set of rings with a new one or repair the one you already have. For example, you can lubricate old rings with gasoline. However, the result will be temporary and you will soon discover a leak again. Therefore, it is still recommended to replace the rings with new ones.
Cleaning the aerator
A clogged aerator often causes low water pressure in the shower hose. An aerator is a device necessary to regulate water pressure. It is located in the spout area. To eliminate the problem, you should thoroughly clean the aerator.
You need to unscrew the aerator from the gander and wash it under water. Please note that the pressure must be strong. After that, simply install it back into place.
If after this nothing has changed, you should take a thin needle and carefully remove debris from the aerator. Reinstall it and check the result. If this does not help, then you should purchase a new aerator.
Prevention
Despite the fact that faucet repair is possible and to an ordinary person It is better to prevent problems with it than to solve them later. To do this, you should remember a few simple recommendations:
- Low quality tap water is the first and main enemy of any modern plumbing. The substances it contains, as well as mechanical impurities, can ruin even the highest quality and most expensive faucet;
- Do not allow solid particles contained in water to get into the elements of the product. Classic rubber gaskets, which are installed in conventional faucets, are more resistant to such particles than those gaskets installed on ceramic discs. Scratches appear on them instantly. To solve this problem, it is enough to install filters for mechanical cleaning;
- It is recommended to reduce the water hardness as much as possible. Excessive carbonate content spoils not only taps, but also electric kettles, coffee makers, etc. To reduce water hardness, you should purchase a softener filter.
All of the above recommendations will help extend the life of your faucet. Please note that you can make the rubber ring yourself. However, it will be short-lived. It is better to install such rings as temporary ones, and immediately replace them with new high-quality ones if possible.
Many, faced with this problem, wonder how to fix a bathroom faucet switch that is also broken. This is quite easy to do. Must have on hand necessary tools, new parts to replace and clearly know what exactly needs to be done.
It should also be noted that by purchasing a quality faucet, you will significantly increase its service life and reduce the possibility of leaks. Don't skimp on plumbing. Otherwise, you will constantly have to spend money on repairs.
The faucet is undoubtedly an integral part of any bathroom. It is used for supplying hot and cold water and comfortable use of a shower or bath. Thanks to this device, you can easily regulate water pressure and temperature. A special switch helps redirect the flow from the bathtub to the shower head, which is (can't help but notice) convenient.
Like other mechanical devices, faucets break down frequently. This is explained by the rapid formation of scale. It is easy to repair such a structure with your own hands. It is not too complicated, and the problem is fixed in a couple of minutes.
In this article, you will get acquainted with the varieties and types of mixers, as well as learn what their structure is, and how to independently eliminate unwanted breakdown of the mechanism.
Species diversity
Knowing how a bath and shower faucet works, you can understand the principle of its operation and deal with problems that arise as a result of a breakdown. All bathroom faucets are divided into three groups:
- Sensory - those that respond to movements by activating a photocell built into the device. DIY repair Such a device is complex, so it is better to entrust such a device to the hands of specialists. Most new development considered for the bathroom. The price for such products in Russia starts from 10,000 rubles. It is usually higher than other types of bathroom faucets.

- Valve valves consist of three structural parts: body, spout and valve. The water jet pressure is adjusted manually. Old Soviet models were equipped with a rubber gasket during assembly; modern ones are equipped with ceramic plates.
Important! Old models of faucets with rubber gaskets are still found on the market, so when choosing sanitary ware for your bathroom, give preference ceramic faucet axle boxes. This type of bathroom faucet is more durable and practical.
- Lever models of mixers in Lately are very popular. The design of such a mixer is presented in the form of a body, a spout and a ceramic or ball cartridge in which cold and hot water are mixed until the temperature you select is reached. The bathroom faucet with a cartridge cannot be disassembled. If the cartridge fails, the bathroom faucet can only be restored by replacing the unusable element.
Shower faucets lever type consist of:
- a control handle that functions as a regulator of water pressure and temperature;
- housings;
- a nut that acts as a retainer for the internal element of the cartridge;
- housing cover that protects the cartridge and gives the design a more aesthetic appearance.
The most common causes of breakdowns
After carefully studying the structure of a bathroom faucet, you will see that fixing it is not such a problem. It is only important to understand the causes of the breakdown. There are several main factors that affect shower faucets and cause product failure:
- The bathroom water mixer is of poor quality. This means that the product is assembled from low-quality components and consumables.
- Use of non-modern Supplies, the service life of which is much lower than modern paronite or silicone gaskets. In addition, they are less prone to deformation and drying out.
- Low quality piped water.
- Hard water, which negatively affects wear resistance internal parts mixer Scale can form not only inside, but also outside, negatively affecting the bathroom faucet. Bronze and chrome - protective covering for sanitary products, protecting them from scale formation and the development of corrosion processes.

Leak in the area where the spout and body meet
The single-lever bath mixer with shower may break down during long-term or continuous use. You can repair this design yourself.
A malfunction associated with a breakdown of the mixer can manifest itself in the form of a leak in the area where the body and spout meet. Plumbers face this problem almost every day. The rubber gasket that isolates the area where the gander meets the body is in constant rotation, which leads to rapid failure. When the gasket wears out, the gib begins to leak. This problem can be corrected by replacing the rubber gasket with a silicone one, which has a longer service life.

Bathroom faucet companies offer a wide range of components and consumables for their products, so you can easily find spare parts for faucets of the required model.
Water leaks from under the control lever
Such breakdowns are typical for single-lever faucets, which are caused by wear of the cartridge. Scale may accumulate inside the device, causing the bathtub faucet to break. Bronze is a coating that protects inner surface. When it overheats, its protective properties are lost. In this case, it is better to take the mixer to a workshop, where disassembly and restoration will be done efficiently. If your bathroom is installed single lever mixer for baths and showers, cartridge failure can be determined by the following signs:
- the lever is difficult to turn;
- the temperature of the supplied water changes spontaneously;
- no water supply;
- The water in the tap does not turn off completely.
If you notice one of these problems, you need to replace or restore the cartridge. Sometimes you have to buy a new mechanism if the bathroom faucet cannot be restored. The price of cartridges depends on the type of mechanism and type of mixer and ranges from 60-100 rubles.
How to fix a faucet yourself
To set up your faucet yourself, follow the instructions:
- Remove the red and blue plug from the housing.
- Remove the faucet lever by loosening the fixing screw. Use a small Phillips screwdriver for this.
- Remove the lever and unscrew the decorative cover.
- Pull out the broken cartridge.
- Mount the new device inside the box and assemble the mixer.
Important! Pay attention to the small protrusions on the cartridge - they should coincide with the grooves knocked out on the inside housings. If you install the element incorrectly, the mixer will leak.
Faucet leaking in a two-valve mixer
The reason lies in wear or damage to the sealing gasket hidden in the crane box. Sometimes the crane box itself is destroyed. If your bathroom faucet is leaking and you don't know how to fix it inexpensively, do it yourself.

A quick restoration of the mixer is performed by turning off the water:
- The leaking valve is freed from the plug.
- Unscrew the holder with which the valve is attached to the body of the product. After this, using a tool (open-end or adjustable wrench), the valve axle box is unscrewed.
- Depending on the degree of damage, the crane axle box or the seal under it is replaced.
- New parts are installed in place of the old ones, after which the mixer is assembled.
How to prevent leakage of the faucet-shower regulator
In the place of the regulator, which is responsible for switching the flow of water from the tap to the shower, there is another seal, which is often damaged. If you encounter such a problem, you can fix the mixer by disassembling only one of its switches. To restore the mechanism you will have to:
- Remove the button/switch. Use pliers to do this and hold the rod in a stationary position.
- Remove the valve with the stem.
- Pull out the damaged oil seal.
- Install the new consumable in place of the old one and place the switch with the rod in place.
Faucet-shower button failure
If, after pressing, the button does not return to its natural position, then the spring inside it has broken. In this case, the button is disassembled according to the scheme described above, and the broken spring is removed and can be replaced. If, when you press the button, water continues to flow from the tap and from the shower, this indicates a breakdown of the oil seal, which is located in the switch rod.

In this case, you need to do the following:
- Remove the button/switch.
- Pull out the rod.
- Change the oil seal.
- Reassemble the switch.
Shower hose is leaking
Damage to the hose gasket will result in leakage. All you need to do to fix the problem is buy a new gasket and replace the old one.
If the cause of the mechanism failure is serious and it cannot be repaired, you will have to buy another bathtub faucet. Bronze inside and chrome plating on the outside will help the new product last longer, protecting it from scale formation and rapid wear of parts.
Having studied this material and familiarized yourself with the main reasons for faucet failure in the bathroom, you will turn into a real jack of all trades and will be able to eliminate the problem in a matter of minutes, without resorting to anyone’s help. Just use the tips and tricks, and you will definitely succeed.
- Varieties
- Device with two valves
- Device components
- Lever lock
- Other types
Usually when renovating a bathroom or shower Special attention is devoted to the selection of tiles, broom or linoleum to cover its floor and shower stall and various small accessories and details. At the same time, the most important element of the bathroom often falls out of sight - the faucet, which in modern city apartments simply cannot be done without. People often have no idea about its structure, types of this device and varieties.
At the same time, they often forget that the main condition for convenient use of a toilet or bathroom is the correct one, which should last at least 10-15 years. Therefore, before buying this unit, you need to at least approximately know its main types and structure.
Varieties
They differ in the method of their installation and location of fastening, the principle of operation of the mechanism that supplies water. According to the last parameter, several types of mixing units can be distinguished, namely:
- Devices with water supply through one valve - they are used when only cold or hot water is needed.
- Mixers of a normal design with two valves and an outlet to the shower head.
- Devices in which a lever with a ball lock is used to regulate water.
- Mixing units with thermostat.
- Devices in which the locking device is equipped with sensors are contactless faucets that help to use water economically.
According to the installation method, all these devices can be divided into the following groups:
- mortise type mixers;
- devices that are built into the wall;
- floor mounting units.
Depending on the place of use, the following types can be distinguished:
- faucets for installation in the bathroom;
- sink fixtures;
- units for shower cabins or having access to a hose with a watering can;
- special devices for bidets (sometimes combined with a shower).
Return to contents
Device with two valves
This is a classic type of bathroom fixture. In them, the water pressure and its temperature are regulated by manually rotating the mixer handles. This device is a small volume chamber designed for mixing streams of hot and cold water.
This mixture reaches the consumer through his spout, on which a mesh is installed to prevent splashing of water. A device with two shut-off valves also has some features:
- To strengthen it to the pipes water supply network special eccentrics are used.
- The distance between the underwater water pipes must be from 14.8 to 15.2 centimeters, otherwise the mixer will not be able to be installed.
- The most important detail(the service life of the device and its reliability depend on it) – these are two valve heads built into the mixer body. Handles are secured to the top with screws. They are made from various materials, and they come in a wide variety of designs, shapes and sizes.
To prevent water from leaking out from the places where various parts are attached to the mixer body, sealing gaskets made of rubber or plastic are used. For normal operation of the device, they need to be changed periodically to avoid water leaks. Since such mixers are widespread, below is given Full description devices of this type.
Return to contents
Device components
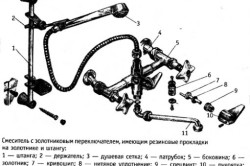
To understand its design in more detail, let’s turn to the Soviet-style faucets still preserved by many, which were produced for combined bathrooms. They consist of such main parts as:
- body-chamber in which hot and cold jets of water are mixed;
- spool switch;
- eccentrics;
- spout with mesh (or without);
- decorative flanges - they cover the connection point water pipes to the mixer;
- rubber gaskets for different parts device,
- valve heads;
- pens.
Such units are connected to the water supply through steel corners if the pipes were installed in the wall. The distance between them is chosen to be 148-152 millimeters. For precise installation eccentrics are used in the horizontal plane of the device. They are different from modern models. During installation, flax tow was previously used. Before screwing the eccentric into the corner (coupling), you must first put on the union nut, and then the decorative flange. The entirety of this type consists of approximately twenty parts.
Rubber gaskets are installed between the eccentrics and the mixer body and are needed to prevent water from escaping from the connection point.
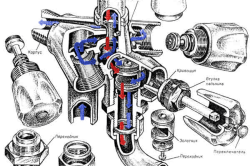
Shut-off valves are screwed into the main body of the device and must fit very tightly to the seats of the device. They have gaskets installed. The taps themselves are closed with handles that are placed on their rotating rods. These elements are secured with screws, which are covered with plastic plugs in red and of blue color(hot and cold water, respectively)
The faucet spout is sealed with rubber and plastic gaskets. To secure it to the body, a fixing nut is provided. The shower-spout switch consists of several elements, the main one of which is the spool. In order for it to tightly block the flow of water jets, rubber gaskets are installed on top and bottom of it, fixed with screws.
To ensure the movement of the spool up and down, a crank is used in this design. The stem of this part has grooves for rubber rings, but linen cord can also be used to ensure a seal. The crank itself needs to be well lubricated. A switch handle is installed on it. A special screw is used to secure it.
On the body there is an adapter for attaching a shower hose, which is secured using an adapter nut with a rubber gasket.


