Simple and functional f-shaped clamps made with your own hands will become indispensable assistants in your workshop and will allow you to save considerable amounts on expensive clamps, of which, as you know, there are never too many. The cam-type quick-release clamp is optimal for situations where large clamping forces are not required: gluing narrow or small parts, edges, fixing workpieces, etc.
The cam clamp works on the principle of a classic f-shaped clamp. It consists of a guide rail and two jaws: movable and fixed. By fixing the workpiece in the jaws and turning the cam 90°, the tool will provide a strong and reliable clamp. It’s not difficult to make a homemade clamp with your own hands at home, with a minimum of tools and consumables.


The proposed clamp drawing and detailing are a basic guide. The design of the product is such that you don’t have to worry about materials and dimensions, changing them to suit your needs. The tire can be made of either metal or wood. You can also vary the length and width of the jaws to increase the gripping depth of the clamp. Rivets or small bolts may be used instead of metal pins. The movable and fixed jaws are mirror images of each other, so it is convenient to produce these parts in series, several pieces at a time.

By making your own set of clamps and simple wooden stops, shown in the photo, you will get an effective corner clamp, which will become an indispensable assistant when gluing together perfect frames.
Carrying out plumbing or carpentry work in places not equipped for this purpose is inevitably associated with the problem of securing workpieces. It is very difficult to prevent them from moving around the table or workbench during processing if they are not equipped with special clamps, a vice or other fixing devices. One such device, simple, affordable and versatile, is clamps. We will tell you what they are and how they are used, and also give detailed instructions on how to make reliable clamps with your own hands.
What is a tool needed for, its design and types of tools
The clamp is an additional carpentry tool. The main purpose of clamps is to fix a workpiece on a support surface or several workpieces for gluing them together; therefore, the design of the tool must include at least two elements: a support surface and a movable jaw equipped with a fixation mechanism. The movable jaw is usually moved using a screw or lever, which allows for increased compression and prevents backlash during operation. Depending on specialization and design features The following types of clamps are distinguished:
- Screw G-shaped ones are the most common, characterized by their simplicity of design and relatively low cost. They are represented by a metal bracket, on one side of which there is a supporting surface, and on the other - a threaded eyelet with an adjusting screw screwed into it. Interior The screw is equipped with a working jaw, the outer one is equipped with a handle. The tool is effective when working with heavy, large workpieces of simple shape.
Clamps of this type are suitable for working with large workpieces
- F-shaped ones are more universal; their supporting surface is fixedly fixed on a long rod along which a working block with a sponge slides. Movement and fixation of the block is ensured by an auxiliary screw or a stepper pressure mechanism.
Objects are fixed using an auxiliary screw and a stepper mechanism
- Pipe - allow you to fix large-sized workpieces by varying the length of the pipe. Consist of two individual elements - base plate with a screw clamp and a jaw sliding along the pipe.
The clamp is suitable for working with large workpieces
- Angular - designed to simplify the joining of workpieces at right angles, for which they have two supporting and working surfaces. They are divided into two subspecies. The first involves the presence of two clamping screws located perpendicular to each other; the second is equipped with a single screw with a double-sided corner block at the end. Very rarely there are specialized clamps that allow you to position workpieces at an acute or obtuse angle.
Clamps of this type simplify joining workpieces at right angles
Corner clamp with double-sided corner block
- Tape - equipped with a flexible element and several jaws floating on it. By fixing the jaws in certain places on the belt and adjusting its tension, you can process workpieces of complex shapes.
The band clamp is equipped with a band element that allows you to fix the workpiece around the perimeter
- Pincers - consist of two hinged parts and a spacer spring. In practice, they are rarely used due to the relatively low reliability of the joint, but they provide maximum speed for installing and removing the workpiece.
This clamp is rarely used due to the low reliability of the joint
At home, the first clamps most often made are three types, since they are not too demanding on materials and production technologies, and also allow you to solve most household problems that require the use of auxiliary tools.
You will find even more information about the types of clamps in our next material:
How to make a carpentry clamp with your own hands: step-by-step instructions with drawings
To make clamps at home, it is enough to have basic plumbing and carpentry skills. The materials used are wooden beam, rolled metal, pipes and fasteners, in particular bolts, studs, nuts, pins. For joining metal parts of clamps, it is desirable to have an electric welding machine. When performing any work, the main thing is to follow the instructions and observe safety precautions.
Manufacturing of screw type tools
This type of clamp will help to secure wood workpieces well.
A clamp made using this method is perfect for fixing small wooden pieces - plywood, fiberboard sheets, OSB and chipboard, as well as boards and thin timber. We suggest that you choose the scale yourself, but otherwise it is better not to deviate from the following sequence of actions:
- Transfer the templates of all wooden parts to thick paper or cardboard in accordance with the selected scale.
- Using the template, transfer the image onto a board of a suitable width. It's better not to use pine boards, but harder wood.
- Using a jigsaw, cut out all the parts. Correct the shape with a file and sand the surface with sandpaper.
- In the “jaws” mark and drill holes for the axial bolt. Lengthen the hole in the upper “jaw” using a round file so that its length is 1.5–2.5 times the diameter of the bolt.
- Drill a hole in the handle for a nut with a diameter corresponding to the number wrench. Using a file, give it a hexagonal shape. Install the nut inside with epoxy or cyanoacrylate glue.
- Assemble the clamp - fix the axial bolt in the lower “jaw” with glue, install the rear loop on the screws, put on the upper jaw and, placing a washer, install the handle. Apply soft pads to work surfaces.
An even simpler option is to make a screw clamp from a hacksaw.
A simple version of a hacksaw clamp
In this case, it is enough to weld a support pad at one end of its arc, and a nut at the other, into which the adjusting screw with jaw and handle will be installed.
Homemade quick-release clamp made of wood
Making such a clamp will take longer
The use of F-shaped clamps significantly speeds up the work process. But making the clamp itself is somewhat more complicated than creating its screw counterpart. You will need to do the following:
- Transfer the images onto the lumber as described above. Accurately observe the specified dimensions of the parts and the locations of the pin holes.
- Cut out the parts with a jigsaw, use it to make a narrow slot in the movable jaw and deep slots for the axial plate. Using chisels, select the groove for the cam lever.
- Drill holes for the pins. Process all external and internal surfaces parts with a file, and then with sandpaper.
- Using a grinder, cut out an axial plate from a metal strip and grind it. Drill holes for the pins.
- Assemble the tool by installing the jaws onto the plate using pins. Insert the cam into the movable jaw. Glue on the working pads.
- Check the functionality of the quick-release clamp. If necessary, change the shape of the working part of the cam lever.
Rough fixation of the lower jaw on the axial plate can be achieved by wedging its guide pins, inserting an additional pin, using a screw clamp or another method.
Video: making a quick clamp
Metal pipe
To make such a clamp you will need a metal pipe
For such a tool, you will need three metal rings, the inner diameter of which corresponds to the outer diameter of the pipe you have, instead of which, by the way, you can use a metal rod. If you have a welding machine, the process of making a clamp comes down to the following algorithm:
- Weld support platforms to two rings, which can be made from angle steel; Install a nut on the third ring, and weld the ring itself to the end of the pipe.
- Weld an improvised handle made of a metal rod to the head of a long bolt, screw the bolt into a ring with a nut.
- From the free end of the pipe, place the ring of the upper movable jaw on it. Make holes in the lower jaw ring for the fixing pins.
- Install the lower ring onto the pipe.
A pipe clamp is ideal for holding furniture elements during assembly; it will be convenient in construction and installation work and other similar operations.
Video: homemade pipe-type clamp
Corner
To make this type of clamp, you can use wood, metal or duralumin. They differ from each other not only in material, but also in clamping force and the size of the fixed workpiece. Our next material provides detailed instructions for making tools:
Both in everyday life and in professional activities related to wood and metal processing, clamps will become an indispensable assistant. By following the instructions and having a simple set of materials, you can make this tool yourself.
In this article you can familiarize yourself with detailed instructions for making a homemade wooden clamp.
This auxiliary tool will be useful for fixing any parts, for example, for processing parts or for holding tightly when gluing several parts together.
In this project, the author decided to make several clamps at once, a kind of set for securing parts of various sizes. But you may not need such a number of clamps, so for simplicity, the volume of materials spent will be indicated per one clamp, and if you want to make exactly the same set as the author’s, then simply multiply the number of materials by four.
Materials used:
- Hardwood wood 1.9 cm thick and at least 2.5 cm wide
- steel rod 12mm
- pin 6 mm 20 turns per 2.5 cm
- inch nuts 12mm 2 pcs.
- inch spring pins 2.38 mm long 19 mm 2 pcs.
- 6 mm tap 20 turns per 2.5 cm for cylindrical nuts
- drill for a 5 mm tap.
Description of the manufacturing process of wooden clamps:
Step one: preparing the wooden parts.

To begin with, the author decided to divide the wooden blank into two parts. The first part should be wider; the jaws of the clamp, measuring 25 by 19 mm, will be made from it. The second part of the workpiece will be square in size with a size of 19 by 19 mm; handles for the clamp will need to be made from it. Dividing the initial wooden blank in this way will make it faster and easier to cut the necessary parts.
Step two: Cutting out the handles for the clamp.


At this stage, a band cutting machine was used.
In order to cut the handle blank to the desired shape, the angle on the machine was set to 33 degrees. As a separator to get required thickness and a 12 mm nut was used to orient the shape.
Thus, making cuts using a machine, alternately turning the workpiece over, the author cut off layer by layer, obtaining a hexagonal shape of the workpiece, following the example of the used nut.
After the hexagonal shape has been obtained and optimal thickness, the machine parameters were switched to a 90-degree cut. Next, the author used the same machine to cut required amount handles 64 mm long from hexagonal blanks.
Step three: Cutting jaws for the clamp.


Next, the author began processing the second workpiece and cutting jaws for the clamp from it. The angle of inclination on the jaws is not mandatory, it rather serves for greater convenience. Therefore, you can determine the amount of tilt yourself based on your preferences. The author made this part longer, after which he used it to cut an inclined angle for other parts and other workpieces. He considered the tilt angle of 15 degrees to be the most universal.
When using a carpenter's angle, it is necessary to take into account the fact that the slope of the line is 50 mm by 70 mm. The angle should be installed at a distance of 12 mm or centrally in a workpiece with a width of 25.4 mm. With this approach, the author recommends first cutting off the corner, and then cutting the jaws for the clamp to a length of 102 mm. These preparatory stages will allow you to reduce the chances of making any mistakes and spoiling the workpiece, which means they will save materials and your time.
After finishing cutting the blanks for the clamp jaws, the author divided them into two groups: he labeled one group as jaws A, and the second as jaws B.
Separation into two groups is necessary, since sponges will have different mount. Therefore, the work of drilling holes for them will also be different; it is easier to understand the difference in fastening diagram from photographs of a ready-made clamp.
Step four: work on the jaws B.
To begin with, markings were made for drilling jaws from both groups. It is necessary to mark two holes with a diameter of 6 mm for the pins that will tighten the jaws. Two holes with a diameter of 6 mm should be located on the inner and upper surface of the jaws, passing through them. The first hole is located 19 mm from the rectangular edge of the jaw and located 9.5 mm from each side. The second hole is marked at a distance of 44 mm from the rectangular (back) wall of the sponge and is also located centrally relative to the other sides. After which sponges B are put aside.
Step five: finishing the sponges from group A.


Jaw A is slightly different from jaw B. Jaw A has two additional holes for cylindrical nuts, through which rods will pass to tighten the jaws of the clamp.
Therefore, in each jaw A two holes with a diameter of 12 mm were drilled through one side, as shown in the picture. The first hole with a diameter of 12 mm should be located at a distance of 19 mm from back wall sponges and at equidistant distances from the top and bottom edges of the sponge. The second 12 mm hole should be located at a distance of 44 mm from the back wall and equally distant from the top and bottom edges. Thus, you should get a set of jaws with two holes along the center line of the outer planes of the jaws, as well as two holes for pins with a diameter of 6 mm with inside sponge
Step Six: Threaded Studs


Using a hacksaw, the existing stud with a 6 mm thread was cut into pieces of the required length. There should be two stud blanks for each clamp. One blank is 114 mm long, and the second is 127 mm long. After which they were put aside until the stage of making handles for the clamps.
Step seven: making cylindrical nuts.

In this case, cylindrical nuts mean round steel parts with side holes drilled in them with threads for a 6 mm stud. Probably, such nuts or something similar can be bought, but the author decided to make them himself.
To make cylindrical nuts, metal was required round blank with a diameter of 12 mm. Cylinders 19 mm long were cut from it, to the thickness of the clamp jaws. Then, holes were made in the side of each cylinder in the center, which, when placing the cylinders in 12 mm holes on jaws B, should coincide with 6 mm holes on the same jaws B. After that, threads were cut into the holes of the steel cylinders at an angle of 90 degrees by 20 turns using a 6 mm tap.
Step Eight: Creating chamfers on the clamp handles


To make it easier and more convenient to hold and tighten the handles of the clamp, each of them will have a chamfer. In addition, such a detail makes appearance the instrument is more attractive, in the opinion of the author.
To begin with, the blank for the handle was secured, in this case in another ready-made clamp. After which the author made markings in the form of a hexagon on the outer surface of the workpiece, and markings were also made in the form of limiting lines along the sides of the future handle at a distance of 3 mm from the outer plane of the handle, as shown in the picture.
After that, using a sharp cutter, the chamfers were cut off and a handle blank with chamfers was obtained.
Step nine: creating a protrusion on the handles of the clamp.


To be able to screw a 12 mm nut onto the handles, the handles need to be cut to a diameter slightly larger than the hole in the nuts. This way, the threads of the nut will engage securely with the wooden lip of the handle, providing a fairly secure connection. It would be convenient to process the handles on lathe to create the desired diameter of the protrusion, but you can also do this manually.
To do this, the author pressed the stop block against the saw guard, and used a 12 mm nut as a limiter for the cutting depth, as well as to ensure the required distance from the fence. After that, a wooden blank was taken for each handle and all the necessary cuts were made.
Thus, the result was a drawing which you can see in the picture above. After cutting off all the extra protrusions, you should get a handle with a ready-made protrusion for the nut.
Step ten: turning the protrusion of the handles.


In order to fit 12 mm nuts onto the handles, you need to cut off all the corners of the protrusion and grind the protrusion to the desired diameter. It is best to practice on some failed workpiece beforehand in order to understand to what extent it is necessary to grind off the protrusion and not spoil other workpieces.
To do this, the workpiece must be firmly fixed and ground to perfection. cylindrical. Then carefully, so as not to damage the workpiece, you need to screw the nut onto the protrusion.
Step eleven: the final stage of making handles.
Every craftsman who makes products and parts made of metal or wood cannot do without homemade clamps. Previously, such a tool was produced in various modifications, from specialized to universal. The main task is to fix the workpiece for processing and joining operations. Let's figure out how it's made quick clamp with your own hands in various variations.
Angle clamp
This type of do-it-yourself metal clamp is designed for fixing two objects at right angles and connecting them to each other using any methods, however, the main purpose is as a jig for welding metal parts at the angle required for work. To make it properly , you will need the following components:

Corners should be welded at 90 degrees to metal or steel plates. We attach the worm-type structure by welding, and screw a pin-driver into the working nut in order to assemble a stop at the end. The stop must turn freely. Then with reverse side it is necessary to drill a hole where we insert a metal rod as a lever. Incredible simple design and practicality of use have become the key to the popularity of such a clamp among everyone who works with metal and products made from it.
Carpenter's clamp
Such designs, used in carpentry, there are the following types:
- Standard clamp, which is the most popular or simple;
- In the form of a caliper for parts small size and operational fixation;
- Self-clamping clamp for milling processes and working with workpieces of various heights.
The first type is made from two pine blocks, a locking nut, rods, threaded wing nuts and thrust washers. The manufacturing process is very simple:
- We cut out the working pliers from the bars, drill holes for the studs, taking into account a small amount of play;
- We screw in the studs and lock them using appropriate methods;
- We ensure alignment with nuts, made either in the form of wings or standard nuts for improved tension.
 The second option is used when prompt fixation of small parts is necessary. Production is carried out from small bars and thin-sheet plywood. Furniture nuts and collar pins act as a worm system. One stop is stationary; we attach it to the end of the guide rail, in which we cut out recesses to fix the moving mechanism.
There are both portable and stationary versions of this design, where grooves are cut for movement with the fastening of fixed stops. The clamp is a furniture nut, a hairpin and a knob. Due to this, you can work with workpieces of any size.
The self-clamping design has a lever with an eccentric at the rotating end. We turn it at a certain angle, a quick clamp is automatically obtained. The height is adjusted with a pin on the workbench. It is made individually for each matrix, depending on its purpose and the purpose of the work being carried out.
Pipe clamp
 Welding metal pipes end to end is a complex operation. It is considered simpler to weld the pipe to the finished system. The design for such cases is made of a metal angle and steel plates. The halves of such a device should be fixed using the traditional method, namely with threaded rods. As a result, you can get a fairly simple and effective design, which will greatly facilitate the work when welding pipes with various designs.
There are other types of designs, including cam mechanisms, tape and wire clamps, which can be useful for working with specific structures, including particularly fragile and thin ones. However, their production is the subject of separate master classes and articles on specialized resources.
Homemade clamps are indispensable assistants for any craftsman working with metal and wooden parts and products. Making them is quite simple and very exciting. Here it is important to follow the manufacturing technology, find the best instructions and videos. You can buy clamps, but they may ultimately not be suitable due to the specificity of the workpiece or work. This is why you should make your own clamps. Good luck working with various workpieces and making homemade quick-release clamps!
It is very important that during processing the part is correctly and permanently fixed. Therefore, tools are so often required that in such situations will be assistants and will be able to solve this problem in such a way that during any thermal or mechanical treatment it remains in one motionless position, as the master needs.
By the way, an angular clamp is just such a clamp that is perfect both for fixing a part during processing and for compressing several parts into a single whole so that a strong bond is obtained.
The principle of operation of the clamp
If the master decides to do some work from wood or metal, then he should process the part. But this can be done efficiently only if this part is fixed very firmly with a clamp.
Old models of such a tool allowed working with only one hand, but now new models of this tool are appearing, which serve as an integral assistant to any master, and they are not only quick-clamping, but also allow you to work with the part with two hands.
There are several types of such clamps:
- Lever.
- Screw.
- Assembly.
- Corner.
- Manual.
 Let us briefly describe each type of clamp. The first type is lever. This means that the work of such an assistant tool is based not only on axial work, but also on the work of levers. Often people also call them clamps, which allow you to quickly fix parts intended for processing.
Lever clamps do not require a master great strength, in order to clamp something with them you only need to apply a little force. And so that the parts are clamped tightly and can no longer move, it is necessary to use a lever, which will do all the work for a person.
The design of such a lever clamp is quite simple; you can even make it yourself. To do this, you will need a main frame and some element where the main clamp can be located. With the help of such an assistant tool, you can not only clamp parts and make them motionless, but also calculate the clamping force, which is important, for example, when gluing.
The remaining types of clamps differ from the first type and from each other in that they have different clamping mechanism. Many of these types of assistant tools can be made with your own hands.
How to choose the right clamp when purchasing
 Choosing a tool such as a clamp is not difficult, you just need to know a few rules that will help you purchase such a tool - an assistant that will become indispensable for you when performing any type of work. First of all, you should pay attention to what the working stroke of your tool is.
In addition, it is worth paying attention to the fact that what is the distance between the elements - clamps. The higher the scores on these two points, the better this tool will be for you. This will allow you to use clamps for working with parts, both large and small.
Types of screw clamps
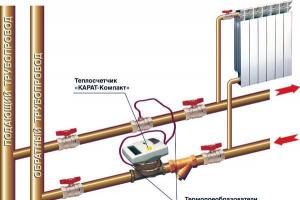
 In such an assistant tool, the first place is no longer a lever, but a screw. This type of clamp is also popularly called a pipe clamp, since it is used for clamping pipes that are usually used for plumbing work.
Such a tool is considered very strong and reliable in the plumbing industry, as it is made of duralumin. By the way, such instruments are also used to make special holes for installation, so that it is convenient to fasten any part to the workbench when working. Making such a tool with your own hands and at home will be quite difficult.
Now a few words about the assembly clamp, which is most often used in the construction of various objects. The main purpose of such a tool is hold any construction materials, such as, reinforced concrete slabs so that they can be processed efficiently.
This clamp is considered the most reliable for work, but if you study its design, you can easily understand that it is simple. Looking at the drawing, which reflects its constituent elements, you can easily assemble it with your own hands.
The manual clamp has several options:
- Cam.
- Wedges.
- Angular.
There are other options for this hand tools- assistant. Popularly, such a clamp is called a spring clamp. This is due to the simple design and the same easy to use. Therefore, you can easily make such an assistant tool with your own hands.
Instructions for making a tool - an assistant with your own hands
 To make a clamp, you must correctly follow the step-by-step steps described in the instructions. First, we acquire the parts that are necessary to make a tool - an assistant with our own hands.
To make a clamp you will need the following items: n several studs with threads of different diameters, nuts, which are suitable in size, several boards made of plywood, and a couple of slats.
The second step for making a clamp is to create the base. You can also make it yourself. To do this, you should secure what you have already done on the table. Then we take the bars and, applying them to the clamp, drill holes where they are needed in order to press them more tightly to the base of the table.
 The third step is to make the clamp yourself. This will require those plywood boards that you prepared in advance. You must press them against the bars that are already attached to the clamp, but so that they are movable.
You must understand that the role of these boards in the tool that you make with your own hands is to act as levers in the clamps. Now using studs and nuts, all that remains is to secure this entire structure that you made with your own hands.
But when using such a tool - an assistant that you made yourself, you should understand that it is not very durable and it is difficult to talk about its reliability. But it can be perfect for many household jobs, if they are not very complex.