A summer cottage or a country house is perfect place for relaxation and work in the fresh air. And how great it is after an active summer day on summer cottage take an invigorating shower, refresh yourself and gain strength. But in most cases country houses do not have the benefits of civilization. Summer garden shower for a summer cottage will help solve many problems when working at a summer cottage. This is both a salvation on a hot summer day and basic hygiene procedures after work. After all, every person, having finished work, wants to stand under streams of cool or warm water and take a shower.
The shower for the dacha is made in different variations and is a prefabricated metal structure with water container, curtain and tray.
summer garden shower for the cottage
It happens different types, heated or unheated, changing room or without. The shower frame has a very convenient design; it is easy to assemble and install in any place convenient for you. Top for summer country shower a tank is installed that can be heated both from sunlight and from electricity, setting the required temperature, which allows you to enjoy hot water even in rainy weather.
The shower for the dacha is very easy to use and does not require special skills during assembly. When disassembled, it does not take up much space, so you can easily put it away in a secluded place or take it with you after the end of the summer season.
With this purchase, you will solve problems with hygiene at your dacha and provide yourself and your loved ones with a comfortable holiday in nature!
A country shower with heating and a changing room is, perhaps, the dream of any lover countryside holiday, because after working in the garden, most of all you want to wash yourself and relax under the streams warm water. We will look at design options and tell you how to make a heated shower in your country house with your own hands.
Features and varieties
Characteristic differences
Speaking about a country shower, it is worth paying attention to a number of significant features that distinguish it from ordinary bathrooms. These differences determine how to solve technical problems and how to implement specific models and structures in suburban areas.
The most significant distinctive features are:
- The shower room is located outside the house on the site and does not have a heating system, thick walls or roof. That is why this design is called summer;
- Even warm shower cannot fully guarantee winter operation. As a rule, such structures allow normal use in conditions of summer and inter-seasonal cold spells, but nothing more;
- There is no centralized water supply. Because of this, it is necessary to equip it with a special tank located above the cabin to ensure water pressure;
- Absent sewer system . This leads to the fact that for the shower to function normally, it is necessary to construct a waste pipe and a septic tank to purify the water. With low intensity of use, you can limit yourself to simply draining water into the ground;
- No centralized supply hot water . This entails the need to construct a heating system from the sun or electrical energy. It is possible to use wood, gas and gasoline heaters.
Important!
The listed differences determine the features of the construction of a country shower, during which it is necessary to solve a number of technical problems: organize the supply and drainage of water, ensure its heating to an acceptable temperature, and build a cabin.
As a rule, dacha owners build showers with their own hands, which is why the methods of their construction take somewhat unique forms, characteristic of folk art. We tried to weed out the unnecessary and highlight the most acceptable design options.
Varieties
There are many ways to make a country shower. These can be simple and unpretentious designs, or real masterpieces of engineering. We will not go to extremes and will look at examples of proven and easy-to-implement solutions.
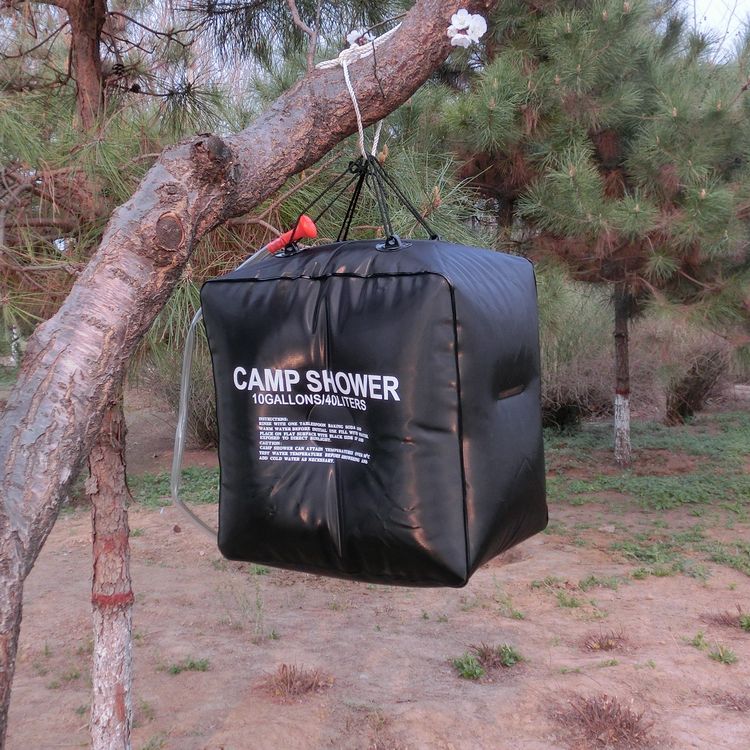
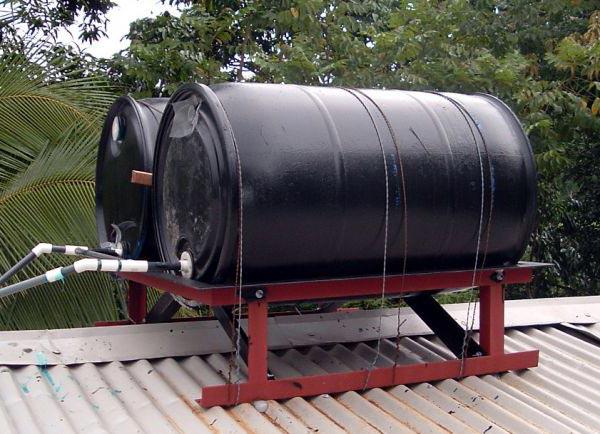
The most common example is country shower cabins with water heated by the sun. Here the heating problem is solved simply: since the shower is summer, the water tank is heated by the sun's rays, for which it is placed on open place above the booth.
It itself is a barrel made of metal or plastic; any tank of sufficient volume can do. On the bottom side of the tank there is a built-in pipe with a tap and a shower head. When you open the tap, water begins to flow downward under its own weight, providing sufficient pressure for comfortable washing.
The outer walls of the tank are coated with black paint to more intensely absorb infrared radiation from the Sun. By lunchtime the water is already quite warm, and by the end of the day it can warm up quite significantly.
More modern version is a tank with a heating element connected to a 220 V network. Today it can be found in construction stores ready-made heated shower cabins for dachas, the price of which ranges from 10,000 rubles and above.
There are also ways to heat water using wood-burning titans, and some craftsmen make something like a gas water heater from blowtorch and a coil from the radiator. These are all interesting, but not the most effective options.
During hot weather, idle Summer shower without any bells and whistles it seems quite comfortable.
But as soon as the sunny weather gives way to cloudy weather, water treatments turns into torture.
And in the off-season - in spring or autumn - only a trained “walrus” can force himself to go into such a bath.
What should the rest of the, so to speak, normal people do? There is only one way out - to provide heating. After reading this article, you can easily make a heated shower at your dacha with your own hands, in which you can wash comfortably in any weather.
At the design stage, the following questions should be considered:
- Tank volume: depends on the number of users. For a quick rinse, 1 person will need at least 15 liters of water.
- Volume of the drainage pit: the pit should be at least two and a half times larger than the tank.
- Frame and cladding material: the frame can be assembled from polypropylene pipes, rolled metal or wooden board and bars. For cladding use any moisture-resistant sheet material: plastic panels, polycarbonate, special plywood. When choosing a material for the first layer of sheathing, there is no need to pursue aesthetics: for the purpose of insulation, the heated shower will be covered with foam plastic.
- Shower dimensions.
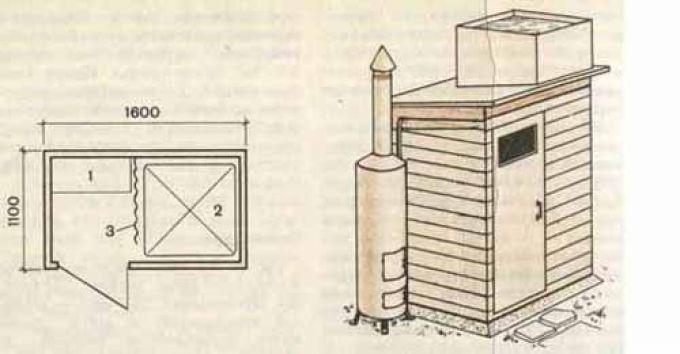
As experience has shown, the most comfortable are structures with dimensions of 1.9x1.6 m in plan (shower + changing room) and a height of slightly more than 2 m.
Choosing a location on the site
The following requirements apply to the shower area:
- the terrain should facilitate the drainage of wastewater (choose a location on a hill);
- the cabin should be well lit by the sun;
- The location of the bath should be protected from wind or draft.
Often a shower cabin is made as an extension to the south side of the house. A frame attached to the wall will be more durable, and the bath will be completely protected from the wind on at least one side.
Preparing the base
 At the site of construction of the cabin, it is necessary to select all the fertile soil, reaching the underlying layer of soil - sandy loam or loam.
Next comes laying the foundation.
Laying the foundation
The building being erected will rest on a foundation of bored piles. Such supports are very easy to construct:
- By using garden borer you need to drill a well, the bottom of which is located 30 cm below the depth of soil freezing. The diameter of the well should be 100 - 150 mm.
- At the bottom of the well, a 30-centimeter sand or gravel-sand cushion is made. It needs to be compacted, pouring generously with water.
- We lower it into the well plastic pipe corresponding diameter. It will simultaneously play the role of formwork and waterproofing for the concrete pile.
- Inside the pipe, it is necessary to secure a reinforcing frame made of 3 vertical rods with a diameter of 8 - 12 mm, equally spaced from each other, connected by crossbars made of rods with a diameter of 6 mm. All frame elements must be connected with annealed wire - welding is not allowed.
- All that remains is to fill the pile with concrete. At the final stage of pouring into concrete, you need to monolith the anchor bolt (in the center), on which the grillage beam will be placed.
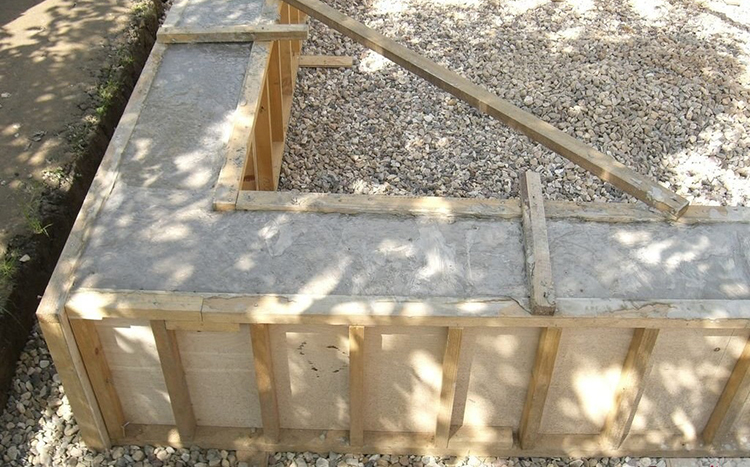
Shower foundation
In soft soil, instead of bored ones, you can use driven piles made from steel pipe with a diameter of 60 - 150 mm with a flattened end.
In this case, the anchor bolt for fastening the grillage beam should be welded to the pile.
Drain arrangement
At a distance of no less than 3 m from the shower, you should dig drain hole about 2 m deep. It must be taken into account that the distance between it and the house or other building must be at least 5 m.
If the soil at the construction site does not absorb water well, you need to drill a well at the bottom of the drainage hole, whose base would reach a layer with good water absorption.
 You need to install a polymer pipe into the finished well, so that about a meter section of it is outside.
Several holes should be drilled in the walls of the pipe at the upper end.
After which, the entire perforation, together with the end hole, is wrapped with geotextile.
There is a type of geotextile that resembles black isospan. In this case, it should not be used, since this material does not allow water to pass through well.
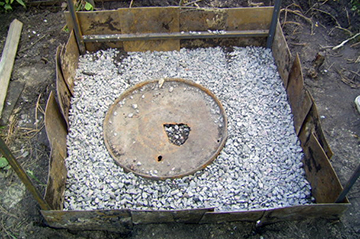
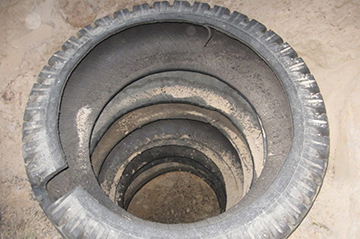
At the bottom of the pit and well, a backfill of crushed stone is made. Then it is installed plastic barrel without a bottom or several worn-out tires. A hole should be made in the wall of this tank to which the pipe coming from the shower will be connected.
 Dacha owners still use their plots to a greater extent for growing vegetables and fruits rather than for recreation. On hot days after hard work I really want to freshen up, so a shower is a must. - Let's look at how to build a frame structure.
Read how to organize a tire drainage pit. How durable is this system, what are its pros and cons.
On hot summer days at the dacha, it’s quite possible to take a cool shower, but if the weather suddenly turns bad or just gets cold in the evening, it’s not so pleasant to swim under ice-cold water. In this article, how to equip your shower warm water using a heating tank.
Construction of the frame
Grillage beams should be laid on the foundation piles, which will simultaneously play a role bottom trim. Next, using corners and self-tapping screws, racks are attached to them, the upper ends of which are connected by beams of the upper frame.
If the frame is assembled from wood, all elements must be treated twice with a water-polymer composition, then with biocides. The last stage of preparation is treating the wood with hot bitumen.
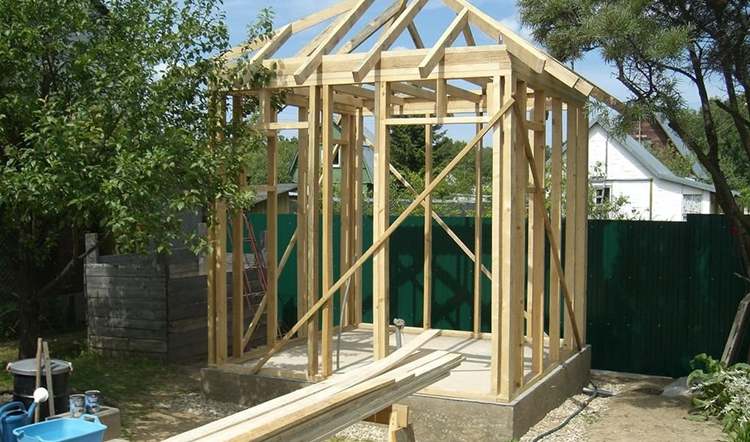
Wood frame
Please note that even with these precautions high humidity will soon lead to the appearance of fungus on the wood. To delay this moment, the wooden shower should be raised above the ground by 200 - 250 mm.
The frame is sheathed with moisture-resistant plywood or plastic, then the walls are covered with foam plastic, on top of which colored polycarbonate is fixed. At the top of one of the walls in the locker room and shower there should be an opening covered with transparent material.
It will be better if such a window in the shower stall is opening - this will make it possible to quickly dry it after water procedures.
Features of the construction of the heating system, floor
 To heat the washing room, you need to install an old thin-walled radiator connected to a closed circuit with heated water circulating through it.
The movement of water in the circuit is ensured by a circulation pump.
In the washing room, instead of the floor, you should install a commercial shower tray (low version).
It is installed inside a frame made of wooden beams.
The floor in the locker room is made in the form of a grid, which is assembled from beams with a cross-section of 40x40 mm or polypropylene pipes. In the latter option, the holes in the pipes should be filled polyurethane foam so that moisture does not accumulate in their cavity.
Installation of the barrel
A tank with an electric heater and thermostat can be installed on top of the cabin. Such products are sold today in a wide range.But this option has significant disadvantages:
- A significant part of the heat is spent on “street heating”.
- All household members, regardless of preferences, will have to wash with water at the same temperature or wait until the water reaches a comfortable temperature after the previous user.
More practical option– attach an inexpensive boiler to the wall outside the shower, protecting it with a canopy. An ordinary barrel is placed on top, from which water is supplied through a tee to the mixer and to the boiler. The outlet from the boiler is connected to the second pipe of the mixer.
 Before you start building a shower room in country house, you need to study a lot of nuances, because when dealing with water, you need to be able to prevent possible leaks and damage to the foundation in advance. — recommendations on the order of construction work.
Making Tips shower tray you will find it yourself in the article.
Video on the topic
How nice it is to escape from the stuffy metropolis and find yourself at your own dacha! Fragrant greenery, birdsong and the friendly sun are wonderful.
But, if there is no summer shower on your site, hot days will turn from relaxation into torture. But building a heated garden shower for a summer cottage with your own hands is not at all difficult. You just need to approach this process in detail.
Before you start building a summer shower, you need to determine exactly where it will be located. Basic selection rules: 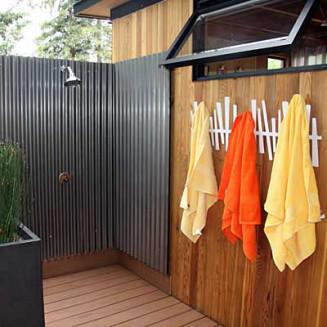
- Place the shower stall in a sunny location. It is advisable to find an area where the sun penetrates throughout the day. Then you can rinse off with refreshing water at any time.
- The shower stall should be located on a hill for the best drainage of water. When using the shower you will spend a large number of water. Stagnation of water under the cabin is fraught with erosion of the soil and, as a result, loss of stability of the structure. Also, stagnant water will lead to unpleasant odors.
- No drafts or visibility. Despite the fact that the wind is warm in summer, the presence of airflow can bring you a lot of trouble. And the location of the shower in the most visible place is not desirable from an aesthetic point of view.
Organization of drainage
The best solution would be to connect the drain to the gutter. If it is missing, dig a hole not far from the shower stall. Using a hose or pipe, connect the drain hole to the hole.
The platform for a summer shower should be inclined towards the drainage pit.
In this case, the used water will flow freely through the inclined pipe.
Provide the bottom of the shower stall with a tray or make a container for water drainage yourself. To do this, fill the area of the required size with concrete. Place bricks around the perimeter that will serve as a side. 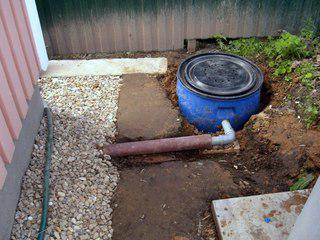
The shower drain cover must be provided with a waterproof coating. The following materials are suitable for this:
- roofing felt,
- hydrostekloizol,
- concrete with the addition of PVA,
- PVC film.
It is a mistake to use a clay covering for drainage. Such flooring will be washed away by water over time.
How much it will cost is detailed in this article.
How to build a country shower and toilet so that they do not interfere with each other is described in detail
Shower cabin
Cabin design
The width and depth of the shower stall should be at least 1 * 1 m, and the height should be 2 m and above. The space inside the finished structure should be enough to turn around, raise your arms and bend over without obstacles.
It should also be taken into account that there should be a place in the booth for a changing room, where water will not penetrate. For the locker room it will be enough to allocate 60 cm. Thus, optimal size the shower room will be 1.6 m * 1 m. The material for the frame can be wooden beam. The standard diameter of racks for such a structure is 100*100 mm.
To impart stability, you can use different methods:
- Concrete every detail of the frame;
- Attach the lower corners of the structure to pegs driven deep into the ground.
When designing a shower stall, consider the design of the buildings in your yard. The shower room should not stand out from the general style.
Project of a country bathroom with a shower compartment
Installation
Cut the timber to the length you need. Connect the side parts of the frame in the form of frames. Strengthen each frame in the middle with jumpers to prevent distortions. The lintels are made from the same timber and should be installed at an angle of 45 degrees.
If you decide to make a shower stall measuring 1.6 * 1 m, then the side parts will be 1 m, the back - 1.6 m, and the front - 1 m, since in the front part you need to leave a space for the door equal to 60 cm. It is not recommended to make a door less than 60 cm for convenient passage to the shower room. Then you should connect the frames.
Before fastening the frames together, make sure that their diagonals match.
Having fastened the frames, reinforce them with jumpers at the top and bottom. This way you will get a solid frame, which can be covered with polycarbonate or any suitable material. It will be interesting to know that along with a shower you can also build a toilet, as well as a utility unit, but the contents of this article will help you figure out how to do this correctly
Install the resulting structure above the prepared inclined platform for water drainage. Use building level for horizontal and vertical alignment of the shower enclosure frame.

Stuff the strips on the bottom jumper. Leave a distance between them so that the water flows freely down onto the sloping platform.
For the shower door, make the frame in the same way: assemble a frame from 4 strips of timber and reinforce them with crosswise lintels to protect the door from distortions. The size of the frame should be approximately 1 cm smaller than the opening for unhindered opening of the doors.
- slate,
- lining,
- moisture resistant OSB,
- cellophane,
- plastic,
- glass.
Please note that any of the materials listed must be opaque.
Having chosen the base, cut out the walls the right size and install them on the frame frames. The top and bottom of the booth do not need to be completely closed for good ventilation. The door must be cut separately. Place the doors on their hinges and line the door with cellophane to prevent water from getting onto the timber. But so that this would not be difficult and very simple, it is indicated in the article.
Container for water
The minimum volume of the water tank should be 100 l, the maximum – 500 l. The container is installed on support posts above the shower.
Please note that the material from which the summer shower tank is made should not be susceptible to corrosion.
The best option would be plastic or stainless steel. If you choose the plastic option, you need to not only install it on the supports, but also tie it to them. Because in the event of strong gusts of wind, the empty container may fall.
It is best to purchase a flat tank with a mounting thread for screwing in the tap. If you don’t find one, make a hole for the faucet yourself.
A slot is made in a plastic barrel using a drill with feather drill. If the water container is metal, use a metal crown. After cutting the faucet into the tank, install a water diffuser on it.
It is good if your container is equipped with a lid, thanks to which the water will not become clogged. The lid can be made from metal, plastic, glass or cellophane.
Water can be supplied to the container manually or using a pump. The last option is preferable.
Sources for heating water in a summer shower
The water in a garden shower can be heated in various ways.
Firewood
To increase the temperature of the water in the summer shower using firewood, install a stove next to the cabin. Place an expansion tank on its surface, which will push hot water into the main shower tank. The principle of the expansion tank is constant circulation of water.
Hot water from the heating system will flow upward, cold water from the container above the shower stall will go down. connection between expansion tank and the main tank will be a metal pipe.
With a wood heating system, you need to use a metal water container, not a plastic one.
Layout of the heating source in the shower at the dacha
Electricity
Install a boiler or heating element with a power of 2 kW or more in the water tank. If you use a heating element to heat water, it must be embedded into the bottom of the water container. The boiler is lowered into the tank from above. But be sure to monitor the water level during the heating process. Otherwise, your appliances may burn out.
To prevent a short circuit from occurring, the wire stretched from the outlet to the shower must be one piece.
You need to install a thermometer on the water tank, which will indicate when the heating devices can be turned off. Or purchase a container with automatic heating, where there is control not only over the temperature, but also over the water level.
A good option for a summer shower with electric heating 2 tanks will be used at once: a large one for cold water, a small one for hot water. In this case, each family member will be able to choose for themselves comfortable temperature. For mixing hot and cold water buy a mixer.
As in the case of heating with wood, it is not recommended to use a plastic tank along with heating devices.
Sun
The most economical and hassle-free heating option is solar rays.

In this case, your shower stall should be in a place that receives direct sunlight all day long. If this is not found, decide at what time it will be more comfortable for you to use the shower.
It is more convenient to rinse off in the midday heat - this means that the shower stall should be in the place where the rays penetrate in the morning; If you prefer an evening shower, choose an area where the sun illuminates during the day so that the water has time to heat up.
How to enhance the heating effect of solar rays?
- Paint the water tank black. The sun's rays warm up dark colors the most.
- Wrap the shadow side of the tank with foil, as this material will retain heat inside the tank.
- With help additional frame pull over the open tank plastic film, which will create a greenhouse effect.
Conclusion
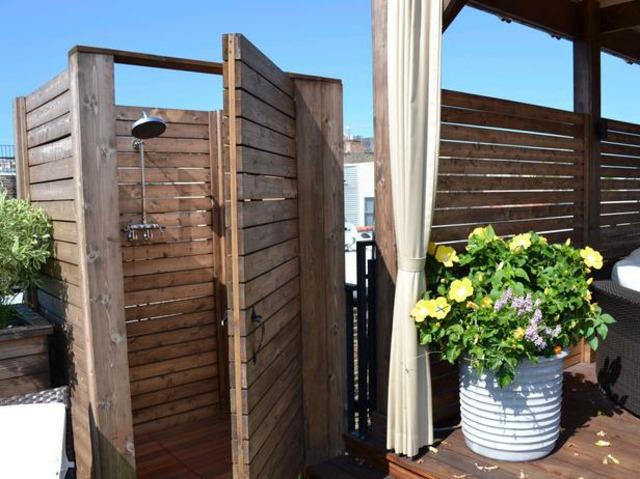
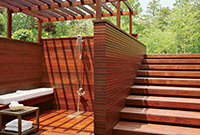
An example of organizing a summer shower
After the final installation of the summer shower, you can create a certain style by adding a few details to it. Plant moisture-loving plants around the booth, which will not only please the eye, but also promote accelerated drainage. Decorate your shower with decorative elements so that an ordinary booth turns into bright accent your garden plot.


