Of course, today everyone has the opportunity to buy any furniture in the store, including a table. But why not make it yourself, with your own hands?
This is not as difficult as it might seem at first glance. In addition, you have the opportunity to make such a table that will ideally fit in size and appearance to the interior of your kitchen or other room.
In addition, do-it-yourself furniture is not only saving money, but also some kind of, but a reason for pride, since not every man knows how to make something these days.
What are the tables
If you decide from the boards with your own hands, then you need to figure out what types of tables are, and decide what exactly you need.
The simplest is an ordinary table with four legs, a table top and a frame. It will not be difficult to make it even for those who are not experienced in woodworking.
If you are experienced enough in this matter, you can do dinner table round or oval, decorate it with carvings, painting or burn out drawings and patterns on the surface.
More difficult option is from planks. In fact, this is the same ordinary table, but rather thick and long crossbars are attached to its legs, on which seat boards are laid on top. So we get a table with benches on both sides. Such furniture is well suited for both the kitchen and for installation in the courtyard of a private house or cottage.
If the room has free space only in the corner, make a corner table that fits perfectly into this unoccupied space. It may not be as convenient to dine behind it as at a classic table, but you can put a TV, microwave or kettle on it - there will be enough space there.
 Another interesting option could be a window sill table.
In fact, this is the same window sill, but significantly expanded and adapted, for example, for a convenient workplace for a student.
The advantage of this solution is that the table will be well lit. most day.
There is also a minus: sitting at such a table in winter, you will have to rest your feet on a very warm, even hot battery heating, which is not very convenient.
Materials and tools
 Buying everything you need to make a table with your own hands is quite simple and will not amount to great work, no big costs. The main material for the dining table is wood, or rather:
- Boards 25 to 50 mm thick, 100–150 mm wide, rather long.
The thicker the material for the tabletop, frame and legs, the heavier, but at the same time more durable they will be.
Choose boards from good tree, without any defects. - Bar. It is necessary for the manufacture of table legs, so choose thick enough and strong samples. The beam can be replaced with the same boards, if you arrange them with the letter "G", or use purchased aluminum table legs. You can also use balusters (curly carved wooden posts that support the railing on some stairs) as legs.
- Chipboard or plywood sheets which can be used as countertop materials. Choose samples that are thick and strong enough to withstand daily stress.
 As with the materials And Do-it-yourself tools and fasteners are easy to get, they are in most homes. If something is missing, you can buy it at the nearest hardware store.
- pencil, corner, roulette and ruler;
- jigsaw or hacksaw on wood;
- screwdriver with a set of nozzles and drills;
- plane, if it is necessary to pre-treat the boards from irregularities and defects;
- kit self-tapping screws, furniture bolts and nuts;
- sandpaper or Sander;
- varnish or stain, roller or tassel for processing the finished table.
Attention! When working with a jigsaw, always remember the safety rules and keep small children or pets away!
simple plank kitchen table
 First we need to make a countertop.
There are several options here:
- cut out chipboard sheet or plywood of the desired size piece with a jigsaw;
- Laying a few is enough wide boards and subsequently fix them on the frame;
- Take a large number of relatively narrow boards, place them side up and glue them together with wood glue.
The result is a fairly thick, heavy and durable countertop.
Stages of work
Step 1. Collecting from boards countertop.


Step 2 We make a frame from boards or their wooden bars. In size, it can be made equal to the table top or with a slight indentation, approximately 2–2.5 centimeters on each side of the table. Having fastened the parts of the frame with screws, connect the frame with the table top with them.
Step 3 After we With put together the frame and the tabletop, half the table is ready. It remains to make only his legs. If a timber is used for this, drill two holes in it for furniture bolts. Moreover, they can be made both on the one hand, one above the other, and on two different ones for more secure fastening to the frame.
Important! Carefully check the length of the table legs, they should not differ from each other. Otherwise, the table will stand unevenly and stagger. If you do not want it to spoil the floor material, fix rubber “shoes” at the bottom of the legs.
After that, make similar holes in the table frame and fasten the legs and frame with bolts and nuts. Also, the legs can be fixed from above, using screws, but over time, this fastening may weaken.
 If you want to make table legs out of boards, fold two boards into an "L" shape on the outer or inner corner frames and secure them with the same furniture bolts or screws.
To prevent the legs from loosening, connect the folded boards together at the bottom and middle parts with screws or nails.
That's all, simple and reliable, do-it-yourself, ready!
Advice: Before proceeding, do simple drawing, preferably from several sides. Constantly check the dimensions of the parts. Some parts of the same size can be sawn out at the same time if you fix the boards or timber with clamps.
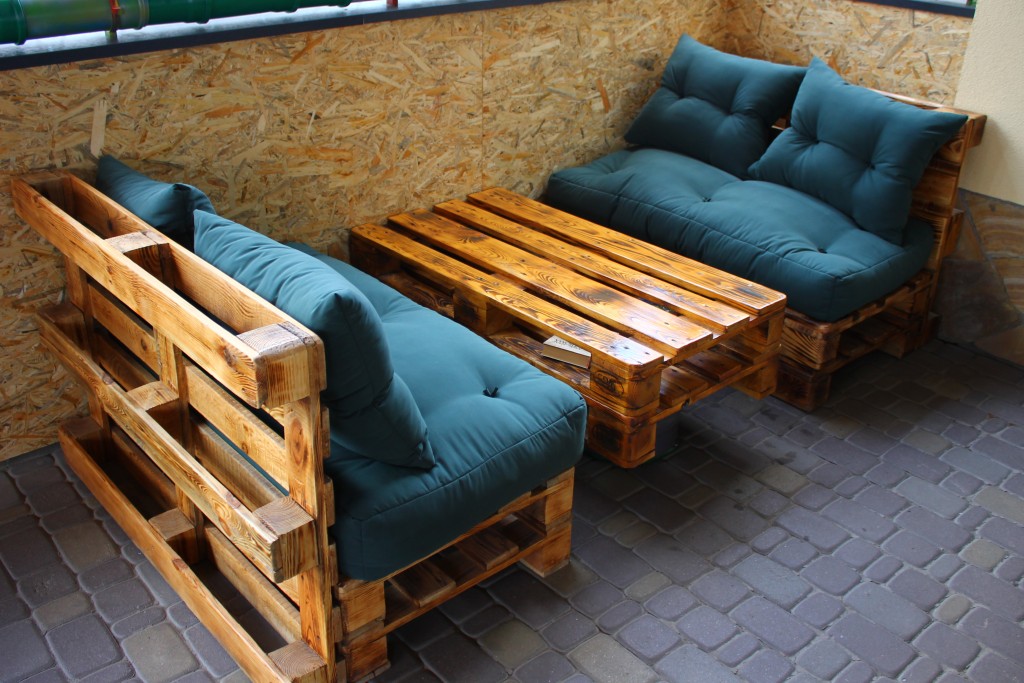
pallet table
 Wooden pallets are widely used in shops and warehouses as cargo pallets.
If you wish, you can get a few pieces for free and use them as a basis for making an original and unusual kitchen table.
If at least one side of the pallet surface is solid, then you no longer need to make a countertop, it is ready.
You just need to process it and, if desired, round the corners.
Note! Since initially the pallets are intended for warehouses, no one is engaged in their grinding and cleaning. Therefore, before making a table out of them, carefully sand them and remove all burrs. Irregularities and defects of the boards can be hidden with putty.
Stages of work
Step 1. Most of the pallets are open and there is plenty of space between the boards. distance, due to which to use the surface of the pallet as countertop not too convenient. There are two ways to solve this problem: either boards appropriate size and to fix with their screws between the boards of the pallet, or install a sheet on top plywood or chipboard.


Step 2 As for ordinary table, table legs from pallets can be made from timber or boards. The best thing fasten them with thick enough and strong pallet beam with nails, screws or furniture bolts.


To prevent the legs from loosening, connect them to each other with crossbars.
An ordinary table can be safely attributed to the category of furniture necessary in the house. This item can, of course, just be bought in the store. But it’s not difficult to make a good solid table with your own hands.
The latter option is most often chosen by owners of their own homes.
Making a table from boards with your own hands
As the simplest option, you can consider in detail the manufacture of a table with a length of 120 cm, a height of 75 cm, a width of 70 cm. For it, you need to prepare the following materials:
- boards 40X140 mm, planed and trimmed, or a floor lath of a suitable size - for example, 36X135 mm;
- a pair of bars with a section of 40X60 mm, 70 cm long;
- 4 furniture screws 10 cm long, with a diameter of 8-10 mm and a flat head;
- jigsaw or hacksaw;
- chisel;
- plane;
- grinder or bar with sandpaper attached to it;
- screwdriver and a set of drills.
Variant of a wooden vintage table (dimensions are in inches).
To make a tabletop, you will need to proceed as follows.
The tabletop must be assembled from cut-to-size boards in the amount of five pieces. They should be attached to the bars with self-tapping screws.
For self-tapping screws, the length must be selected so that the tabletop board with their help would be securely attached to the bars, while they should not pass through. When using a tongue-and-groove board, the tabletop is assembled solid, but from the last board it is better to remove the tongue from the edge with a jigsaw, and cut the side side.
If an ordinary planed board is used, it is better to leave a gap of about 3-4 mm when assembling the tabletop, especially if the table is intended for a summer residence. Such a gap does not interfere with the use of the table, but it greatly facilitates maintenance and does not allow dirt accumulations in those places where the boards are adjacent to one another, making up the table top. It is very simple to provide gaps with identity: when assembling the tabletop, you need to lay a rail with the desired width between the boards or use a metal corner.
Back to index
Legs for construction
The legs are made from the same material as the tabletop. At one leg, both parts will be connected “in half a tree”. Boards for the manufacture of legs are marked as follows:
- on fiberboard sheet or plywood, you need to draw a rectangle. Its dimensions are determined by the formula "A"X600 mm. Here A \u003d 750 - b (that is, the thickness of the countertop, calculated in millimeters);
- The board is placed along the diagonal of the rectangle so that different edges of the board are in opposite corners. Now you can mark the line along which it will be necessary to cut the boards, the "joint" on one and the other boards.
After the markings are made, the legs are cut to length, each half-tree is sampled. Then everything is adjusted and assembled using PVA glue with the addition of small sawdust and a few self-tapping screws. After the legs of the table are assembled, they must be attached to the bars of the tabletop with furniture screws, a stiffening rib must be strengthened between the legs - this is done with the help of long self-tapping screws. It is possible to close both ends of the table top with bars, to fix them, use nails that have previously “bitten off” hats. They should be sunk into the wood in one blow of the hammer.
Almost ready. It is highly desirable to perform coloring of the product. To do this, you can use a stain or a colorless water-based acrylic varnish. This provides protection from precipitation and external influences.
Back to index
Classic woodwork
For those who prefer classical forms, you can offer to make just such a table. The following materials will be required:
- 4 pieces of timber with a length of 710 mm, section 10x10 cm;
- a board with a section of 10X2 cm, cut like this: two pieces of 800 mm, two of 1600 mm, two of 750 mm;
- four boards with a section of 250x40 mm, length 2 m.
The manufacture of table parts is carried out as follows. The wooden tabletop will need to be rounded on both sides. To perform the markup, taking into account the fact that all the details are done by hand, you can use the most common gymnastic hoop or an object of a similar shape. It is placed on boards, tightly folded in relation to each other - first at one end, then at the other. According to the markup, the boards are cut with a jigsaw.
All parts of the table have now taken the form necessary to continue the work. They are cleaned with coarse sandpaper, then the surface is polished and soaked with stain two or three times.
Assembly must be done in the following order:
- the base box is assembled from parts whose width is 1600 and 800 mm. For fasteners use galvanized self-tapping screws 4X60. Before assembly, the joints are properly treated with waterproof PVA glue or a good carpentry adhesive. The short parts of the box must be attached to the end of the longer ones;
- boards for the manufacture of countertops must be laid out on a flat surface. A prepared box is placed on top - it must be centered and its inner contour drawn with a pencil. After that, the box is removed;
- in the most outlined contour, an indent of 110 mm is made from the corners - this is a place for the table legs. Further, glue and galvanized self-tapping screws 4X45 are attached to the tabletop of the board, which will ensure the integrity of the tabletop;
- the box is installed on the countertop, while the pre-made contour must be taken into account. The parts are fastened with self-tapping screws, while steel corners must be used. The place where the table legs will be installed must be left free;
- legs are installed in the corners of the box, fixed with glue, screwed from the outside with self-tapping screws. The strength and durability of the structure to a greater extent depend on how tightly the table leg is placed in the corner of the box. Therefore, before using self-tapping screws, it is better to ensure that the legs are fixed in the corner in any convenient way. The table is ready with your own hands.
You can start using the table when the carpentry glue dries and the structure acquires the necessary strength.


Of the abundance of furniture offered, wooden tables and chairs remain popular everywhere. Natural materials ensure environmental friendliness, safety and durability of models. Solid wood furniture can be found in any country house, apartment or office.
In addition, wooden furniture can be made independently.

Wooden kitchen tables
Before you buy a table, you should consider a few nuances. It is on them that the comfort and mood of the household in the kitchen depends.
Ergonomics
Due to the fact that small apartments usually have kitchens small size, do not forget about ergonomics. First of all, when choosing a dining wooden table, you should take into account the comfort of staying near kitchen items furniture.

It is not comfortable when you rest your elbows or legs on a neighbor or on the legs of a table. In addition, there should be an optimal distance from the table to other pieces of furniture. The table should be approximately 80 cm away from walls and other items in the kitchen.

The height of the table also plays an important role. It should be selected depending on the height of the persons sitting behind it. Low (70-74 cm) tables are recommended for short people. Those with a height of 1.6 m to 1.7 m should buy tables with standard sizes (75-76 cm).

Appearance of the tabletop
Before choosing a countertop design, you need to calculate how many people you usually need to place behind it. Shapes are found: oval, round and rectangular and square.
Tables that do not have corners should be placed in spacious kitchens. Tables with a square or rectangle shape fit perfectly into small spaces. You should see if the appearance of the table fits the overall interior.

Practicality
There are many models that carry additional functionality, namely, they replace the cabinet, can be folded and unfolded if necessary.

A wooden extendable table is a great solution for those owners who suffer from a lack of space in the dining room.
Like any furniture, these products have a number of positive and negative qualities. Wooden tables in the kitchen have the following advantages:
- the uniqueness and originality of the wood texture, which cannot be recreated;
- the ability to withstand shock and everyday use for a long time;
- environmentally friendly, thanks to a natural material that does not contain glue and does not emit harmful substances in atmosphere.

Negative characteristics include: high cost, vulnerability to moisture and dampness. At elevated temperatures, the material can dry out, thereby forming cracks and loosening of the table. Over time, the surface may darken or be attacked by pests.

Wood table in the living room
Recently, it has become fashionable to decorate a living space in white tones. A combination of white furniture and light decoration of walls and windows is actively used. dark and White color can also be combined in furniture.

For example, the table top can be white, while the legs and edging of the table are dark. Such furniture is often used when decorating a room in a minimalist style. In a spacious living room or studio, a white wooden table is a great solution.

The glass-wooden table is often located in front of the sofa, is not high in size and is used as fashion element furniture in the hall. It is intended: for drinking tea in front of the TV, storing books and magazines, as well as for working in front of a laptop.
Table made of solid wood in the country
On personal plot The most important gathering place for loved ones and guests is the gazebo or outdoor space.

In nature, one is drawn to everything natural, so a wooden table for a summer residence is a combination of beauty and practicality in one item. In addition, this piece of furniture goes well with the overall rustic style.


Wooden tables for suburban area must be not only durable, but also moisture resistant. If the table is often exposed to moisture, you should choose a larch product.

Country tables should have the property not to deteriorate under the scorching sun. Due to its density, walnut or oak is considered the best material for a country table. This wood considered firm and expressive. To resist pests, the oak is seared, that is, it is kept in water for a while. Such material is more expensive than its counterparts.

You can save if you choose a table made of coniferous wood. They have lightness, pleasant color, smell and moisture resistance. The increased resin content resists water absorption.

How to make a wooden table yourself?
Some summer residents make tables themselves. Creativity and diligence will allow you to save money and create a unique thing in your summer cottage. Making a wooden table with your own hands is not at all difficult. Enough to have in your arsenal necessary materials, tools and some time.
Tools and materials needed for manufacturing:
- plane;
- grinder or paper;
- screwdriver with a set of bits;
- jigsaw or saw;
- chisel;
- means for staining and varnishing;
- metal corners;
- yardstick;
- building level;
- fittings for fastening (screws, bolts, self-tapping screws);
- boards 40 or 50 mm thick;
- 4 bars for wooden legs table size 50x50 mm;
- auxiliary boards 40 mm thick for attaching the tabletop.
Procedure (step by step instructions)
- Decide on the dimensions of the future homemade product. For table lengths greater than standard, at least four posts must be installed.
- Boards for the countertops are pre-cut and sawn to the desired size.
- Place five boards in parallel, fasten them from below with self-tapping screws to the auxiliary transverse boards. Leave room for table legs.
- Install the leg bars with metal corners and fasten them to the table top.
- To prevent distortions and stability of the legs, skip the planks around the perimeter under the table top. If the table has more than four legs, an additional cross bar must be strengthened in the middle.
- Clean the edges of the tabletop with sandpaper from all sides.
- Cover the product with pest control (stain) and, if desired, apply a layer of varnish.

There are many ways to create a table with your own hands. The final version of the home-made wooden table proposed by us can be seen in the photo.

Wooden tables for kids
When a young child grows up and begins to sit on his own, the time comes for him to feed him with various complementary foods.

Wooden table ik for feeding - the most good option furniture designed for a comfortable meal. Tables are usually made together with chairs and have a common design.

There are several types of children's chairs:
- transforming chairs
- chairs with adjustable back.

In the first case, the seat height is adjusted according to the purpose. The child can not only eat at the table, but also play if you remove folding table out of wood and lower the seat.

In the second case, the adjustable seat height allows you to raise the baby higher or lower it to a safe distance from the floor. Even in the event of an unsuccessful maneuver, the child will not be able to harm himself and will allow the mother to do her daily chores in the kitchen.


When buying wooden tables for feeding, parents may not worry about the health of the child - he will not have allergic reactions. Therefore, natural wood material is most often used for the manufacture of children's furniture.
When buying a table, pay attention to sharp corners which may cause unwanted damage to its little owner.

Finally, I would like to say that thanks to wooden furniture, there are many opportunities to equip a home for a different design. Especially popular is country style using natural materials and copying the antique interior.
Safety and personal health directly depends on the type of materials that are in your home.

Another important fact is that wood is such a material that you can work with without using complex tools and equipment. Thus, any man is able to create beautiful things on his own for reasonable money.

Photo of a wooden table


The table is an essential attribute of the kitchen interior. At the same time, it should not only combine style, beauty and comfort, but also be quite reliable. And what could be more reliable and durable than natural wood? The problem is that high-quality wooden furniture is not cheap, so not everyone can buy it for their kitchen. However, do not despair, because making a wooden table with your own hands is a completely feasible task for a person who is able to distinguish a screw from a nail and knows how to use a drill, a jigsaw and a grinding machine.
Rocking bed made in a pallet. Tire coffee table. Here is another example where boxes are used this time to make a garden chair. Plastic boxes as a chair. Wooden trunks are carved and turned into a coffee table. If you have old tires in your garage, why not use them to make garden puffs like the picture below?
Make a sapphire old tire. You can also do garden furniture with tires. This project will be a little nicer, but just let your imagination run free to create armchairs and original files. Making garden furniture with tires. You can find the palette in this Scandinavian style garden sofa. Attached to casters, this sofa can be moved to suit your needs.
The choice of kitchen table design depends on several factors, such as the size of the kitchen, the number of occupants, and the interior design. If you look at the options that furniture manufacturers offer, then among the whole variety of designs, three categories can be distinguished:
- tables of medium size for 4-6 people;
- overall tables for a large family or receiving guests;
- practical folding tables for small kitchens.
A table in the kitchen should combine three qualities: aesthetics, convenience and practicality.
Garden daybed made in palette: Scandinavian decoration is on the rendezvous. Here is a very simple project. Make your own table from a magazine. You will probably have to sand the surface of the log, but other than that, you will be able to enjoy your furniture very quickly.
Side table from a magazine. Less common, but increasingly fashionable, cinder block is a great material to use in garden furniture. Discover originality and simplicity garden bench below. Brick and several wooden beams enough to make this original bench for garden.
To make a kitchen table with your own hands, you need to have a product drawing on hand, the necessary set of tools and at least some woodworking skills. Below are design options for standard, large and small kitchens with photo instructions and detailed description each stage of the manufacture of a wooden table.
Making your own garden furniture has never seemed so easy. Whether in a pallet, wood or cinder block, your home garden furniture will impress! In one corner of the terrace was equipped with a small home bed. Are you tired of the same furniture models being freely used in many different contexts? Are you looking for ideas to create unique wooden pallet furniture? If your answer to these questions is “yes”, we invite you to check out the ideas we have selected for you in this article and try to imitate your favorite models.
Rectangular baluster dining table
A rectangular design with a standard size of 1200x600mm is considered the most popular due to its practicality. This table can easily accommodate a family of 4 people. In addition, it can be installed both in the center of the kitchen (if space permits), or placed close to the wall in order to save free space.
You won't be disappointed with the results! wooden pallets can be easily found in stores with regular deliveries made by heavy trucks. Their biggest advantage is that they are almost always inexpensive and sometimes free. They are also multifunctional, with unparalleled organic air and at the same time respectful of the environment.
Garden furniture made from recycled pallets. Depending on the complexity of the project you choose, you will use wood pallets with very little modification, or completely transform them to make them unrecognizable. For beginners, it is better to choose a simple project, such as a small bass, a bench or a shelf.
schematic drawing
In order to make the wooden table more attractive, we will use balusters instead of straight legs. If not at hand lathe, then such legs can be ordered separately at the nearest furniture workshop.
For your information! Balusters are figured pillars that are primarily found on the railings of stairs, balconies and roofs. However, the use of these elements in the manufacture of kitchen tables is also far from uncommon.
Wooden pallets - more tricks for building your furniture
Many handymen admit that when building wooden pallets, the hardest time is deconstructing the same before creating a new piece. But the good news is that you can also choose a piece of furniture that doesn't necessarily require complete disassembly. Using the puzzle, you can simply cut out the palette according to the dimensions of your new project. Coffee table is a good starter project for those who prefer not to deconstruct the entire palette.
Drawing of a rectangular table on balusters
To assemble the product you will need the following materials and tools:
- 4 finished baluster legs 720 mm high;
- furniture board 30 mm thick for countertops;
- board 20x100mm for the frame;
- wood screws about 30 mm long;
- drill (screwdriver);
- a circular saw;
- grinder;
- sandpaper of different grain sizes;
- building level;
- square;
- roulette;
- wood glue.
Step by step assembly instructions
A do-it-yourself kitchen table made of wood on balusters is made in the following sequence:
Wooden pallets to create a chic garden room. If you plan to use planks as a more plowed building material, you must first remove the nails from the wooden pallets. It will take you about 30 minutes to lay out the pallet, which will provide you with 10-12 meters of wood. The amount you can use after that usually depends on the condition of your slats after removal.
Sofas covered in beige velvet coffee table in a wooden palette and a matching shaggy rug. To enable you to create your own range of furniture, you can first measure the slats and then cut them to your desired size. Assemble the new one with nails or wood screws. Drain the entire pan with sandpaper to level its surface. Don't forget the places where you cut it, or the holes formed by the removed nails.
- We prepare the cross members of the frame. To do this, we cut a 100 mm board into 4 parts (2 by 400 mm, 2 by 1000 mm), after which we remove the burrs and bring the surface to a smooth state with sandpaper or a grinder.

- We take the balusters and connect them in pairs with short crossbars (400 mm), making a small indent from the edge of the leg (about 15 mm). Fastening is carried out by means of glue and screws, which are twisted at an angle from the inside of the board.
Tip! In order to prevent the appearance of cracks, it is better to pre-make holes for the screws.
Large corner sofa for your living room
Finally, this is the most creative moment of the whole process - choose a varnish or paint color and decorate! The only pleasant moment will be lying on a long chair that you made yourself, or placing your cup of coffee on a table made by yourself! Wooden pallets to personalize the bedroom.
We make strong and reliable legs
A platform to support your mattress and isolate it from the floor is one of the most simple furniture, because you don't even need to deconstruct the pallets before assigning your new instructions to them. Also, this project only requires 2 wooden pallets for a single bed! Accordingly, you will need 4 for large beds and one or two additional rooms if you want to add a headboard. Decom Tip: Insert the light strings with batteries between the pallet boards to make the sword dream come alive!

Fastening the short crossbars to the legs
- We connect the finished pairs of legs with long crossbars (1000 mm). The fastening algorithm is the same as in the previous step.

The final stage of mounting the table frame
Natural wooden pallets for industrial interior sublimation! His answer mostly depends on your interior decorating style as well as your personal preferences. For example, for an industrial loft space, it is better to use only clear varnish to preserve the original texture. Add other raw materials, vintage pieces and metal furniture to make the above reading corner look completely inspiring!
Coffee table on rollers painted white Scandinavian style
If, on the other hand, you prefer Scandinavian style, you have the freedom to choose between "natural" and "white". The main reason for this is that light wood and flawless white are trademarks in Scandinavian decor. Apparently, a straight sofa in anthracite gray and a coffee table on wheels painted in white go together beautifully. An alternative is to use a pastel paint color, but especially if you want to give the décor a touch of retro chic.
- After we have made the frame of a wooden table with our own hands, we move on to the countertop. If it comes to the kitchen, then it is better to purchase a ready-made furniture board. Although for a gazebo or cottage, where the requirements for the appearance of the table top are not so strict, it can be assembled from grooved boards.

Scandinavian decor is chic and cozy at the same time. But raw boards look equally attractive, especially against a white background and an almost pristine pearl gray. By the way, both small tables and large sofas can be predominantly equipped with casters to become mobile. And although the furniture on wheels looks quite industrial, it must be admitted that their practical side is unparalleled. Who had to move the sofa for 3-4 people, he knew perfectly well what that meant!
Garden sofa in wooden pallets decorated decorative pillows. Finally, keep in mind that furniture you plan to use outside will require a special protective layer. Even the most aesthetic and original furniture is useful when it is easily damaged by the weather! Whatever your choice of design and décor, you won't be disappointed with the unique charm offered by wooden pallet furniture that you've handcrafted with full creative inspiration!
Furniture board for countertop
- The finished tabletop must be connected to the frame. To do this, we put it front side on a flat and clean surface, and evenly place the base with legs on top. The fastening of the crossbars to the tabletop is carried out with screws according to the same principle that was described in paragraph 2. However, in this case, you must be extremely careful not to drill through the countertop.

Table frame assembly
Raise the bed with a wooden pallet. Accessories add comfort to the bedroom. Bedroom in bright colors. Island kitchens have become an indispensable way to think modern kitchen. Not only for modern design, but also because island kitchens are equipped with multifunctional additions that make them convenient and suitable for any purpose. In addition, being an island, usually located in the center of the kitchen, it becomes the center, the center around which the whole family or roommates gather when preparing meals.
- On this, the manufacture of a kitchen table with your own hands can be considered almost complete. Final stage characterized by the process of grinding the surface, as well as the application of stain or varnish, the color of which is selected for the interior of the kitchen.
Note! The number of layers of varnish depends on the type of wood. Hardwoods, such as oak or hornbeam, do not absorb varnish well, so 1-2 coats are enough in this case. But for pine or spruce, you will need at least 3 layers of coating.
Make an island kitchen out of a chest of drawers
Different furniture, different alternative. The chest of drawers is very well suited to the realization of your island, suitable for any purpose you want to satisfy. This is because it is reliable, functional mobile phone with plenty of storage space for all the kitchen utensils you want to keep in your hand.
Tables for furnishing and decorating a room with your own hands
Again, you can choose to paint the furniture in a different color so that it blends perfectly with the kitchen and other decorative furniture from environment. The change in application, if you are going to make your island kitchen with a chest of drawers, is not so much. It's basically integration added as hooks and coasters useful for supporting kitchen utensils. Even so, as with low libraries, ideal dimensions and maximum functionality and aesthetics will be achieved by perfectly combining two different drawers to create a single piece.

Wooden dining table with balusters
Wooden table for a large family
An oversized table at which you can dine with a large family or arrange a feast by inviting friends must have a reliable design. Regular four legs are usually not enough to hold a heavy tabletop. Therefore, one has to accept additional measures to reinforce the frame.
If the cabin height seems too low, you can overcome this problem by adding legs to furniture or wheels, which will allow you, among other things, to get rid of the island you prefer on with great ease, so you can achieve the height you want. However, try to respect the original style of the chest.
Making important measurements and calculations
If you only use one chest of drawers and not two stacked on top of each other, then consider replacing or returning back if it looks aesthetically different. You might even consider scorching the back with chalkboard paint so you can have more functionality. On this floor, you can write a shopping list, ingredients for a recipe, or leave room for your children's creativity. Finally, as mentioned above, you can add hooks, coasters, bars to hang kitchen towels, paper napkins, baking gloves, or miscellaneous items.
Product design
In this example, we will consider how to make a large wooden table for the kitchen with our own hands measuring 2337x978 mm (naturally, slight deviations in one direction or another are allowed).

Drawing big table wooden
Before starting work, lumber should be prepared for:
Make an island kitchen from an old table
Another option you have if you want to do homemade home cooking, is to use an old unused table that you will give a second life to, and the remaining seeds will turn it into something very useful. Apply some retouching and add some finishing.
Have fun customizing your island the way you would like by adding whole line multifunctional parts that can be well maintained in the kitchen. Even so, you can draw a table, choosing even bright colors, but always respecting the style of the environment, and then adding all the useful elements to best organize the available space. paper roll support, towel strap and magazine storage where you can store all the best recipe books.
- supporting frame (38x90 mm);
- countertops (38x140 mm);
- support bars (19x64 mm).
You will also need the following tools:
- a circular saw;
- jigsaw;
- drill;
- screws (4x65 mm);
- drills (3 mm);
- furniture glue;
- pencil, tape measure, sandpaper.
Manufacturing steps
To make the table reliable and have an attractive appearance, you need to responsibly approach each stage. So let's get started:
- We make parts for the future wooden table from the purchased lumber with our own hands:
- 2 upper transverse beams (38x90x978 mm);
- 4 legs (38x90x695 mm);
- 2 bowstrings (38x90x921 mm);
- 1 longitudinal lower beam (38x90x1575 mm);
- 1 longitudinal upper beam (38x90x1473 mm);
- 2 braces (38x90x772 mm);
- 7 blanks for countertops (38x90x2337);
- 6 support bars (19x64x432 mm).
We carefully grind all the details, achieving an absolutely smooth surface without burrs.
Important! Grinding quality wooden surface depends on the correct grain size of the emery. For primary grinding, the grain size should not be larger than 200 µm.
- We fasten the legs in pairs with each other using transverse beams (above) and a bowstring (below). We use two screws for each connection.

- With the help of a longitudinal lower beam, we connect two bowstrings together.

Fastening of the lower transverse beam
- We strengthen the structure with the help of the upper transverse beam.
Advice! In order for the beam to securely connect the two halves, in addition to screws, additional wooden dowels with a diameter of 10 mm should be used.
- We cut the ends of the blanks for the braces at an angle of 45 degrees. After that, we attach both braces to the upper and lower transverse beams.
![]()
Fastening of the upper transverse beam

- We connect the wooden boards intended for the countertop with cross beams from the inside of the structure.

- Additionally, we strengthen the countertop with the help of supporting strips. Make sure that they do not go beyond the dimensions of the table.

Strengthening the structure with support bars
- If desired, semicircular corners can be made in the kitchen wooden table, which will give the product a more elegant look.

This option is suitable for a large kitchen or dining room, and for giving
Folding wooden table for a small kitchen
If there is not enough space in the kitchen to accommodate a large or medium-sized table, then you should look for a more original approach. One of these solutions is a folding table that is attached to the wall and is very easy to remove, freeing up the space occupied by itself.
Materials and tools
To make a folding wooden table for the kitchen with your own hands, you will need the following:
- furniture board 30 mm thick;
- wooden beam 20x60 mm;
- loops (6 pcs.);
- corner lamella (2 pcs.);
- wooden dowels;
- dowel;
- screws;
- drill;
- jigsaw;
- grinder or sandpaper;
- glue;
Assembly: step by step
Advice! Before starting work, decide on the place where the table will be installed. Since the design is attached to the wall, it is very important to take into account all the features of the future interior of the kitchen, so that later you do not have to rearrange, leaving unsightly holes from the dowels in a conspicuous place.
Do-it-yourself kitchen table assembly steps:
- We prepare parts for folding legs. To do this, we cut the wooden beam into 8 parts: 4 with a length of 720 mm, 4 with a length of 320 mm. We sand each element, removing burrs.

- Assemble two rectangular frames. The rails are interconnected by means of furniture dowels, under which it is first necessary to drill blind holes with a diameter of 8 mm.

- We connect the finished frames with each other with loops. In addition, a narrow rail must be attached to one frame with the help of hinges, which will be attached to the wall.

- We fix the frame to the wall with dowels, after which we install corner lamellas on the sides. It is important to arrange the slats in such a way that they do not interfere with the legs to fold.
Advice! Instead of corner slats, you can use any furniture corners of the appropriate size, matched to the color of the table.

Fastening the structure to the wall
- From wooden shield cut out the tabletop with a size of 900x600 mm. For a more effective look, the corners can be rounded. After that, all ends should be processed with a grinder.
- From the countertop we “separate” a piece 250 mm long, which will be attached to wall construction. The two parts are connected to each other by means of loops.


- We install the 250 mm part on the corner lamellas and connect the elements with screws.

The final stage of mounting a folding table in the kitchen with your own hands
- You can ennoble the table at your discretion by applying stain, varnish or paint. But even in its original form, such a product looks very good.

Wooden folding table - an original solution for a small kitchen
On the Internet, you can find a lot of options for how to make a wooden table with your own hands. We looked at three of the simplest solutions for standard, large and small kitchens, the production of which is quite economical and does not require specialized machines and extensive experience in working with wood. For the manufacture of more complex structures, we recommend that you seek help from specialists.
In conclusion, watch the video, which shows how from the old wooden planks you can make a pretty decent kitchen table.
Video: do-it-yourself wooden table
A table for a summer cottage is not just a piece of furniture, it is a ritual place where all household members invariably gather. IN summer time no one expresses a desire to go into the house to drink tea or have lunch. In the fresh air, the appetite is better, and the food is tastier. In order not to carry furniture from home for gatherings, you can make an outdoor table for giving with your own hands, at the same time taking care of the benches.
garden table with built-in bench
The country table does not imply the complexity of the design, so there will be no problems with its assembly, even for individuals who are far from carpentry and creative work. We will present you some very simple and at the same time original ideas for its creation, perhaps some of the proposed by us will become a decoration for your site.

the table for giving should be durable
Outdoor furniture is subjected to serious tests, so it must be made from durable materials. Specifically for the table, you can take:
- Stone.
- Tree.
- Metal.
- Handy materials.
The tables from the latter look especially interesting. But first things first.
Wooden table

outdoor dining set
Choosing the material Special attention pay attention to the type of wood. Board board - strife and use, in our case, not all are suitable. Flexible and easy to work conifers unfortunately they won't fit. In addition to the fact that they need special impregnation, because they are too flammable, the resin they release will also spoil the tablecloth and dishes.
The necessary elements must be sought among the blanks from hardwood. On the countertop it is necessary to collect boards with a thickness of 30-50 mm. For greater strength, they are stuffed on the frame. The legs of the structure can be saddled straight or X-shaped. It is important to process all the details well so that there is no danger of driving a splinter while wiping the table. Mandatory processing of the finished product with protective impregnations.

folding wooden table in the country with their own hands
In order to make a table “for centuries”, varnish it, and do it, as they say, without sparing the brush. The composition must be literally rubbed into the wood, and this will be possible only if you slightly heat it in a water bath. Lacquer coating is made in three layers.
stone table

a round table and benches made of stone will last for decades
If you want to make a monolithic structure that boggles the imagination and creates a special mood for meals, try working with stone. You can create a table of this type for a summer residence with your own hands or buy ready product. Shops offer granite and marble options in a wide range. There you can also pick up benches made of the same material as a set for them.

to inspire life in old table, it is enough to tile the countertop with tiles
It will not be cheap, but if you really want to have such a luxury in the garden as a stone table, try to reduce the price of it. Lay out the bases of the benches and the table yourself. For this, it will fit perfectly:
- Flagstone.
- Brick.
- modern blocks.
- Regular cobblestone.

stone stump table
These materials will be much easier to fit into the overall concept of the garden and combine them in existing buildings. On the countertop, seats and backs, it is quite possible to take an artificial stone. The view from this, the composition will not lose.
metal tables
Those who are "friends" with iron and have at hand welding machine, may be of interest metal furniture. Products are elegant and aesthetic, with openwork decor inserts. The metal table will also need to be protected from early destruction. This is done by priming the metal before the final painting.

round table for summer cottage stone countertop and figured metal legs
Forged tables will satisfy the needs of respectable owners, but it is unrealistic to make them with your own hands. Similar designs are ordered by professionals. Forging requires the conditions of a forge. However, given that products of this type can be wonderfully combined with wood, stone, glass, you can only purchase a forged table base and complete it with a table top yourself.

stylization of a table and chairs under a mushroom meadow will create some zest in landscape design suburban area
If you are determined to work on creating a country table yourself and are ready to make it non-standard, look at the "unnecessary" things in each shed. Perhaps among them there are items that can become consumables for creativity.
Mixed assortment
An equally practical option for a country table, along with wooden, metal, rattan, stone products, is a “hodgepodge” made of all sorts of things. This creation will become a multicolored "character" of your garden and will never go unnoticed. What to make it from? You will not believe! Your starting materials will be:
- Broken flower stand.
- Metal barrel lid.
- Colored plastic scraps or round glass.

a set of timber
Take a sheet of paper and try to draw on it a circular ornament in the spirit of the Moroccan style. Enlarge the creation to the required size. A photocopier will help you do this quickly.
We put the resulting blank under the glass and draw lines with a copper contour. Let it dry for a day or less. The recommended drying time is indicated by the manufacturer.

it is enough to decorate the side parts of the bench and chairs with wheels to get original garden furniture for a summer residence
Now it's the turn of painting the marked glass with stained glass paints. The main thing here is that the colors are evenly located inside the area allotted to them. If you have never worked with specific paints, it makes sense to practice on a separate piece of glass in order to understand how much you need to take for high-quality coloring of fragments. The completed painting must also be thoroughly dried.
Finished glass can be additionally decorated with elements drawn with a copper outline.
Cover the barrel lid with white paint, which will hide traces of rust, and proceed to the preparation of the main part of the countertop.

table for giving from a vazyanka of firewood
The metal part of the flower stand, which will serve as a supportdo-it-yourself table for a summer residencemust be primed, painted acrylic paint in copper color and partially patinated.
After the footboard is ready, glue the points of contact with the glass with a window seal. This is necessary for its best fastening.
Now the final stage. Gather all the parts together: put the glass top in the lid and put the composition on the stand.
It may not be very comfortable to dine at such a table, but it will be very pleasant to drink coffee in the evening cool.

decorating an ordinary stump with a mosaic, you can get an original table
pallet models
After the construction of a country house, you probably still have at least a few pallets on which packed bricks or building mixtures were brought. You don’t even suspect what a lifesaver it is for finishing a summer residence. With their help, the table will be ready in a few hours, and it will have such a look that it will not be a shame to put it not only in the garden, but also in home interior. At the same time, note that you will not even incur special financial costs.
![]()
pallet garden table
A do-it-yourself table made from pallets can be designed in several ways. For example, for the simplest option, you will need:
- Screwdriver.
- Brushes.
- Sandpaper.
- Swivel wheels.
- Colored antiseptic stain.
- Screws.

mobile table for giving from pallets
The first step is to sand the pallet. At the first stage of removing the rough layer, use coarse-grained sandpaper, fine-grained sandpaper will be required for final processing. If there is a grinder in use, which is equipped with grinding wheel, use it instead of sandpaper rolls. This will speed up the preparation process.

master class for making a table for a summer house with your own hands
Turn the pallet over and attach small swivel wheels to the bottom. This is done with ordinary screws. For greater reliability of fastening, place under the last washers that can be removed from similar screws used for working with metal tiles. Don't disregard this advice. The bases of the wheels have large enough holes, and a screw without a lining will not be able to fix the part to a wooden surface with high quality.

step by step table making process
Now it remains to open the finished product with a wax-containing antiseptic. If you want to highlight the tree structure use transparent composition. To give color, stain is required. You can style the table:
- under oak;
- larch;
- rosewood;
- nut;
- pine.
A low wide table would be appropriate on the veranda, in attic room, bath interior.

If you want to do summer zone rest more comfortable, make not just a table from pallets, but a whole set of country furniture, supplementing it with permanently fixed benches. Such a kit can be made portable and, if necessary, moved from the barbecue, say, to the pool or to the pergola.

bright pallet table for the whole family
A creative option for a country environment would be a pallet, transformed into a countertop and equipped with vintage legs left over from an old dresser, table, cabinet. This detail needs to be highlighted in a contrasting color.
You can use such furniture in the bedroom, gazebo, on the terrace.
Reel table

vertical planks allow you to place various items
“The coil is heavy in itself, but it is easy to construct a lightweight version from it. table for giving and again, do it yourself »
A cable reel is also an excellent material for creating a country design. Look at it - it's almost a finished table! A little decor and it's ready to use. The easiest way to decorate the coil is with twisted twine. To do this, simply wrap it tightly around its trunk. The upper disk of the structure is ground and varnished. If you want to add functionality to the product, install vertical rails around the circumference. They can also be decorated with a rope. With the advent of the crossbars, you can store the necessary items under the table.

reel table with umbrella mount
The coil is heavy in itself, but it is easy to construct a lightweight version of the table for giving and, again, do it yourself. You will only need the top disc from the product, which will act as a countertop. The frame frame for its installation can be made of metal.
If in a shady garden there is a stump of a suitable height and strength, then it can also be converted into an impromptu table with the help of a reel disk. This idea will be good not only for the playground, it is also rational to use it when organizing a relaxation corner for adults. By sawing a wooden disk in half, it will be possible to assemble original armchairs, which can also be put on stump legs. Get a good garden set.

the reel table can be decorated with any pattern
Wood table?
Why not? Such a brutal option can become a decoration for a barbecue area and even a living room. Work is nothing. We find an old thick log, impregnate it with stain and level the lower part, giving the product stability.

stump table on wheels
No less easy to manufacture and attractive in design is a mobile hemp table. By the way, its functionality can be expanded if you are not too lazy to sew a foam seat on it, which will allow you to easily transform the structure into a comfortable pouf.
Not in short supply in the country and chopped firewood. Of these, it is also not a problem to quickly build a comfortable table design for a summer cottage with your own hands. Gather flat base and fasten the split bars into the countertop with a belt tie. Put it all on its feet and enjoy communication with primitive nature in full.

table for a living room cottage from an old log
Tire garden composition
Do not rush to get rid of old tires. They can be used to make a magnificent landscape decor with extended functionality: use the table not just as a table, but the pouf next to it not only as a pouf, but arrange inside them a place for garden tools, For example.

the table and chairs are made in the same design style from old tires
Paint the tires in a color acceptable to you, dry, fold in a column, fastening the elements silicone sealant or other suitable composition.
Now take care of the countertop and seat. The first one is nice to make from durable plastic or cut them out of wood. For a pouffe, also saw out a plywood disc of a slightly smaller diameter than that of tires, glue foam rubber to it and cover it with a cloth. Removable parts are ready.
Distillation table

movable table made of old boiled wood with a wooden top
Did you find grandmother's brew in the bins? Fabulous! We transform it into a mobile storage table. We equip the bottom with wheels, and for the upper part we assemble a countertop from the boards. Having cut the boards to size, we collect them together on cross bars, the length of which must correspond to the diameter of the boiling. This will help the countertop to stay firmly in place, and not move out of the way and not turn over at the slightest load. There will be enough space inside the impromptu table to organize a mini-bar.
By the same principle, empty boxes, barrels, etc. can be converted into useful items.

original table with large metal wheels instead of legs and built-in benches
Conclusion
As you can see, assembling a table for a summer residence with your own hands is a very exciting and absolutely not labor-intensive activity. Here, even beginners do not have to be afraid to spoil something, because, initially unsuitable for direct use, objects and elements are used. Try your hand at an unusual business for you. Perhaps the final results will be an incentive not to stop there, but to go further. From the materials presented, you can make many more unusual and necessary things in the country everyday life!
Photo gallery - do-it-yourself table for giving:


 digital camera


![]()


 without additional processing, the table will last at least two seasons


Even if furniture production is far from your area, make country table with your own hands to gather with family and friends on warm summer evenings is quite a feasible task.
Its main advantage, in contrast to the purchased one, is undoubted savings. It is not necessary to make a table from scratch: simply by assembling purchased parts, you will save 30-50% of the cost. If it is possible to use materials left over from construction or repair, the costs will be limited to the purchase of fittings.
To choose a design, you need to decide where the product will be used.
Using cheap non-standard boards for a country or kitchen table - substandard - you will get advantages that are not available for mass production. Sounds doubtful? But this is so: the knots, due to which the boards are rejected, have the most interesting decorative properties. If you succeed in emphasizing them successfully, you will become the author of a completely unique design product, which is a pity to leave in the garden in the rain.

Making a country table with your own hands to gather with family and friends on warm summer evenings is quite a feasible task.
To choose a design, you need to decide where the product will be used: on a grassy lawn under a tree, to complement an arbor, to stand in a workshop or in a house.
The simplest country table can be assembled in a few hours with a minimum of materials, but it will not last long either. To get a product that will be really pleasant to use, you need to carefully prepare the boards and perform all technical operations at each stage with high quality.

Its main advantage, in contrast to the purchased one, is undoubted savings.
If you find a large stump in the forest, it can be easy to make garden table. It is only required to remove the bark from the stump, make an even cut along the top, sand it, treat it with an antiseptic and varnish it. It is enough to nail or screw a finished furniture board to the "leg" from the stump - and you're done.
Worktops made of boards fastened at the bottom with transverse slats look good. If you prefer a glued worktop, you can do it yourself, but this will require a lot of effort.

If you succeed in emphasizing them successfully, you will become the author of a completely unique design product, which is a pity to leave in the garden in the rain.
It is difficult for a novice master to fix the legs securely, so try to choose a design by correctly evaluating your skills and taking into account the cost of labor and time. The easiest way to make cruciform and L-shaped legs. To attach straight legs - you need to carefully connect the parts.
One of the coziest options for the garden - collapsible table with benches, which can be installed in the gazebo or on the veranda. It's easy to do, the main thing is to choose quality materials and properly prepare them for work.

The simplest country table can be assembled in a few hours with a minimum of materials, but it will not last long either.
How to choose a tree?
For a garden or kitchen table, wood of many species is suitable, both soft (pine, spruce, cedar, fir) and hard (oak, birch, ash, walnut, maple, apple, pear, acacia, etc.). The exception is too soft woods wood (poplar, alder, aspen, willow).
One of the main parameters of the suitability of wood for making furniture is resistance to decay: the species listed above meet this requirement.
If you are not planning on doing furniture work constantly or just starting to practice, give preference to the most common types of wood - pine and birch.

Worktops made of boards fastened at the bottom with transverse slats look good.
Wood can be used for the tabletop, frame and legs different breeds. At the assembly stage, you will need dowels: they are usually made from acacia or boxwood. Birch wood has an inexpressive pattern and can significantly warp due to spilled liquid - it is better not to use it as a countertop material, but due to the hardness of this breed, legs can be made from it.
The countertop is best made of oak or pine. If you know how to brush wood, the surface of the kitchen table can become a real work of art. Soft wood lends itself to brushing: the wood is fired gas burner, and soft fibers are removed with an iron brush. Work is best done in the yard due to a large number dust. If you managed to burn the wood evenly, the result will please you. The brush can be tinted with stains, stains, artistic acrylic paint diluted with water. Of course, wood brushing is not required: it is only a finishing option.

If you prefer a glued worktop, you can do it yourself, but this will require a lot of effort.
The choice of paints and varnishes and glue
Before proceeding with the installation, the boards must be protected from decay. The tree must be impregnated with a water-polymer emulsion (WPE): the treatment is carried out twice with an interval of 3-5 days. This is enough for the product to last a long time.
Some models require glue. Along with special carpentry adhesives (BF-2, etc.), building PVA can be used: it is applied to both surfaces to be glued, dried to a “tack”, then the parts are connected and kept under pressure for up to three days.

It is difficult for a novice master to fix the legs securely, so try to choose a design by correctly evaluating your skills and taking into account the cost of labor and time.
Choice paintwork materials determined by where you plan to use the product: in the yard or indoors. For garden table which is inevitably exposed to precipitation, alkyd, alkyd-urethane, nitrocellulose varnishes and oil paints are suitable. For the kitchen table, as well as for any furniture that is constantly in the room, it is better to use acrylic paints and varnishes: they are more environmentally friendly and do not have a strong smell. Lacquers marked with the "blue angel" mark are recommended for children's furniture and toys.
If you decide to cover the wood with stain, paint or just tinted varnish, this must be done before assembly. Material compatibility must be considered. The lacquer is tinted with a paint of a suitable composition: if the lacquer is alkyd, the paint should be oily, if you use acrylic lacquer, it can only be tinted with acrylic paint. First, a small amount of varnish is thoroughly mixed in a separate container with paint, and then the resulting mixture is added to a larger volume of varnish.

One of the coziest options for a garden is a collapsible table with benches that can be installed in a gazebo or on a veranda.
What tools are needed
For work you will need:
- hacksaw,
- circular saw or jigsaw;
- drill;
- screwdriver;
- hammer (if you decide to use nails).

For a garden or kitchen table, wood of many species is suitable.
This list includes only the most necessary tools, but in order to make the work more comfortable and the finished product look aesthetically pleasing, it is advisable to buy or rent a rotary miter box, an eccentric grinder and milling machine.
The rotary miter box makes it possible to make saw cuts exactly under right angle. An eccentric sander will allow you to prepare parts simply, quickly and efficiently: you will sand the boards in an hour, instead of doing it all day manually with sandpaper. For high-quality processing of the ends, a belt grinder is useful, and a milling machine allows you to select a tree for the necessary grooves and process the edges.

If you do not plan to engage in furniture work all the time or are just starting to practice.
Homemade pallet table
A spectacular rustic table can be constructed from pallets (wooden pallets). If you are a happy owner of such a container, especially a double-deck pallet, just disassemble it: there is no problem in purchasing boards!
Think it's always better to buy new boards? You probably have not worked with wood before: raw wood cannot be used (the product deforms after a few months), and dry boards are much more expensive. To dry raw wood boards, they are stacked in a well-ventilated area: this required process delay your project by 4-6 months! A good option for the kitchen table can be the already mentioned rejected boards, also dry.

It is possible to use wood of different species for the table top, frame and legs.
Let's go back to the pallets: they are dismantled. Now at your disposal are strong boards with different patterns and colors, it is possible that from trees of different species. These features should not be considered as disadvantages: they will give the product a zest: you just need to create an interesting composition from them, alternating boards of a similar shade.
The sides of the pallet will make an excellent frame, and the remaining planks will be used to assemble the countertop.

Work is best done in the yard due to the large amount of dust.
To make the legs, you will need a bar with a thickness of at least 5 cm. All the details must be prepared: sanding strictly along the fibers with sandpaper, first coarse (No120-150), then finer grit (No400-600), carefully removing dust.
Some boards can be painted with acrylic or oil paint. Loft style fans can use stencils in the form of numbers or simple graphic symbols. Boards with a beautiful natural pattern “morim” or simply varnished. After staining or first coat acrylic lacquer soft fibers rise; they need to be sanded with medium grit sandpaper and a new coat of varnish applied.

A spectacular rustic table can be constructed from pallets (wooden pallets).
If a non-aqueous varnish is used, it is enough to apply 2-3 layers, and if acrylic, the number of layers can reach up to ten.
A good option for the kitchen table can be rejected boards, also dry.
We fasten the tabletop boards with planks, which we place at the joints of the boards. Using a drill, a screwdriver and self-tapping screws, we fasten the boards to the planks (we use two self-tapping screws at the joints, one on solid boards). The use of a drill is necessary so that when screwing in the screws, the wood does not crack. We assemble the frame from the prepared sidewalls of the pallets. Using a drill bit suitable for self-tapping screws, we drill holes at the joints. We coat the joints with glue and fix with self-tapping screws. We install the legs: simply fasten the boards to the frame, screwing in the screws diagonally. To strengthen the structure, we make jumpers at the bottom in a similar way.

To make the legs, you need a bar with a thickness of at least 5 cm.
Wooden table with glued top
For a glued worktop, you need to choose boards of the same width. If the table is intended for a workshop and its appearance is not of great importance, you can use old floorboards: there are already grooves there. To make the grooves yourself, you need a milling machine.
To assemble the countertop, a flat surface is required. We simply coat the sidewalls with glue, join the boards without gaps and tighten the resulting structure with clamps. Depending on the glue used, the countertop should dry from 1 to 3 days. If everything is done correctly, you will get a countertop with a completely flat surface without cracks. It remains to work out the ends - first trim with a jigsaw, and then sand. In the absence of a belt grinder, this must be done manually - with sandpaper, first large, then medium grit.

After varnishing the parts, you can proceed to the installation, which consists of several stages.
If you don’t want to mess with glue and clamps, you can use a ready-made furniture board made of hardware store. Then the countertop remains covered with a transparent or tinted varnish.
For a good result, you need to apply 5-7 (for acrylic varnish up to 10) layers. After every third layer work surface countertops should be sanded with fine-grained sandpaper, carefully removing dust with a damp cloth. At the varnishing stage, it is important not to rush: each layer of varnish should dry well.
It remains to make the legs of a garden or kitchen table: let's focus on the option with L-shaped legs. You will need boards with a thickness of at least 22-25 mm.

For a glued worktop, you need to choose boards of the same width.
L-shaped legs consist of two parts connected at an angle of 90. On the boards to be joined, it is necessary to make a selection, coat the joint with wood glue, and then install self-tapping screws.
When the glue dries, cover the legs with varnish and after drying, simply fasten them to the countertop with screws.

The connection of the legs with the tabletop has several options.
Table with straight legs
To make straight legs, it is enough to file a thick beam into pieces of the same length. The connection of such legs with the tabletop has several options.
In order for the straight legs to be installed securely, at home, you can use the connection on the dowels. You can make them yourself from acacia wood or buy ready-made ones. To assemble dowel joints, you need quick-drying wood glue (BF-2).

To make straight legs, it is enough to file a thick beam into pieces of the same length.
Table with X-shaped legs
Sequence of work.
- On inside We fix the countertops on self-tapping screws, two strips on each side.
- To make the table look good, the edges of the planks must first be cut at an angle of 52.
- We fasten the paired planks so that the legs fit, we make laps of 2-3 mm on each side.
- Laying boards on flat surface, crossing them at the right angle. We measure the distance between the ends of the boards: it should correspond to the width of the table.
- We circle the intersection with chalk: here it is necessary to choose half the thickness of the boards so that after assembly they lie in the same plane.
- We coat the recesses with glue and place the parts under the press for 1-3 days. For greater reliability, the connection can be strengthened with self-tapping screws.
- We varnish the legs.
- It remains to attach them to the table top, placing them in the grooves formed by the slats - and the table for giving with your own hands is ready.

X-shaped legs are made of bars or boards with a thickness of at least 50 mm.
Table with benches
The best solution for a gazebo is a dining table with benches attached to it. It is better to make such a design collapsible in order to clean it indoors for the winter.
The table will require thick boards (from 32 mm), which must be cut into pieces according to the drawing. IN this option Two benches are attached to the table. When all the parts are cut, they must be sanded, paying special attention to the ends. We varnish each board separately.

The best solution for a gazebo is a dining table with benches attached to it.
To connect the parts of the structure, we will prepare the studs (length 160 mm), nuts and washers - 24 pcs each. For other connections, use self-tapping screws or nails of a suitable length. Using a drill, it is necessary to prepare all the holes for the fasteners.
According to the drawing, we assemble the countertop and the upper parts of the benches. We cut the transverse slats along the edges, the angle should be 45. This is convenient to do with the help of a rotary miter box.
We make and fasten all the legs to the screws. We fasten the parts cut at an angle.

We varnish each board separately.
We tighten the product with studs with bolts. The holes for the studs must be pre-drilled with a drill. When installing the stud, you need to put washers on both sides and tighten the nuts using a wrench.

We tighten the product with studs with bolts.
Seat boards are fixed with gaps of 5 mm. When the seats are connected to the sawn supports, we attach them to the assembled base with 160 cm boards: you will need 4 boards.
We install the remaining studs and enjoy the result.

Using a drill, it is necessary to prepare all the holes for the fasteners.
VIDEO: Do-it-yourself wooden table in the gazebo
50 photo ideas: how to make this table with your own hands


