If it is not possible to supply hot water to a private house or in country house, then in this case it would be advisable to build a summer shower.
How to build a summer shower with your own hands from wood?
To build wooden shower At the dacha with your own hands, you can follow the following instructions:
First you need to select appropriate place for the construction of a structure. When choosing, you should take into account that such country shower will be constantly exposed to moisture both inside and outside.
Advice: it is better to build such a structure in a well-ventilated area. This is necessary so that the wood dries faster. Also, you should not plant bushes, trees and tall plants near the shower, as they retain moisture, do not allow air to circulate, and, as a result, interfere with the drying of the wood from which the country shower is made.
Production earthworks. For the shower, we dig a hole measuring 1x1 m, 40 cm deep. At the bottom of the pit we lay a layer of crushed stone, which will help the soapy water to be absorbed into the soil faster. Next, you should place cinder blocks in the corners. They must be set according to level.

Next we proceed to frame manufacturing. To do this, we take boards whose thickness is 30 mm and width - 15 cm. A base measuring 1x1 m will be made from them. 4 beams with a section of 70x100 mm are attached to this base. To bandage the frame, side and two transverse jumpers are used, which are inserted into the grooves. They also serve as reinforcement for the roof, on which a hundred-liter tank will be installed.


Works on frame covering. For these purposes, you can use lining, blockhouse or false beams. The gaps between the grooves should be two to three millimeters. This is necessary so that the timber can expand freely when regularly wet. In our case, a material that imitates logs was used to cover the shower.


do-it-yourself shower for your dacha step-by-step instruction. Photo


Finishing work. Before painting, it is necessary to prime the wood. For these purposes, a bioprotective antifungal impregnation is suitable, after drying the surface is painted with façade acrylic water-borne varnish in at least 3 layers.

The next stage of building a shower in the country is tank installation for water.

construction of a shower in the country. Photo


Tip: for summer shower It is advisable to use a tank with a minimum volume of one hundred liters.
You can build such a wooden shower at your dacha with your own hands in one or two days.
building a shower in the country with your own hands. Video
DIY summer shower
For construction it is necessary to prepare the following materials:
- timber;
- fasteners (screws);
- shower kit, which includes a bracket, faucet, curved pipe, adapter and nozzle;
- rubber hose.
How to build a summer shower in your country house with your own hands?
Construction procedure:
Compilation drawings. For such a structure it will be necessary to produce wooden pallet in the shape of a circle made of dense wood. We will have cardboard of the required size as a template. First you need to place the cardboard on a flat surface and secure it with tape. Next, using measuring devices, draw a circle with two squares located inside. This template will be used to construct the wooden floor.


DIY summer shower drawings
Construction pallet. Our floor will be three-layer. The procedure for installing the base for the floor is as follows:

Works on pipe installation. Combine all the elements that are in the shower set.


DIY summer shower step by step instructions. Video
DIY summer shower step by step instructions. Video instruction
Summer shower for a summer house made of pipes and polycarbonate
This option attracts with its low cost and resistance of materials to action. sun rays and moisture, as well as ease of processing.

The procedure for constructing the foundation and floor
Before you start building a polycarbonate summer shower, you need to decide on its location. An inconspicuous place with flat surface, away from wells and wells.
Site preparation. To do this, fill it with sand and compact it.

Drill or dig four holes into which the foundation posts will be inserted.

Place a layer at the bottom of the hole crushed stone 10-12 cm thick.

Install pipes made of plastic used for laying sewers. We fill them inside and outside.

DIY summer shower step by step instructions. Photo

In the central part it is necessary to dig drainage hole and fill it with crushed stone.


We also fill the area around the blind area with crushed stone.

We make from timber with a cross section of 100x150 mm base for the structure and attach it to the foundation columns. For these purposes, it is necessary to drill holes in the cement and insert plugs into them.


It is also necessary to screw the jumpers to the frame with self-tapping screws and reinforce the structure with steel corners. We lay between the pipe and the timber waterproofing.


Tip: before installing the jumpers, you need to try on the pallet, since it will subsequently be installed between them. Therefore, if necessary, it will be necessary to adjust the frame to the dimensions of the pallet.


Next, you need to display the height of the floor from the 50x50 timber around the entire perimeter and after that you can start installing flooring . The result should be a base with a built-in tray.


The procedure for constructing walls and roofs
Let's start construction wooden frame soul. At this stage it is necessary to provide a doorway. In our case, the height of the walls will be 2.5 meters.


summer shower made of polycarbonate step by step instructions. Photo

A solid one is attached to the rafters sheathing.

Making a layer waterproofing from roofing felt or bikrost.

From the sides we produce sheathing processed board.

To cover roofs We use soft tiles.

After this we process all wooden frame stain in two layers, and then with varnish in two or three layers. For a structure such as a summer shower made of half-carbonate, you will need about 7.5 liters of stain.


Frame cladding polycarbonate from the outside. For these purposes, it is recommended to use a special thermal washer, for which holes must be cut on polycarbonate using a cutter.


Door made in the form of a wooden frame. Its height is two meters. To add rigidity, jumpers and jibs are used. Next, the door frame is painted, hung on hinges and lined with polycarbonate.


After that they hang water heating ba k, faucets, curtains, hooks, rugs and other accessories.


At the bottom of the pan it is necessary to drain the drain into drainage pipe , inserted 20-30 cm into the crushed stone base.


At the final stage we produce improvement of the entrance in the country shower. To do this, we dig a hole, fill the foundation with concrete and lay reinforcement in it. After the concrete gains strength, we lay bricks on it, on which the wood steps will be installed. If desired, you can make decorations. For this you will need cement and stones.


We attach the steps.

Do-it-yourself shower for a summer house
The first thing you need to do before starting construction is to decide on location summer shower. A well-lit, calm, slightly elevated place is suitable for such a structure.

Advice: it is advisable that the shower is not located too close to buildings and is built in the same style as them.
Stages of building a shower in the country
Compilation project. It is planned to build a shower consisting of two small rooms. Minimum size bathing compartments should be 100x100 cm, changing rooms - 60x100 cm. In our case optimal size soul - 200x150 cm.
At the selected site mark the rectangle dimensions 140x190 cm. We drive pipes in the corners. The foundation for the shower will be piled from two-meter asbestos-cement pipes, the diameter of which is 90-100 mm. They need to be buried in dug holes to a depth of about 1.5 m. 20-30 cm should remain above the ground surface. After this, a drainage and drainage system is installed.

Summer shower project. Photo
To organize water flow, it is done waterproof layer. It can be made from polyvinyl chloride film or roofing felt, which must be laid on an inclined surface. As an option, you can make a reinforced concrete screed.

The top and bottom are made harness frame.

Installation of plank flooring.
Tip: To ensure water flows out of the shower stall, it is recommended to install floorboards with gaps of 10 mm wide.

The shower room should be separated from the changing room by a high threshold and curtain.
Finishing work. The outside of the country shower is sheathed with clapboard or siding, moisture-resistant plywood, fiberboard, etc. For interior finishing, you should also use materials that are not afraid of moisture.
A water tank must be installed on the roof; the water heater is installed indoors.

Do-it-yourself utility block with shower for your dacha

Construction procedure:
Once a suitable location for constructing a shower has been selected, you can begin excavation work: dig foundation pit, fill it with ASG and lay it out point brick foundation.


Once the foundation is ready, you can begin construction wooden frame designs. For these purposes, timber is used.


For sheathing shower on the sides and back in this project, a 10 mm thick board was used. A window and door opening should be provided at the front.


Device roof frame from wooden beams. In this project, window openings should be provided on the folding roof.


The corners should be lined with boards.


Can be used for roofing bitumen shingles.


The door is made of boards. Door handles and steps can also be cut from wood.


All wooden elements necessary paint paint or varnish.
Arrangement of benches, installation shower tray, covering walls with plastic, attaching hooks, etc.


Summer shower projects for the garden
Project No. 1
For a shower, you can also use not only a wooden frame, but also a metal one. This design can be installed directly on the ground. A curtain is used as a door in this project.

Project No. 2
Shower can be made from wavy metal sheet, which can be bent in a semicircle. For this option there is no need to install a water heating tank. It will be enough to connect to the water supply.

Project No. 3
This summer shower made from pipes is lined with white plastic on the outside and brown on the inside. The shower stall can be erected on a paved concrete platform. For this option you will need a water heating tank.

Project No. 4
Wooden flooring can be used as a floor in such a shower. The inside of the room is lined with blue plastic. Instead of a roof, a wooden lattice is used.

Project No. 5
The base of this shower is made of metal pipes. Brown corrugated sheet was used to cover the walls. The roof is also made of corrugated sheets. Light in shower room enters through openings between the wall and roof.

Project No. 6
Red polycarbonate was used to make this shower. For this option there is no need to install the tank on the roof. To use such a shower stall, you will need to connect it to the water supply.

Project No. 7
The frame of such a shower is made of metal pipes painted in Blue colour. Plastic was used to cover the walls white. A metal structure was made for the tank.

Example No. 8
Country style shower. The frame is made from dry tree trunks. Branches are used for cladding. Logs are fixed on top of the structure, on which a water tank is installed.

Project No. 9
The frame for such a shower is made of metal elements. The floor and wall cladding are varnished wood. This type of summer shower does not have a door or a water tank.

It is difficult to imagine modern life without comfort. It is for this reason that many consider a trip to the dacha to be a real “hard labor”. Moreover, “hard labor” did not consist of earthworks, and in a completely different way - the absence of elementary conditions. Every second person has country cottage area, where you can hide from the annoying bustle, dust and city speeds. A heated summer shower for a dacha is an indispensable attribute of such housing.
Options
There are several ways to acquire such a structure as a country summer shower. You can buy ready-made or do it yourself. As a rule, by such a building as a country shower we mean quite simple design with a barrel (plastic or metal) on the roof. Such a shower has the following disadvantages:
- instability of water temperature;
- water purity is far from perfect;
- the water blooms quickly;
- constant problems with replenishing the capacity.
The complete structure of a country shower will allow you to comfortably take water procedures. To bring your idea to life with your own hands, you just need to look at photos and videos from detailed instructions, buy everything necessary materials. By reading the advice of the experts and spending a little of your precious time, you can quickly and efficiently create the comfort that is so necessary.
Most prefer building a warm shower in the country. The reason for this choice is quite simple - climatic conditions cannot guarantee always hot weather. On cold days, there is no way to bring the water temperature up to the desired temperature, but you don’t really want to swim in cool water. This is one of the reasons why they prefer heated summer showers.
Place for a shower in the country
In order to get a convenient and functional design, you should pay attention to the location. For a summer shower, you should choose a place that is well protected from the wind, since on hot days there is a risk of illness due to drafts. Also the place should well lit by the sun.
If you are planning to install a heated shower with your own hands, and the water will be heated by an electric heating element, an open sunny place will only bring benefits. In hot weather, the energy of the sun quickly heats the water and helps retain heat at night. The construction of a summer shower should be accompanied by the construction of a drainage pit.
Methods for forming a drain pit
One of the most simple methods, which is simple and effective to use, is drain hole under the shower stall. But this method is not always practical. It is much more practical to make recesses with an inclined pipe through which water is directed into the drainage hole.
Before you get started drain hole, you should consider its location. This issue should be taken seriously and all the nuances taken into account:
- there should be a distance of five to eight meters between the drainage pit and the structure;
- the pipes used should not be too long.
Before you start building a drainage pit, it is worth considering how much volume is needed. The volume depends on the nature of use of the housing, the frequency of use of the bathhouse, shower and housing in general.
It is believed that 0.5 cu. m volume of drainage pit for one person – quite enough.
Pipe laying
When laying pipes you cannot miss important point- it is necessary to maintain a slope of three to five degrees. If, when performing work, you adhere to the rule “the longer the pipe, the greater the slope,” everything will be fine.
Material for arranging a drainage pit
A variety of materials are used to construct the structure, from brick to concrete rings.
Design form
The most ordinary drainage pit is in the shape of a cube. But this option is not entirely correct, since the walls of such a structure simply cannot withstand the load and begin to collapse. Another thing is to use a drain pit cylindrical . The load is distributed completely over the entire structure, as a result, destruction is zero.
Little tricks
A few little secrets and the drainage hole will serve for many years.
In order to extend the cleaning period of the structure, you can apply some nuances. For example, divide the plum. In this case, you will get a main drainage hole and another smaller one. What will it give? Liquid without solid particles will be drained into one structure, for example, a smaller one. This approach will make it possible to quickly absorb water into the ground, and mucus will not form on its walls.
The second option is to use biologically based products. The advantage of this product is bacteria that are able to process waste. The result is that water seeps into the ground faster and easier.
We must not forget about drainage and septic tanks. Their location should be close to the drainage pit, since if water gets on them it will lead to the appearance of:
- unpleasant odor;
- soil destruction;
- may lead to destruction of the foundation.
To avoid problems with drainage, the design is better put on a hill.
Before you start building a shower with your own hands, you should familiarize yourself with heating options. In conventional buildings, as a rule, tubular electric heaters are used. There is only one disadvantage of such heaters - it is necessary to constantly monitor the heating process. When the water in the shower reaches a certain temperature, the electric heater must be turned off.
Heating options
 The electric heater can be installed manually. If you suspect that you cannot cope with this procedure, it is better to buy a ready-made tank with a built-in heater.
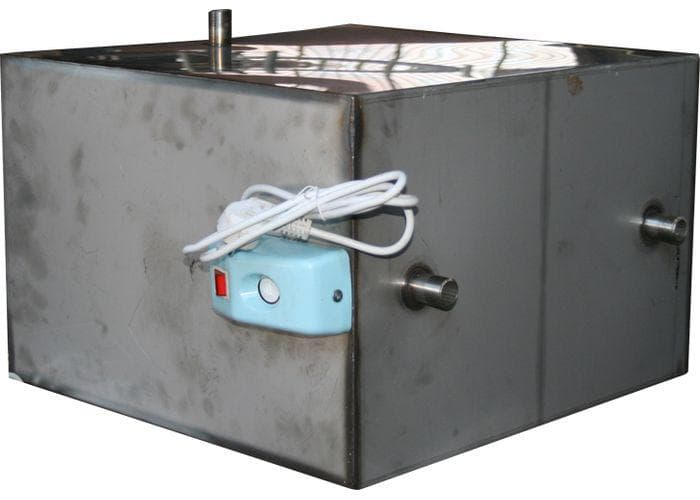
The choice of tank takes into account the required volume of water. Today, you can purchase tanks of various shapes equipped with everything you need. This tank has temperature control and automatic shutdown.
There are tanks that are fully automated, have a control panel. Thanks to such innovations, it is easy to control the water heating process. Such tanks are also equipped with an emergency thermal switch.
If we talk about the advantages of metal and plastic tanks, the latter have more positive properties:
- water in plastic tanks does not bloom;
- joints and seams do not rust;
- the properties of water do not change.
The use of titanium is another option for a heated country shower. Titanium is a kind of metal structure that has, as an addition, a lower structure. It is used exclusively for kindling, due to which the water in the upper part is heated. In order to get water at the required temperature, you should have another tank that will contain cold water. After mixing hot and cold water, it turns out liquid desired temperature. An undeniable advantage is that not only the water is heated, but also the room itself.
This heating model is more suitable for capital country houses, since additional chimney and ventilation are required.
There is a very convenient and cheap option, this is a shower bag. A portable shower does not require separate buildings. It can be hung in any convenient location. Water (about 20 liters) is poured directly into the bag. Such a portable device can also be equipped with a water heater and pump.
Designing an outdoor shower correctly
 Before you start building a summer shower for your dacha, it’s worth developing a project that will help you avoid major mistakes. The project is not difficult to do, the main thing is to imagine the end result and build on it. Height of the future structure should not exceed three meters, since a person must freely raise his arms up. Don't forget about space. While in the shower stall, there should be no restrictions on movement. When building a shower, adhere to the following parameters:
- the booth must be at least 1X1 m;
- It is important not to forget about allocating space for clothes.
During the construction process, it is necessary to take into account that insufficient area can lead to destruction of the structure. In order to slightly strengthen the structure, give it reliability and durability, use pile foundation.
Pile foundations have proven themselves well and are widely used in construction. Modern pile foundation quite popular, because in terms of price it is much cheaper than its “brothers”, and the quality is no worse.
To install such a foundation, metal pipes with a diameter of 100 mm are used. For pipes it is necessary to drill holes in the ground. The pipes should protrude 15–30 centimeters above ground level.
DIY frame for a summer shower
Any material is suitable for construction: wood, slate, film and others. After installing the frame, it is best to concrete the holes. The frame must be quite strong, since a water tank will be installed.
Floor, pallet for construction
The shower floor can be done in different ways. If the choice fell on boards, they should be laid, leaving holes into which water will flow. But the disadvantage of this floor is that goes into the cracks cold air , thereby creating discomfort. It is for this reason that pallets are often used on top of the existing floor.
Between the pallet and the floor, as a rule, waterproofing is carried out; for this purpose, a material such as roofing felt is used.
Water tanks
Tanks can be plastic, steel, of stainless steel. The basic principle of operation for a heated summer shower is connecting to electricity and automated system heating The principle is this - when the water cools, the mechanism instantly works, and the water again reaches the desired temperature.
If wiring is provided in the shower stall at the dacha, do not forget about the basic rules of electrical installation. The shower is a place where humidity is increased, so you need to take into account all the nuances:

In order to extend the life of the heater, it is worth clearly monitor the water level. If the heater is turned on without water, it will overheat and it may explode. Repair of such products is not provided.
Heating water in the shower is necessary to create comfortable conditions during water procedures in the country. Warm water in the shower is truly a godsend for avid summer residents.
We create warm shower at the dacha: clarifying technical issues
Of course, before starting construction, you will have to make drawings of a warm shower in the country with your own hands in order to calculate all the materials, and in addition, the technical capabilities that you are going to endow this structure with.
After all, heated water is often available in such buildings only in hot weather, that is, it is heated naturally depending on weather conditions, but it can also be forced heating.
Heated country shower
This is exactly what in a forced way heating the water, as well as the insulation of the architectural structure itself, we want to tell you and bring to your attention in this article.
Warm shower box
How to supply hot water

- The main problem for a shower separate from the house is hot or at least warm water - if this can be organized in the building from common system, then autonomy is needed here. In this case, the most convenient option is a flow-through electric heater, because almost any Vacation home connected to the electrical network, therefore, the installation of such a device is a minor technical problem, where safety instructions against electric shock must be followed.
- Let's say right away that this is not any super option - very high temperature the device does not heat the water, especially if it is cold, but, given the very specifics of a country shower, it will be quite enough for you warm water . In most cases, even if the device is expensive, it will not heat water above 40 ⁰C, but you are unlikely to need more.
- Another option is eyeliner hot water from the house– the pipes are laid underground and insulated, but during transportation too much heat loss occurs and if this does not bother you, then this option is better than the first.
How to heat a shower stall

Infrared wall heaters
Of course, in the summer you will not have a question about how to heat the shower stall - it will already be warm or even hot there, but in the spring or autumn, when you plant a garden or harvest, your shower will most likely seem too chilly. But you can make such a box with heating here too, infrared heaters are ideal for heating and there are good reasons for this.
Firstly, the IR panel will heat up very quickly small room, since there is a special principle of heat-calorie release - the panel will heat not the air, but nearby objects, which will become the source of heat.
Secondly, such devices can be installed in any place convenient for you - on the floor, on the ceiling and on the wall and, thirdly, they can be easily turned off and removed. This very “thirdly”, perhaps, is the dominant factor in favor of IR systems - they will not be stolen, since you will have the opportunity to bring them into the house for the winter, or even take them to the city.
Note. Infrared heaters there are not only different power, but also of different configurations.
That is, it can be a device in the form of a panel, but it can also be of a film type - the latest models can be installed under the cladding of walls and ceilings.
How to keep warm in a country shower

Insulation of boxing with polystyrene foam
So, we need an insulated shower in the country, that is, given that our design will be quite simple, most likely made of boards or OSB, this will not be enough to keep the cold from the street out. Two materials are best suited for thermal insulation here: mineral wool(glass or stone (basalt), but not slag) and foam plastic (in as a last resort– extruded polystyrene foam, but it is much more expensive).
The process of laying such insulation is actually no different from installation in other rooms - the same frame and fastenings are most suitable for the material used.
But there is one very important nuance, which arises due to the specifics of the shower box - it is constantly humid there, therefore, the thermal insulation must be protected from water splashes. If you are installing from the street side, then this question disappears by itself, but inside it is extremely important, otherwise you risk developing fungus and mold there.

Foil - excellent waterproofing
So, it is best to cover the insulation with ordinary thick cellophane film, and then cover this entire structure with foil or any thin foil insulation, as shown in the photo above. Here you will immediately, as it were, “kill two birds with one stone” - protect the insulation from moisture penetration and create an infrared reflector.
The fact is that foil has an excellent property - it reflects infrared rays, therefore, the excess consumption of heat calories in the box will be minimal.
Note. It is very important that you insulate not only the walls, but also the ceiling, since according to the laws of physics, heated air rises and if there is poor thermal insulation there, then warm air will disappear very quickly.
The same applies to ceiling waterproofing - steam, rising upward, will be reflected by foil insulation.
Plumbing nuances

Since we are insulating the shower box outside, it is quite natural that we will not make a drain (grid) floor there, since cold air will flow from below and all heating will be useless. In such cases, of course, it is best to fill the floor concrete screed with insulation, which is most often used as an expanded clay cushion laid on a layer of sand.
That is, the screed here is poured according to all the rules - the soil is planned, then a waterproofing film is laid with a fold on the walls, then a layer of sand of 2-3 cm is poured and after that - an expanded clay cushion, the thickness of which depends on the coldness of the soil, but not less than 4-5 cm.
Don’t think that we made a reservation about waterproofing the shower floor - the film is needed here not to prevent water from getting into the soil, but to keep the cushion dry - thereby reducing the thermal conductivity of the materials.

You will need to install a drain into the floor and take it to the general sewer system, to a septic tank, or dig it nearby cesspool, just use it exclusively for soapy water. But still, the best option there will be a septic tank - this way you will not only not pollute the soil, but also not dilute unpleasant odors, which exude stagnant water.
Conclusion
You understand that building a wooden box is quite easy, but how to make it so that you can wash in it during the cold season is a completely different question. So such a seemingly insignificant structure in this case will turn out to be a capital facility, but if you supply water underground, you will be able to wash there at any time of the year.
http://gidroguru.com
A dacha is the dream of almost every metropolis resident. Many city dwellers enjoy spending part of their vacations and weekends at their dacha. They enjoy working in the garden, gardening, and arranging the dacha itself: this way they are distracted from the noisy bustle of the city. After a hot working day at the dacha, you want to take water treatments. It’s good if the site is located near rivers and reservoirs. The rest have to build their own shower stall on the site, equipping it with heating and a changing room. We will discuss how to do this with your own hands in this material.
Choosing materials for a country shower
A country shower with heating and a changing room is not so difficult to build. But how great it is to take a swim after a hard day in comfortable conditions. E it’s worth spending a little time and effort, and for your own convenience. In this case, it is absolutely not necessary to spend a large number of funds for construction and equipment of the structure.
For a summer shower, you can choose practical and not the most expensive materials. Firstly, you will definitely need cement mortar. It is better to install more massive structures on a poured foundation; for lightweight models, you can choose a pile option.
When choosing materials, you should be guided by the characteristics of the work. For a small pit for pouring the foundation, a shovel, available in every house, is sufficient. Pile structures will require narrow but deep holes, which are dug using special electric or pneumatic tools.
Choosing suitable material, take into account not only its cost, but also the characteristics and requirements for preparation and care (impregnation with protective agents, the need for timely ventilation, etc.).
What material to build a summer shower from:
- brickwork- This is not the cheapest option, but the most durable of all. If you have brick left over from building a house, then choose this option. Such a shower with a dressing room and heating will last a long time;
Brick building
- You can often find wooden shower buildings in the country. Natural wood is environmentally friendly, looks impressive against the backdrop of nature and has quite acceptable strength. But here it is important to remember: d To ensure the durability of the building, it is necessary to provide high-quality ventilation for the shower stall. For this purpose, during construction, wide gaps are specially left in the floor and walls. The disadvantage of this option is that in windy weather or when it gets cold, it will blow from these cracks. In addition, it is necessary to treat the wood with a fire retardant (fire retardant) to protect against fire, because the building is equipped with heating devices (electric or fuel);
- a modern option is a garden shower with a changing room and heating made of polycarbonate. This material has a lot of advantages: while the sheets are light in weight, their cellular structure provides high strength. In addition, polycarbonate does not change its properties under the influence of natural factors. The ease of cutting and installation are also convincing arguments in favor of this material. Thanks to a lot of advantages, it is quite convenient to work with polycarbonate even for those who have picked up this material for the first time;
- outdoor showers are often built from plywood. This material inferior in strength to boards, but also costs much less. Plywood also requires treatment to resist fire, moisture and rot;
- Slate with a straight surface can also be used to build a country shower. It is more difficult to work with when cutting material, but it has strength and durability, is not afraid of moisture, so it is quite suitable for building a shower cabin;
- sheet plastic– a moisture-resistant material that allows you to build a summer country shower with heating and a changing room yourself in the shortest possible time. Varieties with different characteristics are available for sale. When choosing, you should pay attention to strength, possible temperature range, lack of toxicity, including emissions harmful substances when heated;

Plastic shower
- It is also possible to use corrugated board or siding.
All sheet materials used as frame cladding. The frame itself can be made from wooden beams, metal pipes or profiles. Special attention deserves an upper deck on which the water tank will be placed. It must rest securely on the vertical parts of the frame and be strong enough to support the weight to the brim of the filled tank.
Types of heated tanks
The tank, that is, a container for water, is selected based on how many people will use the shower. If few people come to the dacha, then there is no need for a large tank. The compact container is easy to install, weighs little, so it heats the water faster. This is quite enough for washing 1-2 people.
There are several types of tanks for summer cottages, depending on the material they are made of:
- carbon metal. This material quickly becomes covered with rust, so its surface must be enameled. Its disadvantage is that with the slightest damage, corrosion develops over time and leaks form. Such a tank is not the best choice at all;

Carbon steel tank
- stainless steel. This material is not afraid of moisture and temperature changes, but it has another disadvantage - it is heavy, which is why it is necessary to build a more durable frame.
- Cink Steel. The coating lasts longer than black steel, but is also short-lived.
- plastic. Nowadays, country showers are increasingly made of plastic. Its basis is food grade polyethylene. Light weight, different colors, quick heating - all these are the advantages of plastic tanks for country showers.
Heating
There are two ways to equip your shower with heating:
- use solar energy;
- use a heating element - heating element.
For a dacha that is visited mainly in hot weather, a naturally heated option is suitable. To increase the sun's effectiveness on the water tank, choose a black container.
Artificial heating is carried out by a device such as a heating element. This device is sold separately, so you can equip your shower with it yourself. At the same time, you can purchase a ready-made container with an already installed heating element. Its advantage is the high-quality installation, as well as the ability to purchase a tank with a thermostat.
Tank with heating element
You set the temperature to which the water will warm up. Attach two containers to the roof, one of which will be with a heating element, and the second without a heating device. Thus, by mixing water, you can use your wooden or polycarbonate shower at any time of the year.
Construction project
First you need to choose the place where the shower will be installed. It is best to place it on the edge of the site in a well-lit place on a small hill. The optimal height is 2–3 meters.

Construction project
The space that the cabin itself will occupy must be at least 100x100 cm. Along with her dressing room standard sizes can be 160x100 cm or a little more.
Having decided on the location, you can begin developing the project. Despite the simplicity of the design, it is better to first transfer your idea to paper. This makes it easier to identify bottlenecks and calculate the amount of materials needed.
Construction Features
The process of building a summer shower begins with preparing the frame parts. It is better to construct it from pine boards. You will need:
- 4 horizontal frame parts (20x90x664 mm);
- Vertical jumper (20x90-664 mm);
- 2 lattice boards (15x90x700 mm);
- 7 planks (15x90x700mm);
- 4 vertical parts (20x40x1820 mm);
- 4 connections (transverse) (20x40x1820 mm);
- hose support (20x40x160 mm);
- 8 fixing strips (20x40x660 mm).
It is also necessary to prepare the following parts for the construction of the shower:
- shower head (with external thread) with a plate for fastening;
- connecting element with internal thread;
- couplings for connecting the shower to the watering hose (4 pcs.);
- coupling shut-off valve;
- clamps (6 pcs.);
- hinges 25x180 mm (4 pcs.);
- wood glue;
- long bolts, nuts, screws.
Construction must begin with installation support pillars. Then the frame is assembled separately and attached to supports. It is recommended to use long bolts for frame fastenings, since the structure must withstand the load from a filled water tank.
Floor installation
The floor can be made of boards, fitting them together not very tightly so that water leaves the cabin through the cracks. But the disadvantage of this option is that cold air will come from under the floor. It is better to use a ready-made shower tray. A hose is connected to the drain hole, through which the water will be discharged to the place intended for drainage.

Laying the foundation
Space delimitation
The shower half can be separated from the dressing room with a plastic curtain. The second option is to install a partition made of moisture-resistant plywood or polycarbonate between these rooms.
Wall cladding and door installation
It is not necessary to install a door from the locker room to the shower - it is enough to hang a curtain made of waterproof material. However, if you have laid a wooden floor, then it is better to build a high threshold between the shower and the locker room.
The outer door must close tightly. ABOUT However, a well-fitted door can swell from moisture and then jam. To prevent this from happening, you need to provide a gap between the door frame and the door, which will be covered by a seal attached along the contour door leaf or frames.
The frame can be covered with polycarbonate. The shower stall will be quite bright. You can also cover the walls with siding or cover them with clapboard, but then you will have to install artificial lighting.
Electricity supply
To connect heating elements to the electrical network, it is better to call an electrician who will select the required wire cross-section and do everything necessary to ensure safe operation of the device. It is better for an inexperienced person not to undertake this part of the work.
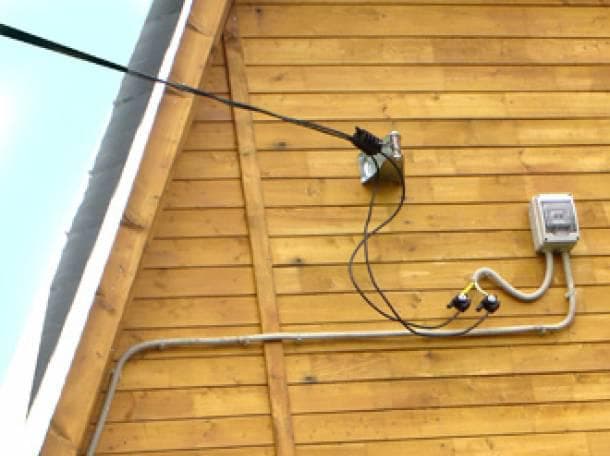
Electricity supply
As you can see, building a summer shower with a changing room and heating is not such a difficult task if you have the desire and opportunity to make such a shower with your own hands. To do this you need:
- Decide on a shower model;
- Choose a water heating method and materials;
- Find a suitable place for installation on the site;
- Build a shower taking into account all the rules listed above in the article.
Video
For an example of creating a warm shower for a summer house, see the video
Conclusion
Using this shower is easy and convenient. It can be used in the off-season, and, if desired, in the winter, you just need to insulate it. All in your hands.


