In winter, for rare visits to the dacha, you need warm room with amenities - a bathhouse with a shower, a kitchen and a bedroom. Yuri Podymakhin decided to create such a universal room in the house. Here's what he says about the shower design.
Concept universal premises boiled down to the fact that it should be all-season, warm, have a bathroom, kitchen and bedroom areas.
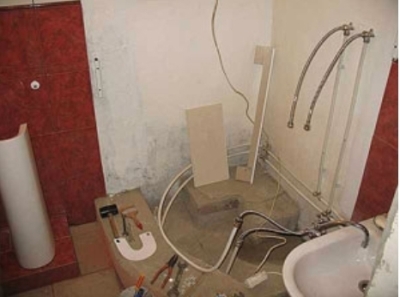
Shower walls
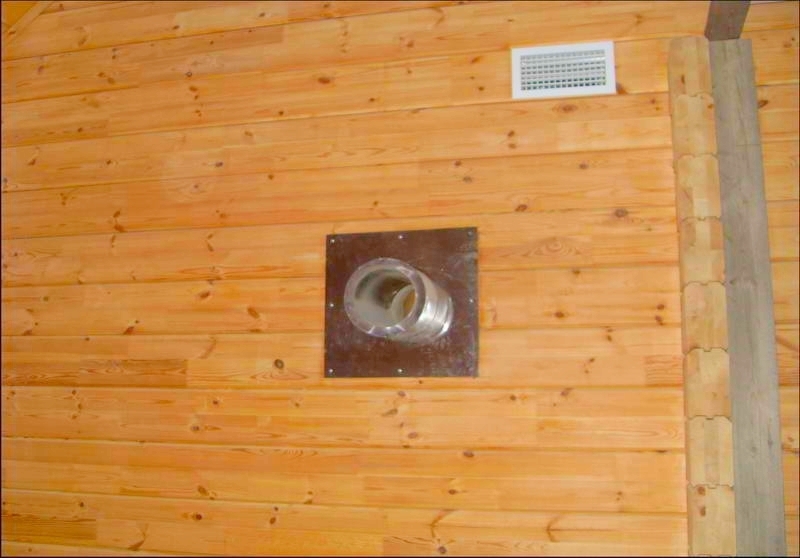
Considering that there is high humidity in the kitchen and shower rooms, I closed all the walls and ceiling after insulation plastic film, and covered the top with gypsum fiber sheets (GVL). 8 shower rooms on the walls were glued with PVC panels on top of the gypsum plasterboard. In the place where the mixer is located, for its reliable fastening under the PVC panel, a steel plate was fixed to the frame stand.
The walls could have been tiled, but... since this is after all a dacha, I decided that with PVC panels it will be warmer.
Floor installation in the shower room
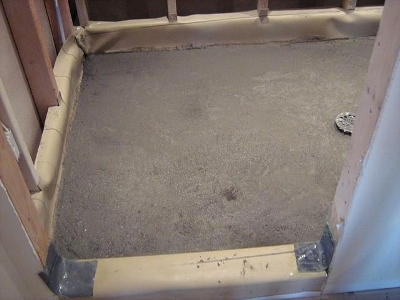
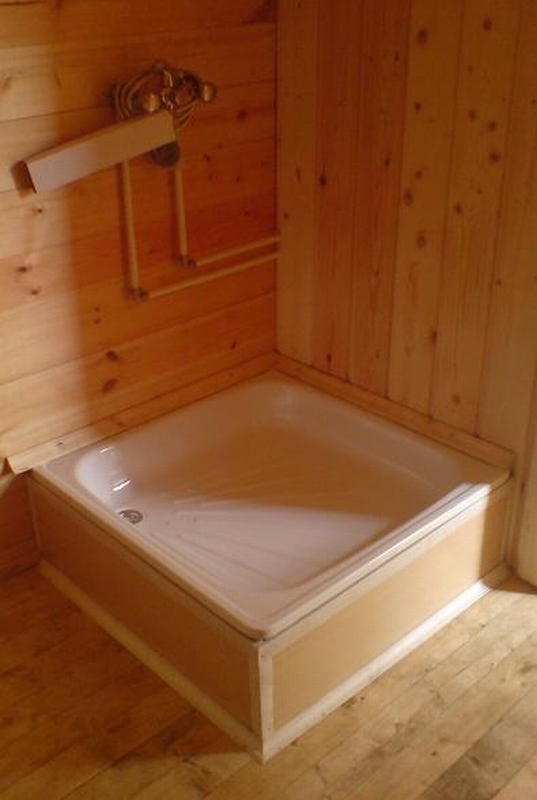
One of the ways to reliably waterproof a bathroom floor is with a cement screed. To avoid differences in floor levels different rooms, at the construction stage, I made the floor joists in the shower room 150 mm high, then the rest of the joists were 200 mm high. To strengthen the overlap, I made double joists in the shower.
The floor in the shower is multi-layered. From bottom to top go: subfloor made of inch boards, vapor-permeable film, ecowool insulation, OSB sheet, gypsum fiber sheet, polyethylene film, cement strainer 5 cm thick, elastic waterproofing, ceramic tiles.
I'll be honest: creating a cement screed in wooden house I was a little embarrassed because it could crack, since a wooden house always “breathes” seasonally. But I couldn’t think of anything else, simpler and cheaper. To reduce the weight of the screed, I used expanded clay as a filler.
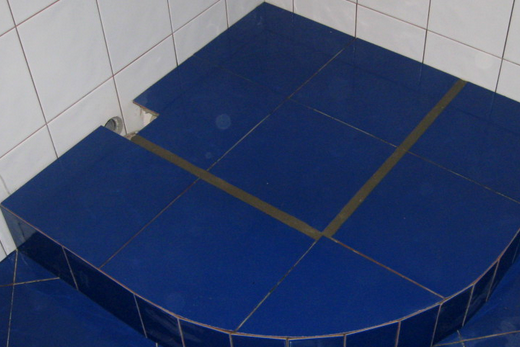
Slope for draining water in the shower
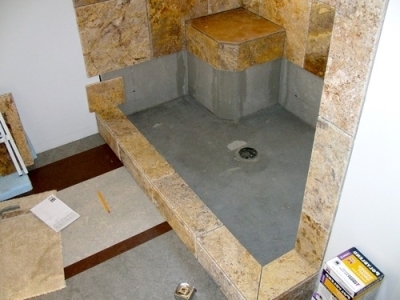
The floor in the shower had to be made with a slope towards the drain so that any water that ends up in the room would flow to one point. This point is shifted to the corner where I initially planned to install a shower stall, but then I decided to just make a shower, which is much cheaper.
I set up the beacons with a slope of 2 cm by 1 m, but now I think that it was necessary to make it larger, since problems arise with joining the tiles when laying them. The room is small - 2.8 * 2.4 m. Laying mosaics on the floor is a bit expensive, and I planned to cut the tiles at the junction of planes with different slopes, that is, along the line of diagonals from the corners to the drainage point. But you need to cut the tiles at an angle. This all significantly increased the labor intensity, and a floor made of pieces would not look very attractive. In general, I laid the tiles in one piece and, using the thickness of the glue, created various slopes. The holes in the tiles were cut out with a grinder and a diamond wheel.
Attention - adjacencies
I’ll especially say about waterproofing on top of the screed - in the corners and junctions. I opted for elastic waterproofing, which is applied under the tiles. And I even bought a special tape to waterproof the junctions between the floor and the wall. I didn’t decide for a long time, since the material is expensive, but I think redoing the floors in the future due to poor waterproofing will be much more expensive. I didn’t buy special waterproofing patches for corners and holes in the floor, but made them from the same tape.
The adhesive for the tiles was also elastic: it allows you to level out movements that arise as a result of micro-movements wooden structures, and due to changes in humidity and temperature.
The wall of the partition separating the shower room from the bathhouse has a gap at the bottom so that the water from the bathhouse also flows to one point bathroom complex.
Do-it-yourself shower in a wooden house - photo
- The walls of the bathroom are covered with polyethylene film and are ready for finishing with gypsum fiber board.
- Placing beacons to create various slopes screeds.
- Waterproofing of junctions using special tape and elastic mastic.
- Fastening the steel strip at the location where the mixer is installed.
- Ready screed.
- Waterproofing of drainage ladder.
- The walls of the bathhouse partition do not reach the floor so that water can drain from the bathhouse.
- Waterproofing sewer pipe.
- Screed after the first layer of waterproofing mastic.
If you know even a little about construction, you should know how capricious a material such as wood can be, which can dry out, crack, deform, and even collect moisture, which can result in mold or rot.
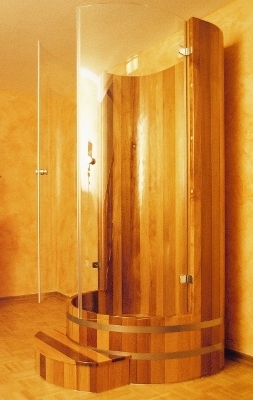
That is why you may encounter particular difficulties when arranging a bathroom. In this case the most best option, which can only be recommended - installing a shower stall in a wooden house.
Note! If earlier experts demanded that the bathroom be located exclusively on the ground floor of the house, then a shower cabin in a wooden house can have a completely different location. This is one of the significant advantages of installing it.
As a rule, this element is installed in a corner area or mounted directly adjacent to one wall. In most cases, a corner arrangement is used, which allows you to more rationally manage the space of the room.
If you are thinking about the question of how to install a shower cabin in a wooden house, first of all you should familiarize yourself with the implementation rules waterproofing works, which are very important, because it is through this that you provide the wood located in the bathroom with protection from the destructive effects of moisture.

Carrying out waterproofing work
Installing a shower cabin in a wooden house begins with waterproofing the floor.
The procedure for doing it is as follows:
- performance concrete screed or as a simplified option - installation of a cement-bonded particle board;
- applying a layer of bitumen or any other coating materials (as a rule, they all have a bitumen base);
- in the joint area, when two layers of bitumen are dredged on top of each other, it is necessary to lay an additional layer of this material to increase the waterproofing properties;
- install ceramic tiles using the highest quality adhesive with waterproofing properties.
In addition there is whole line additional nuances that should be paid attention to when performing waterproofing in the bathroom wooden house. In addition to treating the floor, the walls of the room and even the ceiling will also need waterproofing protection. To do this, you can plaster the surface and treat it with an antibacterial fungicidal composition.

Note! To the list the latest developments These include glass-magnesium sheets, which are so reliable and practical that they can even surpass the advantages and capabilities of drywall. Their fixation is carried out on a pre-fabricated frame base using dowels.
When applying glass-magnesium sheets, joints should be covered with sealing tape. After which you can lay an attractive mosaic or ceramic tiles.
Advice for those who do not know how to install a shower cabin in a wooden house: in the places where it is adjacent to the wall, a small gap will always form, which must be treated with sealant. Moreover, it is bitumen material that should be used, not silicone.
Features of correct installation
Wooden housing will shrink over time, so before making a shower in a wooden house, you should take this factor into account. The easiest way to avoid problems with wood deformation changes is to use a sliding frame. Thanks to the use of this element, the visual height of the room will remain unchanged.
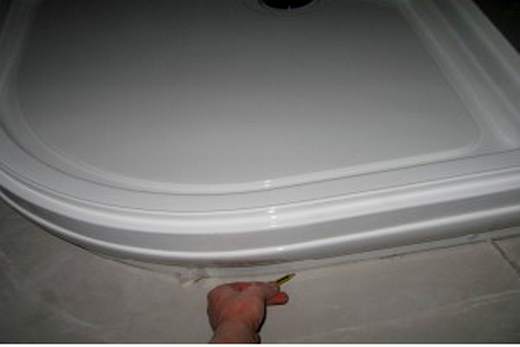
Initially, you must connect the hose from the shower stall to the riser leading to the sewer. In this case, it is imperative to seal all connections. The shower tray has a drain; a silicone-treated gasket must be placed there.
After this, you can install the tray, secure the stands, mount the siphon and drain.
Note! It is imperative to check the structure for leaks.
Most modern models shower stalls require access to electricity. For bathrooms, special sockets are provided that exhibit increased resistance to moisture. As a rule, these elements are located behind the shower stall or to the side of it. The wire that will lead to the socket must be in a free state, avoid tension.

After this installation is carried out:
- front panels;
- side panels;
- rear panels;
- doors.
The shower cabin usually includes an aluminum profile. This is precisely the basis where the walls are inserted, on top of which another aluminum profile must be fixed. The upper element is aimed at holding all the walls of the cabin stationary.

Note! Beginners often make a common mistake and confuse the upper and lower aluminum profiles. This must be avoided at all costs.
After fixing the curtains of the cabin, the shower doors are installed, which can be sliding, where they are installed on sliding rollers, or hinged, put on special hinges.
Then it comes to:
- hand shower;
- tropical shower;
- mixer;
- mirrors;
- pens;
- shelves.
If the model of your shower stall has a hydromassage and a radio, as a rule, such elements require a voltage of 12 volts. Then you will definitely need a specialized converter, so do not forget about installing this part.
HideShower cabin - source high humidity. Wood tends to deteriorate when exposed to moisture. Therefore, the following recommendations are relevant when installing a cabin in a wooden house. Read the instructions in our article.
Features of installing a shower cabin in a wooden house
1. Cover the walls in the room where the shower will be located with moisture-resistant plasterboard, and lay out the floors with tiles. Fill the gaps between the tiles with putty and carefully seal them with waterproof mortar. The same is possible using glass mosaic, PVC panels, any other waterproof finishing materials.
![]()
An example of installing a shower cabin in a wooden house: the wall near the cabin is protected with mosaic tiles
2.Install the shower cabin on a sheet of roofing felt.
3. Provide room ventilation. The simplest option: 3-4 holes with an area the size of an “eighth of a palm” (1/8 of the palm area) at the bottom of the room wall opposite the shower stall and 3-4 similar holes in the wall above the shower stall. Often the side panels of the cabin are mounted with a gap from the pan - so that there is an influx of air into the cabin. But you shouldn’t get carried away with ventilation: a draft in the shower is a surefire way to catch a cold!
Do not forget to provide plugs or flaps for ventilation holes for winter time.
4.If you don’t want to bother with tiles, drywall, etc., just thoroughly saturate the logs/boards with drying oil.
5.The best option is larch lining. Larch is not afraid of moisture. All of Venice stands on stilts made of Russian larch. Of course, it will be expensive: sq. a meter of larch cladding will cost more than 1 thousand rubles. But good!
Covering the floor and furniture with larch in the bathroom
Options for non-standard installation of a shower tray
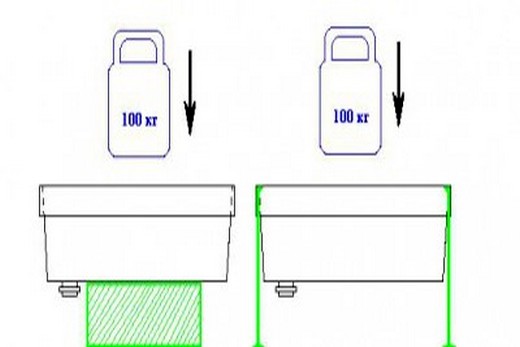
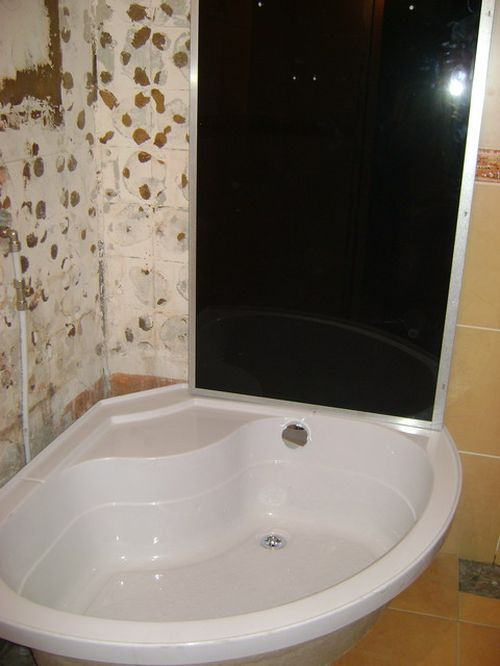
For most modern shower cabins, trays are made of acrylic (see article) reinforced with steel rods. The legs for the pallets are positioned so that the load is transferred specifically to the reinforcement and not to the acrylic. Therefore, any attempt to shift the support points, to place the pallet on some “stumps”, “pegs”, “columns” will only lead to the pallet breaking.
Drawing a template for constructing a podium for a shower stall
And, of course, they give more space for the imagination of craftsmen.
In addition, sometimes it becomes necessary to lift the pallet from a clean practical considerations. For example, to ensure water drainage. Or you got a shower stall without legs (such designs are available for sale) and you need space under the tray for a siphon. Then the shower stall is placed on a podium (pedestal). There is nothing particularly complicated about this.
Installation of a shower cabin on a podium
1.Determine how much you need to raise the shower stall above the floor. The choice of material for the podium depends on this. For a pallet, for example, to be 15 cm higher than the floor, you need to make a podium two bricks high. If 20 cm, then from foam concrete blocks 10 cm thick. 30 cm - from foam concrete blocks 15 cm thick (two such foam blocks are approximately equal to four bricks).
2. Place the shower tray on a sheet of plywood (plasterboard) and outline it with a pencil. Cut out the resulting shape with a jigsaw. This will be the template.
3.Lay the template on the floor. Place bricks (foam blocks) on it. On the bricks that protrude beyond the template, mark the areas that need to be cut.
4. It is better to model a brick at home using a felt wheel with an abrasive coating. It can be attached to a regular knife sharpening machine. Filing the bricks will take a lot of time, but it will be done carefully. In principle, the same can be done using the usual emery wheel, but every second brick will be rejected. The easiest option is to beat off the corners of the bricks with a trowel. But it will be rough work.

The brick is laid according to the template and filled with mortar. You can see the hole for the drain
5.If a drain pipe from the shower stall will pass through the podium, then try to arrange the bricks so that the passage for this pipe is at the junction of four bricks. Then, by cutting the corners of these four bricks, you will get a hole for the drain pipe.
Making a hole in a solid brick at home is simply impossible. If inside the podium there should be a siphon and a pipe going to sewer drain, then provide recesses for them too.
By the way, in order not to get confused with the location of the bricks, number them.
6. Place the template on the floor where the shower stall will be located. Outline it with chalk. Then remove the template and lay out the bricks in its place so that the outline of the masonry coincides with the line drawn in chalk on the floor.
7. Fill the cracks between the bricks cement mortar. Using the same solution, straighten the areas of the brickwork that deviate from the template.
8. In principle, the podium is ready. For aesthetics, you can cover it with tiles or cover it with an extension of the “skirt” of the pallet. And install a shower stall.
The podium is tiled and ready to install a shower stall
Installation of a shower stall on bricks (bars, hemp)
If the shower tray has collars bent horizontally outwards along the upper edge, plus the tray is made of steel or cast iron, then a Russian person has an inescapable desire to install a tray supported precisely on this collar. Or on any other area of the surface of the pallet not intended for this purpose.
There are a great many ways. Someone lays a “skirt” of brick around the perimeter of the pallet. Someone fits the posts or beams and places a pallet on top of them.
Most often, these activities are carried out by eye and on a whim. But the starting point for starting work is the above-described technology for installing a pallet on a podium using a plywood template, only the podium in the new case is made hollow and somewhat larger in size than the pallet, and the internal bricks of its walls are adjusted according to the template.
The weight in this picture represents the person who came up with illustrated methods for installing a shower tray
We would like to warn you - if the pallet is really steel or cast iron, and between its collar and brickwork turns out to be cement mortar, then in six months it will grind terribly whenever a person moves around the shower stall. The reason is simple: the cement will crumble a little, the sand used as a filler under the pressure of steel/cast iron will be crushed, ground into powder, and the sound will be terrible.
How to install a shower stall in a private house on a wooden floor
IN rural houses, dachas, cottages, the floors are laid with boards, often no more than 4 cm thick. The weight of a shower cabin with a person inside is approximately 300 kg, and the strength of this flooring may not be sufficient.
Therefore, it is necessary to place the cabin supported on the load-bearing beams of the flooring (or place it on the floor areas above such beams). As a drastic measure, place a cement screed under the cabin tray with support on the foundation of the house or on the solid basement floor.
How to do it? We describe the generalized methodology.
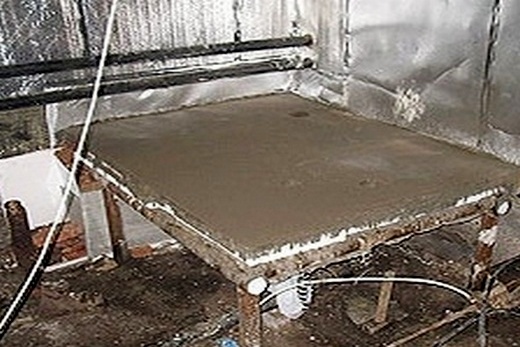
Installation of a screed for a shower stall on metal supports in a house with a basement
1. Outline with chalk on the basement floor the projection of the shower tray where it will stand. Cut the same hole in the floorboards of the room above the basement.
2. You get four steel pipes with a diameter of at least 5 cm and calibrate them in length - so that when installing one end on the basement floor, the second end of the pipe is flush with the floor of the room on the first floor where the shower stall will be located.
3. At the corners of the drawing on the floor, place formwork with a height of at least 70 cm. The formwork here is made of boards (plywood, assembled from metal sheets) a box without a bottom and a lid. Its dimensions are approximately 12 cm from the side of the box to the pipe installed in the center of this box. If the pallet is small and you have a lot of cement, then make a common formwork for all four pipes.
4.Install and secure all four pipes in the formwork. The easiest way is to simply hold them vertically with your hands, although you can reinforce them with slats. Fill the formwork with cement mortar.
5.You have created cement elevations, from which pipes stick out vertically to the floor of the first floor. After the cement has hardened, weld a steel sheet at least a centimeter thick (“finger-sized”) to the tops of the pipes. Weld steel strips to the sides of this sheet to create a metal box open at the top with a wall height of 3-5 cm. If the drain from the pan goes into the basement sewer, do not forget to make a hole in the pan for the drain pipe.
6. Place the pallet in the box and level it horizontally, twisting it threaded connections legs Then fill this container with cement mortar. You now have a platform with a screed for the shower stall.
7. To make the structure stable, weld strips to the bottom that diverge horizontally to the nearest load-bearing beams of the floor covering. Screw these strips to the joists or floorboards from below, on the basement side. Thanks to this, the screed platform is guaranteed not to wobble from side to side. Fill the gap between the floor boards and the platform polyurethane foam. Cover the entire structure with the “skirt” of the shower stall.
8.If your basement has an earthen floor rather than cement, then first you will have to drive piles into it along the contour shower tray, then install formwork around them to secure the support pipes, and then proceed as described above.
Installing a shower cabin without a tray
IN country house or an individual cottage, where there is no threat of flooding the neighbors from below, you can install. A screed is placed on the floor where the cabin will be installed with a slope towards the drain hole. Profiles for mounting shower stall walls are mounted into the screed, and tiles are placed on top of the screed. Retraction waste water often imitated with a cement or zinc groove to the nearest bed.

The floor is prepared for installing a shower cabin without a tray
It is better to insulate the floor of the shower stall. A good option– laying larch boards over the screed. And the feet don’t freeze, and the legs don’t slip, and it’s beautiful, and it doesn’t rot!
About legal consequences
Isn't it a redevelopment of the home that needs to be agreed upon with the supervisory authorities? Won't they be fined? Will they evict you?
Your fears are not unfounded. According to paragraph 1.7.1 of the “Rules and Standards technical operation housing stock”, approved by Decree of the State Construction Committee of the Russian Federation dated September 27, 2003 No. 170, “... laying new or replacing existing inlet and outlet pipelines, electrical networks and devices for installing shower cabins, Jacuzzis, washing machines increased power and other new generation plumbing and household appliances” refers to “re-equipment of residential or non-residential premises” and requires approval.
Prepare an application for redevelopment, notarized copies of title documents for the premises where the shower stall is located, technical passport of the premises, consent of all family members, permission from the body authorized to protect cultural heritage.
It will probably be possible to do without a redevelopment project carried out by a licensed construction and design organization. But you will have to make your own sketch of installing a shower stall in the bathroom.

Failed to agree...
True, we are not aware of any cases of court decisions for the illegal installation of shower cabins or “high-power washing machines.” There is no open source agreement on such events with the Moscow Housing Inspectorate. It must be assumed that citizens feel good in their illegal shower cabins, and the regiment’s law enforcement officers have enough other concerns. By the way, they can check you only with court approval. Who also has a lot to do.
A shower cabin in a wooden house will not only be a practical solution, but also a very sophisticated option for arranging a bathroom. Wood is a very capricious material, since in winter it dries out, and in spring and autumn, on the contrary, it gains moisture. Therefore, when arranging a house made of wood, it is worth considering these nuances.
1
The shower stall is an excellent small-sized and universal option for adoption water procedures. However, regardless of decision taken(whether to install a full-fledged one in a wooden house), you should Special attention pay attention to protecting the wood from excess moisture in the room. Of course, the most basic aspects of protecting your home from moisture will, of course, be reliable waterproofing walls and floor. You can install a shower cabin in a wooden house yourself, having previously familiarized yourself with the conditions of its installation, as well as the requirements that it must meet.

Shower cabin in a wooden house
Before installing a shower with your own hands, you should know following points when choosing a bathroom stall:
- It can be square or rectangular in shape, or round or semicircular to fit the corner of the room.
- The optimal dimensions of the booth should be at least 80x80 cm, so that you can freely bend over, raise and release your arms. For comfortable installation and subsequent use of the shower, you need to leave a space of at least 40 cm around the perimeter.
- The height should be such that there is at least a 30 cm margin for installing the podium. It is worth considering that a house made of wood shrinks a little during use.
- When choosing a shower stall model, you need to make sure that the nominal pressure of the equipment matches the pressure in the water supply system of the house.
- In addition to the functionality of the equipment (that is, the number of massage attachments or tropical rain functions, mini-sauna or Turkish bath), the shower stall must be heat-resistant and shock-resistant. The thickness of elements made of glass must be at least 6 mm.

2 Installation options and installation of a shower cabin
Do-it-yourself installation of a shower cabin can be done in 3 options:
- a booth with a tray, where the floor is inclined, that is, with a drain;
- like a box with a steam generator with many different tasks and options;
- standard cabin with tray and classic drain.
Of course, you should make sure that the shower stall is decorative design harmonized with the overall interior of the bathroom.

- If the shower cabin is installed without a tray, you will need to waterproof the floor - build a tile platform and take into account a hole for water drainage. The drain hole in the floor should be laid at an angle.
- To install a cabin with a pallet, you must first make a layout of the room, that is, establish its future location. It can be installed either in the corner of the bathroom adjacent to the wall, or located as a free-standing structure.
- All electrical power systems, sewerage and plumbing must be installed in advance, and their outlets must be thoroughly sealed before installing the shower stall. If necessary, the bathroom floor is leveled with a cement-concrete screed.
- First, the hose is connected from the cabin to the sewer riser, then all joints are treated with sealant. A gasket is installed in the drain hole of the pan, which is lubricated with silicone.
- Next, the pan itself is installed on the brackets to secure the panel, and the drain and siphon are mounted. After these steps, you need to check the entire structure for leaks.
- The next stage will be the doors. Installation begins with the installation of side panels, that is, with guides for door leaves. The boundaries of the connections are certainly sealed with sealant, then the other components of the system are assembled into a single integral structure.
- The final moment of installation is the installation of the booth door in place after the sealant has completely hardened and the final verification of the entire structure for tightness, as well as checking the functionality of the plumbing and electrical power systems.
3
Before installing a shower stall in a wooden house, it is necessary to make high-quality, thorough waterproofing of the floor, walls and ceiling of the bathroom. When building a wooden house, the floor level in the bathroom should be 10-12 cm lower than in the rest, because later, when the cement screed and installation of the floor covering are made, the floor surface will be leveled.
Used as floor waterproofing polymer-bitumen mastic, which is applied under the screed. In this case, the floor can be made of ceramic tiles, mosaics, linoleum, porcelain stoneware, moisture resistant laminate, covered with adhesive cork, moisture-resistant wood or thermowood.
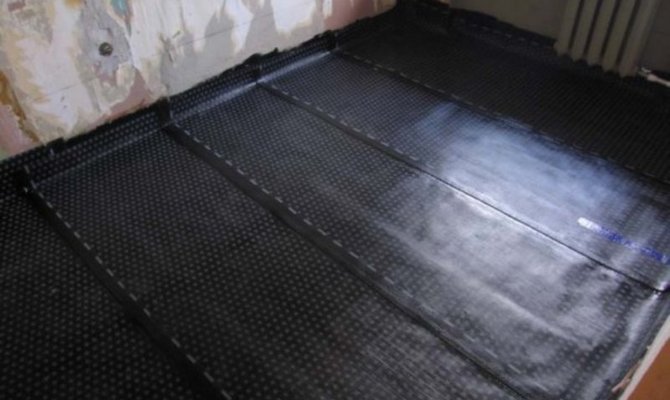
Waterproofing the floor in a wooden bath
The walls of a wooden house, like the ceiling, are plastered and treated with an antibacterial compound. Glass-magnesium sheets or plasterboard are used as a waterproofing material. Such sheets are fixed to the sheathing using dowels, and the joints are sealed special tape. Ceramic tiles or mosaics are glued on top of the sheets. Preference should be given to bitumen-based sealants rather than silicone ones.
Living in a wooden house is not only a specific environment and comfort, but also an opportunity to reliably protect your home from high humidity thanks to innovative technologies and materials.
The arrangement of a wooden house has a number of features, since wood is unusual building material. In particular, the installation of a shower stall in a wooden house deserves special attention, because wood, as you know, is highly susceptible to moisture.
In this article we will take a detailed look at how to install a booth to ensure the safety of wooden surfaces.
General information
Not long ago, construction companies recommended installing shower cabins exclusively on the first floor of a building. However, thanks to the development of technology in Lately There are no restrictions. The only thing is that the structure is installed either in a corner or simply adjacent to the wall.
The most important thing is to properly waterproof to prevent water from reaching the wood. Otherwise, it will lead to rotting. Below we will familiarize ourselves with the rules for insulating and installing a shower stall.

Waterproofing rules
Floor treatment
So, before making a shower stall in a wooden house or installing a finished structure, you need to prepare the site.
You need to start work from the floor:
- First of all, you need to lay cement-bonded particle boards (CSP) on the floor.
- Then a layer of bitumen or other coating material should be applied over the DSP. The compositions may have different names, but most of them are based on bitumen.
- Roofing material is laid overlapping over the bitumen, which will improve waterproofing.
- Next, you need to lay the ceramic tiles using a special waterproof adhesive.
Note! Before proceeding with waterproofing, it is necessary to treat wooden surfaces antiseptic.
Waterproofing walls and ceilings
After preparing the floor, you should waterproof the walls and ceiling. There are several options for doing this job:
Ventilation
To protect a room from the harmful effects of moisture, waterproofing alone is not enough. In addition, you also need to ensure ventilation of the room.
If the house is residential, then it will be quite difficult to arrange supply and exhaust ventilation with your own hands. In this case, the solution to the problem is to install exhaust fan, which will increase the intensity of natural air movement.
To do this, the fan is installed under the ceiling, and a small gap is created at the bottom of the doors. After taking water procedures, you should turn it on for a few minutes, as a result of which the vapors will leave the room and the air humidity will normalize.
Cabin installation
Installation features
First of all, it should be said that installation services for cabins are offered by almost all plumbing stores that sell them. However, the price for these works is quite high. Considering that the assembly does not cause any particular difficulties, it is more advisable to do it yourself.
Advice! If the house has not shrinked, it is advisable to fix the shower stall to a sliding frame. Essentially this metallic profile with elongated holes, the length of which slightly exceeds the possible shrinkage.
Before you begin the installation, you need to familiarize yourself with the following nuances of this procedure:
- First of all, it is necessary to provide communications - electricity, water and sewerage.
- The junction of the booth to the wall must be coated with sealant.
- The drainage must be carried out at an angle, so the tray must be higher.
Note! The procedure for assembling and installing the cabin contains instructions that must be studied before starting work.
Work order
So, installation of the booth is carried out in the following sequence:
- The work begins with installing the siphon on the pallet.
- Next, the pallet is installed on the legs. Its position needs to be checked building level. The position is adjusted using special screw feet.
- After installing the tray, the siphon is connected to sewer pipe . The joint must be coated with sealant.
- Next, according to the instructions, you need to assemble the glass shower enclosure. First of all, guides for walls and doors are attached to the pallet. After this, racks and crossbars are installed. As a rule, all elements are attached using self-tapping screws.

Photo shows frame assembly
- Then you need to apply it to the profiles silicone sealant and insert glass walls into them.
- After installing the walls, you should install the doors. To do this, you first need to install the upper and lower rollers.
- Next, the glass is fixed in the upper rollers.
- After this, the lower rollers are pressed and the glass is installed in the groove of the fasteners.
- Then, according to the diagram, the roof and other fittings are installed.
- At the end of the work, all communications are connected.
Note! After installing the booth, it cannot be used until the sealant hardens. This usually takes several hours.

This completes the installation process of the shower cabin. Now you need to check the functionality of the electrical equipment and the tightness of the structure. If water leakage is detected in any areas, it is necessary to seal them with silicone.
Advice! Before installing a shower cabin in a wooden house, it is advisable to assemble it on a separate spacious area in order to understand how it is assembled. Dealing with the assembly features in the bathroom will be much more difficult due to limited space.
Conclusion
In general, installing a shower stall in a private house is done in almost the same way as in apartments. The only thing is that this procedure requires more thorough waterproofing. In addition, to maintain normal humidity in the bathroom, it is necessary to ensure high-quality ventilation.
From the video in this article you can find some additional information on this topic.


