When there is a desire to change the situation in the apartment and add a little originality to it, start with the little things. Try to change the lampshade, and you will be surprised at the transformation of your family nest.
And if you manage to find an original model that differs from analogues, then the changes will impress not only you, but also your guests.

Is it true, unique lampshades are worth a lot of money, piece work eminent masters can not be purchased for a penny.

But after all, no one bothers you to create your own unique masterpiece from cheap, and sometimes even junk materials, which will look much better than the samples presented in the store.

All you need is simple materials, a little patience and a flight of fancy, and we will tell you how to make a lampshade with your own hands.
materials
You can create a masterpiece from everything that you have at hand: fabric, paper, thread, twine, wire, plastic bottle, beads or beads.

In general, absolutely everything is suitable, even what you usually send in a garbage bag.

Don't believe? Just look at the photo of the lampshade.

frame
If you have a frame from an old lampshade, then this is just wonderful.

However, do not be upset if one is not found, because you can create a frame yourself from ordinary wire.

Copper, aluminum, steel - everything that you can independently combine into a single structure will do.

The metal frame of the classic lampshade consists of three rings and six jumpers between them. The small ring is a holder, which is connected by three jumpers to a ring of a larger diameter.

The same, in turn, is connected by jumpers to the last ring. The following photos will help you understand the design.
From fabric
When a lampshade frame is available, the easiest way to create your own masterpiece is to wrap the base with a cloth. For this you will need:
- paper (newspaper);
- scissors;
- textile;
- chalk or pencil;
- threads.

Wrap the frame with newspaper in such a way as to form a pattern out of it. Then transfer the resulting shape to the fabric with chalk, adding 1 cm on each side to the seam.

Make a pattern, chop off the edges and sew the sides, forming a cover for the base of the future lampshade. We bend the upper and lower edges of the "cover" in such a way as to close the rings of the frame and fix it with a seam.

Note!

Voila, your lampshade for the floor lamp is almost ready. It remains to add a few highlights to your taste, giving it originality.
From threads
How to make a lampshade when there is no frame? As easy as pie.

Take a balloon without drawings, glue, thread, marker and start creating.

First you need to inflate the balloon and mark on it the upper and lower borders of your future masterpiece. Then take the threads and wrap them around the ball, trying not to protrude beyond the marked contours.

Apply glue diluted 1:1 with water to each layer of thread. When the density of the wound thread satisfies you, fix the cut edge and hang the ball to dry. After 3-4 hours, the threads will dry. Then pierce the ball and carefully detach it from the walls of the finished lampshade.

Leaves and flower petals woven between the layers of threads can give additional charm to a lampshade made of threads.
Note!

The ball, decorated with sparkling droplets of beads, also looks original. In general, watch and be inspired.
From paper
regular sheets office paper, glossy magazines, a cheap newspaper, an unnecessary book or an ordinary notebook, paper towel or a napkin - these are all future lampshades.

It doesn’t matter if there is a frame or not, the main thing is that there are scissors, glue and paper. A thousand and one versions of such lampshades can be described with the words “cut and stick”.

The main thing is not to forget a few simple rules:
- a paper lampshade is safest to use with economy light bulbs, which heat up much less than incandescent bulbs;
- the diameter of the lampshade for lamps should be large so that the paper does not get too hot;
- for a bright room, you can make a lampshade from thick paper, but for dark, thin, well-transmitting light is needed;
- be careful with color. For example, red or yellow paper will add warmth to the room, green and blue - cold.

Well, that's all. Charge with new ideas, arm yourself with improvised means and forward to easy changes that bring warmth and comfort to your home.

Note!

DIY lampshade photo


Handmade items fill the house with special warmth and comfort. Plus, they are exclusive. We offer an overview of lamps that will completely change the atmosphere in the room, turning into an object of envy from the groans of friends and relatives. Moreover, they are made from everyday items that are usually thrown away.


A cardboard bag for juices or other drinks is a common thing in most homes. Most of the time it gets thrown away. But the Malay designer Edward Chu spent a lot of time to cut them into hundreds of strips and build amazing lamps from them without a drop of glue, a simple origami principle.

Yaroslav Olenev proposed to make lamps from disposable plastic spoons and became the winner in the nomination "Ecology and Design" from the magazine "Future Now".


Not less than original application I also found Natalie Simpson for ordinary wooden hangers. But they look amazing in the form of a chandelier.
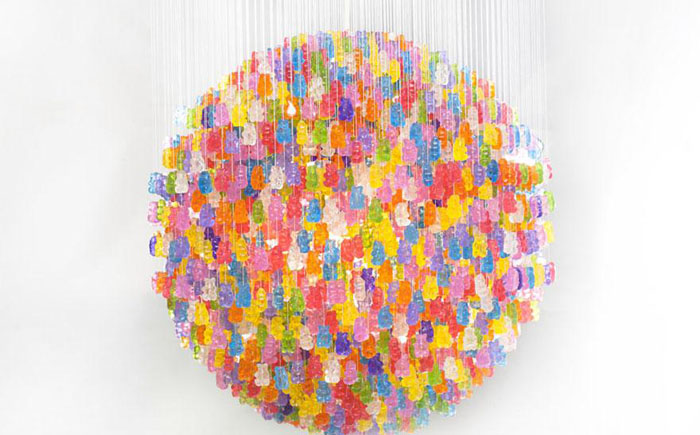

Kevin Chempeny must be given credit, not everyone has the strength and patience to string 14 thousand bears to get a chandelier.

Tira Hilden and Pio Diaz have their own vision on the problem of housing lighting. Thanks to their lamps, the room becomes like a forest. All walls come to life and turn into trees.

Talented welder Matt Ludwig was also an excellent designer. For the JJ's Red Hots restaurant, he made an incredible original chandelier from the old drum set.

Texan artists Joe O'Connell and Blessing Hancock made stunning lamps from old bike parts and hung them in a tunnel under the highway.

It will probably be difficult to find a more original chandelier than a pumpkin from a Polish artist. It carves stunning patterns on the peel that do not repeat.

Lampshades from felt hats by Jeeves & Wooster.

Once Heather Jennings saw an amazing Rhododendron chandelier in the store, only it cost more than $ 800. Then the designer decided that she could do just as well with her own hands. To do this, she needed paper molds for cupcakes.
11. Chandelier in the kitchen

A chandelier made of ordinary metal tetrahedral graters will look incredibly beautiful.

Still fresh in my memory are vases and candy bowls made from openwork napkins. Now it's time to knit chandeliers.

A strange option is offered by Fansois Lego, he believes that the most The best way cutlery storage is a chandelier.

A large cloud is cut out of wood, but the rest and the switch are made of cardboard.

A few globes can make a wonderful cascading chandelier, a great way to light up a flight of stairs.
Lighting devices can not only dispel the darkness, but also give an unusual aura to your interior.
There are many different ideas with which you can make Wall Light or a lamp of any other type with your own hands.

You yourself are able to create a masterpiece that is not in any store.
Creating an extravagant chandelier
Very original item is obtained from the simplest materials, most of which can be saved after a picnic. Lamps from various containers will look spectacular.

For this you will need:

- oval plastic bottle with a capacity of 5 liters;
- disposable spoons;
- cable with cartridge and plug;
- low power LED lamp;
- pliers;
- glue gun;
- screwdriver;
- stationery knife.

To avoid fire, use only LED bulb!

With a knife, carefully cut off the bottom of the bottle, then remove the handles from all plastic spoons. Apply a small amount of hot glue from a gun to the cut point, glue them on the bottom of the container.

Approximately you will need about seventeen pieces. Place the next and remaining rows in a checkerboard pattern.

In order to hide the neck of the bottle, put ten to twelve spoons without a handle on the glue so that they form a ring.

Pull the cartridge with the lamp and cable through the hole at the bottom of the bottle.
If you do not want to make this part yourself, you can purchase it in any department of household goods - the wire, socket and plug are already connected together.

Make a hole in the lid for the cord by drilling it with a drill or a hot self-tapping screw. Screw on the lid, put on the previously prepared spoon ring on top. Exclusive LED lamp ready for operation.

A few ideas for creating lampshades
It is enough just to create a lamp from improvised materials for a house or a summer residence.

Idea N1
- any hollow dishes (it can be an old pan or flower pot);
- wire;
- polyurethane foam and gloves;
- paint and brush;
- sharp knife;
- pliers.

Place the object taken as a basis upside down. Wind the wire around the product the way you want to see the lampshade, since all the turns copy its shape. Put on gloves and squeeze the foam a little bit onto the frame so that it completely covers the wire, leave to dry.

Then, using a knife, give the contours more evenness and paint in any color. This option will be the best for a street lamp.
Idea N2 is a classic
- thick wire;
- pliers;
- small water bottle.

Note!
To make the upper central element on the bottle, wind a coil of wire, then remove it and cut off the excess. The ends must be fixed so that they form a ring whose diameter should allow the cartridge to pass through at the bottom, and prevent it from coming out at the top.

Next, you need to make a large outer ring from the wire. To secure it, you will need four equal pieces of wire. Connect one edge of each with a small one, and the other with a large ring. The upper part of the lamp is ready.

The largest will be the lower circle of wire, it must be attached to the second upper one, evenly placing five identical pieces of wire.

To decorate the frame, pass the wire through the second upper ring, giving it a wavy shape, wind it onto the base. Do the same for the bottom ring.


Note!

On a walk through the forest, take an interestingly shaped branch with you, an excellent wooden lamp will come out of it. Wash the branch and peel off the bark from it with a knife, varnish it for wood. For good stability, screw the lamp to a heavy stand with screws, it can also serve as a tree.

A better option is an oak, find a broken branch and saw off a circle of at least five centimeters thick from it. Coat it with varnish or paint it too.
Making a lampshade with children
There is an option for making a lampshade with children. For the frame, you need a canister or bottle with a capacity of five liters. You need to roll the paper strips into a tube, it is best to wind them around a pencil or sushi stick, then glue the remaining edge with glue.

These blanks must be glued to the frame in several layers so that there are no gaps. When the glue dries, the lampshade can be put on table lamp or do ceiling lamp which looks very unusual.

Experienced needlewomen can knit or crochet a lampshade, decorating it with knitted flowers and ribbons.

To give the product the correct shape, you can use a starch solution or ordinary PVA glue. Look at the proposed photos of knitted lamps, how much tenderness and comfort they have!
Note!

This article told you how to make a lamp with your own hands. Using the information received and your own imagination, now you can create an exclusive lighting fixture for any room.
DIY lamp photo


What could be more beautiful than the satisfaction of a self-created original crafts, which will become bright accent in gray everyday life? We offer several simple models, for the manufacture of which does not require professional skills and financial costs. Go ahead, get to work!
Every day we have to throw away empty tetra packs, but meanwhile this is an excellent basis for an openwork chandelier. We cut strips 5 cm wide, fold them into the desired shape and begin to carefully glue. So that the structure does not fall apart prematurely, it is possible to assemble it on a round piece of suitable sizes.


From disposable spoons it turns out quite a decent lampshade. We take a 5-liter plastic container and cut off the bottom. We break off the cuttings and the remaining parts with the help of glue gun mount on the base, imitating pineapple peel. It is better to use a low-temperature light bulb for safety reasons.


Ordinary wooden hangers transform with creativity. By simply cutting them in half and placing them in a circle, we get a modernist chic lamp from the 30s era. A completely surreal option is also possible - pass a strong thread through the attachment point of the suspension and simply string the shoulders, unfolding a little.


Funny Gummi Bears - perfect solution for children. The difficulty lies in the accuracy of placing individual figures, so we recommend making a template with radial holes through which we lower the white threads. Do not try to use lollipops - these are acrylic figures!


The effect of a dense forest in the bedroom is achieved by bizarre chiaroscuro. Several stylistic roots, wire, skillful hands- and the original ball under the ceiling will plunge the room into the world of the unknown. Or gather the rhizomes, peel, dry and weave as you like. Ready product better varnished.


Has the drum set lost its former attractiveness and is gathering dust in the garage? From the bored musical instrument an extravagant chandelier is mounted without problems - good, that's all fasteners originally included in the package. Original and beautiful, and most importantly - quiet!


If you are the owner of a bicycle workshop, then you probably have a container with unusable spare parts in the corner. some creativity and welding machine- you will get a unique product, similar to the ancient inventions of the crazy Mechanicus. Of course, you can’t hang it in the living room, but just right for a nightclub.


Leaky galabash (a bottle of African gourd) lends itself well to engraving. Intricate patterns, contrasting transitions of textures from shiny to matte, elegant perforations scatter ethnic ornaments of the Black Continent on the walls.


It's in the hat - a funny tandem of top hat and bowler hat creates a solid entourage of a cigar club for gentlemen. If you are not an English dandy, do not despair - an old Stetson, a bright sombrero or a straw bryl will also work. It is important not to be a hostage to sanctimonious dogmas.

Paper cups for cakes will become an elegant accent of your interior. It’s not difficult at all - we glue them two by two, straightening the bottom one, and we connect the resulting “flowers” with a thread in a spiral. We cover the original night light with glue or varnish for strength.


Banal iron graters look very original above the bar counter. You need 4 tubes with electric cartridges and a meter length of 2-core wire. Don't forget about fire safety– metal ceiling lamps seriously heat up.

Have your lace doilies done their job? Do not rush to part with them! Inflating a balloon white color, we find a brush and PVA, straighten the matter on the surface and coat it abundantly. An hour later, the elegant lampshade is ready for use.


Cutlery can decorate a meal not only with serving. The spoons collected in a bundle resemble a silver tulip. And connoisseurs of Kandinsky or Dali will appreciate the avant-garde cube, constructed from knives and forks. Bon appetit!

An interesting effect in the children's room is created by small light screens in the form of a cartoon cloud. A light bulb located behind it dimly illuminates the walls without blinding the eyes. Adding some more funny clouds, we get a romantic sunset.


Several brightly glowing globes will dynamically enliven the space above the stairs. Oceans and continents will light your way - an original and charismatic solution with deep connotations. Correctly select the proportions of the unique installation and charge yourself with positive.

Don't know where to put the miscellaneous remnants of services? Drill holes in the cup and saucer, place the cartridge in the middle and connect with a hollow tie - as in a conventional lamp. White porcelain scatters light wonderfully - hang the composition over a coffee table and enjoy a fragrant drink.

A ball of yarn can be successfully used as a chandelier. Several skeins of thread, a white balloon, electrical fittings and glue - we randomly wrap the base and generously spread it with a binder. Wait until it dries completely - and a unique masterpiece is ready. They cannot play football, but the product is quite reliable.
Can you make a table lamp out of beer cans? It turns out yes! Only a lot of them will be needed - after all, we use only valves for opening. We connect the frame of the desired shape from a rigid wire and begin to braid the base. It turns out something like a shiny chain mail. Unfortunately, the exact amount of raw materials is unknown.


Charming lamp in the shape of a cute alien animal is very easy to make. The most time-consuming process is cutting narrow paper wedges. We connect several wire rings together to get a semblance of a sphere, and with the help of adhesive tape we fasten the prepared parts in layers. All!


The option with pronounced charisma will appeal to hardened bachelors and lovers of noisy parties. Having seen an impressive installation above the table, guests will immediately understand what awaits them in the next couple of hours. Cheap and cheerful, but with soul...

Where to put endless plastic bottles? If you are tired of fighting them, we suggest you turn their myriad to your advantage, at least partially. Cut off the bottoms and you have mass in your hands small parts. Arbitrarily connect them with threads - there are no restrictions on the form.


There is no doubt that the right lighting in the kitchen sets the tone for the whole interior. A chandelier can become a central element in this cozy and warm room.
Using improvised materials - or even junk - you can make a lampshade from threads, an eco-style lamp from jute twine, or plastic bottles, but you can make real masterpiece – beautiful chandelier from wooden or glass beads.
And you can not only hang a lamp made by yourself in the kitchen or in the dining area, but also give it to your loved ones.
Method 1. From improvised materials - everyone can!
The simplest do-it-yourself lamp is made of threads. Indeed, even a child can handle such a design. So, to make a chandelier of threads, we need:

- Threads - you can take ordinary jute twine or thick cotton threads, with a total length of at least 100 meters, the color is chosen based on your imagination and the existing interior;
- PVA glue and a brush for its application;
- Petrolatum;
- 2 balloons - one for work, the second for testing; it is better to take a ball not ordinary, but round, then the shape of the lamp will be the correct shape.
Advice! Also suitable for children Or a rubber beach ball. For very large fixtures, a fitball is suitable, for example.
Work on creating a ball of threads is carried out in the following sequence:
- Inflate the balloon the right sizes. Do not forget that the resulting lampshade made of threads will repeat the shape of the ball. Draw with a marker one or two circles at the top and bottom (more below).
- Pour the glue into a container and carefully process the threads. And the ball itself can be coated with Vaseline with a brush.
Advice! Do not immediately apply glue to all the threads - it is better to move along the place of winding.
- This is followed by winding the threads on the ball, taking into account the drawn holes - it depends on the density of the winding how your lampshade will turn out in the end.

- After the ball is wrapped, you need to leave the future chandelier to dry for at least 24 hours.
- The ball bursts and its remains are easily removed from the steel solid construction. As a result, a lampshade made of solid threads was obtained.
- A hole is cut from above - under the cartridge.
- It is necessary to check the strength - another ball is inserted into the lamp and inflated. This will demonstrate the flexibility of the design.
In this way, you can also perform local lighting in the kitchen by creating several lamps from threads with your own hands. And you can hang it in the dining area, as shown in the photo.


Do not forget that for a ball of threads you can make additional decor in the form of interesting coloring, beads, butterflies or artificial flowers, or you can make a whole bunch of balls of different sizes.

By the same principle, you can come up with your own unique design lamp. For example, from lace, or a ceiling lamp as in the photo below.


Method 2. Create a masterpiece - you need to try!
Excellent kitchen lighting will turn out if you make a lamp of beads or fabric with your own hands. Get a lamp in style or a real chandelier-chandelier.
For this job you will need:
- Old hoop, garden basket, hanging metal planter, or wire to create a frame;
- Decorative chains;
- Beads, beads, ribbons, strong threads;
- Cartridge with a lamp.


The lamp will be a two- or three-level structure of rings located one above the other and connected by chains or wire.
Rings can be taken different sizes, creating a lampshade in the spirit of vintage classics, or the same - just such lighting is performed in.


The base of the lamp is certainly painted, wrapped or decorated, after which they start stringing beads.

The consumption of beads in this project is as follows:
Lower part: beads with a diameter of 16 mm, 15 pcs. on a thread;
Upper part: beads with a diameter of 12 mm, 31-32 pcs. on a thread.
Here you can vary the degree of tension and the number of threads.
Advice! Work should be carried out by first hanging the chandelier and inserting a cartridge into it.
By analogy, you can create a chandelier made of artificial fruits for the kitchen. And subdued lighting will turn out if you use fabric for covering the frame. As a rule, such a lampshade is made for country styles and.
Method 3. Lamps made from waste materials - for a modern kitchen!
Most original lamp can be made from this waste material, like plastic bottles and disposable spoons - it's beautiful, cheap and environmentally friendly!
We make a lampshade in the style of minimalism and - no additional decorations from threads and beads, only matte white or colored plastic. To make such subdued kitchen lighting with your own hands, we need:
- Base made from a 5 liter plastic bottle;
- Cartridge with wire and lamp;
- Glue for high-quality fixation;
- Lots of disposable spoons.
To make a chandelier with your own hands, cut out the bottom of the bottle and cut off the handles of the spoons (not completely, so that a small stalk remains). Using glue, we fix the cut spoons on the base bottle. They need to be placed evenly, in order, then the lampshade will look attractive.
Advice! Each next row is overlapped, without gaps.
The resulting chandelier will resemble fish scales. However, it should be remembered that such a design is quite dense, which means that additional lighting will definitely be needed in the kitchen.
The shape of the lamp can be different, for example, in the form of a lotus.

From disposable spoons you can make such decorations.

A lamp made of plastic bottles, or rather from their bottoms, made by hand, may seem lacy or consisting of many small flowers.

Advice! Such a lampshade can be made not white, but colored - which means that you need to take colored bottles or paint it with paint of the original color: copper, gold, steel, pink, black, etc.
The resulting lampshade can be hung in the kitchen or over the dining table.
Let your kitchen be cozy and bright! We wish you creative success and present some more great ideas for making kitchen lamps with your own hands from improvised means.


